« October 2008 »
S M T W T F S
1 2 3 4
5 6 7 8 9 10 11
12 13 14 15 16 17 18
19 20 21 22 23 24 25
26 27 28 29 30 31
You are not logged in. Log in


Search the site:


powered by FreeFind
Volunteer with us.

Entries by Topic All topics  
A Latest Site News
A - Using the Site
AAA Volunteers
AAB-Education Centre
AAC-Film Clips
AAC-Photo Albums
AIF & MEF & EEF
AIF - Lighthorse
AIF - ALH - A to Z
AIF - DMC
AIF - DMC - Or Bat
AIF - DMC - Anzac MD
AIF - DMC - Aus MD
AIF - DMC - British
AIF - DMC - BWI
AIF - DMC - French
AIF - DMC - Indian
AIF - DMC - Italian
AIF - DMC - Medical
AIF - DMC - Remounts
AIF - DMC - Scouts
AIF - DMC - Sigs
AIF - DMC - Sigs AirlnS
AIF - DMC - 1 Sig Sqn
AIF - DMC - 2 Sig Sqn
AIF - DMC - Eng
AIF - DMC - Eng 1FSE
AIF - DMC - Eng 2FSE
AIF - DMC - GSR
AIF - 1B - 1 LHB
AIF - 1B - 6 MVS
AIF - 1B - 1 LHMGS
AIF - 1B - 1 Sig Trp
AIF - 1B - 1 LHFA
AIF - 1B - 1 LHR
AIF - 1B - 2 LHR
AIF - 1B - 3 LHR
AIF - 2B - 2 LHB
AIF - 2B - 7 MVS
AIF - 2B - 2 LHFA
AIF - 2B - 2 LHMGS
AIF - 2B - 2 Sig Trp
AIF - 2B - 5 LHR
AIF - 2B - 6 LHR
AIF - 2B - 7 LHR
AIF - 3B - 3 LHB
AIF - 3B - 8 MVS
AIF - 3B - 3 LHB Sigs
AIF - 3B - 3 LHFA
AIF - 3B - 3 LHMGS
AIF - 3B - 3 Sig Trp
AIF - 3B - 8 LHR
AIF - 3B - 9 LHR
AIF - 3B - 10 LHR
AIF - 4B - 4 LHB
AIF - 4B - 4 Sig Trp
AIF - 4B - 9 MVS
AIF - 4B - 4 LHFA
AIF - 4B - 4 LHMGS
AIF - 4B - 4 LHR
AIF - 4B - 11 LHR
AIF - 4B - 12 LHR
AIF - 5B - 5 LHB
AIF - 5B - 10 MVS
AIF - 5B - 5 LHFA
AIF - 5B - 5 Sig Trp
AIF - 5B - ICC
AIF - 5B - 14 LHR
AIF - 5B - 15 LHR
AIF - 5B - 1er Regt
AIF - 5B - 2 NZMGS
AIF - AASC
AIF - Aboriginal LH
AIF - Badges
AIF - Cars
AIF - Chinese LH
AIF - Double Sqns
AIF - Engineers
AIF - Fr - 22 Corps
AIF - Fr - 13 LHR
AIF - Honour Roll
AIF - HQ - 3rd Echelon
AIF - Marching Songs
AIF - Misc Topics
AIF - NZMRB
AIF - NZMRB - AMR
AIF - NZMRB - CMR
AIF - NZMRB - EFT
AIF - NZMRB - NZMFA
AIF - NZMRB - NZMGS
AIF - NZMRB - OMR
AIF - NZMRB - Sig-Trp
AIF - NZMRB - WMR
AIF - Ships
AIF - Ships - Encountr
AIF - Ships - Una
AIF - WFF
AIF - Wireless Sqn
Battles
BatzA - Australia
BatzA - Broken Hill
BatzA - Liverpool
BatzA - Merivale
BatzB - Boer War
BatzB - Bakenlaagte
BatzB - Belmont
BatzB - Bothaville
BatzB - Buffels Hoek
BatzB - Coetzees Drift
BatzB - Diamond Hill
BatzB - Driefontein
BatzB - Elands
BatzB - Graspan
BatzB - Grobelaar
BatzB - Grootvallier
BatzB - Hartebestfontn
BatzB - Houtnek
BatzB - Karee Siding
BatzB - Kimberley
BatzB - Koster River
BatzB - Leeuw Kop
BatzB - Mafeking
BatzB - Magersfontein
BatzB - Modder River
BatzB - Onverwacht
BatzB - Paardeberg
BatzB - Palmietfontein
BatzB - Pink Hill
BatzB - Poplar Grove
BatzB - Rhenoster
BatzB - Sannahs Post
BatzB - Slingersfontn
BatzB - Stinkhoutbm
BatzB - Sunnyside
BatzB - Wilmansrust
BatzB - Wolvekuil
BatzB - Zand River
BatzG - Gallipoli
BatzG - Anzac
BatzG - Aug 1915
BatzG - Baby 700
BatzG - Evacuation
BatzG - Hill 60
BatzG - Hill 971
BatzG - Krithia
BatzG - Lone Pine
BatzG - Nek
BatzJ - Jordan Valley
BatzJ - 1st Amman
BatzJ - 2nd Amman
BatzJ - Abu Tellul
BatzJ - Es Salt
BatzJ - JV Maps
BatzJ - Ziza
BatzM - Mespot
BatzM - Baghdad
BatzM - Ctesiphon
BatzM - Daur
BatzM - Kurna
BatzM - Kut el Amara
BatzM - Ramadi
BatzN - Naval
BatzN - AE1
BatzN - Cocos Is
BatzN - Heligoland
BatzN - Marmara
BatzN - Zeebrugge
BatzN - Zeppelin L43
BatzNG - Bitapaka
BatzO - Other
BatzO - Baku
BatzO - Egypt 1919
BatzO - Emptsa
BatzO - Karawaran
BatzO - Peitang
BatzO - Wassa
BatzP - Palestine
BatzP - 1st Gaza
BatzP - 2nd Gaza
BatzP - 3rd Gaza
BatzP - Aleppo
BatzP - Amwas
BatzP - Ayun Kara
BatzP - Bald Hill
BatzP - Balin
BatzP - Beersheba
BatzP - Berkusieh
BatzP - Damascus
BatzP - El Auja
BatzP - El Buggar
BatzP - El Burj
BatzP - Haifa
BatzP - Huj
BatzP - JB Yakub
BatzP - Kaukab
BatzP - Khan Kusseir
BatzP - Khuweilfe
BatzP - Kuneitra
BatzP - Megiddo
BatzP - Nablus
BatzP - Rafa
BatzP - Sasa
BatzP - Semakh
BatzP - Sheria
BatzP - Surafend
BatzP - Wadi Fara
BatzS - Sinai
BatzS - Bir el Abd
BatzS - El Arish
BatzS - El Mazar
BatzS - El Qatiya
BatzS - Jifjafa
BatzS - Magdhaba
BatzS - Maghara
BatzS - Romani
BatzS - Suez 1915
BatzSe - Senussi
BatzWF - Westn Front
BW - Boer War
BW - NSW
BW - NSW - 1ACH
BW - NSW - 1NSWMR
BW - NSW - 2NSWMR
BW - NSW - 3ACH
BW - NSW - 3NSWIB
BW - NSW - 3NSWMR
BW - NSW - 5ACH
BW - NSW - A Bty RAA
BW - NSW - AAMC
BW - NSW - Aust H
BW - NSW - Lancers
BW - NSW - NSW Inf
BW - NSW - NSWCBC
BW - NSW - NSWIB
BW - NSW - NSWMR_A
BW - NZ
BW - Qld
BW - Qld - 1ACH
BW - Qld - 1QMI
BW - Qld - 2QMI
BW - Qld - 3ACH
BW - Qld - 3QMI
BW - Qld - 4QIB
BW - Qld - 5QIB
BW - Qld - 6QIB
BW - Qld - 7ACH
BW - QLD - AAMC
BW - SA
BW - SA - 1SAMR
BW - SA - 2ACH
BW - SA - 2SAMR
BW - SA - 3SACB
BW - SA - 4ACH
BW - SA - 4SAIB
BW - SA - 5SAIB
BW - SA - 6SAIB
BW - SA - 8ACH
BW - SA - AAMC
BW - Tas
BW - Tas - 1ACH
BW - Tas - 1TIB
BW - Tas - 1TMI
BW - Tas - 2TB
BW - Tas - 2TIB
BW - Tas - 3ACH
BW - Tas - 8ACH
BW - Vic
BW - Vic - 1VMI
BW - Vic - 2ACH
BW - Vic - 2VMR
BW - Vic - 3VB
BW - Vic - 4ACH
BW - Vic - 4VIB
BW - Vic - 5VMR
BW - Vic - 6ACH
BW - Vic - AAMC
BW - Vic - Scot H
BW - WA
BW - WA - 1WAMI
BW - WA - 2ACH
BW - WA - 2WAMI
BW - WA - 3WAB
BW - WA - 4ACH
BW - WA - 4WAMI
BW - WA - 5WAMI
BW - WA - 6WAMI
BW - WA - 8ACH
BW Gen - Campaign
BW Gen - Soldiers
BW General
Cavalry - General
Diary - Schramm
Egypt - Heliopolis
Egypt - Mena
Gen - Ataturk Pk, CNB
Gen - Australia
Gen - Legends
Gen - Query Club
Gen - St - NSW
Gen - St - Qld
Gen - St - SA
Gen - St - Tas
Gen - St - Vic
Gen - St - WA
Gm - German Items
Gm - Bk - 605 MGC
GW - 11 Nov 1918
GW - Atrocities
GW - August 1914
GW - Biographies
GW - Propaganda
GW - Spies
GW - We forgot
Militia 1899-1920
Militia - Area Officers
Militia - Inf - Infantry
Militia - Inf - 1IB
Militia - Inf - 2IB
Militia - Inf - 3IB
Militia - Inf - NSW
Militia - Inf - Qld
Militia - Inf - SA
Militia - Inf - Tas
Militia - Inf - Vic
Militia - Inf - WA
Militia - K.E.Horse
Militia - LH
Militia - LH - Regts
Militia - LH - 1LHB
Militia - LH - 2LHB
Militia - LH - 3LHB
Militia - LH - 4LHB
Militia - LH - 5LHB
Militia - LH - 6LHB
Militia - LHN - NSW
Militia - LHN - 1/7/1
Militia - LHN - 2/9/6
Militia - LHN - 3/11/7
Militia - LHN - 4/6/16
Militia - LHN - 5/4/15
Militia - LHN - 6/5/12
Militia - LHN - 28
Militia - LHQ - Qld
Militia - LHQ - 13/2
Militia - LHQ - 14/3/11
Militia - LHQ - 15/1/5
Militia - LHQ - 27/14
Militia - LHS - SA
Militia - LHS - 16/22/3
Militia - LHS - 17/23/18
Militia - LHS - 24/9
Militia - LHT - Tas
Militia - LHT - 12/26
Militia - LHV - Vic
Militia - LHV - 7/15/20
Militia - LHV - 8/16/8
Militia - LHV - 9/19
Militia - LHV - 10/13
Militia - LHV - 11/20/4
Militia - LHV - 19/17
Militia - LHV - 29
Militia - LHW - WA
Militia - LHW-18/25/10
Militia - Military Orders
Militia - Misc
MilitiaRC - Rifle Clubs
MilitiaRC - NSW
MilitiaRC - NT
MilitiaRC - Qld
MilitiaRC - SA
MilitiaRC - Tas
MilitiaRC - Vic
MilitiaRC - WA
Militiaz - New Zealand
Tk - Turkish Items
Tk - Army
Tk - Bks - Books
Tk - Bks - 1/33IR
Tk - Bks - 27th IR
Tk - Bks - Air Force
Tk - Bks - Yildirim
Tk - POWs
Wp - Weapons
Wp - Hotchkiss Cav
Wp - Hotchkiss PMG
Blog Tools
Edit your Blog
Build a Blog
RSS Feed
View Profile
Open Community
Post to this Blog
Site Index
Education Centre
LH Militia
Boer War
Transport Ships
LH Battles
ALH - Units
ALH - General
Aboriginal Light H
Weapons
Ottoman Sources

"At a mile distant their thousand hooves were stuttering thunder, coming at a rate that frightened a man - they were an awe inspiring sight, galloping through the red haze - knee to knee and horse to horse - the dying sun glinting on bayonet points..." Trooper Ion Idriess

The Australian Light Horse Studies Centre aims to present an accurate history as chroniclers of early Australian military developments from 1899 to 1920.

The Australian Light Horse Studies Centre site holds over 12,000 entries and is growing daily.

Contact: Australian Light Horse Studies Centre

Let us hear your story: You can tell your story, make a comment or ask for help on our Australian Light Horse Studies Centre Forum called:

Desert Column Forum

WARNING: This site contains: names, information and images of deceased people; and, language which may be considered inappropriate today.

Saturday, 11 October 2008
The Battle of Beersheba, Palestine, 31 October 1917, 3rd LHR, AIF, Unit History Account
Topic: AIF - 1B - 3 LHR

The Battle of Beersheba

Palestine, 31 October 1917

3rd LHR, AIF, Unit History Account  


3rd LHR men feeding their horses near Beersheba.

[AWM Picture P05109.004]


Frank M Blackwell and DR Douglas produced a unit history in 1950 called The Story of the 3rd Australian Light Horse Regiment. This story has subsequently been reprinted by Lieutenant Colonel Neil C. Smith AM with upgraded information in which included a section specifically related to the battle of Beersheba and extracted below.

Smith AM, Lieut-Col NC, THE THIRD AUSTRALIAN LIGHT HORSE REGIMENT 1914-1918 - A Short History And Listing Of Those who Served, (Melbourne 1993), pp. 61-2:

[61]

BEERSHEBA

At 1830 on 30th the Anzac Mounted Division left Asluj and marched NE, the object being to envelope and attack Beersheba from the East and North East in co-operation with other Brigades attacking from the South. At 0300 we halted for half an hour, and horses and men had a hurried meal. At 0800, point 1390, situated North East of Beersheba, was reached, and from here the Regiment was sent forward, the objective being Tel el Saba, which was seen to be strongly held by the enemy with several machine guns, which were placed in stone huts and sangars, and were thus well protected from our fire from all quarters.

[62]

Two Squadron advanced mounted till within about 1200 yards under heavy fire, they  of their objective when, coming under covering fire they dismounted and advanced on foot, the horses being placed under cover in the Wadi. The Auckland Mounted Rifles cooperating on our right the attack was pushed home under covering fire from our artillery, which did excellent work in dislodging machine guns. We advanced in short rushes down each bank of the Wadi, both of which being very flat were swept by Machine Gun and Rifle fire; a bravery and utter disregard of danger was shown by the stretcher bearers in dressing and attending to the wounded on these exposed positions.

Lance Corporal A.C. Rodgers, medical detail, and Trooper T.R. Hogarth, the latter being posthumously awarded the MM, were killed. The enemy surrendered upon the final assault being made. Lieutenant M.R. Sandland, of A Squadron, was killed during the attack. Our causalities were one officer and 10 other ranks killed, and 18 other ranks wounded.

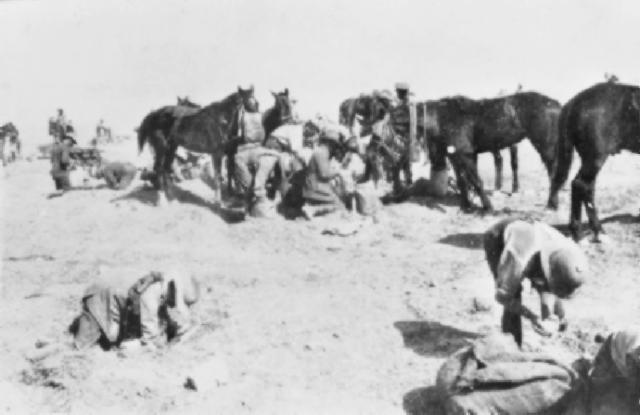
Upon Tel el Saba being captured the horses were brought up the Wadi, and evidently were observed by the enemy, who concentrated the fire of two batteries of 77 mm guns upon the Wadi near Tel el Saba, but we were able to get the horses away before many casualties had occurred among them. Owing to rain having fallen a few days before there was an abundance of surface water available so that we were able to water the horse and replenish water bottles. While watering in the Wadi several enemy planes bombed us, but failed to do any damage.

The Regiment then moved to Point 960 and bivouacked, having previously despatched a Squadron to Beersheba to get in touch with the 1st Regiment. This Squadron returned at 2200. During the day our transport which had been left at Point 1300 were heavily bombed by enemy planes, the casualties being four Other Ranks killed and five wounded, 10 horses killed and seven wounded.

The Regiment remained in bivouac on 1st November, parties were sent out to collect tibben, which was found in large quantities. Quantities of war material were also found. The surface pools having been used up it now became necessary to water the horses at Beersheba; here all of the wells had been destroyed by the enemy, with the exception of one, and thus the horses of all units had to be watered at the one place, which meant great congestion at the water area day and night. This presented a splendid target for enemy planes, who were particularly active during these operations, and did a great deal of bombing. Machine Guns and Hotchkiss Rifles were used against them, and had the affect of keeping them at a high altitude, and occasionally brought one down.


Further Reading:

3rd Light Horse Regiment, AIF

3rd Australian Light Horse Regiment, Roll of Honour

The Battle of Beersheba, Palestine, 31 October 1917

Australian and New Zealand Roll of Honour

Battles where Australians fought, 1899-1920


Citation: The Battle of Beersheba, Palestine, 31 October 1917, 3rd LHR, AIF, Unit History Account 

Posted by Project Leader at 4:34 PM EADT
Updated: Sunday, 4 October 2009 9:20 AM EADT
The Battle of Beersheba, Palestine, 31 October 1917, 2nd LHR, AIF, Unit History Account
Topic: AIF - 1B - 2 LHR

 The Battle of Beersheba

Palestine, 31 October 1917

2nd LHR, AIF, Unit History Account


Major William Ernest Markwell, KIA 31 October 1917

[From:  Bourne, "NULLI SECUNDUS", plate facing p. 38]


Lieut-Colonel GH Bourne's unit history of the 2nd Light Horse Regiment, AIF, included a section specifically related to the battle of Beersheba which is extracted below.

Bourne, Lieut-Colonel GH, "NULLI SECUNDUS" - The History - of the 2nd Light Horse Regiment Australian Imperial Force - August 1914 - April 1919, (Tamworth 1926), p. 47:

[47]

CHAPTER VII

PALISTINE

The big scrap started before daylight on 31st, Tel el Saba, one of a range of hills about 1,000 feet high, and three miles east of Beersheba, was found to be held in strength. This was a foregone conclusion, as a glance at the map will show. Time being all important, the natural thing to do seemed to envelop the position and march around it to the east and get astride get astride the Beersheba -Jerusalem road. However, the 3rd Regiment and a regiment of NZMR Brigade were sent straight at it to make a frontal attack. Out C.O. was detached to command Brigade Advance Headquarters, and Major Markwell assumed command of the Regiment. 1st and 2nd Regiments were ordered down on to the plain to support 3rd Regiment if necessary and also to guard their left flank which was threatened.

Tel el Saba was so well defended by machine guns (which our batteries could make no impression on) that the frontal attack could make no headway. About 1400 2nd Regiment was ordered to come into action on the left of the 3rd, and to cooperate in the attack on Tel el Saba We went in at the gallop and reached some mud huts about 800 yards from our objective. Here we dismounted and sent led horses back. Out 13 pounder guns, though well served, were making not the slightest impression on the Turkish redoubts; and additional guns were sent up to assist. That old veteran Lieut. Wassun was wounded, and while being carried away a shell again seriously wounded him, and killed one of the stretcher-bearers.

Our coming in on the left of the 3rd Regiment drew the bulk of the defenders' garrison that way, thus, though we could not advance our selves, enabling the NZMR Brigade on the right to push up to the Turkish position; but not before we had sustained our heaviest casualty. About 1630, an enemy shrapnel bursting low, had killed Major Markwell. The loss of that most gallant Officer was irreparable. The following is an extract from Routine Order which expressed the opinion of all "The C.O. desires to place on record the severe loss to the Regiment, in the death of Major WE Markwell, DSO. His loyal and devoted services to the Regiment since its formation were exemplary. His courage and energy in the field, his ability and conscientiousness as an administrator, his frank and generous nature, as a comrade, combined to mark him as one of the finest soldiers in the AIF, and his untimely death before reaching his prime, while in temporary command of the Regiment, is a heavy blow to this unit in particular, and to the AIF as a whole."

Tel-el-Saba having fallen, two troops, under Lieuts. Weller and Anderson were attached to 1st Regiment which was now advancing dismounted against the town of Beersheba itself. It was now nearly dusk, and though we had not yet gained the ancient city, the Turks realising they were surrounded, were preparing to fly. Most of their guns had already been pulled out. The outer works to south, and west of the city had fallen to the 20th Corps. The 1st Regiment had almost reached Beersheba when the 4th Brigade was sent in at the gallop, they and the 1st Regiment almost dead heating into different quarters of the town. The Brigade, less one regiment, assembled in Wadi Saba that night. Our casualties for this engagement were as follows:-

Killed: One officer and one other rank.


Further Reading:

2nd Australian Light Horse Regiment, AIF

2nd Australian Light Horse Regiment, Roll of Honour

The Battle of Beersheba, Palestine, 31 October 1917

Australian and New Zealand Roll of Honour

Battles where Australians fought, 1899-1920


Citation: The Battle of Beersheba, Palestine, 31 October 1917, 2nd LHR, AIF, Unit History Account 

Posted by Project Leader at 1:00 PM EADT
Updated: Thursday, 8 October 2009 4:19 PM EADT
The Battle of Beersheba, Palestine, 31 October 1917, 1st LHR, AIF, Unit History Account
Topic: AIF - 1B - 1 LHR

 The Battle of Beersheba

Palestine, 31 October 1917

1st LHR, AIF, Unit History Account


2826 Pte Donald McBean, 1st LHR, and friends who took part in the Battle of Beersheba


PV Vernon's 1985 centenary celebration of the Royal New South Wales Lancers included a section on the work performed by the 1st Light Horse Regiment during the Great War. The pages specifically related to the battle of Beersheba are extracted below.

Vernon, PV, editor, The Royal New South Wales Lancers 1885-1985, (Sydney 1986), pp 130-1


[130]

CHAPTER 10

PALISTINE AND THE JORDAN VALLEY: OCTOBER 1917-MARCH 1918


THE regiment left the beach on October 24 and marched with the brigade to Fukhari, where Captain M. E. Wright rejoined from duty at Anzac Mounted Division headquarters. Next day the movement was resumed and after passing Esani and Khalasa, Asluj was reached on the night of October 29-30. At Asluj Regimental Sergeant-Major J. R. Wright and Squadron Sergeant. Major A. I. McDonald were promoted to commissioned rank.

The 2nd Light Horse Brigade was covering Asluj until 6 am, on October 30, when 2nd Lieutenant J. R. Wright and 12 other ranks relieved them on their clay observation post. One troop under Lieutenant Frost was detailed as escort to "B" Echelon transport, and 2nd Lieutenant Parbury and 40 other ranks were detailed as a working party with engineers developing the water supply. The regiment less the two troops left Asluj at 5.30 p.m. and, after watering, joined the brigade near Asluj railway station, which was the rendezvous of the Anzac Mounted Division prior to its advance against Beersheba. After a long night march, the high ground east of and overlooking Beersheba was reached at dawn and orders were issued to the 1st Brigade to attack Tel el Saba, the 2nd and 3rd L.H. being detailed to initiate the attack, while the 1st L.H. was held in reserve. At 10.30 a.m. the regiment was detailed to take up a position on the left flank of the Inverness Battery, which had come into position a mile southeast of Saba, near Khurbet el Watan. The advanced troops were heavily shelled, and all led horses had to be taken back some distance to the broken ground. Lieutenant Wright, with two sections, carried out a very daring reconnaissance of the enemy's position in Wady Saba, bringing back much valuable information. The New Zealand Mounted Rifles materially assisted the attack by a flanking movement from the north, and Tel el Saba was occupied at 3 p.m.

At 4.10 p.m. the regiment received orders to attack the town of Beersheba on the line Hill 970 to the mosque in the town, both inclusive; this line, which was on the northern side of the
 

[131]

town, was made good just after dark. Before the order to attack had been received, however, the position generally had become grave. The enemy, though driven off Saba, was still strong south of the town and stronger north of it. Only a few hours of daylight were left, and the possession of the wells in the town was imperative, for both the infantry and the cavalry. It was neck or nothing, and General Chauvel ordered that Brigadier-General Grant's 4th Australian Light Horse Brigade should make a mounted attack on the trenches on the south-east. At 4.30 p.m. the 4th and 12th Regiments commenced their famous charge. Within an hour Beersheba had been entered, the lightning attack so disorganising and demoralising the Turks that the opposition to the 1st Light Horse Brigade, on the north, failed.

The regiment, strengthening the position, sat tight all night. "A" Squadron under Major White and "B" under Captain Kater held the outpost line, with two troops of "C" Squadron, under Captain Mack, in reserve. A few enemy cavalry approached during the night, but retired on being fired on, at least one of their number being killed. The regiment had taken 90 prisoners, including 11 officers, at the small cost in casualties of two killed (including the R.S.M, P. J. Lenehan) and one wounded. The "A" Echelon transport had had a bad time, two enemy 'planes dropping bombs which killed one other rank and wounded 2nd Lieutenant W. G. Drummond and eight other ranks, while 17 draught horses and five riding horses were killed. Within a few days the infantry had broken the Turkish line at Sheria and, again, between Gaza and the sea. This blow was the opening gambit in the great cavalry drive up the Philistine Plain to Jaffa.

On the morning of November 1, officers' patrols under Lieutenants James, Edwards, Guthrie and Gray were sent forward at 4 a.m. to the front and reported all clear by 6 a.m. Guides went back to escort the camel convoy which arrived at the south side of Beersheba during the afternoon, and at midday the unit was relieved by infantry and moved to a new bivouac site, 1,000 yards east of Beersheba. The weather was wet. The transport with "A" Echelon reached camp at 6 p.m. with horses obtained from other units, as so many had been killed. During the afternoon 20 men under Lieutenant Otton were employed digging graves and 20 more under Lieutenant Parbury were detailed to guard the prisoners.


Further Reading:

1st Australian Light Horse Regiment, AIF

1st Australian Light Horse Regiment, Roll of Honour

The Battle of Beersheba, Palestine, 31 October 1917

Australian and New Zealand Roll of Honour

Battles where Australians fought, 1899-1920


Citation: The Battle of Beersheba, Palestine, 31 October 1917, 1st LHR, AIF, Unit History Account

Posted by Project Leader at 9:58 AM EADT
Updated: Thursday, 8 October 2009 4:39 PM EADT
9th LHR AIF War Diary, 11 October
Topic: AIF - 3B - 9 LHR

9th LHR, AIF

9th Light Horse Regiment

War Diary, 11 October

Pro Gloria et Honore - For Glory and Honour

Regimental March -  Marching Through Georgia


The following entries are extracted and transcribed from the 9th Light Horse Regiment War Diary, the originals of which are held by the Australian War Memorial. There are 366 entries on this site. Each day has entries as they occurred from 1914 to 1919. In addition to the 9th Light Horse Regiment War Diary, when appropriate, entries from the 3rd Light Horse Brigade War Diary and other regiments with the Brigade will also appear. Entries from the unit history, Darley, TH, With the Ninth Light Horse in the Great War, Adelaide, Hassell Press, 1924 will also appear from time to time. The aim is to give the broadest context to the story and allow the reader to follow the day to day activities of the regiment. If a relative happened to have served in the regiment during the Great War, then this provides a general framework in which the individual story may be told.


The Diary


1914

Sunday, October 11, 1914

Formation of Regiment occurring at Morphettville Race Course Camp. 


1915

Monday, October 11, 1915

9th Light Horse Regiment Location - Rhododendron Spur

9th Light Horse Regiment War Diary - More heavy rain today and more discomfort for troops owing to scarcity of roofing material. Pay drawn for Regiment. A plentiful supply of planks 9 x 2 and poles 4 x 4 has been received. Great improvement has been made in the fire trenches of the position and in bivouacs for the men. State strength 15 Officers, 299 Other Ranks, total 314. Bayonet strength 187. Sick to hospital 5 and from hospital 2.


1916

Wednesday, October 11, 1916

9th Light Horse Regiment Location - Bir el Abd

9th Light Horse Regiment War Diary - No entry.


1917

Thursday, October 11, 1917

9th Light Horse Regiment Location - Um Urgan

9th Light Horse Regiment War Diary - Shaw, Lieutenant OJ, returned from Cairo leave and resumed duties of Acting Adjutant.


1918

Friday, October 11, 1918

9th Light Horse Regiment Location - Kaukab

9th Light Horse Regiment War Diary - Johns, 142 Trooper AA, died [Cholera suspect]. All further leave to Damascus cancelled.


1919

Saturday, October 11, 1918

9th Light Horse Regiment Location - Adelaide

9th Light Horse Regiment War Diary - Regiment disbanded.


Previous: 9th LHR AIF War Diary, 10 October

Next: 9th LHR AIF War Diary, 12 October


Sources:

See: 9th Australian Light Horse Regiment, Contents
Australian Light Horse Studies Centre, AIF War Diaries of the Great War, Site Transcription Policy


Further Reading:

9th Light Horse Regiment AIF

Bert Schramm Diary

9th Australian Light Horse Regiment, Roll of Honour 

Battles where Australians fought, 1899-1920

 
Citation: 9th LHR AIF War Diary, 11 October

Posted by Project Leader at 1:01 AM EADT
Updated: Thursday, 16 September 2010 1:29 PM EADT
Diaries of AIF Servicemen, Bert Schramm, 11 October 1918
Topic: Diary - Schramm

Diaries of AIF Servicemen

Bert Schramm

11 October 1918


Bert Schramm


2823 Private Herbert Leslie SCHRAMM, a 22 year old Farmer from Whites River, South Australia. He enlisted on 17 February 1916; and at the conclusion of the war Returned to Australia, 10 July 1919.

During part of the course of his military service with the AIF, Bert Schramm kept a diary of his life. Bert was not a man of letters so this diary was produced with great effort on his behalf. Bert made a promise to his sweetheart, Lucy Solley, that he would do so after he received the blank pocket notebook wherein these entries are found. As a Brigade Scout since September 1918, he took a lead part in the September Offensive by the Allied forces in Palestine. Bert's diary entries are placed alongside those of the 9th Light Horse Regiment to which he belonged and to the 3rd Light Horse Brigade to which the 9th LHR was attached. On this basis we can follow Bert in the context of his formation.


The Diaries

The complete diary is now available on the Australian Light Horse Studies Centre Site at:

Bert Schramm Diary


Finding more about a service person. See:

Navigating the National Archives Service File 


Bert Schramm's Handwritten Diary, 5 - 11 October 1918

[Click on page for a larger print version.]


Bert Schramm

Friday, October 11, 1918

Bert Schramm's Location - Kaukab

Bert Schramm's Diary -  Nothing doing. Sickness is causing alarm. About 75% of the Brigade are down with fever, dysentery etc. and there have been several deaths from cholera.


9th Light Horse Regiment War Diary

9th Light Horse Regiment Location - Kaukab

9th Light Horse Regiment War Diary - Johns, 142 Trooper AA, died [Cholera suspect]. All further leave to Damascus cancelled.

9th LHR AIF War Diary, 11 October    


Darley

Darley, TH, With the Ninth Light Horse in the Great War, Adelaide, Hassell Press, 1924, pp 163 - 166.

No Entry


Previous:  Bert Schramm's Diary, 10 October 1918

Next:  Bert Schramm's Diary, 12 October 1918


Sources Used:

Bert Schramm's Diary

National Archives Service File.

Embarkation Roll, AWM8.

Australian War Memorial Roll of Honour

Nominal Roll, AWM133, Nominal Roll of Australian Imperial Force who left Australia for service abroad, 1914-1918 War.


War Diaries and Letters

All War Diaries and letters cited on this site should be read in conjunction with the Australian Light Horse Studies Centre, War Diaries and Letters, Site Transcription Policy which may be accessed at:

Australian Light Horse Studies Centre, War Diaries and Letters, Site Transcription Policy 


Further Reading:

Bert Schramm Diary

Bert Schramm Diary, Album

Bert Schramm's Photo Album

9th Australian Light Horse Regiment, AIF

9th Australian Light Horse Regiment, War Diary, Day by Day Account

Battles where Australians fought, 1899-1920


Citation: Diaries of AIF Servicemen, Bert Schramm, 11 October 1918


Posted by Project Leader at 1:01 AM EADT
Updated: Tuesday, 7 June 2011 12:07 PM EADT

Newer | Latest | Older

Full Site Index


powered by FreeFind
Let us hear your story: You can tell your story, make a comment or ask for help on our forum.

Desert Column Forum

A note on copyright

The Australian Light Horse Studies Centre is a not for profit and non profit group whose sole aim is to write the early history of the Australian Light Horse from 1900 - 1920. It is privately funded and the information is provided by the individuals within the group and while permission for the use of the material has been given for this site for these items by various donors, the residual and actual copyright for these items, should there be any, resides exclusively with the donors. The information on this site is freely available for private research use only and if used as such, should be appropriately acknowledged. To assist in this process, each item has a citation attached at the bottom for referencing purposes.

Please Note: No express or implied permission is given for commercial use of the information contained within this site.

A note to copyright holders

The Australian Light Horse Studies Centre has made every endeavour to contact copyright holders of material digitised for this blog and website and where appropriate, permission is still being sought for these items. Where replies were not received, or where the copyright owner has not been able to be traced, or where the permission is still being sought, the Australian Light Horse Studies Centre has decided, in good faith, to proceed with digitisation and publication. Australian Light Horse Studies Centre would be happy to hear from copyright owners at any time to discuss usage of this item.

Contact

Australian Light Horse Studies Centre

eXTReMe Tracker