


Topic: AIF - WFF
Western Frontier Force
Egypt, 1915 - 1916
The History of the Composite Australian Light Horse Regiment
The following is an unpublished essay written by Steve Becker in 2008 called: The History of the Composite Australian Light Horse Regiment. It is reproduced below.
On the 19 November 1915 a British Officer strode into the Officers Mess at Heliopolis, he was to be the Commanding Officer of the newly formed Composite Australian Light Horse Regiment and had come straight from the Staff of the 2nd Mounted Division where he had been given just 12 hours to assemble his regiment and be ready to move for operations in the Western desert. This officer was Major the Honourable Dudley Roger Hugh Pelham, 4th son of the Earl of Yarborough, educated at Eton and commissioned from The Royal Military Collage Sandhurst into 10th Hussars in 1894. He had served in the Boer War and was a well known cricketer who played first class cricket for the European India side of 1902-03 As he looked around the mess of the newly gathered Australian Light Horse officers he began to brief them of the situation.
Following the upraising by the Berber tribes in the North African desert one of these tribes known as the Senussi based at the Egyptian Oasis at Siwa had been engaged in a guerrilla war against the Italians who had taken the province of Libya from Turkey since 1911. In 1915 when Italy became an ally to Britain the Senussi encourage by Turkey turned their attention to Egypt where in the last month they have fired on British and Egyptian service personal and occupied the towns of Sidi Barrani and Sollum, and with the concern that should this uprising spread to the general Egyptian population the British position in Egypt would be threatened. It was decided to send all available troops into the desert to prevent this. How ever due to the situation at Gallipoli and the need to garrison the Suez Canal, as well as the movement of troops to Salonika, a number of composite formations would need to be raised from the available formations then in Egypt until regular units could be obtained.
The Composite Australian Light Horse Regiment was to be drawn from all the Australian Light Horse Reinforcements now under training and waiting deployment to Gallipoli and also those who by wounds or illness had yet to return or those that had been left behind to watch the stores and equipment in Egypt. The Squadrons were to be based on the present Light Horse brigades with “A” Squadron formed from the 1st Light Horse Brigade details, “B” Squadron from the 2nd and 3rd Light Horse Brigades details and “C” Squadron from the 4th Light Horse Brigade details. The medical staff would be drawn from the 3rd Light Horse Field Ambulance and the Signals from the 3rd Light Horse Signal Troop, men from the 3rd Light Horse Brigade train 12th Company Australian Army Service Corps would fill out the ranks of the Transport Troop. In all some 23 officers and 531 men were concentrated at Heliopolis for the adventure ahead.
The problems with sorting out the Regiment were to say the least overwhelming. Most of the Officers and men being new to the Army had only limited training in Australia before embarking to Egypt, Few completed any Troop, Squadron or Regimental training or knew how a Light Horse Regiment operated in the field or the tactic’s that involved. Added to the problems was the lack of equipment which was left over from the main theatres of war, the only thing there were plenty of were horses for the men and wagons for the Transport Troop.
The men did have their pick of the best horses in the Light Horse as they set about their training as a Light Horse Regiment. Fortunately a number of the officers and men were from the Light Horse Militia in Australia, whilst a number had served in the Boer War and had a firm grounding in the duties of Army, only there were a lack of qualified Non Commissioned Officer’s in the Regiment and the wholesale promotion of those who were believed could fill the duties of Troop Sergeant and Troop Corporal along with other Non Commissioned Officer’s ranks had to fill these important positions.
Thankfully there were a number of Veteran soldiers willing to pass on their knowledge, these included the Regimental Second In Command Major Thomas Daly of the 9th Light Horse Regiment who had started out as a Private in the 8th Militia Infantry Regiment in 1901 and commissioned in 1905, he had a solid background in handling men and along with the 40 year old Adjutant, Lieutenant Henry Forbes of the 5th Royal Irish Lancers who had served in the British Army since 1894 and had fought as a Sergeant in the Boer War winning the Distinguished Conduct Medal then as a Sergeant Major in the Warwickshire Yeomanry at the beginning of the present war.
There were around thirty men in the Regiment who could claim service in the Boer War and included such veteran’s as Arthur Thompson from the 3rd New South Wales Mounted Rifles and Bushveldt Carbineers who was a witness against Breaker Morant at his famous trial, Hamilton Yaldwyn as a Sergeant in the Queensland Imperial Bushman and later as Captain with the 7th Australian Commonwealth Horse, John Morris who began the war as a Private with the 1st Queensland Mounted Infantry and later returned as Squadron Sergeant Major of the 7th Australian Commonwealth Horse and who stayed to fight in Royston’s Horse during the 1906 Natal Rebellion, the men included many in Australian formations was well as British Soldiers and Sailors and a New Zealander from the 3rd Contingent along with men who travelled to South Africa to join and fight. The most famous of the Boer War soldiers was Captain John Hutton Bisdee VC he had won the Victoria Cross as a Private with the 1st Tasmanian Imperial Bushman and later returned as a Lieutenant in the 2nd Tasmanian Imperial Bushman. He had long service in the Militia and at the start of the war was the Commanding Officer of the 26th Light Horse Regiment Tasmanian Mounted Infantry and was now Officer Commanding “C” Squadron.
After a regimental parade on the 20 November the men were warned that the Regiment was to move to a camp outside Alexandria and the men packed up and boarded a train at Zeitoun and travelled by rail to Gabball Station at Alexandria before disembarking and moving down to Mex Camp the next day. The regiment being over subscribed by 30 soldiers had the choice of discarding that number before this move so the 524 officers and men that entered the Western desert were the best of the reinforcements available in Egypt.
Mex Camp was a large British base with many units forming and training. These units were part of the lately created Western Frontier Force under command of Major General A. Wallace, the principle combat units of this force were the Composite Yeomanry Mounted Brigade with three Composite Yeomanry Regiments which contained the mixed Squadrons and Troops of no fewer then 20 different Yeomanry Regiments all drawn from the replacements of the Yeomanry Brigades of the 2nd Mounted Division and along with the Composite Infantry Brigade which comprised the 2/8th Middlesex, 2/7th Middlesex, 1/6th Royal Scots and the 15th (Ludhiana) Battalion of Sikhs made ready for operations in the Western desert of Egypt.
Here the Light Horse Regiment was attached to the Composite Yeomanry Mounted Brigade and started training in earnest in the formations and drills of a Mounted Regiment in the field however with a great deal to learn and limited time the training was intensive with short breaks for leave into Alexandria. On the 1 December the training program was interrupted and supplemented when the men were issued with new equipment including swords and rifle buckets to integrate them with the British Yeomanry regiments.
Nevertheless all too soon the Regiment was warned to be ready to move as the Senussi were approaching the Port town of Matruh and had cut the El Daaba road and were needed to support the forces already deployed there. An advance component of the Regiment loaded stores, signalling equipment and baggage on ships to sail for Matruh on the 6 December while the main body of the regiment would travel by rail to El Daaba on the 8 December then move cross country to Matruh. Only due to the poor water supply each Squadron would need to travel separately supported by the water wagons of the Composite Australian Army Service Corps of the 1st Australian Divisional Train under Major Albert Holdsworth with Major Frederick Francis, two officers and 93 men of whom an advance party under Lieutenant Claude Thomas had left on the 4 December with the 15th Sikhs and the 2nd Composite Yeomanry Regiment to Matruh. The Regiment began reforming as they arrived in Matruh between the 11 and 12 December.
The Affair at the Wadi Senab 11 to 13 December 1915
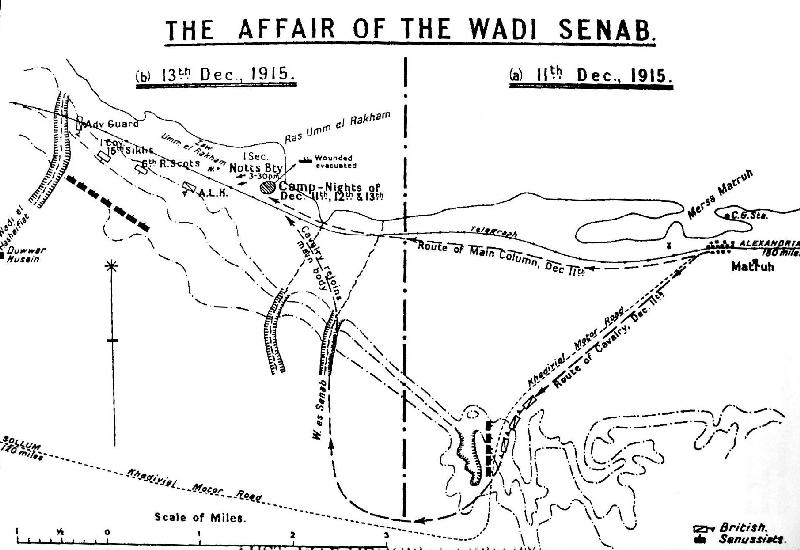
On the 11 December "A" Squadron under Captain Ernest Hudson was the first element of the Composite Australian Light Horse Regiment to arrive at Matruh. However no sooner had this Squadron arrived when it was ordered to move as quickly as possible to support the Yeomanry moving to Samaket el Medwa 16 Km south of Matruh.
This Yeomanry force was under command of Lieutenant Colonel JLR Gordon (15th Sikhs) comprising;
• 15th Battalion Sikhs (two Companies),
• 2nd Composite Yeomanry Regiment (Berkshire, Buckinghamshire and Dorsetshire Squadrons),
• Yeomanry Machine Gun Section (three Machine Guns),
• Nottinghamshire Battery RHA (one section of two guns),
• A detachment of Royal Navy Armoured cars (four Rolls Royce Armoured cars), and
• 1st South Midland Field Ambulance (one section)
At 7 am on the 11 December the Infantry under Lieutenant Colonel JLR Gordon marched west from Matruh along the coast road while the 2nd Composite Yeomanry Regiment under Major Wigan and the section of guns of the Nottinghamshire Battery RHA with two Armoured Cars moved south west following the Khedivial Motor road under orders to conduct a sweep to the south and drive the Senussi into the infantry to the north.
After 11 am the advance guard of the Buckinghamshire Squadron under Captain Cheape having crossed the Wadi Raml exposed their right flank and came under disarray fire from the direction of the Wadi Mejwa. The Commanding Officer of the 2nd Composite Yeomanry Regiment sent Major Foster’s Berkshire Squadron to the left front and Major Reeves Dorsetshire Squadron to the right to bring the Senussi under fire while the remainder of the column continued on the road.
As the squadrons were deploying into position Major Foster suddenly ordered his Berkshire Squadron to charge the unseen shooters targeting his men, the Squadron quickly advanced into the attack forming into line as they charged across the flat ground all the time coming under unexpected heavy fire from an unknown position, killing Squadron Sergeant Major William Cox.
The Senussi position was soon found as the Squadron stubbled into Wadi Mejwa thought to contain some of the Senussi only to find it held over 300 tribesmen. The Berkshire Squadron how trapped were forced to fight for their lives as the Senussi were not prepared to take prisoners.
Seeing the situation Major Wigan commit more of his column to help by attacking the flanks of the Senussi supported by the armoured cars and the guns, soon the Senussi seeing their flank being turned broke and ran onto the high ground of Gebel Medwa and into the many wadis to west to continue the skirmish and where the yeomanry became engaged with the Senussi in a running fight which developed back to the Wadi Senab.
In the early afternoon “A” Squadron the Composite Light Horse Regiment arrived to help, however the fighting was almost over and were directed to clear the remainder of the rear guard from the Wadi Senab. By 3 pm the engagement was over which allowed the medical services to recover the one officer (Colonel Snow) and 16 other ranks killed and two officers and 16 other ranks wounded, most came from the Berkshire Squadron. About 83 of the Senussi were killed in this action and seven taken prisoner. After dark the entire force concentrated at Ras umm er Rakham with the 15th Sikhs.
The next day, 12 December saw many of the Yeomanry horses to fatigue to move and patrols had to be drawn from the fit Yeomanry and “A” Squadron to examine the battle area during which they captured 25 prisoners and seized a quantity of cattle and camels neglected by the Senussi.
That evening the force was reinforced by two companies (C and D with Machine Gun section) of the 1/6th Royal Scots under Lieutenant Colonel A.O. Jenney with a supply convoy of stores which left Matruh at 10.30 am. This convoy included an element of the Composite Australian Army Service Corps under Lieutenant Claude Thomas.
On the morning of 13 December the column was ordered by Lieutenant Colonel Gordon to continue its advance on Ras Manaa and began to move at 8 am in the direction of Dawar Hussein along the coast road. In the van guard was the Dorsetshire and Buckinghamshire Yeomanry Squadrons then one company 15th Sikhs followed by two companies 1/6th Royal Scots while the reminder of the column with the Berkshire Squadron and one company 15th Sikhs and the machine gun section of the Royal Scots remaining at Ras umm er Rakham.
In the interim “A” Squadron the Composite Light Horse Regiment was ordered to investigate the wells at Bir Shola, about 40 Km south west of Ras umm er Rakham before joining the main column near Ras Manaa. Captain Hudson commenced his movement at 8.30 am following part of the way at the rear of the main column before turning off towards Bir Shola.
Shortly after 9.15 am as the leading Yeomanry Squadron was approaching the Wadi el Hasheifiat the columns long left flank became suddenly engaged by the Senussi estimated to be between 1200 to 1500 men with two guns and two or three machine guns. These were deployed along the cliffs of the Gebel el Olamiya forcing the British to move to their left to counter this fire. Small groups of the Senussi attacked the Yeomanry in the Wadi to cut them off from the 15th Sikhs as the Royal Scots found them selves under heavy attack on the coast road and the flanking platoon from C Company under Lieutenant Jardine was badly cut up.
Meanwhile “A” Squadron moved to attack the right flank of the Senussi while the Yeomanry attacked the left flank in the Wadi el Hasheifiat however any cooperation was impossible due to the ground and Senussi fire wounding Trooper Sydney Baker “A” Troop shot in the leg and Trooper George Hicks “C” Troop shot in the shoulder.
Around 10 am the Senussi brought their field guns into action and one or two 4 inch guns opened fire on the column still they were poorly handled and unlike the Machine guns which hit the Royal Scots very acutely. Under cover of this fire the Senussi moved to surround the Column and cut them off from Matruh. This forced Lieutenant Colonel Gordon to order Royal Scots to retire on his position however due to their many wounded his could not be undertaken at present and “A” squadron was directed to retire and defend Gordon’s Head Quarters as he tried to concentrate his scattered and disorganized forces into an all round defence.
Lieutenant Colonel Gordon then sent a heliograph message to the supply column at Ras umm er Rakham for help and the machine gun section of the Royal Scots and three officers and 73 men of the Composite Australian Army Service Corps and Royal Scots Transport “turned out full of fight with shirts and trousers and with rifles and bandoliers” and moved to the sound of the guns.
About a mile short of the column they found the Senussi positioned in some wadis to the rear of the column and Lieutenant Claude Thomas attacked by dividing his men into three sections under himself, Lieutenant Louis McQuie and Lieutenant Norman Henderson the Transport officer of the Royal Scots while the Royal Scots machine gun section provided cover and took the tribesman under fire. Once in position he led an assault on the Senussi who scattered on there approach. Seeing a ammunition limber stuck fast in the mud Lieutenant Thomas went to help by pulling two mules across the open only to fall mortally wounded as Sergeant Albert Sanders took command and led his party clearing the wadi losing Driver Andrew Thompson killed and about five men of the Australian Army Service Corps wounded. Having now secured this position they were required to leave part of this force to protect the column’s rear while the remainder joined Lieutenant Colonel Gordon.
Sometime after 10 am news of the Senussi attack was passed back to Matruh where the remainder of the Composite Light Horse Regiment under Major Pelham were order to mount and move as quickly as possible to the battle area with one section of two guns of the Nottinghamshire battery, these fresh reinforcements arrived at Ras umm er Rakham around 2.15 pm and joined the defences near Lieutenant Colonel Gordon’s Head Quarters.
These squadrons were quickly moved to the left rear of the Royal Scots supported by the guns of the Nottinghamshire Battery, which with some good shooting stopped the tribesman from pressing their attack, both “B” Squadron under Captain Brune moved to the right of “A” Squadron while “C” Squadron under Captain Bisdee VC moved to its left, there they formed lines with “A” Squadron in the centre to repel an expected attack, only the Senussi held back allowing the Yeomanry, 15th Sikhs and the Royal Scots strung out along the Coast road to concentrate around 3 pm under the protection of the Light Horse near Lieutenant Colonel Gordon’s Head Quarters.
Around 3.15 pm Lieutenant Colonel Gordon sent the now combined forces against the Senussi positions with the Royal Scots attacking the Gebel el Olamiya ridge while the Composite Light Horse Regiment moved to the flank. During this fighting Corporal John Kelly and Trooper Edward Clements “A” Troop “C” Squadron were wounded as the Regiment moved to cut the Senussi off on the high ground. Meanwhile the Royal Scots lead by the Adjutant Captain Gillatt and Major Milligan took the fight to the tribesman capturing the ridge line, only due to the terrain this couldn’t be completed before their adversary had fled where the Royal Scots lost during the day three soldiers killed and three officers and fourteen men wounded. The Light Horse Regimental Padre Captain William Devine had taken up a rifle and fired at the Senussi until all the Royal Scots wounded were recovered, he would later win a Military Cross and the French Croix de Guerre with the 48th Battalion in France.
The Senussi now escaped onto the high ground however they continued to shell the area and snipe at the reforming troops who had taken the Gebel el Olamiya ridge line from the Senussi nevertheless Lieutenant Colonel Gordon didn’t follow up the fleeing tribesman instead he withdrew his troops and were allowed to retire to their camp at Ras umm er Rakham without serious torment before darkness. The column spent a quiet night with no firing or attacks by the Senussi, little knowing the Senussi had moved to cut off the columns return to Matruh and lay an ambush.
The Column recorded some 9 other ranks killed and 6 officers and 50 other ranks wounded however they believe they had killed some 250 of the Senussi only their true casualties were very much lower being less then 150 killed and wounded. The columns wounded were evacuated by sea during the night using the hospital ship “Rashid”.
At 6 am on the morning of 14 December the column began there return to Matruh, while the garrisons at a number of wells were withdrawn as General Wallace wanted to concentrate and reinforce his available forces at Matruh.
Around 9.30 the Senussi conducted an ambush against of the column only the tribesman had been in the field for some time and had little to eat or drink and the sprit of victory had left many of them and most had slowly retired to their bases during the night leaving few to engage the column. The column passed the ambush site with only a few artillery shells falling and the odd shot being taken. Most accounts don’t even mention any contact at all.
Between the 15 and 24 December heavy rain turned the ground to mud making it unfavourable for major operations to be were undertaken nevertheless the Light Horse and Yeomanry continued there patrol work as snipers were the main concern to the garrison along with the cutting of the road to El Daaba.
On the 16 December Major Pelham took the Composite Light Horse Regiment out in force clearing to a distance of 5 Km’s of the perimeter of Matruh, on the 17 December they had an encounter with the Senussi near the White Sands hills only the tribesman fled before the Light Horse came into contact and the regiment returned to Matruh that night.
On the 18 December “C” Troop “B” Squadron under Lieutenant John Land conducted a patrol outside Matruh only to get into trouble when fired on by the Senussi, the Regiment was alerted to support them when Lieutenant Land extracted his Troop with only one men wounded, Trooper Henry Hausknecht who was shot in the thigh.
During this interlude new units began to arrive by sea at Matruh including the 1st Battalion New Zealand Rifle Brigade, two 4 inch Naval Guns and “A” Battery Honourable Artillery Company with the Composite Yeomanry Brigade Head Quarters under General JDT Tyndale-Biscoe and the 1st Composite Yeomanry Regiment. The Berkshire Squadron 2nd Composite Yeomanry Regiment was returned to Alexandria on the 17 December by sea to be disbanded back to its parent regiment.
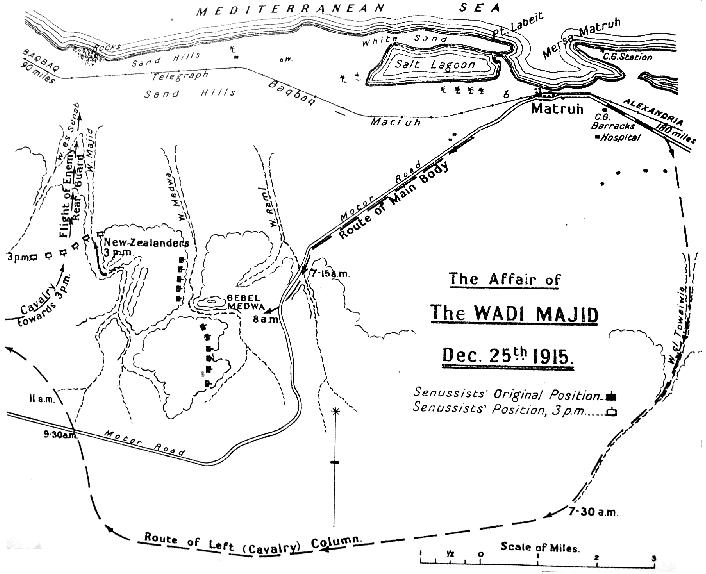
The Affair at the Wadi Majid 25th December 1915
Meanwhile the Senussi were still gathering their forces at Gebel Medwa south of Matruh while another force was at Halazin. The leader Ja Far Pasha had a base of three regular Battalions each about 300 men trained by Turkish advisers and the balance native tribesman. This numbered around 5000 men, four guns and a number of machine guns.
Between 23 and 24 December two BE 2c aircraft from “B” Flight 14 Squadron Royal Flying Corps under Captain FH Jenkins made reconnaissance patrols in the area of Gebel Medwa and Halazin finding these concentrations and General Wallace ordered a surprise attack on the main force at Gebel Medwa on Christmas day.
The attacking force would be made by two columns each would advance under cover of darkness and attack the Senussi by surprise at Gebel Medwa in the morning.
The Right Column under Lieutenant Colonel Gordon with;
• Buckinghamshire Squadron 2nd Composite Yeomanry Regiment,
• Nottinghamshire Battery RHA (one section of two guns),
• 15th Battalion Sikhs,
• 1st Battalion New Zealand Rifle Brigade,
• 2/8th Middlesex,
• 137th Indian Field Ambulance,
• 1st South Midland Field Ambulance (less one section), and
• Water section Composite Australian Army Service Corps.
This Column would advance by night along the Khedival Motor road and attack the Senussi frontally.
While the Left Column under General Biscoe with;
• Head Quarters Composite Yeomanry Brigade,
• 1st Composite Yeomanry Regiment (Hertfordshire and Duke of Lancaster’s Own Squadrons and composite Derbyshire and City of London Squadron),
• Composite Light Horse Regiment (three Squadrons),
• Nottinghamshire Battery RHA (one Section of two guns),
• Yeomanry Machine Gun Section, and
• 1st South Midland Field Ambulance (one section)
This Column would make a wide 10 Km detour east up the Wadi Toweiwia then west to cut the Senussi retreat from Gebel Medwa.
At 4 pm on the morning of the 25 December, the Left Column departed camp to begin there turning movement while at 5 am the Right Column started their march as the Buckinghamshire Yeomanry in front screened the column while the 15th Sikhs, 1st Battalion New Zealand Rifle Brigade and the 2/8th Middlesex followed in complete silence.
Around 6 am the sun began to rise when the Senussi pickets saw the leading British column moving alongside the Khedival Motor road and lit the warning bon fires alerting the Senussi into their battle positions. As they rushed to their defence’s one of their guns opened fire on the column.
At 7.15 am the Right Column crossed the Wadi Raml and Lieutenant Colonel Gordon ordered the 15th Sikhs under Major Pennefather to attack the Senussi south west of Gebel Medwa and send one company forward to occupy Gebel Medwa which appeared not to be held by the Senussi. Gebel Medwa was successfully taken by the Sikh company after 7.30 am without a fight while the main column continued there advance on the main Senussi position behind the Wadi Medwa
At 8 am the enemies artillery became more effective and the Nottinghamshire‘s guns took them under fire at about 2000 metres, this was helped by the guns from the Sloop “HMS Clematis” firing at over 10 Km’s off Matruh and the use of a spotting aircraft from 14 Squadron Royal Flying Corps for the ship which silenced the Senussi guns.
By 9 am the 15th Sikhs, were still fighting in front of Wadi Medwa when Lieutenant Colonel Gordon sent a company of the Middlesex Battalion to relieve the Sikh company on Gebel Medwa to concentrate the Sikh battalion. The assault by the Sikhs was a classic frontal advance under fire, which was supported by the 1st Battalion New Zealand Rifle Brigade under Major Austin which at 9.30 am moved “A” company under Major Kay to the left flank of the Sikhs and Captain Puttick’s “B” company to the right, at the same time the Buckinghamshire Yeomanry and the remainder of the Middlesex Battalion were sent to the enemies left to turn that flank.
This attack was finally successful when the ridge was taken after 10 am by the Sikhs and the Senussi broke and fled into the wadis to the west, however the yeomanry of the Left Column had still not arrived in the battle area and the tribesman had time to escape as the Infantry followed the fleeing Senussi fighting from wadi to wadi. A young Sikh officer which took part in the assault was Lieutenant John Smyth VC who had already won the Victoria Cross in France with his regiment and would later rise to General and Commander of the 17th Indian Division in Burma during World War 2.
The late arrival of the Left Column was in part due to the slowness in clearing the Wadi Toweiwia at 7.30 am when the wheeled transport was delayed by the rocky ground leaving the Hertfordshire Yeomanry squadron to lend a hand and later joined the Right column when the Left column had advanced to far ahead.
At 8 am the lead Squadron of the Left Column was Captain Bisdee “C” Squadron Composite Light Horse Regiment guided by Lieutenant Beck when they found there way blocked by a mixed force of Senussi camelry and cavalry 6 Km’s due south of the Gebel Medwa during which they fired on wounding Trooper Clifford Brown “A” Troop in the leg.
This obstacle was removed when the guns of the Yeomanry Machine gun section came into action with the guns of the Nottinghamshire Battery forcing the Senussi to retire to the west nevertheless they had delayed the Columns advance till 9 am.
Following this action the Yeomanry and Light Horse of the Left Column kept moving west pursuing the retiring mounted Senussi not knowing that the Right Column was successful and the Senussi infantry were escaping, a number of messages sent to the Left Column from General Wallace all failed to contact them until 3 pm when the messages were seen and acted on. Its is reported that Major Pelham had seen these signals and requested his regiment go and engage these retiring enemy Infantry only General Biscoe considered it to difficult to undertake.
The Left Column then moved north to the area of the Wadi Majid and joined the New Zealand Rifle Brigade who’s “A” and “B” companies had trapped about 150 men of the Senussi rear guard. The Light Horse Squadrons moved up to the high ground supported by two squadrons of Yeomanry and two guns of the Nottinghamshire Battery to bring fire onto the Senussi only to come came under fire from hidden positions around the wadi, this fire hit the leading Troop under Lieutenant Frank Snow mortally wounding Trooper Henry Creed “A” Troop “A” Squadron in the head and wounding Captain Ernest Hudson. Harry Creed was a young 19 year old Railway clerk from Sydney whose parents lived in Nelson New Zealand and became the only Light Horse soldier to die in the Composite Light Horse Regiment, other casualty was Trooper Albert Roberts “B” Troop “B” Squadron wounded in the hand.
Again most of the Senussi had escaped and the Right column was ordered to concentrate on the Wadi Medwa after 5 pm and rested on the battlefield while the Yeomanry and Light Horse of the Left Column were ordered to return to Matruh that night. After a cold wet night the Right Column returned to Matruh on the morning of the 26 December.
British casualties were given as 13 killed and 51 wounded, among the dead were six men (CSM Purkis) and 14 wounded from the New Zealand Rifle Brigade, while the Senussi dead were estimated to be around 300 with between 20 and 82 prisoners.
On the 28 December with the weather once more slowing operations General Wallace decided to clear the Senussi from his rear and open the track from Matruh to El Daaba. A Column under General the Earl of Lucan commander of the Composite Infantry Brigade was sent to clean up the largest concentration at Bir Gerawla.
This force included;
• Composite Light Horse Regiment (three Squadrons),
• 1st Composite Yeomanry Regiment (Hertfordshire and Duke of Lancaster’s Own Squadrons and composite Derbyshire and City of London Squadron),
• Nottinghamshire Battery RHA (one section of two guns),
• 15th Sikhs,
• 2/7th Middlesex,
• 1st Battalion New Zealand Rifle Brigade,
• 1st South Midland Field Ambulance,
• 137th Indian Field Ambulance, and
• Water section Composite Australian Army Service Corps
When the column arrived at 7 pm at Bir Gerawla no resistance was met and the Senussi had fled. The column destroyed stores and stock belonging to the Senussi and the local Bedouin, then moved to Bir Zarka south of Bir Gerawla however again the Senussi had fled after which the column returned to Matruh by the 30 December having destroyed eighty tents and large quantities of grain and bringing in 100 camels and 500 sheep. The biggest hazard to the men was the ground socked by rain and now no more than sludge this forced the men to drag all the wheeled transport and guns by hand.
By the start of a new year at war the weather yet again turned appalling with large falls of rain over the area of operations, this seriously restricted the movement of cavalry and wheeled transport. On the 1 January 1916 a patrol of “B” Troop “B” Squadron under Lieutenant Warren Palmer with Captain Purdy “C” company, the Adjutant Captain Bell and medical officer along with about 40 men of the New Zealand Rifle Brigade went out to find the body of Corporal Beresford-Wilkinson killed on the 25 December around the Wadi Medwa, when the body was recovered they returned that night without incident.
At this time the 3rd Light Horse Regiment entered the field as an element of Minia Force part of the Western Frontier Force which took up positions at the Wadi Natrum about 60 Km’s north west of Cairo to cover the Nile River from Senussi attacks from the Baharia Oasis while the remainder of the 1st Light Horse Brigade followed around the 13 January 1916 to join them.
On the 9 January the weather had cleared enough to continue operations and once again Lord Lucan was ordered to take a column out to destroy the Senussi encampments between Matruh and El Daaba in particular a camp of 80 plus tents at Gebel Howeimil.
This column was composed of the following;
• Composite Light Horse Regiment (three Squadrons),
• 1st Composite Yeomanry Regiment (Hertfordshire and Duke of Lancaster’s Own Squadrons and composite Derbyshire and City of London Squadron),
• “A” Battery Honourable Artillery Company (one Section of two guns),
• 2/7th Middlesex (two companies),
• 15th Sikhs (two companies),
• 1st South Midland Field Ambulance,
• 137th Indian Field Ambulance, and
• Water section Composite Australian Army Service Corps under Captain Chester Reynolds.
Before this move the famous Thomas Henley MLA of the Australian Comforts Fund arrived in Matruh on the 11 January brining the War Chest Funds Christmas Billies, he had picked up the nickname of “King Billy” for his valuable work in the Western desert. These were passed around the regiment as well as the British soldiers and contained all types of wonderful things not seen by these men for some time. An English soldier mentioned the Australians as “a splendid corps, indeed the word “friendly” is not quite enough only “Matey” expresses so much better”.
The column was ready to proceed on the 12 January and moved to Baqqush on the afternoon of the 13 January, the slow going was due to the ground saturated by rain which made the movement of horse and wheeled transport very difficult. Next day the column arrived at Gebel Howeimil which was found deserted, nevertheless a number of smaller camps in the area were found and burned while the stock was taken and a number of prisoners captured, once completed the column returned to Baqqush that night having travelled around 80 Km’s across difficult terrain.
On the 15 January “B” and “C” Squadrons with the Regimental Headquarters of the Composite Light Horse Regiment with one section “A” Battery Honourable Artillery Company were sent to El Daaba as part of the garrison while the main column returned to Matruh on the 16 January with 13 prisoners, 140 camels and 50 cattle as prizes.
Once at El Daaba the Regimental Headquarters and “B” Squadron proceed to Alexandria and were disbanded around the 19 January while “C” Squadron remained as protection at El Daaba with a few cars of the Royal Navy Armoured car section until it was returned to Alexandria and disbanded around the 5 February.
During this period the Yeomanry Composite Regiments were also under going changes as formations were being returned to Alexandria to be reformed with their Regiments which had now returned from Gallipoli. These complete units were slowly moving into the desert to merge with the Western Frontier Force.
The Affair at Halazin 23 January 1916
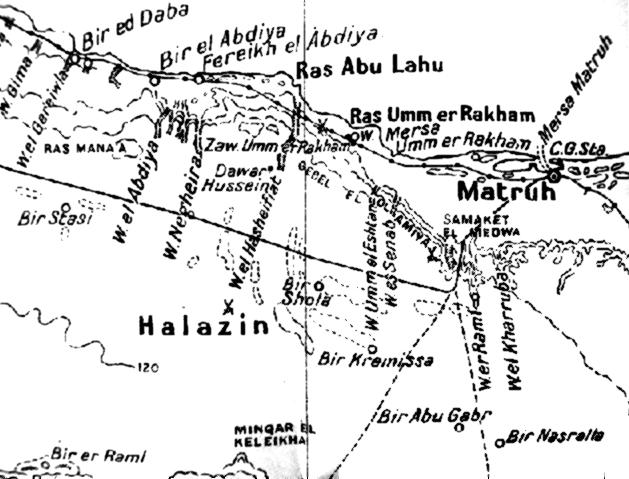
On the 19 January aircraft from 14 Squadron Royal Flying Corps again located the Senussi encampment at Halazin around 35 Km’s south west of Matruh which contained over three hundred tents including that of the Grand Senussi. General Wallace ordered the Troops to be ready to move as soon as the South African Brigade had arrived at Matruh. By the 21 January the 2nd Battalion under Lieutenant Colonel Tanner had arrived and General Wallace decided to move with those forces available to destroy the camp.
The force again divided into a number of Columns, the Right Column under Lieutenant Colonel Gordon with;
• Duke and Lancaster’s Own Yeomanry (one Squadron),
• Nottinghamshire Battery RHA,
• 15th Sikhs,
• 2nd South African Battalion,
• 1st Battalion New Zealand Rifle Brigade, and
• 137th Indian Field Ambulance
The Left Column under General Biscoe with;
• 1/1st Buckinghamshire Yeomanry Regiment (three squadrons),
• Composite Yeomanry Regiment (Hertfordshire and Dorsetshire Squadrons) with “A” Squadron Composite Light Horse Regiment,
• Yeomanry Machine gun Section,
• “A” Battery Honourable Artillery Company (less one section at El Daaba), and
• 1st South Midland Field Ambulance
Reserve Column of General Wallace’s Head Quarters with;
• Australian Signal Section Composite Light Horse Regiment,
• Surrey Yeomanry Squadron (two Troops),
• 1/6th Royal Scots (two companies A and B), and
• A detachment of Royal Navy Armoured cars
Baggage escort of;
• 2/8th Middlesex (two companies), and
• Composite Australian Army Service Corps under Captain Chester Reynolds
The force left Matruh at 4 pm on the morning of 22 January and moved to Bir Shola where they camped and spent a chilly night sleeping on the wet ground awaiting all columns to concentrate.
At 6 am on the 23 January both the Right and Left Columns moved to Halazin followed by the reserve Column while the baggage train remaining at Bir Shola, the Right Column advanced covered by the cavalry of Left Column with “A” Squadron acting as the advance guard. Around 8.25 am the Senussi forward posts were found and “A” Squadron moved to engaged them, when the fighting became intense General Wallace ordered a squadron of the Buckinghamshire yeomanry with “A” Battery Honourable Artillery Company forward as support while the Infantry of the Right Column were dispatched around 10 am to take over the advance from the Cavalry.
The 15th Sikhs led the advance supported by the 2nd South African Battalion and the 1st New Zealand Rifles, while the Light Horse and Yeomanry of the Left Column now relieved by the infantry moved to the Senussi right flank to protect the Infantry and to out flank the defences. The guns of the Nottinghamshire Battery covered the Infantry advance as the tribesman retired in front of the Right Column until the Senussi arrived at Halazin and took up prepared positions in the shape of a semi circle and waited the British attack having drawn them into a trap.
At 11.45 am as the 15th Sikhs closed on the main entrenchments two companies of the 2nd South African Battalion with their new Lewis machine guns were moved to support the exposed right flank of the Sikhs as the Senussi now appeared in force on the Sikhs right. At around the same time large forces of the Senussi were seen moving onto our left flank to engage the cavalry of the Left Column.
The Senussi now pressed their attack against the 2nd South African Battalion’s right flank and a company of the New Zealand Rifles with their Machine Gun section was sent to the enemies left to take them under fire, this stopped that attack however the Senussi again sent forces to there right outflanking the New Zealanders, forcing the commitment of a company of the Royal Scots under Major Adams from the reserve to counter that threat losing one killed and five wounded.
Mean while the large Senussi forces on our left slowed any advance by the leading Squadrons of the Buckinghamshire Yeomanry Regiment as the Senussi pressed their attack around 1.30 pm when the yeomanry were forced under pressure to retire. “A” Squadron under Captain Hudson was to the rear supporting two Squadrons of the Buckinghamshire yeomanry were also forced to cover the retiring Yeomanry under heavy Senussi fire.
As the yeomanry fell back through the Light Horse “A” Squadron found itself in the front rank and soon had to conform with the Yeomanry and to conduct a fighting withdrawal Troop by Troop as the Senussi fire increased in strength and parties tried to out flank the Light Horse line, Sergeant Albert Maxwell “A” Troop was shot in the knee, and both Trooper Thomas Bushby and Trooper Albert Wyatt from “C” Troop were shot in the thigh during this intense fighting.
To its rear “A” Squadron was supported by the Dorsetshire Squadron and “A” Battery Honourable Artillery Company which provided artillery support to the infantry, and on the approach of the Senussi one gun had to pivot to the left to engage them, still the Senussi pushed on in overwhelming strength as all the cavalry retired back as far as the Reserve Column and the Head Quarters of General Wallace.
To restore the situation half of “A” and “D” companies of the New Zealand Rifles under Major Kay were ordered with the remaining Squadron of the Buckinghamshire yeomanry to move to their rear to support the cavalry and protect General Wallace’s Head Quarters. This attack on the left flank of the Senussi checked them for a while allowing the cavalry to reform and sort them selves out while “B” company under Captain Puttick soon arrived to assist. Signaller Percy Nance of the Australian Signal Section Composite Light Horse Regiment with General Wallace’s Head Quarters manned his post under heavy Senussi fire relaying messages as the action flowed around him.
The battle now took on the surreal as the 15th Sikhs were still advancing onto the Senussi entrenchments while the British left and right flanks were being turned or beaten back by the Senussi.
At 2.45 pm the 15th Sikhs supported by the South Africans and New Zealanders over ran the Senussi trenches forcing the tribesman to escape in all directions abandoning all their equipment and stores in the camp. This also led to the pressure on both flanks suddenly disappearing as the Senussi departed the battlefield at high speed, however the worn out cavalry forces of the Left Column were to exhausted for any vigorous pursuit of the fleeing Senussi and along with the Armoured Cars who were stuck in the mud with many of the horses worn out from the sticky mud and hard fighting the battle closed around 4.30 pm.
The cost of the battle were given as 312 men with one officer (Captain Walsh) and 20 men killed and 13 officers and 278 men wounded, of whom the South Africans lost one officer (Captain JD Walsh) and 7 men killed with four officers and 102 men wounded of whom one officer (Lieutenant WG Strannock) and two men died of wounds while the New Zealanders lost one man killed and two officers and 30 other ranks wounded. The British believed Senussi losses were 200 killed and 500 wounded only the British again failed to finish the Senussi off as the majority escaped to reform again.
After the battle the column was too fatigued to move and with the ambulances and supply wagons stuck in the mud and unable to join them until morning as the Columns spent another cold wet night on the battlefield with neither blankets or greatcoats, recovering all the wounded and burning the encampment and looting what ever could be found.
On the morning of the 24 January the Senussi showed no sign of continuing the battle and at 8.30 am the force moved back to Bir Shola and the limited comfort of the baggage train, as the ground turned to mire. The weather cleared on the 25 January and the force retired to Matruh, it was said in good spirits with 25 train wagons and 20 other vehicles of the Composite Australian Army Service Corps or the artillery limbers carting the suffering wounded and the dead.
Once at Matruh all the remaining Composite Forces were finally broken up and returned to there units, this included “A” Squadron and the Composite Australian Army Service Corps who left Matruh around the 30 January and returned to Alexandria on the 5 February. With large forces now available in Egypt these were now being sent into the desert for a second offensive against the Senussi and replaced all the composite Yeomanry units with fresh veteran units of the 2nd Mounted Yeomanry Brigade, General Wallace was relieved due to physical strain and General W.E. Peyton arrived to command the advance on Sollum.
Finally on the 9 February “A” Squadron was disbanded and the Composite Australian Light Horse Regiment disappeared into history. However the 1st Light Horse Brigade continued operations as part of the Western Frontier Force covering Baharia Oasis until the 11 May 1916 when the Brigade was redeployed to the Suez front.
What value could be said about the Composite Australian Light Horse Regiment and all the Composite forces in the Western desert at that time? The forces were themselves no more then a stop gap until regular Troops could be released and the job they were given was to stop Senussi expansion into Egypt and protect Matruh. This they did even if they were unsuited to the mission they were given with almost all the Mounted composite units being drawn from poorly trained reinforcements. Added to the problems of the Troops was the weather which was the worst for some time and large rain falls over the area of operations was something never expected in the desert, that with the surprising ability of the Senussi to reform their ranks and fight was a lesson to the British Generals who believed all they had to do was show the colours and the tribesman would run away.
It was said by the British Command in their official report that “Had the standard of training and the experience of the whole column been equal to those of the 15th Sikhs, the Senussi might have been heavily defeated”. Of all the units that saw action in the Western desert between December 1915 and January 1916 the 15th Sikhs was the most experienced having fought in France while no other British unit had as yet seen action.
However the Composite Australian Light Horse Regiment never received the recognition it deserved for its work in the western desert as the Senussi campaign took place between the great battles at Gallipoli and the later Light Horse victories in the Sinai desert, even Gullett’s History of the AIF in Sinai and Palestine Volume VII The Official History of Australia in the War of 1914-1918 has no mention of the Composite Light Horse Regiment only these few words on page 50,
“Meanwhile on the 23 January a composite British force including Indians, New Zealanders, South Africans and Australians, had captured and burned the Senussi camp at a point 25 miles west of Mersa Matruh, and so eased British anxiety about the Egyptian western desert.”
There is an excellent description of this campaign in CEW Bean’s History of the AIF in France 1916 Volume 111 Annex 1 the Official History of Australia in the War of 1914-1918.
Nevertheless the Composite Australian Light Horse Regiment was the first mounted force used by Australia in the Great War and fought Australia’s first cavalry actions of that war and this experience would later served the men well in the great victories ahead.
Three men are known to be awarded decorations with the Regiment during its actions in the Western desert they are, Sergeant Albert Maxwell awarded the Italian Bronze Medal while Major Dudley Pelham Commanding Officer and Signaller Percy Nance received a Mention in Dispatches.
These are the major appointments to the 1st Composite Australian Light Horse Regiment;
RHQ (54 men)
Dudley Roger Hugh Pelham 10th Hussars Maj to T/LtCol CO
Thomas Joseph Daly 9 LHR Maj 2ic
Henry Norman Forbes 5th Lancers Lt Adjt
Gerald Eugene Macdonald Stuart 3 LHFA Capt RMO
Nicholas O'Brien 15Bn Lt Sig/officer
Alfred Watt 8 LHR Lt QM
William Archibald Moore 3 LH Bde HQ Capt Chaplain (CofE)
William Devine AACD Capt Chaplain (RC)
Harry Worthington 9 LHR Capt Vet Officer
John Frederick William McDonald 9 LHR A/Sgt to RSM *reduced to Sgt/TSSM 12th Dec 1915 to B Sqn ** replaced by SSM Bowden
Albert Edward Dyos 5 LHR RQMS
George Bailey Fletcher 9 LHR Farrier QMS
Frank George Lawrence 9 LHR Saddler Sgt
Patrick John Malone 8 LHR Transport Sgt
Leonard Lewis Scorer 3 LH Sig Troop Signal Sgt
Joseph Clegg RASC Armourer Sgt
SHQ A Sqn (20 men)
Ernest Alfred Knight Hudson 1 LHR Capt OC A Sqn
Graham Wallas 1 LHR A/Sgt to SSM A Sqn
Herbert Victor Trickett 1 LHR Pte to SQMS A Sqn
Robert William Cooper 8 LHR S/Smith Cpl to Farrier Sgt A Sqn
A Troop A Sqn (35 men) (based on 10R/1 LHR)
Frank Noel Snow 1 LHR 2/Lt A Troop Officer A Sqn
Albert Maxwell 1 LHR Pte A Troop Sgt A Sqn
B Troop A Sqn (30 men) (based on 11R/2 LHR)
George Taylor Pledge 2 LHR 2/Lt B Troop Officer A Sqn
Robert Dingwell Butters 2 LHR Pte B Troop Sgt A Sqn
C Troop A Sqn (40 men) (based on 9R and 11R/1 LHR)
Harold Ireland Johnson 7 LHR 2/Lt C Troop Officer A Sqn
William Harrington Cowper 1 LHR Pte C Troop Sgt A Sqn
D Troop A Sqn (31 men) (based on 9R/1 LHR)
Alan Pearse 6 LHR 2/Lt D Troop Officer A Sqn *Lt Yaldwyn to B Sqn
Charles Seton Logan 1 LHR Pte D Troop Sgt A Sqn
SHQ B Sqn (16 men)
Fulke Prideaux-Brune 1 LHR Capt OC B Sqn
Arthur Henry Bowden 7 LHR Pte to SSM B Sqn * to RSM 12 Dec 1915 ** replaced by T/SSM McDonald
Arthur Wyatt Miles Thompson 10 LHR A/Sgt to SQMS B Sqn
James Rusher Campbell FQMS 9 LHR Far/Sgt to Farrier QMS B Sqn
A troop B Sqn (38 men) (based 9R/10 LHR)
Albert Hopkins 10 LHR 2/Lt A Troop Officer B Sqn *FGCM drunkenness 8 Dec 1915 (who replaced him unknown)
John Graham Sandilands 10 LHR A/Cpl A Troop Sgt B Sqn *to hosp Dec 1915.
Eric Alexander Miller 10 LHR A/Cpl A Troop Sgt B Sqn
B Troop B Sqn (40 men) (mixed 2, 4, 6 and 10 LHR's)
Warren Clive Palmer 2/Lt 10 LHR B Troop Officer B Sqn *Lt Pearse to A Sqn
Horace Andrew Forward 10 LHR Pte B Troop Sgt B Sqn *to hosp Dec 1915
Edward O'Keefe 9 LHR Cpl B Troop Sgt B Sqn
C Troop B Sqn (30 men) (based 9R/5 LHR)
John Norman Land 5 LHR 2/Lt C Troop Officer B Sqn
Walter John James Bloomfield 8 LHR A/Sgt C Troop Sgt B Sqn
D Troop B Sqn (37 men) (based on 11R/5 LHR)
Hamilton Yaldwyn 5 LHR 2/Lt D Troop Officer B Sqn *changed from A Sqn **FGCM drunkenness 8 Dec 1915 who replaced him unknown.
Denis Vincent Hannay 5 LHR Lt D Troop Officer B Sqn *possible to 2ic B Sqn
Charles Hugh Lyon 8 LHR Sgt D Troop Sgt B Sqn
Ewen Gore Stewart 5 LHR A/Sgt D Troop Sgt B Sqn
SHQ C Sqn (16 men)
John Hutton Bisdee VC Hon/Maj 12 LHR to Capt OC C Sqn
Michael William Cowell 8 LHR Sgt to SSM C Sqn
Norman George Burnett 11 LHR Pte to SQMS C Sqn
James Arthur Brocos Phillip 10 LHR Far/Sgt to Farrier Sgt C Sqn
A Troop C Sqn (32 men) (based on 4R/11 LHR)
Aubrey Sydney Nobbs 11 LHR 2/Lt A Troop Officer C Sqn
Thomas Norman Johnson 11 LHR Pte A Troop Sgt C Sqn
Duncan McIntrye 11 LHR Sgt A Troop Sgt C Sqn
B Troop C Sqn (30 men) (based on 4R and 5R/12 LHR)
William Beck 12 LHR Lt B Troop Officer C Sqn
Alfred John Finlayson Bugler 12 LHR B Troop Sgt C Sqn
C Troop C Sqn (36 men) (based on 2R/13 LHR)
John Crisop Morris 13 LHR 2/Lt C Troop Officer C Sqn
William George Sydney Holland 13 LHR A/Cpl C Troop Sgt C Sqn *to hosp Dec 1915
William David Tollens 13 LHR A/Sgt C Troop Sgt C Sqn
D troop C Sqn (38 men) (based on 5R/13 LHR)
Arthur Ernest Constable Lord 13 LHR 2/Lt D Troop Officer C Sqn
Albert James Gibson 13 LHR Pte D Troop Sgt C Sqn *to hosp Dec 1915
Silverton Silas Claude Payne 13 LHR A/Sgt D Troop Sgt C Sqn
Sources both Official and Non Official
British Official History of the War Military Operations in Egypt and Palestine Aug 1914 to June 1917 by LtGen Sir George MacMunn and Capt Cyril Falls,
History of the AIF in Sinai and Palestine, Volume VII, the Official History of Australia in the War of 1914-1918 by HS Gullett,
History of the AIF in France 1916 Volume 111 Annex 1 the Official History of Australia in the War of 1914-1918 by CEW Bean,
Supplement to the London Gazette 21 June 1916 Operations on the Western Front to 31 January 1916 by General Maxwell,
History of the Berkshire Yeomanry Regiment,
The Campaigns in Palestine by General Morshead,
Nominal Roll book 129 of Composite Light Horse Regiment Field Returns B213 – 7-1-16, 26-1-16 and 24-3-16,
History of the Operations of the 1st Div Train AWM 16 4360-3-1 (unpublished)
History of the 3rd LHFA by Capt Gerald Eugene Macdonald Stuart (unpublished),
History of the South African Forces in France,
History of the 6th Bn Royal Scots,
History of the New Zealand Rifle Brigade by Austin,
Equal to the Task History of the RAASC by Fairclough,
With Our Army in Palestine by Anthony Bluett
Personal Diary of Sapper Charles William Jamieson 3rd LH Sig Troop (unpublished),
Personal account by Lt Heath Surrey Yeomanry,
Personal letter by Jack McGlade (unpublished),
Personal diary of Dvr S. Stevenson (unpublished), and
Personal diary of WJ Darmody 1 Div Train (unpublished)
Acknowledgement:
By kind permission of Steve Becker, below is an account of the Australian Composite Regiment which fought in the western desert of Egypt as part of the little known campaign against the Senussi and their uprising in late 1915.
Further Reading:
Western Frontier Force, Egypt, 1915 - 1916
Battles where Australians fought, 1899-1920
