« January 2010 »
S M T W T F S
1 2
3 4 5 6 7 8 9
10 11 12 13 14 15 16
17 18 19 20 21 22 23
24 25 26 27 28 29 30
31
You are not logged in. Log in


Search the site:


powered by FreeFind
Volunteer with us.

Entries by Topic All topics  
A Latest Site News
A - Using the Site
AAA Volunteers
AAB-Education Centre
AAC-Film Clips
AAC-Photo Albums
AIF & MEF & EEF
AIF - Lighthorse
AIF - ALH - A to Z
AIF - DMC
AIF - DMC - Or Bat
AIF - DMC - Anzac MD
AIF - DMC - Aus MD
AIF - DMC - British
AIF - DMC - BWI
AIF - DMC - French
AIF - DMC - Indian
AIF - DMC - Italian
AIF - DMC - Medical
AIF - DMC - Remounts
AIF - DMC - Scouts
AIF - DMC - Sigs
AIF - DMC - Sigs AirlnS
AIF - DMC - 1 Sig Sqn
AIF - DMC - 2 Sig Sqn
AIF - DMC - Eng
AIF - DMC - Eng 1FSE
AIF - DMC - Eng 2FSE
AIF - DMC - GSR
AIF - 1B - 1 LHB
AIF - 1B - 6 MVS
AIF - 1B - 1 LHMGS
AIF - 1B - 1 Sig Trp
AIF - 1B - 1 LHFA
AIF - 1B - 1 LHR
AIF - 1B - 2 LHR
AIF - 1B - 3 LHR
AIF - 2B - 2 LHB
AIF - 2B - 7 MVS
AIF - 2B - 2 LHFA
AIF - 2B - 2 LHMGS
AIF - 2B - 2 Sig Trp
AIF - 2B - 5 LHR
AIF - 2B - 6 LHR
AIF - 2B - 7 LHR
AIF - 3B - 3 LHB
AIF - 3B - 8 MVS
AIF - 3B - 3 LHB Sigs
AIF - 3B - 3 LHFA
AIF - 3B - 3 LHMGS
AIF - 3B - 3 Sig Trp
AIF - 3B - 8 LHR
AIF - 3B - 9 LHR
AIF - 3B - 10 LHR
AIF - 4B - 4 LHB
AIF - 4B - 4 Sig Trp
AIF - 4B - 9 MVS
AIF - 4B - 4 LHFA
AIF - 4B - 4 LHMGS
AIF - 4B - 4 LHR
AIF - 4B - 11 LHR
AIF - 4B - 12 LHR
AIF - 5B - 5 LHB
AIF - 5B - 10 MVS
AIF - 5B - 5 LHFA
AIF - 5B - 5 Sig Trp
AIF - 5B - ICC
AIF - 5B - 14 LHR
AIF - 5B - 15 LHR
AIF - 5B - 1er Regt
AIF - 5B - 2 NZMGS
AIF - AASC
AIF - Aboriginal LH
AIF - Badges
AIF - Cars
AIF - Chinese LH
AIF - Double Sqns
AIF - Engineers
AIF - Fr - 22 Corps
AIF - Fr - 13 LHR
AIF - Honour Roll
AIF - HQ - 3rd Echelon
AIF - Marching Songs
AIF - Misc Topics
AIF - NZMRB
AIF - NZMRB - AMR
AIF - NZMRB - CMR
AIF - NZMRB - EFT
AIF - NZMRB - NZMFA
AIF - NZMRB - NZMGS
AIF - NZMRB - OMR
AIF - NZMRB - Sig-Trp
AIF - NZMRB - WMR
AIF - Ships
AIF - Ships - Encountr
AIF - Ships - Una
AIF - WFF
AIF - Wireless Sqn
Battles
BatzA - Australia
BatzA - Broken Hill
BatzA - Liverpool
BatzA - Merivale
BatzB - Boer War
BatzB - Bakenlaagte
BatzB - Belmont
BatzB - Bothaville
BatzB - Buffels Hoek
BatzB - Coetzees Drift
BatzB - Diamond Hill
BatzB - Driefontein
BatzB - Elands
BatzB - Graspan
BatzB - Grobelaar
BatzB - Grootvallier
BatzB - Hartebestfontn
BatzB - Houtnek
BatzB - Karee Siding
BatzB - Kimberley
BatzB - Koster River
BatzB - Leeuw Kop
BatzB - Mafeking
BatzB - Magersfontein
BatzB - Modder River
BatzB - Onverwacht
BatzB - Paardeberg
BatzB - Palmietfontein
BatzB - Pink Hill
BatzB - Poplar Grove
BatzB - Rhenoster
BatzB - Sannahs Post
BatzB - Slingersfontn
BatzB - Stinkhoutbm
BatzB - Sunnyside
BatzB - Wilmansrust
BatzB - Wolvekuil
BatzB - Zand River
BatzG - Gallipoli
BatzG - Anzac
BatzG - Aug 1915
BatzG - Baby 700
BatzG - Evacuation
BatzG - Hill 60
BatzG - Hill 971
BatzG - Krithia
BatzG - Lone Pine
BatzG - Nek
BatzJ - Jordan Valley
BatzJ - 1st Amman
BatzJ - 2nd Amman
BatzJ - Abu Tellul
BatzJ - Es Salt
BatzJ - JV Maps
BatzJ - Ziza
BatzM - Mespot
BatzM - Baghdad
BatzM - Ctesiphon
BatzM - Daur
BatzM - Kurna
BatzM - Kut el Amara
BatzM - Ramadi
BatzN - Naval
BatzN - AE1
BatzN - Cocos Is
BatzN - Heligoland
BatzN - Marmara
BatzN - Zeebrugge
BatzN - Zeppelin L43
BatzNG - Bitapaka
BatzO - Other
BatzO - Baku
BatzO - Egypt 1919
BatzO - Emptsa
BatzO - Karawaran
BatzO - Peitang
BatzO - Wassa
BatzP - Palestine
BatzP - 1st Gaza
BatzP - 2nd Gaza
BatzP - 3rd Gaza
BatzP - Aleppo
BatzP - Amwas
BatzP - Ayun Kara
BatzP - Bald Hill
BatzP - Balin
BatzP - Beersheba
BatzP - Berkusieh
BatzP - Damascus
BatzP - El Auja
BatzP - El Buggar
BatzP - El Burj
BatzP - Haifa
BatzP - Huj
BatzP - JB Yakub
BatzP - Kaukab
BatzP - Khan Kusseir
BatzP - Khuweilfe
BatzP - Kuneitra
BatzP - Megiddo
BatzP - Nablus
BatzP - Rafa
BatzP - Sasa
BatzP - Semakh
BatzP - Sheria
BatzP - Surafend
BatzP - Wadi Fara
BatzS - Sinai
BatzS - Bir el Abd
BatzS - El Arish
BatzS - El Mazar
BatzS - El Qatiya
BatzS - Jifjafa
BatzS - Magdhaba
BatzS - Maghara
BatzS - Romani
BatzS - Suez 1915
BatzSe - Senussi
BatzWF - Westn Front
BW - Boer War
BW - NSW
BW - NSW - 1ACH
BW - NSW - 1NSWMR
BW - NSW - 2NSWMR
BW - NSW - 3ACH
BW - NSW - 3NSWIB
BW - NSW - 3NSWMR
BW - NSW - 5ACH
BW - NSW - A Bty RAA
BW - NSW - AAMC
BW - NSW - Aust H
BW - NSW - Lancers
BW - NSW - NSW Inf
BW - NSW - NSWCBC
BW - NSW - NSWIB
BW - NSW - NSWMR_A
BW - NZ
BW - Qld
BW - Qld - 1ACH
BW - Qld - 1QMI
BW - Qld - 2QMI
BW - Qld - 3ACH
BW - Qld - 3QMI
BW - Qld - 4QIB
BW - Qld - 5QIB
BW - Qld - 6QIB
BW - Qld - 7ACH
BW - QLD - AAMC
BW - SA
BW - SA - 1SAMR
BW - SA - 2ACH
BW - SA - 2SAMR
BW - SA - 3SACB
BW - SA - 4ACH
BW - SA - 4SAIB
BW - SA - 5SAIB
BW - SA - 6SAIB
BW - SA - 8ACH
BW - SA - AAMC
BW - Tas
BW - Tas - 1ACH
BW - Tas - 1TIB
BW - Tas - 1TMI
BW - Tas - 2TB
BW - Tas - 2TIB
BW - Tas - 3ACH
BW - Tas - 8ACH
BW - Vic
BW - Vic - 1VMI
BW - Vic - 2ACH
BW - Vic - 2VMR
BW - Vic - 3VB
BW - Vic - 4ACH
BW - Vic - 4VIB
BW - Vic - 5VMR
BW - Vic - 6ACH
BW - Vic - AAMC
BW - Vic - Scot H
BW - WA
BW - WA - 1WAMI
BW - WA - 2ACH
BW - WA - 2WAMI
BW - WA - 3WAB
BW - WA - 4ACH
BW - WA - 4WAMI
BW - WA - 5WAMI
BW - WA - 6WAMI
BW - WA - 8ACH
BW Gen - Campaign
BW Gen - Soldiers
BW General
Cavalry - General
Diary - Schramm
Egypt - Heliopolis
Egypt - Mena
Gen - Ataturk Pk, CNB
Gen - Australia
Gen - Legends
Gen - Query Club
Gen - St - NSW
Gen - St - Qld
Gen - St - SA
Gen - St - Tas
Gen - St - Vic
Gen - St - WA
Gm - German Items
Gm - Bk - 605 MGC
GW - 11 Nov 1918
GW - Atrocities
GW - August 1914
GW - Biographies
GW - Propaganda
GW - Spies
GW - We forgot
Militia 1899-1920
Militia - Area Officers
Militia - Inf - Infantry
Militia - Inf - 1IB
Militia - Inf - 2IB
Militia - Inf - 3IB
Militia - Inf - NSW
Militia - Inf - Qld
Militia - Inf - SA
Militia - Inf - Tas
Militia - Inf - Vic
Militia - Inf - WA
Militia - K.E.Horse
Militia - LH
Militia - LH - Regts
Militia - LH - 1LHB
Militia - LH - 2LHB
Militia - LH - 3LHB
Militia - LH - 4LHB
Militia - LH - 5LHB
Militia - LH - 6LHB
Militia - LHN - NSW
Militia - LHN - 1/7/1
Militia - LHN - 2/9/6
Militia - LHN - 3/11/7
Militia - LHN - 4/6/16
Militia - LHN - 5/4/15
Militia - LHN - 6/5/12
Militia - LHN - 28
Militia - LHQ - Qld
Militia - LHQ - 13/2
Militia - LHQ - 14/3/11
Militia - LHQ - 15/1/5
Militia - LHQ - 27/14
Militia - LHS - SA
Militia - LHS - 16/22/3
Militia - LHS - 17/23/18
Militia - LHS - 24/9
Militia - LHT - Tas
Militia - LHT - 12/26
Militia - LHV - Vic
Militia - LHV - 7/15/20
Militia - LHV - 8/16/8
Militia - LHV - 9/19
Militia - LHV - 10/13
Militia - LHV - 11/20/4
Militia - LHV - 19/17
Militia - LHV - 29
Militia - LHW - WA
Militia - LHW-18/25/10
Militia - Military Orders
Militia - Misc
MilitiaRC - Rifle Clubs
MilitiaRC - NSW
MilitiaRC - NT
MilitiaRC - Qld
MilitiaRC - SA
MilitiaRC - Tas
MilitiaRC - Vic
MilitiaRC - WA
Militiaz - New Zealand
Tk - Turkish Items
Tk - Army
Tk - Bks - Books
Tk - Bks - 1/33IR
Tk - Bks - 27th IR
Tk - Bks - Air Force
Tk - Bks - Yildirim
Tk - POWs
Wp - Weapons
Wp - Hotchkiss Cav
Wp - Hotchkiss PMG
Blog Tools
Edit your Blog
Build a Blog
RSS Feed
View Profile
Open Community
Post to this Blog
Site Index
Education Centre
LH Militia
Boer War
Transport Ships
LH Battles
ALH - Units
ALH - General
Aboriginal Light H
Weapons
Ottoman Sources

"At a mile distant their thousand hooves were stuttering thunder, coming at a rate that frightened a man - they were an awe inspiring sight, galloping through the red haze - knee to knee and horse to horse - the dying sun glinting on bayonet points..." Trooper Ion Idriess

The Australian Light Horse Studies Centre aims to present an accurate history as chroniclers of early Australian military developments from 1899 to 1920.

The Australian Light Horse Studies Centre site holds over 12,000 entries and is growing daily.

Contact: Australian Light Horse Studies Centre

Let us hear your story: You can tell your story, make a comment or ask for help on our Australian Light Horse Studies Centre Forum called:

Desert Column Forum

WARNING: This site contains: names, information and images of deceased people; and, language which may be considered inappropriate today.

Tuesday, 19 January 2010
The Battle of Anzac Cove, Gallipoli, 25 April 1915, 10th Infantry Battalion War Diary
Topic: BatzG - Anzac

The Battle of Anzac Cove

Gallipoli, 25 April 1915

10th Infantry Battalion War Diary 


War Diary account of the 10th Infantry Battalion, AIF.


The following is a transcription of the War Diary of the 10th Infantry Battalion, AIF, of their role in the landings at Anzac on 25 April 1915.
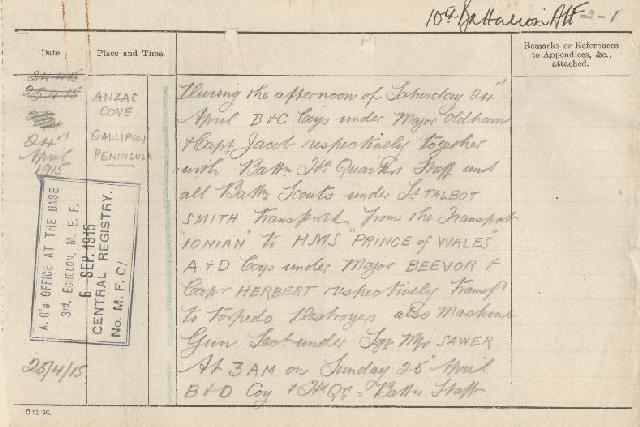
 

24 April 1915

During the afternoon of Saturday 24th April, "B" and "C" Companies under Major Oldham and Captain Jacob respectively together with Battalion Headquarters Staff and all Battalion Scouts under Lieutenant Talbot Smith transferred from the Transport Ionian to HMS Prince of Wales. "A" and "D" Companies under Major Beevor and Captain Herbert respectively transferred to torpedo destroyers, also Machine Gun Section under Sergeant Major Sawer.


25 April 1915

At 3 am on Sunday 25th April "B" and "D" Companies and Headquarters Battalion Staff, Signallers and Scouts left the Prince of Wales in cutters, life boats etc being towed to within 50 yards of shore by steam boats. Absolute silence was maintained by all in our boats and directly the boats were cast off by the steamers we quietly rowed towards the shore dawn was just breaking 4.15 and no sound was heard except the splash of oars, we thought that our landing was to be effected quite unopposed, but when our boats were within about 30 yards of the beach, a rifle was fired from the hill in front of us above the beach, right in front of where we were heading for, almost immediately heavy rifle and machine gun fire was opened upon us, we had to row for another 15 yards or so before we reached water shallow enough to get out of boats, this was at about 4.15 am - we got out of boats into about 3 feet of water and landed on a stony bottom the stones were round and slimy and man officers and men slipped on them and fell into the water, but all bravely and silently made all haste to reach the beach, under a perfect hail of bullets, many men fixed their bayonets before reaching the shore. I ordered men to lay down, fix bayonets and remove packs this was done in a couple of minutes the men of 9th 10th and 11th Battalion were all mixed up on the beach, but there was no time to reorganise so I ordered all to advance, the men sprang to their feet at once and with a cheer charged up the hill held by the Turks and drove them off it. Following up their success by firing on the quickly retreating foe. Shortly after this the two Companies, "A" and "B" off the Torpedo Destroyers reached the beach, they were subjected to heavy shrapnel and machine gun fire, these companies pushed on quickly and soon joined up in a general advance.

By about 8.30 we were about a mile inland and were holding big hill and ridge in front of it, we then pushed on to Shrapnel Hill and I reported to the Brigadier Colonel MacLagan, he was anxious for us to push on to the next ridge but as the enemy just then developed a strong counter attack he decided that we should "dig in” on the forward slope of Shrapnel Ridge. The Battalion Headquarters did our best to reorganise the companies in the following order "D" Company on left, "C" next facing same direction and portions of "A" and "B" farther around to south and in advance of section of defence held by 1st Brigade. The line held at this time was the forward edge of Plateau Wheatfield now known as the Pimple.

A section of defence from about 100 yards west of head of Shrapnel Gully to 50 yards east, thence about 100 yards south east was reorganised and orders issued to "dig in for all you are worth!" At this time - men of all Battalions in Brigade being mixed up - "D" Company was on the left - "C" Company Centre, "A" and "B" on right - our machine gun section was in the firing line in a position which enfiladed the Gully. Two officers and about 10 men of 11th Battalion one officer and about 15 men of Canterbury Rifles New Zealand were in our lines. The position taken up was consolidated and strengthened as much as possible and was held by us until relieved by Marine Division on Wednesday night, 28th April. In order to give confidence and support to Marines I remained in support just in rear of Shrapnel Ridge at the head of Shrapnel Gully and only withdrew at 8.30 am on Thursday, 29th April.

On Sunday afternoon 25th April we repelled two counter attacks made by the enemy one of these attacks was made at about 4 and the second at about 5, both attacks were made in considerable force, minor attacks were made during Sunday night and on Monday morning following a heavy bombardment by enemy's artillery.

On Tuesday morning 27th April am attack was made by a force of dismounted cavalry, on our right front. The cavalry came forward and dismounted, then without covering fire, charged dismounted. This attack was carried forward to within 500 yards of our trenches, when our fire was opened upon them, after a number of casualties on their side they retreated at the double.

At 7.30 pm on Tuesday an attack was again made, but the attacking force appeared to lose direction. When the attackers got within 200 yards of our position, they moved obliquely across our front under our heavy fire, they suffered considerable losses and retired in great disorder.

During the whole of these four anxious days the Headquarters of the Battalion was in close touch with all the Companies and kept them well supplied with ammunition, food and water in the connection the Headquarters Signallers did excellent work. Battalion Headquarters was dug in, in centre of our section of defence at head of Shrapnel Gully.


29 April 1915

Our men were thoroughly exhausted and their nerves shattered after 96 hours continuous fighting in the trenches with little or no sleep, the dreadful anxiety of not knowing how the battle was progressing, especially on our left, every night just before dark the enemy shelled our trenches and fired heavy bursts of rifle fire at our trenches which gave us the impression that they intended to rush our position , at no time during the 96 hours did their firing cease, although it raised in volume at times the fusillade was simply deafening but fortunately it did little damage for our men by this time were well dug in. The enemy on several occasions threatened to make a bayonet charge but our rifle and machine gun fire evidently prevented them from doing so. Our men behaved themselves splendidly.


War Diaries

All War Diaries cited on this site should be read in conjunction with the Australian Light Horse Studies Centre, AIF War Diaries of the Great War, Site Transcription Policy which may be accessed at:

Australian Light Horse Studies Centre, AIF War Diaries of the Great War, Site Transcription Policy 


Further Reading:

The Battle of Anzac Cove, Gallipoli, 25 April 1915

The Battle of Anzac Cove, Gallipoli, 25 April 1915, 10th Infantry Battalion, Roll of Honour 

The Battle of Anzac Cove, Gallipoli, 25 April 1915, 3rd Infantry Brigade, Roll of Honour 

The Battle of Anzac Cove, Gallipoli, 25 April 1915, AIF, Roll of Honour 

Battles where Australians fought, 1899-1920


Citation: The Battle of Anzac Cove, Gallipoli, 25 April 1915, 10th Infantry Battalion War Diary

Posted by Project Leader at 12:01 AM EAST
Updated: Sunday, 11 April 2010 12:44 PM EADT

View Latest Entries

Full Site Index


powered by FreeFind
Let us hear your story: You can tell your story, make a comment or ask for help on our forum.

Desert Column Forum

A note on copyright

The Australian Light Horse Studies Centre is a not for profit and non profit group whose sole aim is to write the early history of the Australian Light Horse from 1900 - 1920. It is privately funded and the information is provided by the individuals within the group and while permission for the use of the material has been given for this site for these items by various donors, the residual and actual copyright for these items, should there be any, resides exclusively with the donors. The information on this site is freely available for private research use only and if used as such, should be appropriately acknowledged. To assist in this process, each item has a citation attached at the bottom for referencing purposes.

Please Note: No express or implied permission is given for commercial use of the information contained within this site.

A note to copyright holders

The Australian Light Horse Studies Centre has made every endeavour to contact copyright holders of material digitised for this blog and website and where appropriate, permission is still being sought for these items. Where replies were not received, or where the copyright owner has not been able to be traced, or where the permission is still being sought, the Australian Light Horse Studies Centre has decided, in good faith, to proceed with digitisation and publication. Australian Light Horse Studies Centre would be happy to hear from copyright owners at any time to discuss usage of this item.

Contact

Australian Light Horse Studies Centre

eXTReMe Tracker