"At a mile distant their thousand hooves were stuttering thunder, coming at a rate that frightened a man - they were an awe inspiring sight, galloping through the red haze - knee to knee and horse to horse - the dying sun glinting on bayonet points..." Trooper Ion Idriess
The Australian Light Horse Studies Centre aims to present an accurate history as chroniclers of early Australian military developments from 1899 to 1920.
The Australian Light Horse Studies Centre site holds over 12,000 entries and is growing daily.
Contact:Australian Light Horse Studies CentreLet us hear your story:
You can tell your story, make a comment or ask for help on our Australian Light Horse Studies Centre Forum called:
The Battle of Anzac Cove, Gallipoli, 25 April 1915, Turkish Official War History Account Topic: BatzG - Anzac
The Battle of Anzac Cove
Gallipoli, 25 April 1915
Turkish Official War History Account
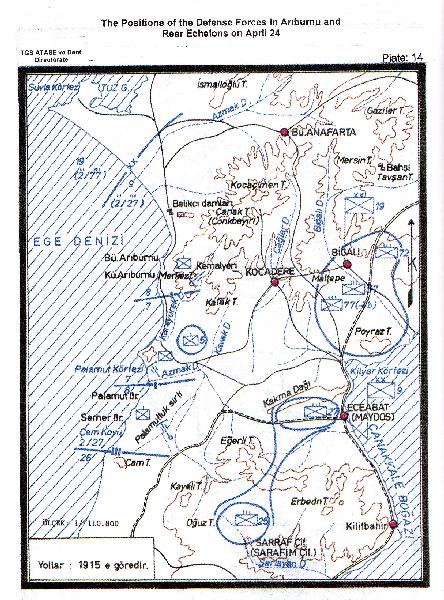
Plate 14.
[Click on plate for larger version.]
In 2004, the The Turkish General Staff Directorate of Military History and Strategic Studiesand Directorate of Inspection Publications in Ankara published a ground breaking text on the Gallipoli campaign. This was the first time the story could be told for an English speaking audience from a Turkish point of view. The book was called A BRIEF HISTORY OF THE ÇANAKKALE CAMPAIGN IN THE FIRST WORLD WAR, JUNE 1914 - JANUARY 1916). The account is structured to appeal to a Turkish audience as it is a conflated and modest translation of the Three Volume Turkish language version. While it has many failings, it was an important contribution to the understanding of the campaign as seen by the Turkish forces at the time and in perspective.
The Turkish General Staff Directorate of Military History and Strategic Studiesand Directorate of Inspection Publications, A Brief History Of The Çanakkale Campaign In The First World War (June 1914 - January 1916), Ankara, The Turkish General Staff Printing House, 2004, pp. 67 - 77.
Ariburnu Landings
E. Ariburnu Landings: the Battles and the Operations That Lasted Until the end of May 1915
1. Preparations and the Operation Plans of the Sides in the Anafartalar Region
a. The Reconnaissance and Security Formations of the 9th Division on the Shoreline (Plate: 14)
As a result of Liman von Sanders's evaluating the actual landing sites as secondary to the Anatolian side, the defense of the 35 km shoreline extending from Azmak Creek, in the north of Ariburnu, to Seddulbahir was left to the power of the 9th Division.
According to the plan devised a battalion affiliated to the 29th Regiment was positioned in the northern sector of the division's area of responsibility. Some units of the 29th Regiment were scattered along the 12 km shoreline between Azmak and Camtepe. The main force was kept intact in the western sector of Eceabat.
The commander of the battalion considering the importance of the Kabatepe shoreline, as it provided an appropriate landing ground, had rightly positioned his reserve forces to 1.5 km to the east of Kabatepe.
A battalion and a company affiliated to the 26th Regiment were reconnoitring the shoreline between Kumtepe and Zigindere, the reinforced 3rd Battalion was positioned in the Seddulbahir forts between Tekeburnu and Morto Port; the 2nd Battalion, on the other hand, was positioned in Kanlidere. (Plate: 14)
The 25th Regiment that was reinforced with the inclusion of an artillery company was being kept intact, in the environs of the Sarafim Farm, to be used against the expected landings on the Kabatepe and Seddulbahir regions.
As for the 19th Division, Staff Lt. Col. Mustafa Kemal (ATATURK) who was in charge of the division was positioned as reserves in the environs of Bigali and Maltepe. (Plate: 14)
The division was given rather hard and peculiar task of defending the area against landings to be launched from Saros, Anatolian shores, and from the southern sector of the peninsula.
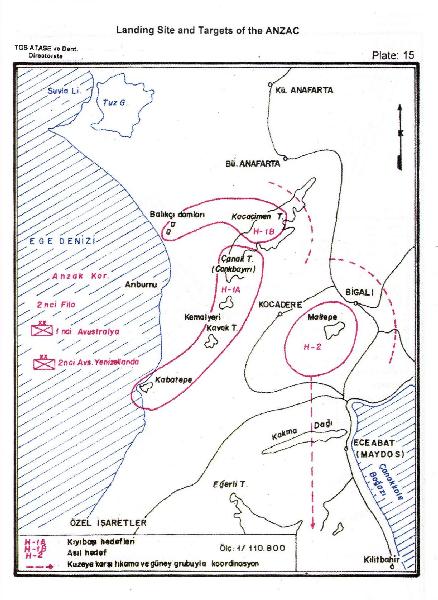
Plate 15.
[Click on plate for larger version.]
b. The Landing Plan of the ANZAC
(Plate: 15)
In General Hamilton's plan the ANZAC troops, consisted of two corps of Australians and New Zealanders, and the 2nd Contingency Fleet were given the task of landing in the Ariburnu region.
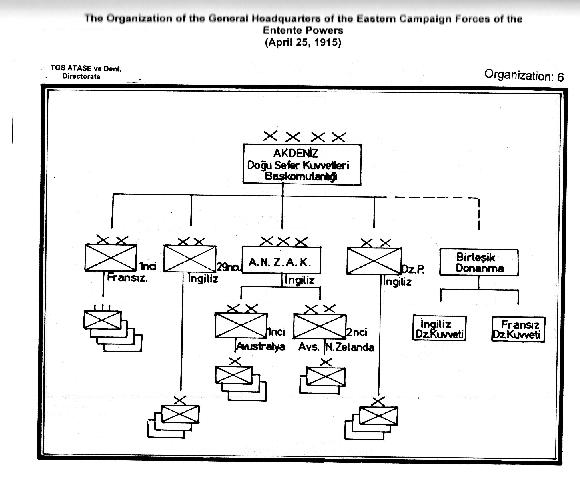
Organization 6
[Click on plate for larger version.]
(Organization: 6).
For an effective surprise landing the first landing was to be performed during the night. The whole corps would advance forward rapidly, paralyze the defense lines, then seize the hills dominating the strait, and marching over to Eceabat line would protect the northern flank of the forces landing on Seddulbahir region.
The plan was also suggested the breaking of the connection of the Turkish Forces with the shoreline; and the issuing of further orders from the General Headquarters for an attack on the Kilitbahir Plateau.
The main characteristic of the plan. was that it was a reflection of the despising and optimistic attitude of the English, as it did not give importance to the factors like range, time, topology, and the strength and the willpower of the defense units. Nevertheless, the realities of the battlefield would eventually clarify the reasons of disappointments.
2. Ariburnu Landings of April 25, 1915, and the First Phase of the Battles on the Shore
a. The Beginning of the Landings landing site on April 25, 1915, by 01:30.
The first wave of attack directed towards Kabatepe was launched at 03:00 by a force of 1500 soldiers.
However, an hour later they have realized that they were drifted north and landed on the shores of Ariburnu instead of Kabatepe shores.
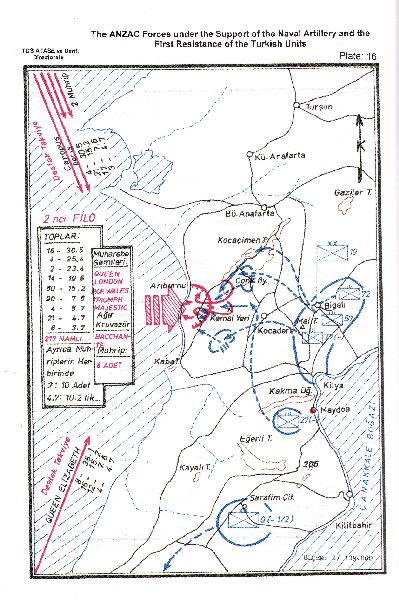
Plate 16.
[Click on plate for larger version.]
b. The First Phase of the Shore Battles and the Intervention of
Staff Lt. Col. Mustafa Kemal, the Commander of the 19th Division, the Landings and the Combats Before Noon (Plate: 16)
The English who landed on the shores of Ariburnu, instead of Kabatepe to their dismay, met with the heavy fire of a small Turkish unit composed of two squads.
The ANZAC troops with the shock of not surprising the Turks could hardly took refuge in the slopes of Ariburnu in utter disorder.
This small Turkish unit continued its resistance despite their being surrounded on both sides, and kept their positions in the Haintepe against the landing ANZAC troops. Only the squad leader and a few soldiers were saved.
Meanwhile, the 3rd platoon of the 8th Company, positioned in the upper ridge, suppressed the English landings with heavy flank fire, following the sunrise the batteries positioned on the ridges of Kabatepe and Palamut started to fire.
The clashes between a handful of Mehmedjiks and two battalions of ANZAC troops were intensifying in Ariburnu by 05:00. While the English battleships were bombarding the area between line Palamutluk ridges - Topgu ridges- Conkbayirf and the shore, the landings intensified and the 3rd Australian Brigade took its positions on the Ariburnu shoreline as of the early hours of the day.
Although the strong ANZAC troops that threw over the resisting weak security forces captured Kanlisirt, the intensive resistance of the Turkish company and the battery positioned on Kabatepe forced them to stop. However, as the time passed by, the weak Turkish units fighting immolatingly, despite their heavy losses, had to withdraw in front of the superior ANZAC forces. There remained no infantry units in Ariburnu or on the ridges in the rear echelons. The English who managed to land almost a division on the site was left unconfined to march over the direction of Conckbayiri.
In the meantime, an ANZAC battalion marching over the Balikci ports was stopped by a decisive resistance of a platoon affiliated to the 8th Company.
The same platoon that managed to stop the landing of an Australian company, and resisted the following attacks finally gave many casualties as the clashes around him were continuing drastically. The superior ANZAC troops managed to seize the Cesarettepe and started reaching over the dominant terrain. The platoon decided to cross over the southern ridges of Conkbayiri and continue resistance. The decision taken excels praise, when the topology, the general condition of the platoon and the complexity of the clashes are considered carefully.
The 27th Regiment that returned from a night exercise, 24/25 April, tired was woken up with the sound of the first gunshot. The commander Lt. Col. Sefik (Col. Aker) alarms his regiment at once.
The commander was of the opinion that the ANZAC troops were to be stopped before the security lines on the shore are broken.
The Commander of the 9th Division, finding the argument consistent issued the following order at 05:00.
"The English are landing their troops on the shores of Ariburnu and Kabatepe. The 27th Regiment taking the mountain artillery positioned on Camburnu under its command should move towards Kabatepe."
Although it may be asserted that the Commander of the 9th Division was hesitant and late in issuing the orders, when the general position and the scope of its area of responsibility are considered carefully it becomes evident that he needed time for the clarification of the situation.
The 27th Regiment set out upon receiving the orders immediately. Information received by phone stated that the ANZAC troops landed two battalions on the shores of Ariburnu, there were severe clashes in the region, the landings were continuing ceaselessly, and that the ANZAC troops seized Kanlisirt, Kirmizisirt, and the other ridges in the northern sector of the region. When the regiment arrived in the environs of Kemalyeri, they have heard the gunshots from Conkbayiri; and observed that the mobile Turkish units positioned on the Duztepe - Conkbayiri axis were trying to delay ANZAC actions.
The Commander of the 27th Regiment, who did not want the spreading and marching of the ANZAC troops over a wider area decided to launch an attack on the Kemalyeri - Merkeztepe line. After a short preparation he launched the attack by 06:00.
Meanwhile, the 9th Division informed that the 57th Regiment of the 19th Division was moved to Kocacimen, and ordered the 27th Regiment to establish contact with the 19th Division.
The attacks of the 27th Regiment had intensified and the ANZAC troops in the Karayurek Creek had been destroyed thoroughly. The moving of the units of the 19th Division towards Conkbayiri was a gratifying incident. Thus the English landings were curbed from the north as well.
There was an interesting moment during the attack of the 27th Regiment. "The Mehmedjiks who were making their way in a dense heath changed their dirty clothes with clean ones, and thus prepared themselves spiritually for the highest rank possible: martyrdom." This in fact was the affirmation of how Mehmedjik was respectful to religious faith, and their deeming the necessity of being clean as they were dying immolatingly for their country.
The Commander of the 27th Regiment sending his report on the position of the ANZAC troops and his plan of attack asked Mustafa Kemal, the Commander of the 19th Division, who had launched an attack on Conkbayiri, to coordinate the maneuvers.
The development of the maneuvers changed the fate of the peninsula as Staff Lt. Col. Mustafa Kemal took the initiatives in his hands at a moment when the critical situation extended as far as Conkbayiri from his own encampments.
Mustafa Kemal upon receiving reports from the 77th Regiment, in Maltepe, and from the 9th Division pertaining to the landings and intensive bombardment of the region alarmed his division. Ordered the cavalry company to reconnoitre the Kocacimen sector, which was the key point of the region, and to resist the enemy till the end if need be.
Actually Kocacimen and Conkbayiri nearby were the most dominant hills in the region. If they were to be lost, the defense of the strait would have been put to risk.
Upon not receiving of orders from the army, Staff Lt. Col. Mustafa Kemal taking all the initiative in his hands, leaving his two regiments and his Chief of Staff in Bigali, ordered the 57th Regiment under his command to get ready for an operation.
Thus he was not only positioning his troops in the key points of the region before the English, but also was giving the commander of the army the opportunity to use the reserve troops wherever he deemed necessary. The Commander of the 19th Division informing the 3rd Corps about the situation directs the 57th Regiment towards Kocacimen at 08:00. The Regiment is given a rest for 10 minutes (Plate: 16).
As soon the Commander arrives Conkbayiri he observes the approaching ANZAC troops and comes face to face with the withdrawing Turkish units. It was a highly critical situation. He orders the withdrawing troops (those who survived the attacks in the Balikci ports) decisively:
"Why are you withdrawing? One does not yield in front of the enemy; one does fight with the enemy. If you are out of ammunition you have your bayonets. Fix bayonets, take your positions!"
Staff Lt. Col. Mustafa Kemal's taking the command just on time showed its effect immediately, as the ANZAC troops were stunned by the positioning troops, and the ANZAC troops took shelter. Thus, very precious time was gained, and the first echelons of the 57th Regiment arrived the scene marching, and held one of the key points of the region, Conkbayiri hill, before the English arrived.
This event is immediately followed by a short order to the 57th Regiment to attack on the hill with elevation 261. Mustafa Kemal in his order says,
"I am ordering you to die! There will be new forces and new commanders to reach and assume your positions while you are dying."
Upon hearing this decisive order the Regiment attacks on the ANZAC troops despite intensive and hellish fire from the fleet. Soon Mehmedjiks destroyed the ANZAC units and achieve their target.
General Hamilton describes the Turkish attack saying,
"The pregnant mountains are continuing to give birth to Turks. They were pressurizing our positions in the highest and most central sectors like a series of unending waves."
Upon receiving information from the 9th Division that the 27th Regiment was engaged in a battle with the English on the west of Kemalyeri, Mustafa Kemal ordered 27th Regiment "to continue its attacks on the right flank of the English" as he was already engaged in battle with the 57th Regiment on the left flank of the English, and wanted the Commander of the 27th Regiment to get in touch with him.
Thus, the dense atmosphere prevailing Ariburnu was temporarily recovered as the English landings were engulfed tightly from the both flanks. The commander of the 19th Division who was not satisfied with the acquired status, ordered 72nd and 77th Regiments, he had left behind in Bigali region, to complete their preparations for marching over Ariburnu in no time.
The ANZAC troops had to withdraw from the hill with elevation 261. Thus, under the prevailing developments in the Conkbayiri region the danger was delayed and a very critical moment was overcome.
An English writer writes the following for the Ariburnu attacks of the day:
"The worst encounter of the operations for the Entente Powers was the presence of this intelligent small ranking officer (Staff Lt. Col. Mustafa Kemal) at the right moment at the very right spot (Conkbayiri). Because, otherwise the ANZAC troops could have captured Conkbayiri that day, and the future of the battle might have been determined at that moment."
The Commander of the 19th Division finds the opportunity to complain and convey his previous suggestions he made to the army for pushing the ANZAC troops in Ariburnu back into the sea by all the forces of the division before their landing, that were somehow turned down, to the command echelons of the 3rd Corps on his meeting with the Commander of the 3rd Corps Esat Pasha who landed in Maltepe via Kilye Port.
His suggestions were found to be reasonable and timely by Esat Pasha. He appoints Staff Lt. Col. Mustafa Kemal as the Commander of the Anafartalar Front. Moreover, Esat Pasha orders the pushing of the ANZAC troops back into the sea by taking the 27th Infantry Regiment under the command of the division.
Upon receiving of orders the Commander of the 19th Division issues his orders saying, "the Division, including the 27th Regiment will attack on the withdrawing English." To this end he orders the joining of the 77th Regiment in the attack on the left flank of the 27th Regiment, and he himself would march over Conkbayiri with the 72nd Regiment to support and reinforce the 57th Regiment. (Plate: 16)
Thus preparations for an attack had begun with four regiments. However, as the 72nd Regiment arrived Conkbayiri by 16:30 the attack was delayed for the next day.
Under the light of the circumstances discussed above, it would not be just to criticize the 19th Division's not attacking in the morning of April 25 with its three regiments. Yet, Staff Lt. Col. Mustafa Kemal had managed to enclose the English landings into a small region in Ariburnu with his initiative without waiting for orders to come.
Plate 17.
[Click on plate for larger version.]
The Battles in the Afternoon
(Plate: 17)
The 1st Australian Division that had completed its landings was fighting with its two brigades, and the third brigade was being kept as reserve.
The landings of the 2nd Australia and New Zealand Division were accelerated.
The attacks of the 27th and the 77th Turkish Regiments were developing steadily despite the intensive bombardment of the English Fleet. The attack of the 57th Regiment on the left flank from Conkbayiri was occasionally coming to a stop in the face of the effective oblique fire of the fleet.
Meanwhile, the 57th Regiment that was reinforced with the coming of a battalion affiliated to the 72nd Regiment takes the Duztepe Ridges on Conkbayiri back from the enemy after a decisive man-to-man combat. As the night arrives the clashes come to an end.
The 27th Regiment that was advancing from the left flank was marching over Kirmizisirt and Kanlisirt. The clashes occurred here were also severe; in front of the bayonet attack launched by the regiment with the echoing of the prayer "Allah, Allah" the ANZAC troops were dissolved and withdrew. Thus the hills known as Kanlisirt were taken back.
On the other hand, the attacks of the 77th Regiment, that was responsible from extending the left flank of the attack launched by the 27th Regiment, could not have been expanded as desired. Although the Regiment captured the Albayrak Ridge it could not go any further and lost contact with the 27th Regiment.
To sum up, as a result of the successful attacks of the 27th and the 57th Regiments against one-and-a-half division of the ANZAC forces, the eastern sector of the hill with an elevation of 180, eastern sector of the Kanlisirt, Kanlisirt, and the Albayrak ridge were taken back from the enemy; thus, all the plans of the English were rendered useless.
They were way far back from their imaginary targets: western ridges of Kabatepe - Kocadere, Conkbayiri - Kocacimen line.
A strong and big ANZAC was confined in a narrow strip on the shore tightly.
The forward echelons of the 1st Australian Division also suffered from heavy losses. They were so demoralized that the dispersed groups and the wounded coming from the fronts all flocked on the beach.
General Birdwood who was amazed at the intimidated faces of the exhausted troops could not help writing General Hamilton that "all the troops will have to retreat." The situation was extremely serious.
The pushing of a force equivalent to a corps under the supporting umbrella of a fleet by the 19th Division back to the sea was a genuine fiasco for the English landing on Ariburnu Front and for the general lay out of the plans they had devised.
General Hamilton, who called for a meeting aboard the headquarters ship at 23:00, off the coast of Ariburnu, discussed withdrawal at length and upon learning that the 2nd Fleet was not ready for withdrawal they abandoned the plans.
Extremely strange lines were taking place in the order issued by General Hamilton after the meeting:
"You have survived the most difficult part of the mission. Your duty, from now on, until our security is established, is to dig trenches, dig trenches, and dig trenches."
As a matter of fact the order issued by the Commander-in-Chief had no importance as a tactical decision; but the idea the order relied on was reflecting the dilemma into which a command and control officer had fallen.
He was in fact leaving the developments in to their natural course.
It was the 19th Division, under the command of Staff Lt. Col. Mustafa Kemal, which pushed General Hamilton into such a dilemma. Only the 27th and the 57th Regiments, composed only of five battalions, of this division did not gave the English forces a chance to penetrate in the inner regions. The 19th Division successfully managed to push them back to their landing grounds and experience extremely fearful moments.
Plate 18.
[Click on plate for larger version.]
The Night Attack of the 19th Division, April 25/26
(Plate: 18)
The Commander of the 19th Division decided to launch another attack on the English, who were stuck in the environs of Ariburnu, and push them back into the sea before they recovered from the effects of the daytime attacks.
The attack came to a halt after the taking of the Kilictepe, the eastern sector of the hill with an elevation of 180 m, eastern half of Kirmizisirt, Kanlisirt, Albayrak ridges where the units lost many lives. However, the fatigued 27th and the 57th Regiments were eager to continue the battle as their morale was amplified by the success of the day.
The attack had begun in accordance with the plan devised earlier. The 57th Regiment recaptured the hill with an elevation of 180 m and they started to march over the Cesarettepe, and Sercetepe; however, the irregular formation of the terrain weakened the control of the troops that were scattered in the dense heath and the operation came to a halt. Upon the counterattack of the ANZAC troops, the Regiment had to withdraw back to the hill with an elevation of 180 m.
Although, definite developments have been achieved in the 27th Regiment's attacks and the whole of Kirmizitepe was seized, the Kanlisirt was abandoned as an outcome of an event occurred in the southern flank. This event stemmed from the deserting Arabian soldiers, who formed the most of the troops of the 77th Regiment. They had hidden themselves in the dense heath and upon the intensive bombardment of the English battleships they fled the battleground.
In fact, many Turkish soldiers and few young Arab soldiers had fought against the English bravely side by side.
The darkness of the night, the unending bombardment of the fleet, irregular formation of the terrain had increased the dispersion of the troops. The control was lost; everything was out of control. The random firing of the ANZAC troops and the deserter Arabs had adversely affected the units fighting in the southern sector of the 27th Regiment; and the beginning of the desertions have rendered this night attack useless.
For short, the attacks that evolved successfully during the daytime, April 25, could not have been repeated as a result of the crisis stemmed from the dissolving of the 77th Regiment in the evening of April 25/26; the 19th Division was thus put at risk.
3. The Battles That Took Place on the Shores of Ariburnu Until the End of April 1915
a. Local Maneuvers of April 26
After the withdrawal of the 77th Regiment, which was dissolved during the night attack in the evening of April 25/26, rendered the positioning of the units of the 27th Regiment who had captured forward echelons of the Kanlisirt tactically difficult, and even more it was impossible for them to stay there.
Yet, the battalion's withdrawal from this ridge on its own, and its withdrawal to the inner regions rather than the eastern sector was not appropriate at all.
The dissolving of the 77th Regiment had severely damaged the 19th Division's plans. Staff Lt. Col. Mustafa Kemal, upon hearing the dissolvings in the southern flank early in the morning, ordered the positioning of the 72nd Regiment to the weakened flank immediately, recovering of the 77th Regiment, and ordered the taking of all the measures to stop the deserters. The Chief-of-Staff of the division was sent to the 3rd Corps to ask for reinforcements. Upon realizing the late arrival of the two regiments of the Corps, the units were ordered to maintain their positions with extreme patience and vigor.
The English who started bombarding the Turkish positions heavily with their strong fleet in the morning of April 26, concentrated their fires especially on the 57th Regiment; and although they launched an attack on the western flank of the regiment, they were driven back with strong retaliation.
Likewise the Turkish units have also managed to maintain their positions against the English's attacks on the left flanks as well as on the positions in the center patiently and vigorously.
Staff Lt. Col. Mustafa Kemal says,
"It was an important day gained by our officers' and commanders' courage and vigor. I can say that my worst day was April 26. Because the force I had against five English brigades was composed of the 57th Regiment that suffered heavy losses during the unforgettable decisive attack on April 25, 27th and 72nd Regiments that were composed of two battalions each, and of the 77th Regiment that was incapacitated. In fact, this was the force that formed the backbone of the Ariburnu Front victory, broke down the courage of the English, and ruined their plans of occupation on April 25."
On the other hand, the only thing the English feared was that they did not know how to cope up with the expected Turkish attacks to be realized on April 26 with the inclusion of new forces. The ANZAC troops spent the night of April 25/26 under such a condition, and the only thing they could do was to minimize the effects of the Turkish attacks by small clashes.
Consequently, they could not have advanced through the gap created by the dissolving 77th Regiment, and seized Kanlisirt after observing it in extreme hesitation for along time.
The general situation of the 19th Division in the evening of April 26 was as follows:
The 57th Regiment positioned on the Duztepe-Inebayir line was blockading the sector leading to Conkbayiri; the 27th Regiment positioned on the line extending from Edirne Ridge to the eastern ridges of Karayurek Creek in the middle thus blockading region extending between Maltepe and Eceabat; the 72nd Regiment positioned in the southern flank was keeping the English flanks under pressure.
A unit, equivalent of a battalion, form the 27th Regiment was reconnoitering the Kabatepe shores; two companies affiliated to 77th Regiment were covering the Azmakdere - Ece Part sector; two companies of the 72nd Regiment were kept as reserve force; and the Division Headquarters was positioned in Kemalyeri. There were no serious clashes between the forces, with the exceptions of heavy bombardment of the fleet and minor clashes occurred in various places, on April 26.
The Battle of Anzac Cove, Gallipoli, 25 April 1915, Fred Waite Account, Part 2 Topic: BatzG - Anzac
The Battle of Anzac Cove
Gallipoli, 25 April 1915
Fred Waite Account, Part 2
New Zealand and Australian Division Headquarters
[From: Waite, p. 90.]
In 1919, Fred Waite, a Gallipoli veteran and hero with a DSO [Citation: "For gallantry and devotion to duty in connection with the operations at the Darddanelles (Mediterranean Expeditionary Force). On the night of 2-3 May 1915 during the operations in the neighbourhood of Gape Tepe for gallantry and resource in rallying his men, and leading them forward at critical moments."] finished his work on the Gallipoli Campaign called The New Zealanders at Gallipoli, which was published by Whitcombe and Tombs Limited in Christchurch. This forms part of the New Zealand Official War history series. It is from this work this extract derives.
Fred Waite, The New Zealanders at Gallipoli, Christchurch , 1919, pp. 86 - 101
Chapter VII.
The First Week.
No one had slept during the night. Re-embarkation was suggested, but a conference was held and the Generals decided to hold on. The men made strenuous efforts. Those not actually fighting were employed making roads up Maclagan's Ridge in the centre, and up Walker's Ridge on the left, in order that the guns might be man-handled up to the positions selected by the artillery commanders.
The stern of the horse boats dropped in the water makes an inclined plane down which the gun is manhandled. The country was too rough for horses, but fifty men on a rope can overcome most obstacles.
About midnight, three companies of the 15th Battalion, 4th Australian Infantry Brigade, arrived and were sent up to reinforce the 1st Australian Division away on the right. They had been hardly pressed just before sunset, and orders were given that all available troops were to support the covering force (the 3rd Australian Infantry Brigade) as they arrived, and to connect up with the New Zealand Infantry Brigade on the left. During the remainder of the night, platoons and companies of the Wellington Battalion of the New Zealand Infantry Brigade, and of the 13th, 15th, and 16th Battalions of the 4th Australian Infantry Brigade, were brought ashore.
The troops arrived in very irregular order—some from one ship and some from another. As each platoon or company came ashore, it was immediately despatched, under the senior officer present, to support the right flank, where the 1st Australian Division was most hotly engaged. The result was that units of both divisions became hopelessly mixed up, and it was several days before they could be disentangled.
By 3 a.m., the whole of the Australian 13th Battalion had arrived. The bulk of it was held temporarily in reserve. One and a half more companies of the Wellington Battalion now occupied Plugge's Plateau, above the beach, and half a company had been sent off to join the 1st Australian Division on the right. By 5 a.m., the remaining company of the Wellington Battalion had arrived, and by 6 a.m., a section of the New Zealand Howitzer Battery was brought ashore, and gladdened the heart of every infantryman as it came into action at the foot of Howitzer Gully. “Boom!” went the howitzer. “The guns, thank God! the guns!” murmured the tired soldiers.
Shrapnel Gully.
The Turk quickly realized that the valley running from behind Hell Spit deep into the centre of Anzac must be the channel of communication. His gunners were so assiduous that it was quickly christened Shrapnel Valley. The top of this valley was afterwards known as Monash Gully.
The glory of the spring was still on the Peninsula. Birds sang in the bushes and the fragrance of crushed wild thyme perfumed the morning air. Patches of red poppies glowed in the sheltered open places. Draped around the prickly scrub were festoons of wild honeysuckle. But down in the bottom of Shrapnel Valley was a dreadful sight. The moist earth in the old creek bed had been ploughed into mud by thousands of hurrying feet. Soldiers, in their eagerness to get forward, had thrown off their kits and equipment, and there the debris lay, punched and trampled into the mess. Dead mules were scattered about in helpless attitudes. Every few yards one met soldiers—their clothes torn by rock and scrub, their bodies mangled by bullet and bomb—stumbling down that Valley of Death to have their wounds dressed at the casualty clearing stations. A steady stream of stretcher bearers carried back limp forms; shrapnel burst high in the air; machine guns spluttered; mountain guns barked; the crash and rattle of musketry never ceased as the echoes rolled round the myriad hillsides. High over all, black specks up in the sky, but watchful as of old, the vultures gathered together, knowing full well that blood was being spilt.
The drumfire down at Helles boomed all day. The old battleships, with their big guns, raked the Turkish positions, while the big 15-inchers of the “Queen Elizabeth” roared loudly above the great roll of gunfire. The moral support afforded by this ship was incalculable. “Good old Lizzie,” the soldiers shouted, as her great guns spoke. Optimistic always, the men looked continually for signs of the British and French advancing from Cape Helles. When the second day's battle was at its height, the cry was raised, “Cease fire! the English troops are here,” but it was only a ruse of the Turks—and the musketry battle resumed its violence. Cries of “Cease fire” and “Retreat” shouted in English, caused at first a momentary wavering, but soon the Colonial soldiers realized the deceptions, and the would-be deceivers shouted commands in vain.
The End of the Second Day.
The second day crept to a close, and our lines were hourly being made secure. Units were inextricably mixed, but, roughly, the Australian Division held the line south of Courtney's Post, while the N.Z. and A. Division held Courtney's and all northwards of it.
No man thought of rest: to work was salvation.
On top of a big yellow mound at the head of Monash Gully there was a rough cross, inscribed, “Here lie buried twenty-nine soldiers of the King.” Two of these men—one an Australian of the 14th Infantry Battalion, the other a sapper of the New Zealand Engineers—had been found just below the fatal crest of Courtney's Post, with their arms still clasped around each other's waists. As they lay among the scrub, those poor lifeless bodies seemed symbolical of the new spirit that had grown up on the Peninsula. While in Egypt, the Commonwealth and Dominion soldiers had their little differences; but the first two days on the Peninsula swept away all the little jealousies and the petty meannesses. Every man helped his neighbour. There was no question of corps, or rank, or colour. By common trials, a common suffering, and a common interest, Australian, Indian, and New Zealander realized they were brothers in fact, as in arms. These first two days made great things possible within the Empire. The experience of those sweet sensations of brotherhood will be cherished and handed down as one of the priceless gifts of Anzac.
The New Zealand machine gun sections experienced a particularly trying time. They were attached to individual battalions and were not fought as a unit. The Auckland guns were pushed forward with their battalion, and somewhere at the head of Monash Gully were so hard pressed that they had to abandon one gun, which was retrieved from its hiding place two days after. The Otagos also came under a very hot fire. They, too, abandoned a gun, but never regained it, as an Australian party found it and consistently refused to give it up! Right through the campaign the Otago Regiment were one gun short, fighting only three guns.
The Wellington gunners were heavily punished on April 27. They evidently pushed too far forward in their eagerness to get at the Turks, but snipers picked them off one by one, until the officer was killed and the whole of the personnel disabled, except one lad who was acting as ammunition carrier.
Gradually the field artillery got their guns from the barges, and with long ropes manhandled them to their almost inaccessible positions. Tracks were cut on the hillsides, rough jetties were improvised, and dugouts were constructed. Mostly these were holes in the ground big enough for a man and his mate to get nearly into. A waterproof sheet served as roof, and when it rained, as it did nearly every night, the waterproof sheet collected and deposited on the occupants whatever water had fallen in the catchment area.
Washing became a lost art. Mirrors were converted into periscopes. The previously spic-and-span New Zealand Army grew dirty-faced, unshaven, and ragged looking.
The rum ration was a boon at this time, as it engendered a little warmth, and enabled one, if off duty, to get a little sleep. “Stand-to” was at 4 o'clock, half an hour before dawn, when the entire force in the trenches and on the beach stood to arms in readiness for an attack.
The First Landing at Suvla.
The front line having been made fairly secure, attention had to be turned to the flanks. A glance at the map will show Nibrunesi Point, near Suvla Bay, about four miles to the north of Ari Burnu, and Gaba Tepe about two miles south. On both these promontories the Turks had look-outs, from which their observers spotted the effect of artillery fire. As with glasses they could see all that occurred in Anzac Cove, it was considered necessary to destroy both look-outs.
For the Gaba Tepe cutting-out expedition Australians were detailed. Nibrunesi Point was assigned to the New Zealanders. Three officers and fifty men of the Canterbury Battalion (13th Westland Company) and an officer and two N.C.O.'s of the N.Z.E. were employed.
The party left Anzac Cove in the dark early one morning and steamed up the coast in a torpedo-boat destroyer. The plan was to land on the northern side of the Peninsula and work upwards to the highest point—Lala Baba. Two destroyers came close in and commanded each side of the Peninsula, whilst the old “Canopus” stood further out to sea and supported the whole. If the Turks at Anafarta behaved badly they would receive chastisement by the guns of His Majesty's Navy.
The observation post itself had some attention from the big ship the day before; but it was not known whether opposition would now be met with. The instructions were to destroy the station, get any prisoners for the Intelligence Officers, and to seek for and destroy a gun that the naval airmen had reason to suspect was being placed there.
The party got ashore without mishap. Day had now broken, and in three groups the attackers crept up the gullies towards the crest. It was a dewy morning, and the fresh, clean smell of the Turkish meadow flowers mingled with the scent of the wild thyme crushed with the soldiers' hobnailed boots.
The place seemed deserted. There was a traversed trench just below the crest. Most of the troops had jumped it, when—crack! crack! crack! broke on the morning silence. Down dropped the Westlanders; then rushed back to the trench, and there, in the sunlight, was the picture—the trench full of squirming Turks, and standing over them with threatening bayonets the gallant boys from Greymouth. Johnny Turk had been caught napping, and the initiative of the New Zealand private soldier had sealed his fate. It was then realized that the few Turkish phrases laboriously learned did not convey much to the terrified prisoners. They quickly decided that the proper thing to do was to throw all their arms out of the trench—and out they came, rifles, knives, and even safety razors. The poor Turkish wounded lay groaning in the bottom of the trench, while the unwounded, on their knees, murmured “Allah! Allah!” and passed their hands mechanically from their foreheads to their breasts and back again. A few men were left to get the wounded and prisoners down to the boat; the remainder scoured the Suvla flats in full view of the Turks on the Anafarta hills.
Three small houses proved to be empty, but in them were found the kits of the guard; in one, the cells of a telephone instrument, with which the garrison communicated with their headquarters at Anafarta. The wire was cut, and a slab of guncotton placed in each of the houses to demolish them.
The gun position was located, but there was no gun mounted. The dead Turks were covered over in their own trench, the charges in the houses were fired, and the party, with captured papers and prisoners, re-embarked without mishap and returned at noon to Anzac.
Thus was the first landing at Suvla carried out successfully by New Zealanders without a single casualty.
The Australian attempt on Gaba Tepe was most unfortunate. The Turks at this place were not caught napping. As at Helles, barbed wire ran down into the water and machine guns enfiladed the landing place. After sustaining many casualties, the party withdrew, and the Turkish post on Gaba Tepe remained a thorn in the side of Anzac until the evacuation.
The Nerve-Centre of Anzac.
A walk along Anzac Cove was full of interest and incident. The little landing beach—a shelving strip of shingle, only twenty-five yards wide—was never safe, but in a measure it was protected from shrapnel by the height of Plugge's Plateau and the two ridges running down towards Hell Spit and Ari Burnu. The Cove became the nerve-centre of Anzac: nestling under the low cliffs on the beach were the Headquarters of the Army Corps, the hospital of the Field Ambulance, the Ordnance and Supply Depots.
General Birdwood had located his Army Corps Headquarters in the little gully debouching on to the centre of the beach. Close by were the naval shore parties with their wireless plant for maintaining communication with the fleet; the Headquarters of the Australian Division were tucked away a little further up the gully.
The southern extremity of Anzac Cove was christened Hell Spit. Jutting out into the water, this point got the benefit of fire from both of the flanks. Here were situated the engineers' stores of explosives and materials; working parties sent for wire, sandbags or timber, did not dwell too long in the vicinity. Close by, under the sandy cliff, the mule drivers of the Indian Supply and Transport had made their little dugouts—the waves of the Ægean lapping their very thresholds. At the foot of the track leading over the spur to Shrapnel Valley were the dressing stations of the Australian Ambulance, with their little Red Cross wharf from which the wounded were evacuated. Just opposite Army Headquarters some of the many stranded barges were made to serve as landing stages for great quantities of bully beef, jam and biscuits, which, placed in high stacks, gave some protection from the shells constantly arriving from the Olive Grove and Anafarta. Hereabout the water barge was also moored; the water being pumped ashore into tanks.
The New Zealand Sector.
The beach north of these stores was allotted to our Division. A little gully running up to the foot of Plugge's Plateau gave excellent cover for the New Zealand battery of 4.5 howitzers—the first New Zealand guns to get ashore, and the only howitzers at that time on the Peninsula. In those early days, infantry carrying parties were constrained to rest awhile in order to observe the shell pursue its lobbing course over Maclagan's Ridge towards the distant target.
At the foot of Howitzer Gully were the New Zealand Ordnance Stores—for a time the most frequented place in Anzac. Fresh water was unobtainable for washing purposes. Continual washing of clothes in salt water made all undergarments very hard, so down to the Ordnance would the soldier go to procure new shirts and socks. Here, also, were piles of captured rifles and ammunition, and a pathetic heap of kits which had been thrown away during the first advance and since collected. A one-time famous old wrestler stood guard over these kits, and one had to establish an undeniable claim before the property was handed over. Very many of the kits were never claimed, being stained with the life-blood of those impetuous spirits who had established the Anzac line.
The mule lines of the Indian Transport Corps ran along the beach in front of Divisional Headquarters. Close by, the dressing station of the New Zealand No. 1 Field Ambulance caught the streams of wounded that flowed down Howitzer Gully and from Walker's Ridge. Out in front of the hospital squatted an Indian mule driver, who spent most of his time clipping mules. Between his bursts of singing in a minor key he would cry, “Hair cut, sixpence!” The soldier, who by this time realized that more than snipers took advantage of cover, would sit on the sandy bank and have his hair cut short by the mule clippers.
The northern extremity of Anzac Cove never received an English name, but was always known as Ari Burnu. The beach north of this point was unsafe for traffic in the daytime, as it was within easy range of Turkish snipers. A few hundred yards along this stretch of white sand were two or three stranded boats—boats that had run in there on the day of the landing, but were stove in and their crews killed by hostile fire. There they lay, a pitiful sight, out in the glare of the noonday sun. To avoid this piece of dangerous beach by day, a communication trench commenced in Anzac Cove along by the wireless station near Ari Burnu. This trench doubled back across the point, running out towards Mule Gully and Walker's Ridge, eventually becoming part of the “Big Sap” that led towards the extreme left flank.
Land was valuable at Anzac, particularly land that was safe. The parts that were exposed could not be used for dugouts or stores, so were set apart as cemeteries. Here, on the point of Ari Burnu, between the Big Sap and the sea, New Zealanders who were killed near Anzac Cove were carefully carried after dark and buried by loving comrades.
The Tragic Lack of Hospital Ships.
If there was one thing that showed our unpreparedness for war on a large scale, it was the neglect to anticipate accommodation for wounded. This did not apply only to the New Zealanders—British, French, Colonial and Indian suffered alike. The regimental medical officers and stretcher bearers did more than mortal men could be expected to do. But a man hit up on Walker's Ridge or at the head of Monash Gully, after receiving his field dressing at a sheltered corner of a trench or in the regimental aid post, had to be carried in the heat, down bullet-swept valleys and along the dangerous beach. Here the surgeons and orderlies of the Field Ambulances redressed the wounds, gave the men something to eat and drink, and placed them out of the sun, away from the torturing flies. Even in these Field Ambulance dressing stations men were not immune from the shrapnel which swept the beach. The Turk could not be blamed for this, as we had, of necessity, to place our hospitals wherever there was room. Streams of men constantly arrived, some walking, many on stretchers—Zionists with tears streaming down their faces, determined Colonials and pathetic-looking Indians—wounded in our cause, now separated from their fellows, and miserable because they could not understand the sahibs' language.
When night came, the picket boats would move into the little Red Cross wharves, and the wounded men were carried to the barges. When a tow was ready, the picket boat started on its journey for the hospital ship or transport. The high ground surrounding Anzac Cove ensured that bullets clearing the crest went many hundred yards out to sea. Some days, when Turkish firing was brisk, the sea was whipped into a white foaming line where the bullets splashed angrily into the water. Through this barrage of singing bullets the Red Cross barge must go. Picket boats or trawlers could not dodge from place to place like soldiers in Monash Gully, so they had to risk it, and take it in their course.
Outside the range of these “overs” were the waiting ships. The hospital ships proper had good appliances for handling wounded. A long box would be lowered over the side, the man and the stretcher placed bodily into it, and hauled up on to the deck, where he was seized by waiting orderlies and whisked away to wards for a diagnosis, a hot bath, some very necessary insecticide, and a meal to suit his particular needs. But the hospital ships soon became overcrowded. Hundreds of men were accommodated on the decks without cots. They did not complain. They came to the war voluntarily, and took what was coming to them as a matter of course. Ask a sorely wounded man if he wanted anything, and if it was not a drink of water, it would be a laconic “Have you got a green?” He seemed more annoyed with the ration cigarettes than he was with the Turk.
Presently the cry would be, “Ship full!” and the next load would be taken to an ordinary transport, dirty, full of vermin, and entirely unsuited for handling wounded. But it had to be. Nothing better was offering. So the wounded men—tossing about on the barge, seasick, with their clothes stiff with blood and their heads burning with the fever resulting from wounds—were hauled up with the improvised tackle to the dirty decks of the transport. There were few medical officers. Some came from the overworked and understaffed field ambulances ashore, and laboured like galley slaves against the tremendous inrush of broken men. Naval surgeons and dressers left their battleships and toiled heroically among the wounded Colonials. But there were not enough doctors to do a tenth of the work. In the old British way, we were paying for unpreparedness with the flesh and blood of our willing young men. On one ship, the only man with any knowledge of medicine was the veterinary officer, who, assisted by clerks and grooms of the waiting Echelon B, saved dozens of lives by prompt and careful attention. So, with a score of men dying on each ship every night, the transports crept with their cargoes of human wreckage to the port of Alexandria—the hospital ships going on to Malta, Gibraltar, or even England. In Egypt, great emergency hospitals were opened, and everything possible was done to alleviate the dreadful suffering of the heroic and uncomplaining soldiers of the Mediterranean Expeditionary Force.
The First Battle of Wassa, Egypt, 2 April 1915, Outline Topic: BatzO - Wassa
The First Battle of Wassa
Egypt, 2 April 1915
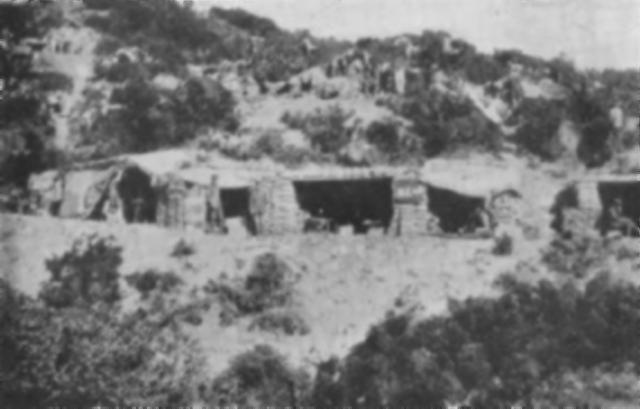
Outline
One of the many buildings destroyed during First Wassa.
First Wassa (also Wozzer or Wazzir), the appellation given to the first of two unheroic riots in the Haret el Wassa (the brothel quarter of Cairo, Egypt) involving troops from Australia and New Zealand. The initial incident occurred on 2 April 1915 (Good Friday), after units of the Australian & New Zealand Army Corps (ANZAC) received news that their period of training was at an end and that orders had been received for them to embark for long-awaited action. Causes of this disturbance reportedly lay in a desire to exact revenge for past grievances arising from dealings with the district's denizens-such as diluted liquor, exorbitant prices, and high rates of venereal infection-although wild rumours of stabbings of Anzac men by locals also appear to have played a part.
Trouble began soon after 5 p.m. when soldiers began evicting whores and their pimps into the street, and tossing their possessions out after them. Bedding, furniture and clothing-even pianos-were thrown from windows of buildings several storeys high. These materials were piled in the road and set alight. The town picket, drawn from the Australian 9th Light Horse Regiment, came on the scene and tried to clear the men out of the houses being attacked. Five arrests were made, although the crowd-growing larger by the minute refused to let these men be taken away, snatched rifles from some of the troopers and threw the weapons onto the fires, and succeed in freeing four of the prisoners.
British military police (MPs) were summoned, about 30 arriving on horseback to choruses of abuse and a shower of stones and bottles. An ill-advised effort by the MPs to gain control by firing their pistols, supposedly over the rioters' heads, resulted in the wounding of four men in the throng estimated at 2,000-3,000. This only served to further inflame matters, and forced the police to hastily withdraw. Efforts by the Egyptian fire brigade to douse the bonfires were also frustrated, its hose-lines being cut, its members manhandled (especially after they turned a hose onto the crowd), and the engine itself finally pushed into the flames.
Left to themselves, the more unruly elements began to loot some shops and put the torch to a Greek tavern. Shortly after 7 p.m. a second fire engine arrived, this time under cavalry escort which exercised extreme tact, and the various fires were tackled while a still sizeable crowd looked on. Since the `Wassa' was close by Shepheard's Hotel, where the Anzac commander had his headquarters, armed troops had also been called out. After Lancashire Territorials (non-regular British troops who were popular with the colonials) were drawn across the road, the rioters wisely began to disperse and order was eventually restored by 10 p.m.
A formal inquiry was convened the following day under Colonel Frederic Hughes, commander of the AIF's 3rd Light Horse Brigade, to investigate the causes of the riot and establish responsibility for its outbreak. Many New Zealand officers attempted to disclaim that their men had played any part, although the evidence of their presence was quite conclusive - the officer leading the Australian picket was adamant that `New Zealanders predominated'. In any event, nine-tenths of those present had been merely spectators. Apportioning blame was next to impossible, however, with few of the 50 witnesses able (or willing) to provide precise information. As the number of men injured by the MPs' bullets (three Australians and one New Zealander) was roughly in proportion to the size of the respective contingents, it could be said that the ‘honours' were about equally shared. So too was the damages bill of £1,700.
Extracted from the book produced by Chris Coulthard-Clark, Where Australians Fought - The Encyclopaedia of Australia's Battles, Allen and Unwin, Sydney, 1998, pp. 100-101.
Additional References cited by Chris Coulthard-Clark:
Bill Gammage, (1974), The Broken Years, Canberra: Australian National University Press.
Suzanne Brugger, (1980), Australians and Egypt 1914-1919, Carlton, Vic.: Melbourne University Press;
Kevin Fewster, 'The Wazza Riots, 1915', Journal of the Australian War Memorial, No.4, April 1984.
The Battle of Anzac Cove, Gallipoli, 25 April 1915, NZEF Roll of Honour Topic: BatzG - Anzac
The Battle of Anzac Cove
Gallipoli, 25 April 1915
Roll of Honour
New Zealand Expeditionary Force
Poppies on the Auckland Cenotaph plinth
The Roll of Honour contains the names of all the men from the New Zealand Expeditionary Force who are known to have served and lost their lives during the Battle of Anzac, 25 April 1915.
Roll of Honour
Bertram ALLAN, Otago Infantry Battalion.
William Eric ANDERSON, Auckland Infantry Battalion.
Henry Thomas BARNETT, Canterbury Infantry Battalion.
Arthur Clifford BOWEN, Canterbury Infantry Battalion.
Thomas Leslie BURNS, Canterbury Infantry Battalion.
Lewis Tom CHAPMAN, Canterbury Infantry Battalion.
Arthur CLARKE, Otago Infantry Battalion.
Robert Hunt CURRIE, Canterbury Infantry Battalion.
Frederick Hugh DODSON, Auckland Infantry Battalion.
The Australian Light Horse Studies Centre is a not for profit and non profit group whose sole aim is to write the early history of the Australian Light Horse from 1900
- 1920. It is privately funded and the information is provided by the individuals within the group and while permission for the use of the material has been given for this
site for these items by various donors, the residual and actual copyright for these items, should there be any, resides exclusively with the donors. The information on
this site is freely available for private research use only and if used as such, should be appropriately acknowledged. To assist in this process, each item has a citation
attached at the bottom for referencing purposes.
Please Note: No express or implied permission is given for commercial use of the information contained within this site.
A note to copyright holders
The Australian Light Horse Studies Centre has made every endeavour to contact copyright holders of material digitised for this blog and website and where
appropriate, permission is still being sought for these items. Where replies were not received, or where the copyright owner has not been able to be traced, or where
the permission is still being sought, the Australian Light Horse Studies Centre has decided, in good faith, to proceed with digitisation and publication. Australian Light
Horse Studies Centre would be happy to hear from copyright owners at any time to discuss usage of this item.