"At a mile distant their thousand hooves were stuttering thunder, coming at a rate that frightened a man - they were an awe inspiring sight, galloping through the red haze - knee to knee and horse to horse - the dying sun glinting on bayonet points..." Trooper Ion Idriess
The Australian Light Horse Studies Centre aims to present an accurate history as chroniclers of early Australian military developments from 1899 to 1920.
The Australian Light Horse Studies Centre site holds over 12,000 entries and is growing daily.
Contact:Australian Light Horse Studies CentreLet us hear your story:
You can tell your story, make a comment or ask for help on our Australian Light Horse Studies Centre Forum called:
The Third Battle of Morlancourt, France, 10 June 1918, Outline Topic: BatzWF - Westn Front
The Third Battle of Morlancourt
France, 10 June 1918
Outline
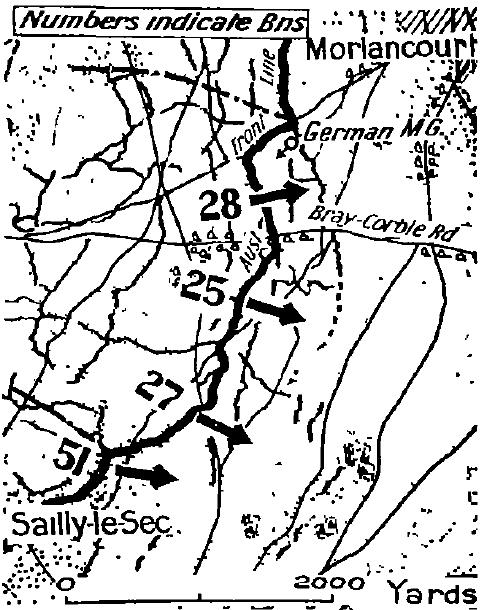
Map outlining the attack at Morlancourt.
[Extracted from Bean, Vol. VI, p. 234.]
Third Morlancourt, an attack carried out on 10 June 1918 by 7th Brigade of the 2nd Australian Division against the southern portion of the Morlancourt spur which overlooked the village of Sailly-Laurette on the Somme. Launched at dusk under cover of an accurate barrage, the operation was a complete success and resulted in the taking of 325 German prisoners at a cost of 400 Australian casualties.
Extracted from the book produced by Chris Coulthard-Clark, Where Australians Fought - The Encyclopaedia of Australia's Battles, Allen and Unwin, Sydney, 1998, p. 148.
Additional References cited by Chris Coulthard-Clark:
C.E.W. Bean (1937) The Australian Imperial Force in France during the Main German Offensive, 1918, Sydney: Angus & Robertson.
The Battle of Messines, Belgium, 7 - 14 June 1917, Outline Topic: BatzWF - Westn Front
The Battle of Messines
Belgium, 7 - 14 June 1917
Outline
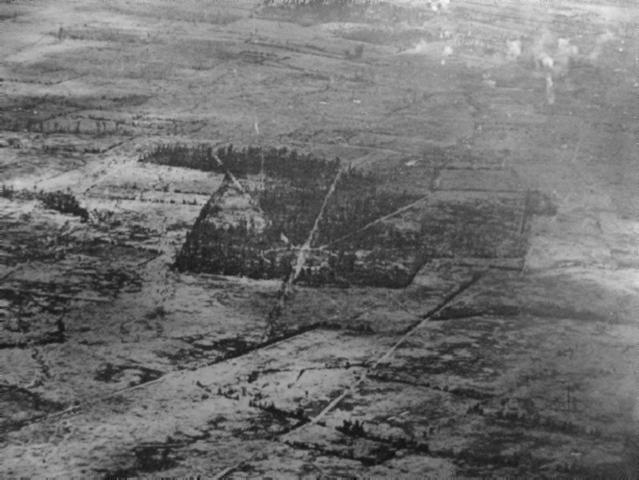
Aerial photograph of operations on 7 June 1917. Note the smoke haze right of Oosteverne Wood.
Messines, a major action in the Flanders region of southern Belgium, undertaken on 7 Jun 1917 for the purpose of' capturing the Wytschaete - Messines ridge south of the British salient at Ypres. Since these low heights-part of the crescent of high ground running east of the battered town-were occupied by the Germans and overlooked British positions, the ridge's capture was essential to plans for an offensive to occupy the Belgian coast. Three army corps were allocated to the task, one of these being II Anzac commanded by Lieut.-General Sir Alexander Godley which comprised three divisions: the 25th British, the New Zealand and the 3rd Australian (Major-General John Monash). In addition, the 4th Australian Division (Major-General William Holmes) was sent to reinforce the corps.
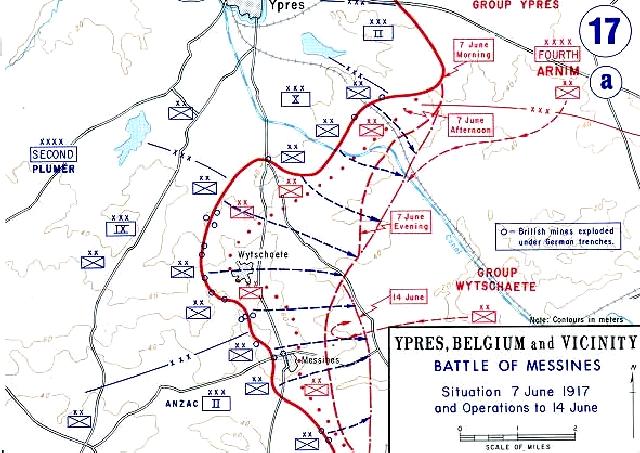
Map detailing the Battle of Messines
A seven-day preliminary bombardment began on 31 May At 3.10 a.m. on 7 June mines containing a million pounds of ammonal, placed in nineteen tunnels which had been dug under and behind the German lines during the preceding two years by Canadian, Australian and British miners, were detonated. The resultant explosions created massive craters, obliterated enemy front-line positions and left survivors stunned and demoralised. The British advance was rapid and largely unopposed, so that by 5.30 a.m. the heights had been easily occupied in one of the most complete local victories yet seen in the war.
Stunning though this success had been, there was drama in the 3rd Division when Monash's men were caught in a German attack using phosgene shells while on approach through Ploegsteert Wood to its start-lines. Some 500 men were gassed and temporarily put out of action, and hundreds more fell to shrapnel rounds, but the division proceeded and was in its correct position for the attack. A further hitch developed that afternoon, when reserve formations moved through to press the advance down the eastern slopes against the German depth positions known as the Oostaverne Line. Delays held back the British corps moving in the centre, forcing the 4th Australian Division to attempt to plug a widening gap so that by the end of the day it was effectively holding half the battlefront.
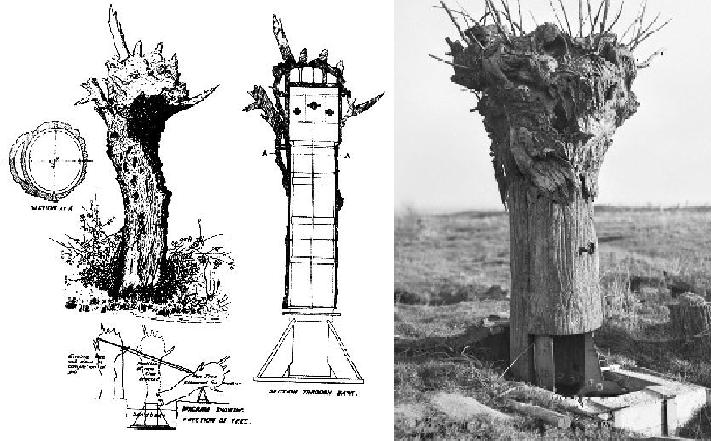
Engineering plans and actual placement of an observation tree by the Australians at Hill 63 during the Battle of Messines.
During this battle the Australians also encountered for the first time the German innovation of concrete blockhouses, which were dubbed 'pillboxes'. Despite strong enemy counter-attacks the next day, and heavy casualties due to artillery fire-from both German and Allied batteries which mistakenly targeted friendly troops-the attacking forces were able to continue expanding their gains to the final objectives laid down for them. For the Australians, success in this operation came at the price of nearly 6,800 casualties, close on two-thirds of these in the 3rd Division. Total losses in II Anzac Corps were about 13,900 - slightly more than the combined total of the two other British corps involved. German losses for the same period were about 23,000, including 7,548 missing.
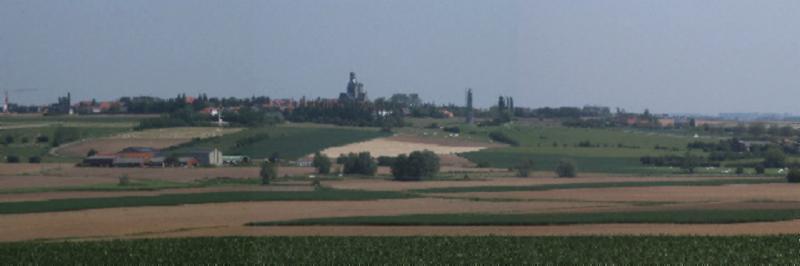
The beautiful gardens of Messines Ridge today over which the men fought in June 1917.
Extracted from the book produced by Chris Coulthard-Clark, Where Australians Fought - The Encyclopaedia of Australia's Battles, Allen and Unwin, Sydney, 1998, pp. 129-130.
Additional References cited by Chris Coulthard-Clark:
C.E.W. Bean, (1933), The Australian Imperial Force in France 1917, Sydney: Angus & Robertson.
P.A. Pedersen, (1985), Monash as Military Commander, Carlton, Vic.: Melbourne University Press.
The Battle of Heligoland Bight, North Sea, 1 June 1915, Outline Topic: BatzN - Heligoland
The Battle of Heligoland Bight
North Sea, 1 June 1915
Outline
Heligoland Bight, a minor action on 1 June 1918 involving aircraft launched from the Australian light cruisers Melbourne and Sydney, which represented the first use of air power in combat by the RAN. During a three-month refit carried out at the Royal Navy dockyard at Chatham in the last quarter of 1917, Sydney had acquired a revolving aircraft launching platform fitted behind and partly over the forward 6-inch gun turret. This enabled the ship to take on board a Sopwith Camel scout for operational use, probably in February 1918. After being similarly fitted with a platform the following month, Melbourne also began operating a Camel in May that year.
When Admiral David Beatty, commanderin-chief of the Grand Fleet, sent a large force to raid enemy minesweepers in the Heligoland Bight on 1 June, both Australian ships were with the Second Light Cruiser Squadron which led the operation. Included in the main body were two heavy cruisers (Courageous and Glorious) which had been fitted out to carry aircraft, escorted by nine destroyers, and the First Battle Cruiser Squadron with Beatty in HMS Lion. Late in the afternoon, with the operation well underway, two enemy seaplanes suddenly broke through cloud cover overhead, passing the cruiser force and making directly towards the bottle-cruisers beyond. After dropping five bombs, the enemy machines turned and within five minutes were reprising the light cruisers on their way back to base to report what they had sighted.
Meanwhile, Sydney and Melbourne had each launched their own aircraft, getting these aloft in the creditable time of just two minutes. The pilot of Melbourne's aircraft lost sight of the quarry as he climbed through the clouds, but Sydney's aviator, Flight Lieutenant A.G. Sharwood, RAF, kept the enemy planes in view and steadily overhauled them in the course of a 100-kilometre pursuit. Eventually getting within range, he opened fire on one of the aircraft and observed it drop down through the mist in a spinning dive. Sharwood was about to follow his opponent down when he spotted another enemy machine behind him, presumably the first seaplane's partner, and was obliged to turn to meet this threat. In the short combat which followed, one of the Camel's guns ran out of ammunition and the other jammed soon afterwards, forcing Sharwood to disengage and head back towards the fleet.
With petrol running low, Sharwood Was beginning to despair of finding the ships when he sighted two British light cruisers with several destroyers and turned towards them. One of these vessels fired at him before he was able to identify himself, but he was then able to descend to make a landing on the water ahead of one of the destroyers - the only way cruiser-launched aircraft could be recovered at that time. Forced to cling for twenty minutes to the tail of his ditched machine, which fortunately stayed afloat, he Was eventually picked up and his Camel subsequently salvaged. Although the incident was not generally regarded as significant, it was actually a useful early demonstration within the RAN of the utility of seaborne air power in support of naval operations.
Extracted from the book produced by Chris Coulthard-Clark, Where Australians Fought - The Encyclopaedia of Australia's Battles, Allen and Unwin, Sydney, 1998, pp. 147-148.
Additional References cited by Chris Coulthard-Clark:
Keith Isaacs (1971) Military Aircraft of Australia 1909 - 1918, Canberra; Australian War Memorial.
The Battle of Kurna, Mesopotamia, 31 May to 1 June 1915, Outline Topic: BatzM - Kurna
The Battle of Kurna
Mesopotamia, 31 May to 1 June 1915
Outline
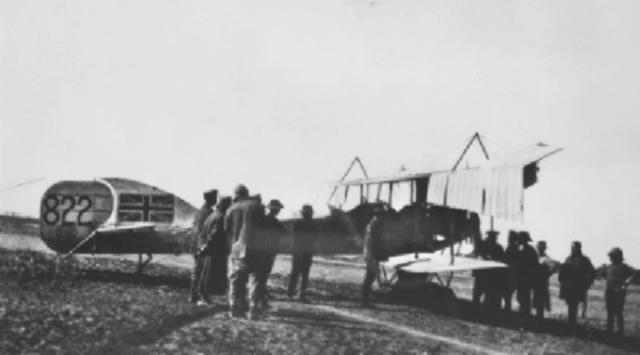
Mesopotamian Flight, Royal Flying Corps gather around a Short 827 seaplane
Kurna, fought between British and Turkish forces on the Tigris River, Mesopotamia (modern Iraq), on 31 May-1 June 1915. The 6th (Poona ) Division of the Indian Army, commanded by Major-General Charles Townshend, undertook a risky frontal assault against the fortified Turkish position which - because of seasonal Flooding - stood out of the river's marshy flats like a string of islands.
Because of this, Townshend was obliged to embark two of his infantry brigades in some 500 pole-propelled Arab barges called 'bellums', which had been armoured with captured steel railway plates. Supporting mountain guns and machine-guns were also mounted on rafts, while heavier artillery were placed aboard accompanying barges and steamers. The sight presented by this curious fleet subsequently caused the battle to he referred to as 'Townshend's Regatta'.
The operation was a signal success which cost the Turks two gunboats sunk, and seventeen guns and 2,000 men taken as prisoners. Despite: the elaborate nature of the works they had been occupying for five months, the bewildered defenders mostly fled after attempting 'only the merest appearance at a fight'. The Turkish collapse was so dramatic that Townshend's personal appearance in a gunboat at Amara (145 kilometres upstream) on 2 June was sufficient to bluff the garrison there into surrendering, too, without a shot being fired.
The Australian involvement in the action was in the form of several pilots, members of the 41-man detachment of the Australian Flying Corps serving with the composite unit known as 'Mesopotamian Flight, Royal Flying Corps'. These partly crewed two aircraft which reconnoitred from a landing ground south of Kurna and brought vital and timely information to Townshend's headquarters regarding the battle's progress, including news on I June that the Turks were abandoning their main position at Bahran Island. They also dropped 20-pound aerial bombs on targets of opportunity and added to the confusion of the enemy's withdrawal.
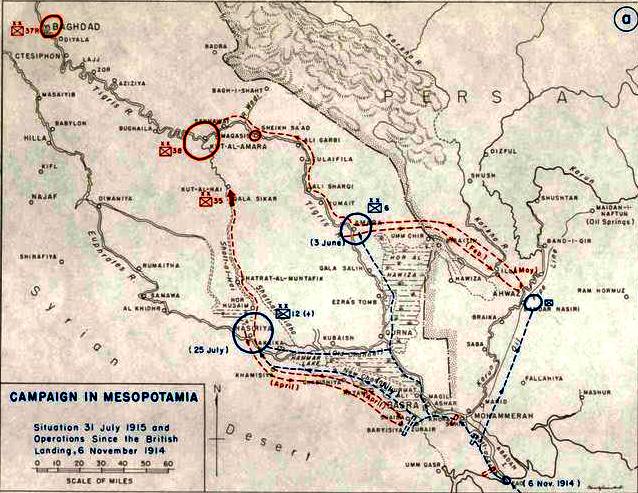
Official History Map of the Kurna and other campaigns in Mesopotamia
Extracted from the book produced by Chris Coulthard-Clark, Where Australians Fought - The Encyclopaedia of Australia's Battles, Allen and Unwin, Sydney, 1998, pp. 106-107.
Additional References cited by Chris Coulthard-Clark:
F.M. Cutlack, (1923), The Australian Flying Corps in the Western and Eastern Theatres of War 1914 - 1918, Sydney: Angus & Robertson.
T.W. White, (1928), Guests of the Unspeakable, Sydney: Angus & Robertson.
The Australian Light Horse Studies Centre is a not for profit and non profit group whose sole aim is to write the early history of the Australian Light Horse from 1900
- 1920. It is privately funded and the information is provided by the individuals within the group and while permission for the use of the material has been given for this
site for these items by various donors, the residual and actual copyright for these items, should there be any, resides exclusively with the donors. The information on
this site is freely available for private research use only and if used as such, should be appropriately acknowledged. To assist in this process, each item has a citation
attached at the bottom for referencing purposes.
Please Note: No express or implied permission is given for commercial use of the information contained within this site.
A note to copyright holders
The Australian Light Horse Studies Centre has made every endeavour to contact copyright holders of material digitised for this blog and website and where
appropriate, permission is still being sought for these items. Where replies were not received, or where the copyright owner has not been able to be traced, or where
the permission is still being sought, the Australian Light Horse Studies Centre has decided, in good faith, to proceed with digitisation and publication. Australian Light
Horse Studies Centre would be happy to hear from copyright owners at any time to discuss usage of this item.