"At a mile distant their thousand hooves were stuttering thunder, coming at a rate that frightened a man - they were an awe inspiring sight, galloping through the red haze - knee to knee and horse to horse - the dying sun glinting on bayonet points..." Trooper Ion Idriess
The Australian Light Horse Studies Centre aims to present an accurate history as chroniclers of early Australian military developments from 1899 to 1920.
The Australian Light Horse Studies Centre site holds over 12,000 entries and is growing daily.
Contact:Australian Light Horse Studies CentreLet us hear your story:
You can tell your story, make a comment or ask for help on our Australian Light Horse Studies Centre Forum called:
WARNING: This site contains: names, information and images of deceased people; and, language which may be considered inappropriate today.
Sunday, 29 June 2008
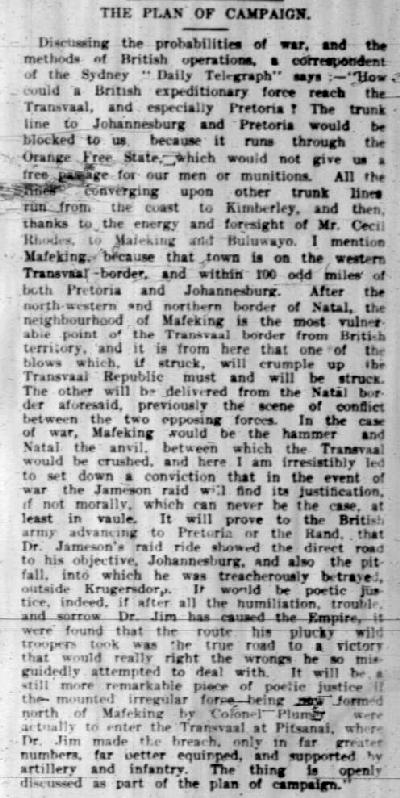
The Boer War British Plan of Attack revealed on 30 September 1899 Topic: BW Gen - Campaign
In this optimistic assessment of the impending Boer War, The Queenslander outlines its speculation on the probable course of the war. The article outlines the strategy to be employed. With inverse prescience, the role of Mafeking is illustrated as a key centre from which to launch an overwhelming attack.
The Queenslander, 30 September 1899, p. 672.
Interesting also is the use of the diminutive Dr Jim to describe the man Dr Jameson who led the infamous raid into Transvaal four years before. No, instead of being disowned by all and sundry, he was now being hailed as a hero.
The fascinating feature is the smug self confidence of the author. At no stage does he even consider that the Boers might not be as compliant and be readily defeated in the manner described. With the benefit of hindsight, the assessment in this article appears risible but seen from banks of the Morton River in the warm comfort of Brisbane protected by the might of the British Navy, it seems like a natural conclusion. One wonders what the author thought of his belief in a quick victory some six months hence.
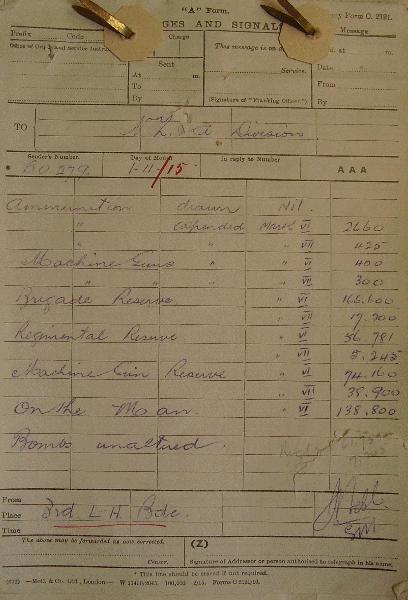
3rd LHB Signals about Ammunition, 1 November 1915 Topic: AIF - 3B - 3 LHB
It may have been war and there may have been men dying in all manner of hideous deaths, but the accountants required their indents to be properly balanced. When a Regiment took over part of a trench line, all items employed by the men were usually removed by them and maintained on the Regimental asset register. Ammunition was slightly different. It was not wise to remove ammunition from the reserves while there was a change in trench deployment. Even the flinty hearted government accountants could see the danger involved. In a compromise to ensure safety as well as keeping the books balanced, ammunition was counted prior to hand over. The regimental adjutant would give a summary down to the last bullet and bomb of the ammunition holding at the trench. Once this was ascertained, then the incoming adjutant would sign a declaration that the reconciliation was accurate and take control of the ammunition.
The first signal, sent from Colonel Antill, the action GOC of 3rd LHB to General Godley, the GOC of the New Zealand and Australian Division. Antill is detailling the Brigade ammunition stocks as at 1 November 1915.
Since there were new models of the humble .303 bullet, the aim was to expend stocks of the older Mark VI ammunition while holding onto stocks of the newer Mark VII ammunition.
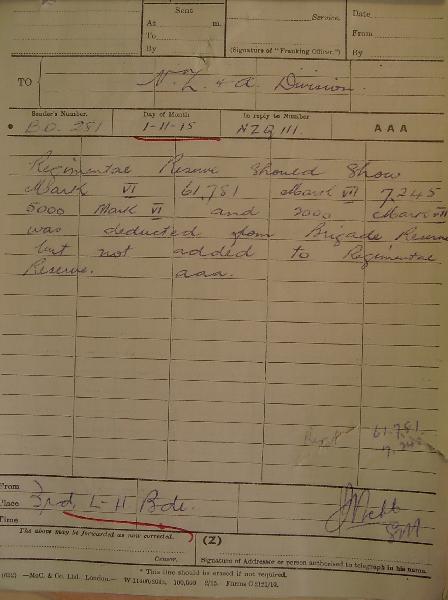
If the adjutant of the 3rd LHB thought his work was done, he was mistaken. An error in the summary was detected at Divisional Headquarters leading to a signal being sent to the adjutant of 3rd LHB with a "please explain" request. While the incoming signal is lost, the reply still exists. The frustration oozes from the words.
There was a spare 2,000 bullets which could not be accounted for from the Divisional Headquarters figures and the answer was urgently required. The missing 2,000 rounds had not been added to the Regimental reserve. The accountant at Divisional Headquarters could breath easy knowing that the bullets had not disappeared through theft nor had been frivolously wasted by firing at the Turks.
Many examples exist of Commanders receiving rude and urgent queries about their expenditure of ammunition. If the ammunition consumption spikes upwards, the GOC could always rely upon a demand for an ammunition audit. An army may have travelled on its stomach but it survived on paper.
Fleas on fleas - The results from careless work - another case study Topic: Gen - Legends
A Legend from Misunderstanding
Squadron? Regiment? Brigade?
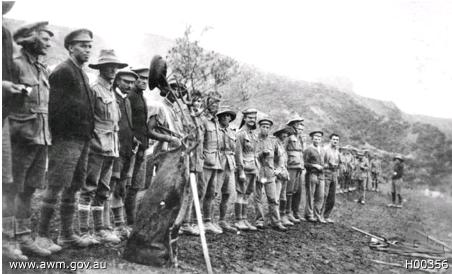
This is a brief examination of an entry in the book by Harvey Broadbent, Gallipoli: the fatal shore, Penguin, Camberwell, Vic., 2005. At p. 208 there is reproduced this picture:
It bears the caption:
Survivors. Just these forty-two men of the 1st Australian Light Horse Brigade, lined up for roll-call, escaped death in their charge at Pope's Hill.
This comment bears some scrutiny. Since a Brigade contains about 2,200 men, although at Gallipoli just prior to the August offensive, most Light Horse Brigades were below strength to containing about 1,200 men on establishment. If the formation mentioned and the figures quoted in the caption were taken literally, that is, 42 men survived, then by implication, there was a massacre of some 1,100 men at Pope's. This, of course, never happened. These men are the remnants of one under-strength regiment of the 1st LHB or even more accurate, the balance of a squadron from the 1st LHR on their regular roll call. Unlike the attack on the Nek where failure was compounded, Chauvel, the GOC of the 1st LHB, saw that the attack failed and called off the other waves from charging. So while this may be a picture of haunting pathos for that formation, the caption needs a little bit of modification.
This is the picture caption: "All that was left of the 1st Australian Light Horse. Only 42 members of the regiment returned after the charge at Anzac."
In essence Broadbent seems to be confused between the terms "Brigade" and "Regiment", an understanding of which is fundamental to accurate military historical writing. This is an error that a novice with little understanding would make, not someone producing a coffee table sized book.
Just to recapitulate on the concepts of Light Horse formations, we have these approximate figures:
A Trooper = 1 Man
A Section = 4 Troopers
A Troop = 10 Sections + 2 troopers or 42 troopers
A Squadron = 4 Troops or 168 troopers
A Regiment = 3 Squadrons + 1 Headquarters Section of 40 troopers or 544 troopers
A Brigade = 3 Regiments + 1 Machine Gun Squadron + 1 Signal Troop + 1 Field Ambulance Squadron + 1 Mobile Vet Troop + 1 Headquarters Section +1 Artillery Battery + 1 AASC Company with Baggage Train, or about 2,176 troopers.
A Division = 3 Brigades + 1 Headquarters Section or 6,600 troopers.
Obviously in reality these figures varied by between 10 to 20 per cent, depending upon the circumstances. Learning this information is fundamental if one is to begin writing about the Light Horse during the Great War. The difference between a Brigade and Regiment is also a fundamental concept and illustrated above by the figures, is a vast difference between the two formations.
Our next task is to put the "42 men" into some type of context. If we examine the 1st LHR War Diary, we see this entry:
1st Light Horse Regiment War Diary, 7 August 1915
So if we tally up this data, we get these figures:
15 killed 34 missing - most will be KIA 98 wounded 42 at roll call 189 men in toto for the Regiment on 7 August 1915.
This figure is far too low for even the 1st LHR and possibly understates it by about another 150 - 200 men. In other words, there is every possibility that the men on the roll call are from a particular squadron and not the regiment.
While the loss of men at any time is tragic, the picture caption gives a false sense of tragedy by overstating the result of an event through either careless or deliberate scholarship.
Careless entries occur when the author does not put in the effort to examine the material to be published. Errors like this put the commentary about the other pictures and text into doubt as no one is able to readily discern the level of accuracy of a particular section. Unfortunately, careless scholarship does not have a sign placed upon it by the author warning the ready that something is dodgy so it ends up tainting the body of the text. This is sad because it spoils what is essentially a very well written book.
On the other hand, for conspiracy theorists, deliberate would indicate that the text is highly political with the intent to blame others for the casualties incurred by Australian forces. At first it was blame the British, now it is blame the Americans. The political idea is that it is everyone else's fault except our own. The alternative corollary of this message is that Australians are incapable of bungling themselves. We are perfection personified. A former Australian PM, Keating tried to peddle this line as did the movie Gallipoli. The truism is of course that if there was a choice between screw up or conspiracy, always go for the screw up. Thus it is doubtful that this mistake was a deliberate error designed to push a particular political line.
So with that in mind, careless or deliberate, it would be best to harbour grave doubts about the veracity of the text in this book and actually examine the authenticity of the captions let alone commentary.
Miscellaneous Militia Topics, Hythe School of Musketry, Outline Topic: Militia - Misc
Miscellaneous Militia Topics
Hythe School of Musketry
Outline
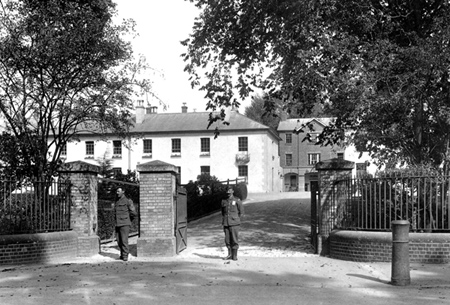
School Of Musketry 1903, Hythe
[From: Frith Collection, No. 50380.]
Musketry
Prior to 1851 the majority of British soldiers were issued with the "Brown Bess" Land Pattern Musket, a smooth-bore, muzzle loading musket which had seen duty in one form or another since 1704. Lack of accuracy was compensated for by the practice of firing in volleys. Musketry, as shooting was known, was more like parade ground drill and as such was a matter for the Drill Sergeant.
More accurate rifles did exist (indeed the principle of rifling the barrel had been known about since 1515) but took so long to reload that it was deemed unwise to have them on general issue. At this point only a few regiments had been equipped with rifles, notably the 60th and the 95th whose special rifle drill stems from this time.
In 1849 a Frenchman, Claude-Etienne Minié, produced a rifle named after himself which, although still a muzzle loader had an expanding bullet that greatly reduced the time required for reloading a rifle. Re-equipment of the Army with this new weapon began in 1851.
The consequence of this was that the Army now had a weapon that was not only more accurate, but had a longer range. For the first time since the demise of the bow and arrow true marksmanship was possible. Shooting ceased to be a drill and became an art based on personal skill. Elevation, windage and ballistics now played a part.
In order to study these new problems and introduce a shooting doctrine for instruction in Rifle Shooting it was decided to form a special Corps of experts, who would also develop and improve the rifles. In March 1853 the Army Estimates included the princely sum of £1,000) for Lord Hardinge to form an "Establishment for the instruction of the Army in rifle and target practice."
Foundation
In June of that year Colonel Hay arrived at Hythe, Kent with a small staff of officers. On 1 August the first instructor, CSgt MacKay of the 19th Foot, was appointed. By 15 September a further three instructors were on strength. They were Sgt. Ruston (3 Gren Gds), Sgt. Lobes (2 Gren Gds) and Sgt. Morris (97th Regt).
The first mention of the establishment of the School was in the Army List of 1854 when it was referred to as the School of Musketry, a name it bore until 1919 when its name was changed to the Small Arms School.
In September 1855 a Corps of Instructors was added to the establishment, consisting of 100 First Class and 100 Second Class Instructors who, as soon as they were sufficiently experienced (except for three who remained at Hythe), were distributed to Depot Battalions and Regiments as required. These men were the Corps of Instructors of Musketry, a misnomer as muskets were being withdrawn from service.
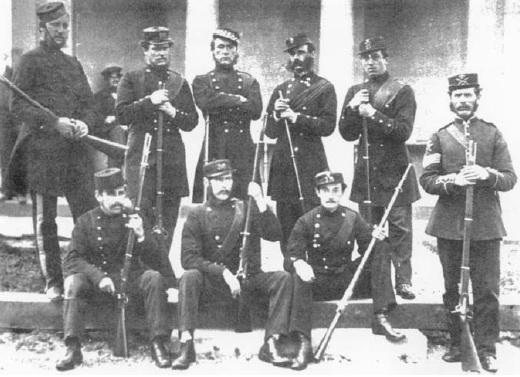
Sergeant Major Instructors with their students, 1860.
The following entries are extracted and transcribed from the 9th Light Horse Regiment War Diary, the originals of which are held by the Australian War Memorial. There are 366 entries on this site. Each day has entries as they occurred from 1914 to 1919. In addition to the 9th Light Horse Regiment War Diary, when appropriate, entries from the 3rd Light Horse Brigade War Diary and other regiments with the Brigade will also appear. Entries from the unit history, Darley, TH, With the Ninth Light Horse in the Great War, Adelaide, Hassell Press, 1924 will also appear from time to time. The aim is to give the broadest context to the story and allow the reader to follow the day to day activities of the regiment. If a relative happened to have served in the regiment during the Great War, then this provides a general framework in which the individual story may be told.
3rd Light Horse Brigade War Diary - Casualties: 8th Light Horse Regiment, one killed, two wounded. 9th Light Horse Regiment, one wounded.
Kenneth Alan McKenzie Diary - Back in trenches. At 2100 Turks opened with heavy fire which died down. At about midnight 8th and 9th lines began with loud cries of Allah and Mahomet and at same time they advanced between dead end of No. 5 and Turks Point and over Secret Sap. No control or leadership. It was like potting rabbits. They wandered aimlessly about and were surprised at the Secret Sap. Bomb throwing, flares etc. Lasted till daybreak. It was slaughter pure and simple. Interpreters induced many wounded to come in. Opposite us about ten yards off one was lying in the scrub waving a white flag. We told him to come in and two more followed. They seemed terribly scared that we would shoot them but they were very glad to surrender. One Armenian could speak excellent English and said that Enver Pasha had come from Constantinople to see them attack and push us into the sea. He was serving under compulsion and the officers forced the Turks out of the trenches staying behind themselves. Poor devils, one couldn't help pitying them. Collected a lot of rifles, ammunition etc, also personal articles. The are lying thick along the trenches. Many have been carried in and buried. Very poorly clothed, especially in footwear. Some of their guns played on us but were engaged by destroyer. Saw Clarence night of 29th. Got letter from Sandford. Brigade Casualties: Seven killed [Hopping 9th] 21 wounded. Turks estimated 250 killed, 200 wounded and 12 captured.
9th Light Horse Regiment War Diary - Routine training and patrol work.
1917
Friday, June 29, 1917
9th Light Horse Regiment Location - El Shellal
9th Light Horse Regiment War Diary - During absence of Royston, Brigadier General JR, CMG DSO, Maygar, Lieutenant Colonel LC, VC DSO, will command the Brigade.
Mounted training carried out in afternoon - troop, Squadron and Regiment.
9th Light Horse Regiment War Diary - Scott, Lieutenant Colonel WH, CMG DSO, who has had indifferent health for some time evacuated to 14th Australian General Hospital.
Parsons, Major HM, DSO, assumes command of the Regiment. Making preparations for move to Moascar where concentration is being made prior to embarkation to Australia.
Kildea, Lieutenant FJ; and, 21 Other Ranks proceeded direct from Zagazig [where they attended 10th Light Horse Regiment Meeting on the 28th June 1919] securing 3rd place in the steeplechase. [Kildea, Lieutenant FJ, with his horse "Never Again"] and 1st in Other Ranks [McCann, 1587 Trooper JF, and his horse "Stiffener Joe"] to No 3 Remount Depot and handed over four rides. This leaves the Regiment without any Animals.
2000, Kildea, Lieutenant FJ; and, two Other Ranks returned from handing horses at Belbeis - four rides. This leaves the Regiment without any animals.
The Australian Light Horse Studies Centre is a not for profit and non profit group whose sole aim is to write the early history of the Australian Light Horse from 1900
- 1920. It is privately funded and the information is provided by the individuals within the group and while permission for the use of the material has been given for this
site for these items by various donors, the residual and actual copyright for these items, should there be any, resides exclusively with the donors. The information on
this site is freely available for private research use only and if used as such, should be appropriately acknowledged. To assist in this process, each item has a citation
attached at the bottom for referencing purposes.
Please Note: No express or implied permission is given for commercial use of the information contained within this site.
A note to copyright holders
The Australian Light Horse Studies Centre has made every endeavour to contact copyright holders of material digitised for this blog and website and where
appropriate, permission is still being sought for these items. Where replies were not received, or where the copyright owner has not been able to be traced, or where
the permission is still being sought, the Australian Light Horse Studies Centre has decided, in good faith, to proceed with digitisation and publication. Australian Light
Horse Studies Centre would be happy to hear from copyright owners at any time to discuss usage of this item.