« June 2009 »
S M T W T F S
1 2 3 4 5 6
7 8 9 10 11 12 13
14 15 16 17 18 19 20
21 22 23 24 25 26 27
28 29 30
You are not logged in. Log in


Search the site:


powered by FreeFind
Volunteer with us.

Entries by Topic All topics  
A Latest Site News
A - Using the Site
AAA Volunteers
AAB-Education Centre
AAC-Film Clips
AAC-Photo Albums
AIF & MEF & EEF
AIF - Lighthorse
AIF - ALH - A to Z
AIF - DMC
AIF - DMC - Or Bat
AIF - DMC - Anzac MD
AIF - DMC - Aus MD
AIF - DMC - British
AIF - DMC - BWI
AIF - DMC - French
AIF - DMC - Indian
AIF - DMC - Italian
AIF - DMC - Medical
AIF - DMC - Remounts
AIF - DMC - Scouts
AIF - DMC - Sigs
AIF - DMC - Sigs AirlnS
AIF - DMC - 1 Sig Sqn
AIF - DMC - 2 Sig Sqn
AIF - DMC - Eng
AIF - DMC - Eng 1FSE
AIF - DMC - Eng 2FSE
AIF - DMC - GSR
AIF - 1B - 1 LHB
AIF - 1B - 6 MVS
AIF - 1B - 1 LHMGS
AIF - 1B - 1 Sig Trp
AIF - 1B - 1 LHFA
AIF - 1B - 1 LHR
AIF - 1B - 2 LHR
AIF - 1B - 3 LHR
AIF - 2B - 2 LHB
AIF - 2B - 7 MVS
AIF - 2B - 2 LHFA
AIF - 2B - 2 LHMGS
AIF - 2B - 2 Sig Trp
AIF - 2B - 5 LHR
AIF - 2B - 6 LHR
AIF - 2B - 7 LHR
AIF - 3B - 3 LHB
AIF - 3B - 8 MVS
AIF - 3B - 3 LHB Sigs
AIF - 3B - 3 LHFA
AIF - 3B - 3 LHMGS
AIF - 3B - 3 Sig Trp
AIF - 3B - 8 LHR
AIF - 3B - 9 LHR
AIF - 3B - 10 LHR
AIF - 4B - 4 LHB
AIF - 4B - 4 Sig Trp
AIF - 4B - 9 MVS
AIF - 4B - 4 LHFA
AIF - 4B - 4 LHMGS
AIF - 4B - 4 LHR
AIF - 4B - 11 LHR
AIF - 4B - 12 LHR
AIF - 5B - 5 LHB
AIF - 5B - 10 MVS
AIF - 5B - 5 LHFA
AIF - 5B - 5 Sig Trp
AIF - 5B - ICC
AIF - 5B - 14 LHR
AIF - 5B - 15 LHR
AIF - 5B - 1er Regt
AIF - 5B - 2 NZMGS
AIF - AASC
AIF - Aboriginal LH
AIF - Badges
AIF - Cars
AIF - Chinese LH
AIF - Double Sqns
AIF - Engineers
AIF - Fr - 22 Corps
AIF - Fr - 13 LHR
AIF - Honour Roll
AIF - HQ - 3rd Echelon
AIF - Marching Songs
AIF - Misc Topics
AIF - NZMRB
AIF - NZMRB - AMR
AIF - NZMRB - CMR
AIF - NZMRB - EFT
AIF - NZMRB - NZMFA
AIF - NZMRB - NZMGS
AIF - NZMRB - OMR
AIF - NZMRB - Sig-Trp
AIF - NZMRB - WMR
AIF - Ships
AIF - Ships - Encountr
AIF - Ships - Una
AIF - WFF
AIF - Wireless Sqn
Battles
BatzA - Australia
BatzA - Broken Hill
BatzA - Liverpool
BatzA - Merivale
BatzB - Boer War
BatzB - Bakenlaagte
BatzB - Belmont
BatzB - Bothaville
BatzB - Buffels Hoek
BatzB - Coetzees Drift
BatzB - Diamond Hill
BatzB - Driefontein
BatzB - Elands
BatzB - Graspan
BatzB - Grobelaar
BatzB - Grootvallier
BatzB - Hartebestfontn
BatzB - Houtnek
BatzB - Karee Siding
BatzB - Kimberley
BatzB - Koster River
BatzB - Leeuw Kop
BatzB - Mafeking
BatzB - Magersfontein
BatzB - Modder River
BatzB - Onverwacht
BatzB - Paardeberg
BatzB - Palmietfontein
BatzB - Pink Hill
BatzB - Poplar Grove
BatzB - Rhenoster
BatzB - Sannahs Post
BatzB - Slingersfontn
BatzB - Stinkhoutbm
BatzB - Sunnyside
BatzB - Wilmansrust
BatzB - Wolvekuil
BatzB - Zand River
BatzG - Gallipoli
BatzG - Anzac
BatzG - Aug 1915
BatzG - Baby 700
BatzG - Evacuation
BatzG - Hill 60
BatzG - Hill 971
BatzG - Krithia
BatzG - Lone Pine
BatzG - Nek
BatzJ - Jordan Valley
BatzJ - 1st Amman
BatzJ - 2nd Amman
BatzJ - Abu Tellul
BatzJ - Es Salt
BatzJ - JV Maps
BatzJ - Ziza
BatzM - Mespot
BatzM - Baghdad
BatzM - Ctesiphon
BatzM - Daur
BatzM - Kurna
BatzM - Kut el Amara
BatzM - Ramadi
BatzN - Naval
BatzN - AE1
BatzN - Cocos Is
BatzN - Heligoland
BatzN - Marmara
BatzN - Zeebrugge
BatzN - Zeppelin L43
BatzNG - Bitapaka
BatzO - Other
BatzO - Baku
BatzO - Egypt 1919
BatzO - Emptsa
BatzO - Karawaran
BatzO - Peitang
BatzO - Wassa
BatzP - Palestine
BatzP - 1st Gaza
BatzP - 2nd Gaza
BatzP - 3rd Gaza
BatzP - Aleppo
BatzP - Amwas
BatzP - Ayun Kara
BatzP - Bald Hill
BatzP - Balin
BatzP - Beersheba
BatzP - Berkusieh
BatzP - Damascus
BatzP - El Auja
BatzP - El Buggar
BatzP - El Burj
BatzP - Haifa
BatzP - Huj
BatzP - JB Yakub
BatzP - Kaukab
BatzP - Khan Kusseir
BatzP - Khuweilfe
BatzP - Kuneitra
BatzP - Megiddo
BatzP - Nablus
BatzP - Rafa
BatzP - Sasa
BatzP - Semakh
BatzP - Sheria
BatzP - Surafend
BatzP - Wadi Fara
BatzS - Sinai
BatzS - Bir el Abd
BatzS - El Arish
BatzS - El Mazar
BatzS - El Qatiya
BatzS - Jifjafa
BatzS - Magdhaba
BatzS - Maghara
BatzS - Romani
BatzS - Suez 1915
BatzSe - Senussi
BatzWF - Westn Front
BW - Boer War
BW - NSW
BW - NSW - 1ACH
BW - NSW - 1NSWMR
BW - NSW - 2NSWMR
BW - NSW - 3ACH
BW - NSW - 3NSWIB
BW - NSW - 3NSWMR
BW - NSW - 5ACH
BW - NSW - A Bty RAA
BW - NSW - AAMC
BW - NSW - Aust H
BW - NSW - Lancers
BW - NSW - NSW Inf
BW - NSW - NSWCBC
BW - NSW - NSWIB
BW - NSW - NSWMR_A
BW - NZ
BW - Qld
BW - Qld - 1ACH
BW - Qld - 1QMI
BW - Qld - 2QMI
BW - Qld - 3ACH
BW - Qld - 3QMI
BW - Qld - 4QIB
BW - Qld - 5QIB
BW - Qld - 6QIB
BW - Qld - 7ACH
BW - QLD - AAMC
BW - SA
BW - SA - 1SAMR
BW - SA - 2ACH
BW - SA - 2SAMR
BW - SA - 3SACB
BW - SA - 4ACH
BW - SA - 4SAIB
BW - SA - 5SAIB
BW - SA - 6SAIB
BW - SA - 8ACH
BW - SA - AAMC
BW - Tas
BW - Tas - 1ACH
BW - Tas - 1TIB
BW - Tas - 1TMI
BW - Tas - 2TB
BW - Tas - 2TIB
BW - Tas - 3ACH
BW - Tas - 8ACH
BW - Vic
BW - Vic - 1VMI
BW - Vic - 2ACH
BW - Vic - 2VMR
BW - Vic - 3VB
BW - Vic - 4ACH
BW - Vic - 4VIB
BW - Vic - 5VMR
BW - Vic - 6ACH
BW - Vic - AAMC
BW - Vic - Scot H
BW - WA
BW - WA - 1WAMI
BW - WA - 2ACH
BW - WA - 2WAMI
BW - WA - 3WAB
BW - WA - 4ACH
BW - WA - 4WAMI
BW - WA - 5WAMI
BW - WA - 6WAMI
BW - WA - 8ACH
BW Gen - Campaign
BW Gen - Soldiers
BW General
Cavalry - General
Diary - Schramm
Egypt - Heliopolis
Egypt - Mena
Gen - Ataturk Pk, CNB
Gen - Australia
Gen - Legends
Gen - Query Club
Gen - St - NSW
Gen - St - Qld
Gen - St - SA
Gen - St - Tas
Gen - St - Vic
Gen - St - WA
Gm - German Items
Gm - Bk - 605 MGC
GW - 11 Nov 1918
GW - Atrocities
GW - August 1914
GW - Biographies
GW - Propaganda
GW - Spies
GW - We forgot
Militia 1899-1920
Militia - Area Officers
Militia - Inf - Infantry
Militia - Inf - 1IB
Militia - Inf - 2IB
Militia - Inf - 3IB
Militia - Inf - NSW
Militia - Inf - Qld
Militia - Inf - SA
Militia - Inf - Tas
Militia - Inf - Vic
Militia - Inf - WA
Militia - K.E.Horse
Militia - LH
Militia - LH - Regts
Militia - LH - 1LHB
Militia - LH - 2LHB
Militia - LH - 3LHB
Militia - LH - 4LHB
Militia - LH - 5LHB
Militia - LH - 6LHB
Militia - LHN - NSW
Militia - LHN - 1/7/1
Militia - LHN - 2/9/6
Militia - LHN - 3/11/7
Militia - LHN - 4/6/16
Militia - LHN - 5/4/15
Militia - LHN - 6/5/12
Militia - LHN - 28
Militia - LHQ - Qld
Militia - LHQ - 13/2
Militia - LHQ - 14/3/11
Militia - LHQ - 15/1/5
Militia - LHQ - 27/14
Militia - LHS - SA
Militia - LHS - 16/22/3
Militia - LHS - 17/23/18
Militia - LHS - 24/9
Militia - LHT - Tas
Militia - LHT - 12/26
Militia - LHV - Vic
Militia - LHV - 7/15/20
Militia - LHV - 8/16/8
Militia - LHV - 9/19
Militia - LHV - 10/13
Militia - LHV - 11/20/4
Militia - LHV - 19/17
Militia - LHV - 29
Militia - LHW - WA
Militia - LHW-18/25/10
Militia - Military Orders
Militia - Misc
MilitiaRC - Rifle Clubs
MilitiaRC - NSW
MilitiaRC - NT
MilitiaRC - Qld
MilitiaRC - SA
MilitiaRC - Tas
MilitiaRC - Vic
MilitiaRC - WA
Militiaz - New Zealand
Tk - Turkish Items
Tk - Army
Tk - Bks - Books
Tk - Bks - 1/33IR
Tk - Bks - 27th IR
Tk - Bks - Air Force
Tk - Bks - Yildirim
Tk - POWs
Wp - Weapons
Wp - Hotchkiss Cav
Wp - Hotchkiss PMG
Blog Tools
Edit your Blog
Build a Blog
RSS Feed
View Profile
Open Community
Post to this Blog
Site Index
Education Centre
LH Militia
Boer War
Transport Ships
LH Battles
ALH - Units
ALH - General
Aboriginal Light H
Weapons
Ottoman Sources

"At a mile distant their thousand hooves were stuttering thunder, coming at a rate that frightened a man - they were an awe inspiring sight, galloping through the red haze - knee to knee and horse to horse - the dying sun glinting on bayonet points..." Trooper Ion Idriess

The Australian Light Horse Studies Centre aims to present an accurate history as chroniclers of early Australian military developments from 1899 to 1920.

The Australian Light Horse Studies Centre site holds over 12,000 entries and is growing daily.

Contact: Australian Light Horse Studies Centre

Let us hear your story: You can tell your story, make a comment or ask for help on our Australian Light Horse Studies Centre Forum called:

Desert Column Forum

WARNING: This site contains: names, information and images of deceased people; and, language which may be considered inappropriate today.

Friday, 26 June 2009
South Australian Militia - 1861, Reedbeds Cavalry and Captain John Haimes
Topic: Militia - LHS - SA

South Australian Militia - 1861

Reedbeds Cavalry and Captain John Haimes


The South Australian Advertiser, Friday, 5 April 1861, p. 3.


The artilce is transcribed below:


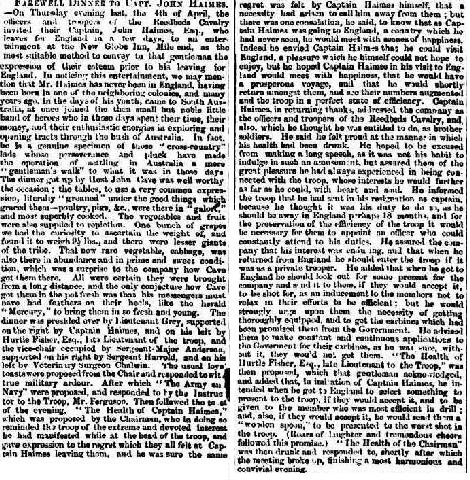
FAREWELL DINNER TO CAPT. JOHN HAIMES.

On Thursday evening last, the 11th of April, the officers and troopers of the Reedbeds Cavalry invited their Captain, John Haimes, Esq., who leaves for England in a few days, to an entertainment at the New Globe Inn, Mile end, as the most suitable method to convey to that gentleman the expression of their esteem prior to his leaving for England. In noticing this entertainment, we may mention that Mr Haimes has never been in England, having been born in one of the neighbouring colonies, and many years ago in the days of his youth came to South Australia, at once joined the then small but noble little band of heroes who in those days spent their time, their money, and the enthusiastic energies exploring and opening tracts through the bush of Australia. In fact he is a genuine specimen of those ''cross country" lads whose perseverance and pluck have made the operation of settling in Australia, a mere "gentleman's walk" to what it was in those days.

The dinner got up by Host John Cave was well worthy the occasion; the tables to use a very common expression, literally "groaned" under the good things which graced them - poultry, pigs, &.c were there in "galore" and most superbly cooked. The vegetables and fruit were also supplied to repletion. One bunch of grapes we had the curiosity to ascertain the weight of, and found it to weigh 9½ lbs., and there were other lesser giants of the tribe. That now rare vegetable, cabbage, was also there in abundance and in prime and sweet condition, which was a surprise to the company how Cave got them there All were certain they were brought from a long distance, and the only conjecture how Cave got them in the pot fresh was that his messengers must have had feathers on their heels, like the herald "Mercury", to bring them in so fresh and young. The dinner was presided over by Lieutenant Grey, supported on the right by Captain Haimes, and on his left by Hurtle Fisher, Esq., late Lieutenant of the troop, and the vice chair occupied by Sergeant Major Anderson, supported on his right by Sergeant Harrold, and on his left by Veterinary Surgeon Chalwin.

The usual loyal toasts were proposed from the Chair and responded to with true military ardour. After which "The Army and Navy" were proposed and responded to by the Instructor to the troop, Mr Ferguson. Then followed the toast of the evening, "The Health of Captain Haimes," which was proposed by the Chairman, who in doing so reminded the troop of the extreme and devoted interest he had manifested while at the head of the troop, and gave expression to the regret which they all felt at Captain Haimes leaving them, and he was sure the same regret was felt by Captain Haimes himself, that a necessity had arisen to call him away, from them; but there was one consolation, he said, to know that as Captain Haimes was going to England, a country which he had never seen, he would met with scenes of happiness. Indeed he envied Captain Haimes that he could visit England a pleasure which he himself could not hope to enjoy, but he hoped Captain Haimes in his visit to England would meet with happiness that he would have a prosperous voyage, and that he would shortly return amongst them, and see there numbers augmented and the troop in a perfect state of efficiency.

Captain Haimes, in returning thanks, addressed the company as the officers and troopers of the Reedbeds Cavalry, and also, which he thought he was entitled to do as brother soldiers. He said he felt proud at the manner in which his health had been drunk He hoped to be excused from making a long speech, as it was not his habit to indulge in such amusement, but assured them of the great pleasure he had always experienced in being connected with the troop whose interests he would further as far as he could, with heart and soul. He informed the troop that he had sent in his resignation as captain because he thought it was his duty to do so, as he should be away in England perhaps l8 months, and for the preservation of the efficiency of the troop it would necessary for them to appoint an officer who could constantly attend to his duties. He assured the company that his interest was enduring, and that when he returned from England he should enter the troop if it was as a private trooper. He added that when he got to England he should look out for some present for the company and send it to them, if they would accept it, to be shot for, as an inducement to the members not to relax in their efforts to be efficient; but he would strongly urge upon them the necessity of getting thoroughly equipped and to get tho carbines which had been promised them from the Government. He advised the, to make constant and continuous applications to the government for their carbines, as he was sure, without it, they would not get them.

"The Health of Hurtle Fisher Esq, late Lieutenant to the Troop, was then proposed, which that gentleman acknowledged and added that, in imitation of Captain Haimes, he intended, when he got to England to select something to present to the troop, if they would accept it, and to be given to the member who is most efficient in drill, and, also, if they would accept it, he would send them a "wooden spoon" to be presented to the worst shot in the troop. (Roars of laughter and tremendous cheers followed this promise.)

"The Health of the Chairman" was then drunk and responded to, shortly after which the meeting broke up, finishing a most harmonious and convivial evening.


Commentary on the Article

The importance of this story lies in the fact that it goes into great detail about the structure of the Reedbeds Volunteer Cavalry, the first mounted formation in South Australia which at the time of this article, maintained a Nominal Roll of 33 men all ranks.

An issue flagged by Captain Haimes in his speech related to the promise by the Government to provide carbines for the unit. While the men provided their own horse and saddle while paying for their uniform as Volunteers, the South Australian Government had promised to arm the men. Years of attempting to get arms from the Government had met with deaf ears. Indeed, it became quite a scandal in South Australia that the Cavalry had no arms. In the end, the press advocated this cause in the community and eventually the men were provided with carbines.


Further Reading:

South Australian Militia - Light Horse


Citation: South Australian Militia - 1861, Reedbeds Cavalry and Captain John Haimes


Posted by Project Leader at 10:59 AM EADT
Updated: Friday, 26 June 2009 11:27 AM EADT
AIF & MEF & EEF, Glossary of Australian Graduation Staff List and Honours
Topic: AIF & MEF & EEF

AIF & MEF & EEF

Glossary of Australian Graduation Staff List and Honours


Each year, a listing of Australian officers was produced. This list detailed such vital information as their commission date, appointments and qualifications. In addition it contained any honours granted during their service. After August 1914, a similar book was produced for the AIF. This was updated every three months until the conclusion of the war and the disbandment of the units. Below is a glossary detailing the nature of the certificates and honours. For people not familiar with British honours, this is essential to understanding the letters attached to the names of various officers.


a. - Passed in Signalling, Aldershot.
(a) - Submarine Mining, Officer's Course, Royal Engineers.
(b) - Electric Lighting, Officer's Course, Royal Engineers.
c. - Passed in Field Engineering, Chatham.
(c) - Brennan Torpedo Course, Royal Engineers.
C. - Passed in Military Topography, Chatham.
C.A. - Central Administration.
Ch. Inst. - Chief Instructor, School of Gunnery.
(d) - Instructors' Certificate (Imperial) Cavalry Pioneer Duties.
f. - Firemaster's Certificate, Woolwich, &c.
F. - Honour's Certificate, Firemaster's Course, Woolwich, &c.
g. - Obtained a Certificate in the Long Course of Gunnery or Gunnery Staff Course, School of Gunnery, Shoeburyness.
H. - Passed Hythe School of Musketry.
i.l.s. - Certificate as Inspector of Laboratory Stores.
M. - Militia.
o. - Passed Ordnance Course, Ordnance College, England.
P. - Permanent.
P.C. - Privy Councillor.
p.f. - Qualified in Position Finding.
P.M. - Graduated at the Staff Colleges, Camberley, England; or Quetta, India.
s. - Passed Course in testing Small Arm Ammunition.
V. - Volunteer.
K.G. - Knight of the Garter.
K.P. - Knight of St. Patrick.
K.T. - Knight of the Thistle.
G.C.B. - Knight Grand Cross of the Bath.
K.C.B. - Knight Commander of the Bath.
C.B. - Companion of the Bath.
G.C.M.G. - Knight Grand Cross of St. Michael and St. George.
K.C.M.G. - Knight Commander St. Michael and St. George.
C.M.G. - Companion of St. Michael and St. George.
G.C.I.E. - Knight Grand Commander of the Indian Empire.
G.C.S.I. - Knight Grand Commander of the Star of India.
G.C.V.O. - Knight Grand Cross of the Royal Victorian Order.
C. V.O. - Commander of the Royal Victorian Order.
M.V.O. - Member of the Royal Victorian Order.
D.S.O. - Companion of the Distinguished Service Order.
I.S.O. - Imperial Service Order.
O.M. - Member of the Order of Merit.
(R) - Reward for Distinguished or Meritorious Services.
V.C. - Victoria Cross.
V.D. - Volunteer Forces Decoration (Colonial Auxiliary Forced)


Further Reading:

B103, Index to Common Terms

Battles where Australians Fought

AIF, MEF and the EEF


Citation: AIF & MEF & EEF, Glossary of Australian Graduation Staff List and Honours

Posted by Project Leader at 12:01 AM EADT
Updated: Friday, 10 July 2009 6:10 PM EADT
The Volunteer Movement in Western Australia, Uniforms and Badges
Topic: Militia - LHW - WA

Western Australian Militia

Uniforms and Badges


The following is an extract from the book written in 1962 by George F. Wieck called The Volunteer Movement in Western Australia 1861-1903, pp. 78 - 82:

 
Uniforms and Badges

Uniforms
Detailed descriptions of uniform adopted by the early Volunteer Infantry corps do not exist therefore the descriptions given herein are incomplete and possibly inexact in some cases. The best has been done with the information available.

Records indicate that about the year 189 the tunic worn by British Infantry was changed to a pattern described by the press of the day as long, ill-fitting, loose and slovenly. Presumably that was the pattern adopted by the Perth and Fremantle Volunteer Rifles in 1862, for the Illustrated London News in 1864 reproduced a sketch drawn by Captain E. Henderson, R.E., depicting these two corps parading in front of Government House, Perth, on a ceremonial occasion, wearing long scarlet tunics, white duck (or canvas) trousers, and shakoes. There is ground for the belief that the Perth facings were blue and Fremantle's green.

The Pinjarrah and Wellington mounted corps adopted a uniform stated to be a replica of that of the 6th Dragoon Guards (with white cords instead of yellow), i.e. scarlet tunic, white doe-skin pantaloons, white helmet with spike, and over-boots. A brief reference to the Union Troop suggests its uniform was of Hussar type.

The W.A. Troop of Horse Artillery appears to have worn a uniform which was for all practical purposes a replica of that of the British Horse Artillery. The Naval Artillery Volunteers carried on Naval tradition.

In 1872 the newly formed Perth and Fremantle infantry adopted in each case, the uniform worn by its predecessor.

New Corps were formed but the first inkling of uniform and details is gained from a ‘water-colour' executed by Lieutenant Colonel E. F. Angelo, Military Commandant at the Albion camp in 1884 which depicts the whole of the Infantry Volunteers (excepting the Geraldton Corps) on a ceremonial parade wearing scarlet tunic, blue trousers and white helmet. It is not known when helmets were officially adopted but there exists a photograph taken in 1878 of soldiers some wearing white helmets and others blue or dark green.

Dress Regulations for Volunteers were promulgated in 1888 (Government Gazette. No. 55) prescribing what should be worn by Officers of Artillery and Infantry (there was no Cavalry at that time). British Army patterns were closely followed, the artillery volunteers copying the Royal Artillery and the infantry adopting the normal scarlet tunic (now shortened), blue trousers with scarlet seam (plus silver braid for ceremonial occasions) and helmet. Infantry could choose a helmet of either dark green British Army pattern or one of the white Mediterranean type; for facing colours they could choose from blue, green, white or yellow. Perth Rifle Volunteers chose blue for facings, all others it is understood originally adopted green; at a later date three corps at least, i.e. Perth, Albany and Bunbury, changed to white.

The 1888 Regulations also authorised blue undress uniform, khaki being substituted by the end of the century.

The year 1900 saw several major divergences.

The West Australian Mounted Infantry adopted khaki tunic, light coloured breeches, slouch hat (turned up on right side) and ‘concertina' top-boots. The Metropolitan Civil Service Battalion favoured grey tunic and trousers, black helmet and black facings. The Goldfields Battalion of Infantry adopted a workmanlike khaki with puttees and slouch hat. The West Australian Highlanders proudly wore a replica of the uniform of the 79th Cameron Highlanders, including the Erract tartan.


Badges
As in the case of uniform, there is no recorded description of the design and date of adoption of the various corps badges. Several helmet plates dating chiefly from the `eighties' have been located; comparison of these suggests the adoption of two basic designs, one for artillery, the other for infantry. The following sketches are copies from the plates of the Perth Artillery Volunteers and Perth Rifle Volunteers respectively. The basic designs were amended to meet the requirements of each corps as follows:
 

Perth Artillery Volunteers Badge


Artillery (1): The words Perth, Fremantle, or Albany being inserted according to requirements. The Albany Corps' plate included a fortress type gun on a barbette mounting in lieu of the field gun.
 

Fremantle Rifle Volunteers Badge


Infantry (2) : The Fremantle Rifle Volunteers plate had a circular strap almost entirely enclosed by a laurel wreath, super-imposed upon the basic star and crown; the area within the strap carried the conventional bugle with ribbons attached and in raised letters on the strap was the Corps title – “Fremantle Rifle Volunteers: Western Australia.”

The Guildford Rifle Volunteers plate had the laurel wreath and a raised "circle" instead of a strap, on the circle in raised letters was the motto "Honi Soit Qui Mal y Pense" and within the circle, in script the Corps initials G.R.V.

The Geraldton Rifle Volunteers plate carried the Corps title on the raised circle with bugle and ribbons within as in the case of Fremantle. It is believed that Albany, York and Bunbury also adopted this style.

There were two unconventional types.

The Civil Service Rifle Volunteer Corps adopted a black oxidized Maltese Cross with an interior raised circle carrying the Corps title. Within the circle on a solid background was a representation in white metal of the crest of the Prince of Wales.

The Goldfields Infantry Regiment's plate was a white metal "Rising Sun" surmounted by a St. Edmund's Crown. In the centre on a solid ground, was an enamelled black swan and on a 3-section (2 over 1) scroll below in raised letters the corps title appeared.


Previous:  Organization and Training

Next: Western Australian Militia, Light Horse


Further Reading:

Western Australian Militia, Light Horse

Western Australian Militia, Infantry


Citation: The Volunteer Movement in Western Australia, Uniforms and Badges

Posted by Project Leader at 12:01 AM EADT
Updated: Friday, 4 September 2009 6:49 PM EADT
Thursday, 25 June 2009
South Australian Militia Structure, 19 August 1861
Topic: Militia - LHS - SA

South Australian Militia Structure

19 August 1861


The return of volunteers enrolled within South Australia up to 19 August 1861 inclusive showed a total force of 1,851 strong. The dissection of this force is as follows:-

Cavalry

Reedbeds Volunteer Cavalry - 33 men. 


Artillery

Port - 27 men;

Adelaide - 68 men.


Rifles

The Adelaide Regiment - 804 men;

Nairne - 22 men;

Noarlunga - 26;
Milang - 42 men;

Mount Barker - 46 men;

Maclaren Vale - 29 men;

Willunga - 34 men;

Finniss Vale - 66 men;

Strathalbyn - 37 men;

Robe Town - 33 men;

Goolwa - 25 men;

Port Elliot 19 men;

Gumeracha - 30 men;

Lyndoch - 22 men;

Kapunda - 86 men;

Angaston - 35 men;

Nuriootpa and Greenock - 41 men;

Virginia - 24 men;

Woodside - 42 men;

Balhannah - 40 men;

Macclesfield - 31 men;

Yankalilla - 10 men;

Meadows - 25 men;

Teatree Gully - l8 men;

Gawler River - 27 men;

Munno Para West - 26 men;

Kapunda Mine - 52 men;

South Australian Free Rifle Corps - 31 men.


Total - 1,851.


The above includes rank and file, and consists of 1 Lieutenant-Colonel, 2 Majors, 1 Adjutant, 31 Captains, 47 Lieutenants, 1 Surgeon, 1 Veterinary Surgeon, 1 Quartermaster, 2 Sergeant Majors, 1 Farrier-Major, 69 Sergeants, 54 Corporals or Bombardiers, 1,640 Privates. Total,
1,851.

The Adelaide Regiment, 804 rank and file, consists of the following companies:-

Regimental Officers - 2 men;

Regimental Noncommissioned Officers - 1 men;

Port Adelaide Rifles - 53;

First Adelaide Rifles - 117 men;

Glen Osmond and Mitcham Rifles - 40 men;

Glenelg Rifles - 33 men;

The Adelaide Rifles - 73 men;

Munno Para East Rifles - 54 men;

West Adelaide Rifles - 84 men;

Sturt and Brighton Rifles - 48 men;

First Gawler Rifles - 56;

The Gawler Volunteers - 59 men;

Salisbury Rifles - 28 men;

Eastern Suburban Rifles - 49 men;

Smithfield Rifles - 38 men;

No. 1 Brighton Rifles - 28 men;

Cadet Company - 41 Cadets.


Total - 804 men.


Further Reading:

South Australian Militia - Light Horse


Citation: South Australian Militia Structure, 19 August 1861 


Posted by Project Leader at 6:13 PM EADT
Updated: Saturday, 27 June 2009 8:41 AM EADT
Mediterranean Expeditionary Force, Order Of Battle, August 1915
Topic: AIF & MEF & EEF

MEDITERRANEAN EXPEDITIONARY FORCE

ORDER OF BATTLE

AUGUST 1915


Between 1929-1932, Cecil Faber Aspinall-Oglander and Archibald Frank Becke produced two volumes about the Gallipoli Campaign for the Historical Section, Committee on Imperial Defence and has been known as part of the Official War History series. The following Order of Battle for the Allied forces is extracted from that source.


Aspinall-Oglander, CF, Military Operations, Gallipoli, (1932), pp. 487 - 495. 


Mediterranean Expeditionary Force, Order Of Battle, August 1915


Commander-in-Chief

General Sir Ian Hamilton, G.C.B.


Chief of the General Staff

Major General W. P. Braithwaite, C.B.


Deputy Adjutant-General

Brigadier General E. M. Woodward.


Deputy Quartermaster-General

Major General G. F. Ellison. [Note: Succeeded Brigadier General S.H. Winter, 7th August.]


VIII CORPS

General Officer Commanding
Lieutenant General Sir F. J. Davies, K.C.B. [Note: Replaced Major General W. Douglas, in temporary command, 8th August.]


Brigadier General, General Staff

Brigadier General H. E. Street.


29TH DIVISION

Major General H. de B. de Lisle, C.B.


86th Brigade
2/Royal Fusiliers.

1/Lancashire Fusiliers

1/Royal Munster Fusiliers.

1/Royal Dublin Fusiliers.


87th Brigade

2/South Wales Borderers.

1/Kings Own Southern Borderers

1/Royal Inniskilling Fusiliers.

1/The Border Regiment.


88th Brigade:

4/Worcestershire Regiment.

2/Hampshire Regiment.

1/Essex Regiment.

1/5th Royal Scots (T.F.).


XV Brigade Royal Horse Artillery (B, L, & Y Batteries).

XVII Brigade Royal Field Artillery (13th, 26th & 92nd Batteries).

CXLVII Brigade Royal Field Artillery (10th, 97th & 368th Batteries).

460th (Howitzer) Battery Royal Field Artillery

90th Heavy Battery Royal Garrison Artillery

14th Siege Battery Royal Garrison Artillery


1/2nd London, 1/2nd Lowland & 1/1st West Riding Field Companies Royal Engineers (T.F.).

Divisional Cyclist Company


42nd (EAST LANCS.) DIVISION (Territorial Force)

Major General W. Douglas, C.B. [Resumed command from Brigadier General W. R. Marshall, 8th August.]


125th Brigade:
1/5th Lancashire Fusiliers

1/6th Lancashire Fusiliers

1/7th Lancashire Fusiliers

1/8th Lancashire Fusiliers


126th Brigade:

1/4th East Lancashire Regiment

1/5th East Lancashire Regiment

1/9th Manchester Regiment

1/10th Manchester Regiment


127th Brigade

1/5th Manchester Regiment

1/6th Manchester Regiment

1/7th Manchester Regiment

1/8th Manchester Regiment


1/1st East Lancashire Brigade Royal Field Artillery (4th, 5th & 6th Batteries). [4th Battery and I section 6th Battery did not arrive from Egypt until September.]

1/2nd East Lancashire Brigade Royal Field Artillery (15th, 16th & 17th Batteries). [In Egypt.]

1/3rd East Lancashire Brigade Royal Field Artillery (18th, 19th & 20th Batteries). [19th & 20th Batteries did not arrive from Egypt until September.]

1/4th East Lancashire (Howitzer) Brigade Royal Field Artillery (1st & 2nd Cumberland Batteries).

1/1st East Lancashire, 1/2nd East Lancashire & 1/2nd West Lancashire [Attached 52nd Division till 28th August.] Field Companies Royal Engineers


52ND (LOWLAND) DIVISION (Territorial Force)

Major General G. G. A. Egerton, C.B.


155th Brigade:
1/4th Royal Scots Fusiliers

1/5th Royal Scots Fusiliers

1/4th Kings Own Southern Borderers

1/5th Kings Own Southern Borderers


156th Brigade:

1/4th Royal Scots.

1/7th Royal Scots

1/7th Scottish Rifles.

1/8th Scottish Rifles.


157th Brigade:

1/5th Highland Light Infantry

1/6th Highland Light Infantry

1/7th Highland Light Infantry

1/5th Argyll & Sutherland Highlanders


1/2nd Lowland Brigade Royal Field Artillery[In Egypt.]

1/4th Lowland (Howitzer) Brigade Royal Field Artillery (1/4th & 1/5th City of Glasgow Batteries).

2/1st and 2/2nd Lowland Field Companies Royal Engineers

Divisional Cyclist Company


ROYAL NAVAL DIVISION

Major General A. Paris, C.B.


1st Brigade:
Drake Battalion

Nelson Battalion

Hawke Battalion

Hood Battalion


2nd Brigade:

No. 1 Battalion Royal Marines Light Infantry

No. 2 Battalion Royal Marines Light Infantry

Howe Battalion

Anson Battalion [On beach duties at Suvla.]


1st, 2nd & 3rd Field Companies Engineers.

Divisional Cyclist Company


IX CORPS

General Officer Commanding
Lieutenant General Hon. Sir F. W. Stopford, K.C.M.G.


Brigadier General, General Staff

Brigadier General H. L. Reed, V.C.


10TH (IRISH) DIVISION

Lieutenant General Sir B. T. Mahon, K.C.V.O.


29th Brigade: [Attached A. & NZ. Corps.]
10/Hampshire Regiment

6/Royal Irish Rifles

5/Connaught Rangers.

6/Leinster Regiment


30th Brigade:

6/Royal Munster Fusiliers

7/Royal Munster Fusiliers

6/Royal Dublin Fusiliers

7/Royal Dublin Fusiliers


31st Brigade:

5/Royal Inniskilling Fusiliers

6/Royal Inniskilling Fusiliers

5/Royal Irish Fusiliers

6/Royal Irish Fusiliers


6/Royal Irish Regt. (Pioneers).

LIV Brigade Royal Field Artillery (A, B, C & D Batteries). [Did not come further than Mudros. Eventually went to Salonika.

LV Brigade Royal Field Artillery (A, B, C & D Batteries). [A & C Batteries did not arrive from Egypt until Sept.]

LVI Brigade Royal Field Artillery (A, B, C & D Batteries). [At Helles. A & B Batteries did not arrive from Egypt until October.]

LVII (Howitzer) Brigade (H.Q. with. A & D Batteries only).

65th, 66thh and 85th Field Companies Royal Engineers

Divisional Cyclist Company


11TH (NORTHERN) DIVISION:

Major General F. Hammersley, C.B.    


32nd Brigade:
9/West Yorks Regiment

6/Yorkshire Regiment

8/West Riding Regiment

6/York & Lancashire Regiment


33rd Brigade:

6/Lincolnshire Regiment

6/The Border Regiment

7/South Staffordshire Regiment

9/Sherwood Foresters.


34th Brigade:    

8/Northumberland Fusiliers

5/Dorsetshire Regiment

9/Lancashire  Fusiliers

11/Manchester Regiment


6/East Yorkshire Regiment (Pioneers).

LVIII Brigade Royal Field Artillery (A, B, C & D Batteries).

LIX Brigade Royal Field Artillery (A, B, C & D Batteries).

LX Brigade Royal Field Artillery (A, B, C & D Batteries). [In Egypt. Eventually sent to Salonika.]

67th, 68th & 86th Field Companies Royal Engineers

Divisional Cyclist Company


13TH (WESTERN) DIVISION: [Attached A. & New Zealand Corps.]

Major General F. C. Shaw, C.B.


38th Brigade:
6/South Lancashire Regiment

6/Loyal North Lancashire Regiment

6/East Lancashire Regiment

6/King's Own.

9/Worcestershire Regiment


39th Brigade:

7/North Staffordshire Regiment

9/Worcestershire Regiment

9/Royal Warwickshire Regiment

7/Gloucestershire Regiment


40th Brigade:

4/South Wales Borderers

8/Royal Welch Fusiliers

8/Cheshire Regiment

5/Wiltshire Regiment


8/Welch Regiment (Pioneers)

LXVI Brigade Royal Field Artillery (A, B, C & D Batteries). [At Helles.]

LXVII Brigade Royal Field Artillery (A, B, C & D Batteries). [In Egypt. Eventually sent to Salonika.]

LXVIII Brigade Royal Field Artillery (A, B, C & D Batteries) [In Egypt. Eventually sent to Salonika.]

LXIX (Howitzer) Brigade Royal Field Artillery (A, B, C & D Batteries). [At Anzac.]

71st, 72nd and 88th Field Companies Royal Engineers
 
Divisional Cyclist Company


CORPS TROOPS

4th (Highland) Mountain Artillery Brigade (T.F.)

Argyllshire Battery and Ross & Cromarty Battery


ATTACHED IX CORPS


53RD (WELSH) DIVISION (Territorial Force) :

Major General Hon. J. E. Lindley. [Succeeded by Brigadier General Hon. H. A. Lawrence 19th August. Brigadier General W. R. Marshall took command 25th August.]


158th Brigade:
1/5th Royal Welch Fusiliers

1/6th Royal Welch Fusiliers

1/7th Royal Welch Fusiliers

1/1st Herefordshire Regiment


159th Brigade

1/4th Cheshire Regiment

1/7th Cheshire Regiment

1/4th Welch Regiment

1/5th Welch Regiment


160th Brigade

2/4th Queen's (R.W. Surrey Regiment)

2/10th Middlesex Regiment

2/4th R.W. Kent Regiment

1/4th Royal Sussex Regiment


1/1st Welsh & 2/1st Cheshire Field Companies Royal Engineers

Divisional Cyclist Company


54TH (EAST ANGLIAN) DIVISION (Territorial Force)

Major General FS Inglefield, C.B.


161st Brigade
1/4th Essex Regiment

1/6th Essex Regiment

1/5th Essex Regiment

1/7th Essex Regiment


162nd Brigade

1/5th Bedfordshire Regiment

14th Northamptonshire Regiment

1/10th London Regiment

1/11th London Regiment


163rd Brigade

1/4th Norfolk Regiment

1/5th Norfolk Regiment

1/5th Suffolk Regiment

1/8th Hampshire Regiment


1/2nd & 2/1st East Anglian Field Companies Royal Engineers

Divisional Cyclist Company


2ND MOUNTED DIVISION: [Dismounted]

Major General W. E. Peyton, C.B.


1st (South Midland) Brigade:
1/1st Worcestershire Yeomanry

1/1st Warwickshire Yeomanry

Gloucestershire Hussars.


2nd (South Midland) Brigade:

1/1st Royal Bucks Hussars

1/1st Berkshire Yeomanry

1/1st Dorset Yeomanry


3rd (Notts. & Derby) Brigade:

1/1st Sherwood Rangers

1/1st Derbyshire Yeomanry

1/1st South Notts Hussars.


4th (London) Brigade:

1/1st County of London Yeomanry

1/3rd County of London Yeomanry

1/1st City of London Yeomanry


5th Brigade: [Attached]

1/1st Hertfordshire Yeomanry

1/2nd County of London Yeomanry (Westminster Dns.).


AUSTRALIAN & NEW ZEALAND ARMY CORPS

General Officer Commanding
Lieutenant General Sir W. R. Birdwood, K.C.S.I.


Brigadier General, General Staff

Brigadier General A. Skeen.


1ST AUSTRALIAN DIVISION

Major General H. B. Walker, D.S.O.


1st Australian Brigade:
1st (New South Wales) Battalion

2nd (New South Wales) Battalion

3rd (New South Wales) Battalion

4th (New South Wales) Battalion


2nd Australian Brigade:

5th (Victoria) Battalion

6th (Victoria) Battalion

7th (Victoria) Battalion

8th (Victoria) Battalion


3rd Australian Brigade:

9th (Queensland) Battalion

10th (South Australia) Battalion

11th (West Australia) Battalion

12th (South Australia & West Australia and Tasmania) Battalion


I. (New South Wales) Field Artillery Brigade (1st, 2nd & 3rd Batteries).

II. (Victoria) Field Artillery Brigade (4th, 5th & 6th Batteries).

III. Field Artillery Brigade: 7th (Queensland), 8th (West Australia) & 9th (Tasmania) Batteries

1st, 2nd & 3rd Field Companies Australian Engineers.

4th (Victoria) Light Horse Regiment [Dismounted]


NEW ZEALAND & AUSTRALIAN DIVISION

Major General Sir A. J. Godley, K.C.M.G.


New Zealand Brigade:
Auckland Battalion

Otago Battalion

Canterbury Battalion

Wellington Battalion


4th Australian Brigade:

13th (New South Wales) Battalion

14th (Victoria) Battalion

15th (Queensland & Tasmania) Battalion

16th (South Australia & West Australia) Battalion


New Zealand Mounted Rifles Brigade: [Dismounted.]

Auckland Mounted Rifles

Wellington Mounted Rifles

Canterbury Mounted Rifles


1st Australian Light Horse Brigade: [Dismounted.]

1st (New South Wales) Regiment

2nd (Queensland) Regiment

3rd (South Australia & Tasmania) Regiment


Maori Detachment.

I. New Zealand Field Artillery Brigade (1st & 3rd Batteries & 6th How. Battery). [H.Q. and Bde, and 6th (Howitzer) Battery did not arrive from Egypt till October, New Zealand artillery was then organized in 2 brigades.]

II. New Zealand Field Artillery Brigade (2nd & 5th Batteries & 4th How. Battery). [H.Q. and Bde, and 6th (Howitzer) Battery did not arrive from Egypt till October, New Zealand artillery was then organized in 2 brigades.]

1st & 2nd Field Companies New Zealand Engineers.

New Zealand Field Troop, Engineers.

Otago Mounted Rifles [Dismounted.]


2ND AUSTRALIAN DIVISION: [Only 5th Australian Brigade present on peninsula in August. Remainder arrived from Egypt early in September.]

Major General J. G. Legge.


5th Australian Brigade:
17th (New South Wales) Battalion

18th (New South Wales) Battalion

19th (New South Wales) Battalion

20th (New South Wales) Battalion


6th Australian Brigade:

21st (Victoria) Battalion

22nd (Victoria) Battalion

23rd (Victoria) Battalion

24th (Victoria) Battalion


7th Australian Brigade:

25th (Queensland) Battalion

26th (Queensland & Tasmania) Battalion

27th (South Australia) Battalion

28th (West Australia) Battalion


4th & 5th Field Companies Australian Engineers.

13th (Victoria) Light Horse Regiment [Dismounted.]


CORPS TROOPS


2nd Australian Light Horse Brigade: [Dismounted.]
5th (Queensland) Regiment

6th (New South Wales) Regiment

7th (New South Wales) Regiment


3rd Australian Light Horse Brigade: [Dismounted.]

8th (Victoria) Regiment

9th (Vic. & South Australia) Regiment

10th (West Australia) Regiment


7th Indian Mountain Artillery Brigade [21st (Kohat) Battery and 26th (Jacob's) Battery

1 x 4.7-inch Gun.

3 x 6-inch Howitzers.


ATTACHED NEW ZEALAND & AUSTRALIAN DIVISION

29th Indian Infantry Brigade:
Major General H. V. Cox.

14th Sikhs

1/6th Gurkha Rifles

1/5th Gurkha Rifles

2/10th Gurkha Rifles.


G.H.Q. TROOPS


20TH BRIGADE, Royal Garrison Artillery:

10th, 15th & 91st Heavy Batteries Royal Garrison Artillery


24TH BRIGADE, Royal Garrison Artillery: [In Egypt.]

17th, 42nd & 43rd Siege Batteries Royal Garrison Artillery


ARMOURED CAR DIVISION (R.N.A.S.)

Nos. 3 [In Egypt.], 4 [In Egypt.], 9, 10, 11 & 12 [In Egypt.] Squadrons.


CORPS EXPEDITIONNAIRE D'ORIENT

Commander
General Bailloud.


1ST DIVISION:

General Brulard.


1st Metropolitan Brigade:
175th Regiment.

1st Regiment de marche d'Afrique (2 Battalions Zouaves, 1 Battalions Foreign Legion).

Foreign Legion Battalion (2 Companies).


2nd Colonial Brigade:

4th Colonial Regiment.

6th Colonial Regiment.


6 Batteries of Artillery (75-mm.).

2 Batteries of Artillery (65-mm.).


2ND DIVISION

3rd Metropolitan Brigade:
176th Regiment.

2nd Regiment de marche d'Afrique (3 Battalions Zouaves).


4th Colonial Brigade:

7th Colonial Regiment.

8th Colonial Regiment.


9 Batteries of Artillery (75-mm.).


CORPS ARTILLERY

1 Heavy Battery, 120-MM. Long (4.7-inch)

1 Heavy Battery, 155-mm- long (6-inch).

2 Heavy Batteries, 155-mm- short (6-inch)

2 Siege guns, 240-mm. (9.4-inch).

Battery of naval guns.


Further Reading:

AIF, MEF and the EEF

Desert Mounted Corps (DMC)

Battles where Australians fought, 1899-1920


Citation: Mediterranean Expeditionary Force, Order Of Battle, August 1915

Posted by Project Leader at 12:01 AM EADT
Updated: Sunday, 4 April 2010 11:25 PM EADT

Newer | Latest | Older

Full Site Index


powered by FreeFind
Let us hear your story: You can tell your story, make a comment or ask for help on our forum.

Desert Column Forum

A note on copyright

The Australian Light Horse Studies Centre is a not for profit and non profit group whose sole aim is to write the early history of the Australian Light Horse from 1900 - 1920. It is privately funded and the information is provided by the individuals within the group and while permission for the use of the material has been given for this site for these items by various donors, the residual and actual copyright for these items, should there be any, resides exclusively with the donors. The information on this site is freely available for private research use only and if used as such, should be appropriately acknowledged. To assist in this process, each item has a citation attached at the bottom for referencing purposes.

Please Note: No express or implied permission is given for commercial use of the information contained within this site.

A note to copyright holders

The Australian Light Horse Studies Centre has made every endeavour to contact copyright holders of material digitised for this blog and website and where appropriate, permission is still being sought for these items. Where replies were not received, or where the copyright owner has not been able to be traced, or where the permission is still being sought, the Australian Light Horse Studies Centre has decided, in good faith, to proceed with digitisation and publication. Australian Light Horse Studies Centre would be happy to hear from copyright owners at any time to discuss usage of this item.

Contact

Australian Light Horse Studies Centre

eXTReMe Tracker