« February 2009 »
S M T W T F S
1 2 3 4 5 6 7
8 9 10 11 12 13 14
15 16 17 18 19 20 21
22 23 24 25 26 27 28
You are not logged in. Log in


Search the site:


powered by FreeFind
Volunteer with us.

Entries by Topic All topics
A Latest Site News
A - Using the Site
AAA Volunteers
AAB-Education Centre
AAC-Film Clips
AAC-Photo Albums
AIF & MEF & EEF
AIF - Lighthorse
AIF - ALH - A to Z
AIF - DMC
AIF - DMC - Or Bat
AIF - DMC - Anzac MD
AIF - DMC - Aus MD
AIF - DMC - British
AIF - DMC - BWI
AIF - DMC - French
AIF - DMC - Indian
AIF - DMC - Italian
AIF - DMC - Medical
AIF - DMC - Remounts
AIF - DMC - Scouts
AIF - DMC - Sigs
AIF - DMC - Sigs AirlnS
AIF - DMC - 1 Sig Sqn
AIF - DMC - 2 Sig Sqn
AIF - DMC - Eng
AIF - DMC - Eng 1FSE
AIF - DMC - Eng 2FSE
AIF - DMC - GSR
AIF - 1B - 1 LHB
AIF - 1B - 6 MVS
AIF - 1B - 1 LHMGS
AIF - 1B - 1 Sig Trp
AIF - 1B - 1 LHFA
AIF - 1B - 1 LHR
AIF - 1B - 2 LHR
AIF - 1B - 3 LHR
AIF - 2B - 2 LHB
AIF - 2B - 7 MVS
AIF - 2B - 2 LHFA
AIF - 2B - 2 LHMGS
AIF - 2B - 2 Sig Trp
AIF - 2B - 5 LHR
AIF - 2B - 6 LHR
AIF - 2B - 7 LHR
AIF - 3B - 3 LHB
AIF - 3B - 8 MVS
AIF - 3B - 3 LHB Sigs
AIF - 3B - 3 LHFA
AIF - 3B - 3 LHMGS
AIF - 3B - 3 Sig Trp
AIF - 3B - 8 LHR
AIF - 3B - 9 LHR
AIF - 3B - 10 LHR
AIF - 4B - 4 LHB
AIF - 4B - 4 Sig Trp
AIF - 4B - 9 MVS
AIF - 4B - 4 LHFA
AIF - 4B - 4 LHMGS
AIF - 4B - 4 LHR
AIF - 4B - 11 LHR
AIF - 4B - 12 LHR
AIF - 5B - 5 LHB
AIF - 5B - 10 MVS
AIF - 5B - 5 LHFA
AIF - 5B - 5 Sig Trp
AIF - 5B - ICC
AIF - 5B - 14 LHR
AIF - 5B - 15 LHR
AIF - 5B - 1er Regt
AIF - 5B - 2 NZMGS
AIF - AASC
AIF - Aboriginal LH
AIF - Badges
AIF - Cars
AIF - Chinese LH
AIF - Double Sqns
AIF - Engineers
AIF - Fr - 22 Corps
AIF - Fr - 13 LHR
AIF - Honour Roll
AIF - HQ - 3rd Echelon
AIF - Marching Songs
AIF - Misc Topics
AIF - NZMRB
AIF - NZMRB - AMR
AIF - NZMRB - CMR
AIF - NZMRB - EFT
AIF - NZMRB - NZMFA
AIF - NZMRB - NZMGS
AIF - NZMRB - OMR
AIF - NZMRB - Sig-Trp
AIF - NZMRB - WMR  
AIF - Ships
AIF - Ships - Encountr
AIF - Ships - Una
AIF - WFF
AIF - Wireless Sqn
Battles
BatzA - Australia
BatzA - Broken Hill
BatzA - Liverpool
BatzA - Merivale
BatzB - Boer War
BatzB - Bakenlaagte
BatzB - Belmont
BatzB - Bothaville
BatzB - Buffels Hoek
BatzB - Coetzees Drift
BatzB - Diamond Hill
BatzB - Driefontein
BatzB - Elands
BatzB - Graspan
BatzB - Grobelaar
BatzB - Grootvallier
BatzB - Hartebestfontn
BatzB - Houtnek
BatzB - Karee Siding
BatzB - Kimberley
BatzB - Koster River
BatzB - Leeuw Kop
BatzB - Mafeking
BatzB - Magersfontein
BatzB - Modder River
BatzB - Onverwacht
BatzB - Paardeberg
BatzB - Palmietfontein
BatzB - Pink Hill
BatzB - Poplar Grove
BatzB - Rhenoster
BatzB - Sannahs Post
BatzB - Slingersfontn
BatzB - Stinkhoutbm
BatzB - Sunnyside
BatzB - Wilmansrust
BatzB - Wolvekuil
BatzB - Zand River
BatzG - Gallipoli
BatzG - Anzac
BatzG - Aug 1915
BatzG - Baby 700
BatzG - Evacuation
BatzG - Hill 60
BatzG - Hill 971
BatzG - Krithia
BatzG - Lone Pine
BatzG - Nek
BatzJ - Jordan Valley
BatzJ - 1st Amman
BatzJ - 2nd Amman
BatzJ - Abu Tellul
BatzJ - Es Salt
BatzJ - JV Maps
BatzJ - Ziza
BatzM - Mespot
BatzM - Baghdad
BatzM - Ctesiphon
BatzM - Daur
BatzM - Kurna
BatzM - Kut el Amara
BatzM - Ramadi
BatzN - Naval
BatzN - AE1
BatzN - Cocos Is
BatzN - Heligoland
BatzN - Marmara
BatzN - Zeebrugge
BatzN - Zeppelin L43
BatzNG - Bitapaka
BatzO - Other
BatzO - Baku
BatzO - Egypt 1919
BatzO - Emptsa
BatzO - Karawaran
BatzO - Peitang
BatzO - Wassa
BatzP - Palestine
BatzP - 1st Gaza
BatzP - 2nd Gaza
BatzP - 3rd Gaza
BatzP - Aleppo
BatzP - Amwas
BatzP - Ayun Kara
BatzP - Bald Hill
BatzP - Balin
BatzP - Beersheba
BatzP - Berkusieh
BatzP - Damascus
BatzP - El Auja
BatzP - El Buggar
BatzP - El Burj
BatzP - Haifa
BatzP - Huj
BatzP - JB Yakub
BatzP - Kaukab
BatzP - Khan Kusseir
BatzP - Khuweilfe
BatzP - Kuneitra
BatzP - Megiddo
BatzP - Nablus
BatzP - Rafa
BatzP - Sasa
BatzP - Semakh
BatzP - Sheria
BatzP - Surafend
BatzP - Wadi Fara
BatzS - Sinai
BatzS - Bir el Abd
BatzS - El Arish
BatzS - El Mazar
BatzS - El Qatiya
BatzS - Jifjafa
BatzS - Magdhaba
BatzS - Maghara
BatzS - Romani
BatzS - Suez 1915
BatzSe - Senussi
BatzWF - Westn Front
BW - Boer War
BW - NSW
BW - NSW - 1ACH
BW - NSW - 1NSWMR
BW - NSW - 2NSWMR
BW - NSW - 3ACH
BW - NSW - 3NSWIB
BW - NSW - 3NSWMR
BW - NSW - 5ACH
BW - NSW - A Bty RAA
BW - NSW - AAMC
BW - NSW - Aust H
BW - NSW - Lancers
BW - NSW - NSW Inf
BW - NSW - NSWCBC
BW - NSW - NSWIB
BW - NSW - NSWMR_A
BW - NZ
BW - Qld
BW - Qld - 1ACH
BW - Qld - 1QMI
BW - Qld - 2QMI
BW - Qld - 3ACH
BW - Qld - 3QMI
BW - Qld - 4QIB
BW - Qld - 5QIB
BW - Qld - 6QIB
BW - Qld - 7ACH
BW - QLD - AAMC
BW - SA
BW - SA - 1SAMR
BW - SA - 2ACH
BW - SA - 2SAMR
BW - SA - 3SACB
BW - SA - 4ACH
BW - SA - 4SAIB
BW - SA - 5SAIB
BW - SA - 6SAIB
BW - SA - 8ACH
BW - SA - AAMC
BW - Tas
BW - Tas - 1ACH
BW - Tas - 1TIB
BW - Tas - 1TMI
BW - Tas - 2TB
BW - Tas - 2TIB
BW - Tas - 3ACH
BW - Tas - 8ACH
BW - Vic
BW - Vic - 1VMI
BW - Vic - 2ACH
BW - Vic - 2VMR
BW - Vic - 3VB
BW - Vic - 4ACH
BW - Vic - 4VIB
BW - Vic - 5VMR
BW - Vic - 6ACH
BW - Vic - AAMC
BW - Vic - Scot H
BW - WA
BW - WA - 1WAMI
BW - WA - 2ACH
BW - WA - 2WAMI
BW - WA - 3WAB
BW - WA - 4ACH
BW - WA - 4WAMI
BW - WA - 5WAMI
BW - WA - 6WAMI
BW - WA - 8ACH
BW Gen - Campaign
BW Gen - Soldiers
BW General
Cavalry - General
Diary - Schramm
Egypt - Heliopolis
Egypt - Mena
Gen - Ataturk Pk, CNB
Gen - Australia
Gen - Legends
Gen - Query Club
Gen - St - NSW
Gen - St - Qld
Gen - St - SA
Gen - St - Tas
Gen - St - Vic
Gen - St - WA
Gm - German Items
Gm - Bk - 605 MGC
GW - 11 Nov 1918
GW - Atrocities
GW - August 1914
GW - Biographies
GW - Propaganda
GW - Spies
GW - We forgot
Militia 1899-1920
Militia - Area Officers
Militia - Inf - Infantry
Militia - Inf - 1IB
Militia - Inf - 2IB
Militia - Inf - 3IB
Militia - Inf - NSW
Militia - Inf - Qld
Militia - Inf - SA
Militia - Inf - Tas
Militia - Inf - Vic
Militia - Inf - WA
Militia - K.E.Horse
Militia - LH
Militia - LH - Regts
Militia - LH - 1LHB
Militia - LH - 2LHB
Militia - LH - 3LHB
Militia - LH - 4LHB
Militia - LH - 5LHB
Militia - LH - 6LHB
Militia - LHN - NSW
Militia - LHN - 1/7/1
Militia - LHN - 2/9/6
Militia - LHN - 3/11/7
Militia - LHN - 4/6/16
Militia - LHN - 5/4/15
Militia - LHN - 6/5/12
Militia - LHN - 28
Militia - LHQ - Qld
Militia - LHQ - 13/2
Militia - LHQ - 14/3/11
Militia - LHQ - 15/1/5
Militia - LHQ - 27/14
Militia - LHS - SA
Militia - LHS - 16/22/3
Militia - LHS - 17/23/18
Militia - LHS - 24/9
Militia - LHT - Tas
Militia - LHT - 12/26
Militia - LHV - Vic
Militia - LHV - 7/15/20
Militia - LHV - 8/16/8
Militia - LHV - 9/19
Militia - LHV - 10/13
Militia - LHV - 11/20/4
Militia - LHV - 19/17
Militia - LHV - 29
Militia - LHW - WA
Militia - LHW-18/25/10
Militia - Military Orders
Militia - Misc
MilitiaRC - Rifle Clubs
MilitiaRC - NSW
MilitiaRC - NT
MilitiaRC - Qld
MilitiaRC - SA
MilitiaRC - Tas
MilitiaRC - Vic
MilitiaRC - WA
Militiaz - New Zealand
Tk - Turkish Items
Tk - Army
Tk - Bks - Books
Tk - Bks - 1/33IR
Tk - Bks - 27th IR
Tk - Bks - Air Force
Tk - Bks - Yildirim
Tk - POWs
Wp - Weapons
Wp - Hotchkiss Cav
Wp - Hotchkiss PMG
Blog Tools
Edit your Blog
Build a Blog
RSS Feed
View Profile
Open Community
Post to this Blog
Site Index
Education Centre
LH Militia
Boer War
Transport Ships
LH Battles
ALH - Units
ALH - General
Aboriginal Light H
Weapons
Ottoman Sources

"At a mile distant their thousand hooves were stuttering thunder, coming at a rate that frightened a man - they were an awe inspiring sight, galloping through the red haze - knee to knee and horse to horse - the dying sun glinting on bayonet points..." Trooper Ion Idriess

The Australian Light Horse Studies Centre aims to present an accurate history as chroniclers of early Australian military developments from 1899 to 1920.

The Australian Light Horse Studies Centre site holds over 12,000 entries and is growing daily.

Contact: Australian Light Horse Studies Centre

Let us hear your story: You can tell your story, make a comment or ask for help on our Australian Light Horse Studies Centre Forum called:

Desert Column Forum

WARNING: This site contains: names, information and images of deceased people; and, language which may be considered inappropriate today.

Tuesday, 10 February 2009
WMR, NZMRB account about Romani
Topic: AIF - NZMRB - WMR

Wellington Mounted Rifles

Battle of Romani, Sinai, August 4 to 5, 1916


Wellington Mounted Rifles account about the Battle of Romani


Romani - Painting by Thomas Henry Ivers

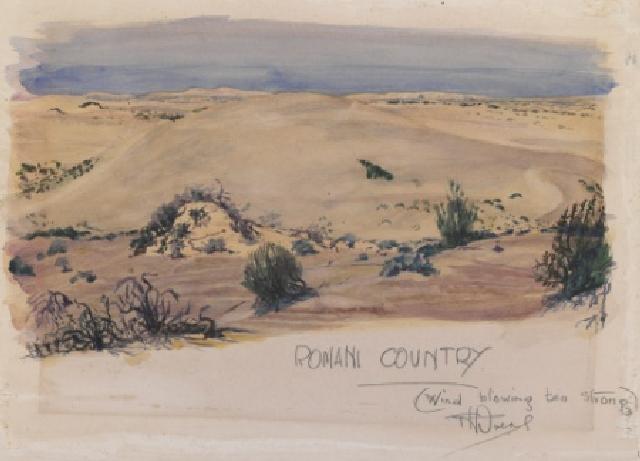
[From: AWM ART02598]


Major Alexander Herbert Wilkie, Adjutant of the Wellington Mounted Rifles, a unit which was part of the New Zealand Mounted Rifles Brigade, wrote an account of this unit in 1924 called Official War History of the Wellington Mounted Rifles Regiment - 1914 - 1919, in which included a section specifically related to the battle of Beersheba and is extracted below. A copy of this book is available on the New Zealand Mounted Rifles Association website.


Wilkie, AH, Official War History of the Wellington Mounted Rifles Regiment - 1914 - 1919, (Auckland 1924).


Battle of Romani Operations

At this time our defensive line extended from the vicinity of Mehamdiyeh, an ancient watering-place, on the left, and then continued southward for a distance of six miles along a line of sand dunes to Katib Gannet, a razor-backed sandhill a mile and a-half south-east of Bir Et Maler. This line was entrenched and held by the 52nd (Lowland) Scottish Division, and it covered the railhead then at Romani, the remainder of the railway being protected by the 1st and 2nd Brigades near Romani and Bir Et Maler and by the New Zealand and 5th Yeomanry Brigades at Hill 70. The two latter brigades guarded also the water-pipe and telegraph lines from Kantara

Lieut.-General H. A. Lawrence commanded the troops in the forward zone, his infantry reserves being some distance in the rear. The headquarters of the Commander-in-Chief, Sir Archibald Murray, were then at Cairo, 130 miles from Romani

On 22nd July the W.M.R. encountered the enemy near Sagia, and the 2nd Squadron captured seven prisoners. The Turks were gradually pressing forward, making no attempt to conceal themselves, their idea apparently being to make as much display as possible in order to impress on our troops his great strength. During the next few days the 1st and 2nd Brigades were kept busy checking the enemy, and on the 28th the 2nd W.M.R. Squadron encountered strong opposition at Umm Ugba, two miles north of Katia. The Turks had taken the Hod there, and were within striking distance of the wells at Katia, so Colonel Meldrum, who commanded our left flank facing Umm Ugba, asked permission from General Royston to take the Hod and to have two guns to assist in the attack. General Royston, who loved a fight, consented, and the attack was made by two W.M.R. Squadrons under cover of machine-gun and artillery fire, and carried out at the point of the bayonet with great determination. The enemy were driven out of the Hod, leaving sixteen dead and eight unwounded prisoners on our hands. The Lewis gunners, under Lieutenant Herrick, performed particularly good work. Finally the Ayrshire Battery shelled an enemy camp at Sagia, on our right, and scattered it

Meanwhile the Turks had been advancing their left flank towards Bir Nagid, where posts of the New Zealand Brigade were located

The country on our right flank, towards Katia, was quite open, and through it ran the ancient road connecting Katia with Duiedar. The possibility of the Turkish attack developing in that direction had been considered by General Lawrence in consultation with Divisional Commanders, and the question as to whether the high ground known as "Wellington Ridge," eight hundred yards south of the W.M.R. camp, should be held and defended was discussed. General Chauvel favoured this being done, and his representations were well grounded, as will be seen later. Wellington Ridge commanded the Light Horse Camps, but it was considered to be too isolated for an Infantry post to hold, so the idea of holding and defending it was abandoned

Early on the morning of August 3rd the 2nd Brigade relieved the 1st Brigade, observing the enemy at Katia. The W.M.R. was advance guard that day, and they soon came under heavy fire. The Turks were in strength, and there was great activity along their positions, so the 2nd Brigade took up an outpost line to keep them under observation, till nightfall, when the Brigade commenced to return to Et Maler, leaving officers' patrols to watch the enemy

At this time the enemy line ran generally as follows :- From a point on his right six miles east of Romani, through the Katia Oasis, and thence to Bir Nagid, his left - a total of seven miles

Meanwhile two regiments of the 1st Brigade had taken up an outpost line three miles in length from Wellington Ridge southward on the right of the Infantry line through Mount Meredith to Hod El Enna to cover the entrants to the gullies which opened towards Katia from the Romani camps. In view of subsequent events, this disposition proved to be a wise one, the presence of these posts confusing the enemy when he appeared and delaying his advance for some time

When the 2nd Brigade withdrew from Katia the Turks must have followed close on its heels, for at 11.30 p.m. the 1st Brigade reported that an enemy force was moving along its front, and just before midnight firing began, principally at Mount Meredith and Hod El Enna. The enemy was found to be in great strength in both these places, and the 2nd Light Horse Brigade, which had reached camp; was ordered out

This brigade did not immediately take part in the fight, being placed under cover of Wellington Ridge, but eventually its firmness and tenacity assisted in checking and finally defeating the Turkish advance

Soon after the Turks had commenced to attack Mount Meredith, firing ceased for some time. This was mystifying at first, but it later transpired that the lull was due to the Turks having wrongly estimated the position of the line held by our troops, as captured enemy maps showed our line much further back. The Light Horse posts around Mount Meredith had not been anticipated by the Turkish Commander, and when our true position became known he had to remodel his plans

At 2.15 on the morning of the 4th, however, heavy firing broke out all along the line, the Turks apparently being ordered to attack whatever was in front of them

The troops at Hod El Enna and Mount Meredith were sorely pressed, and began to withdraw gradually. The enemy pressed the attack with great vigour, and events around Mount Meredith began to develop rapidly. Strong bodies of the enemy were outflanking our right, gaining ground slowly, and at 4 a.m. the 1st Brigade was forced back towards Wellington Ridge. The Turks had meanwhile captured Mount Meredith and had lined the crest, bringing machine guns into action

At daybreak, as the situation became more acute, General Royston extended the 6th and 7th Light Horse Regiments from the right of 1st Brigade westward, his instructions being to hold Wellington Ridge at all costs. The W.M.R. were in reserve behind the northern slopes of the hill in a depression, and with them were the led horses of the 6th and 7th Regiments. This depression afforded the only available cover for the horses, on account of heavy rifle and machine-gun fire which raked the ground around it, but the horses in massed formation presented a splendid target for enemy air craft, which were then active, and when a number of them suddenly appeared, flying low, some anxious moments were passed. Fortunately, the airmen did not observe the packed horses beneath them, and they directed their bombs, without result, at the Leicester Battery, close by

Just before 5 a.m. the enemy's guns - some of them being 5.9. calibre - opened fire along Wellington Ridge, and they searched the ground in rear The enemy flanking movement continued, and aeroplane bombing became more active. At the same time machine-gun fire from Mount Meredith swept Wellington Ridge, making the southern slopes of the latter untenable, and the 1st Brigade was ordered to withdraw to a knoll further back. A little later the 1st Brigade was driven from the Knoll, but the 2nd Brigade, fighting stubbornly, clung to the western slopes of Wellington Ridge

Divisional headquarters had meanwhile also moved back, and established itself in the W.M.R. camp. Colonel Meredith was then ordered to collect the 1st A.L.H. Brigade, which was retiring on Et Maler, and later one of its regiments was sent to strengthen our right

At seven o'clock the W.M.R. took up a position on the left rear of the 6th and 7th Light Horse Regiments, the movement being carried out at the gallop under very heavy rifle and machine-gun fire. The Turks were then advancing rapidly towards Wellington Ridge, and the 6th and 7th Regiments were withdrawn to take up a line on the right of the W.M.R. the latter covering the retirement. The Turks thereupon occupied Wellington Ridge, and the high ground overlooking the Light Horse camps, which now came under heavy artillery, machine-gun, and rifle fire. It will thus be seen that the line taken up by Colonel Meldrum lay between the Turks and the Et Maler Camps, and it was owing to the stiff resistance maintained there, supported by the fire of the Ayrshire and Leicester Batteries, that the Turkish advance towards Romani railway station was held up

The fight had now reached a very interesting stage. Our defence line was very thinly held; all our regimental reserves had been absorbed into it, and the Infantry reserves were not in sight. The Turks, however, did not appear to fully appreciate the situation; they hesitated for a time on Wellington Ridge, when they might have used their greater numerical strength to better advantage, and it was during this time that fate was to turn against them

Meanwhile the general situation had apparently been viewed with some alarm in the vicinity of Divisional Headquarters, where the orderly-room clerk of the W.M.R. had been ordered to burn the regimental records. The cooking utensils and other impediments had been packed for removal when the quarter-master of the W.M.R. arrived from the firing line, where the Turks had been checked, and he arranged with the cooks to unpack the dixies and serve up tea in the firing line. The cooks responded readily, and in the face of heavy artillery and rifle fire they carried the tea to their comrades, who, having had no time to breakfast, fully appreciated it

The enemy were meanwhile pressing forward between Et Maler and Mount Royston, a big sandhill on the left of his line, three and a-half miles west of Mount Meredith, and during this momentous phase in the operations General Royston was the most noticeable and ubiquitous figure on the battlefield Although wounded himself, he rode amongst his men, for whom he always had a cheery word, inspiring them and exhorting them to take cover, while openly exposing himself. The General was most energetic throughout the fighting, and used up no fewer than eight horses during the day

At 9.45 a composite Regiment of Yeomanry gained touch with the enemy two miles south-west of Mount Royston, the Anzac Division at that time being extended from Wellington Ridge, where the W.M.R. held the left on the line to some sandhills north of Mount Royston, our right, where the Yeomanry soon joined up. A little later two companies from the 156th Infantry Brigade took over part of our line from the 7th L.H. Regiment on the right of the W.M.R., thus enabling the line to be extended further westward to check the enemy advancing there

Meanwhile the N.Z.M.R. Brigade had been advancing from Hill 70, and at eleven o'clock it reached Canterbury Hill, close to Mount Royston, the key of the position. The arrival of the N.Z. Brigade and Yeomanry at this point was most opportune and, commencing to attack immediately, they ultimately changed the whole aspect of the fight. The Turks were entrenched, and they defended stubbornly, but the New Zealanders gradually closed in on them, and by five o'clock, on the approach of the 42nd Infantry Division, General Chaytor was able to thrust all his mounted reserves into the fight, and Mount Royston was captured at the point of the bayonet

At six o'clock the Infantry arrived, too late to take part in the fighting, but they garrisoned Mount Royston whilst the mounted troops continued to attack further on the left

The forward move of the mounted troops on the right flank continued till darkness set in, when an outpost line was taken up by the two L.H. Brigades and two battalions of Infantry, these continuing the line from the right of the 52nd Division to Mount Royston, facing the enemy, who still held Wellington Ridge

Although the 1st and 2nd Brigades had been moving continuously for about twenty hours, and it must be remembered that the W.M.R. and the 6th and 7th Regiments had already been without sleep for two nights, they were confident of dislodging the enemy next morning. The tenacity in holding up the Turks close on their camp and the opportune arrival of the New Zealand Brigade at Mount Royston had saved the day, and it was from that time that the Turks lost their offensive, never to regain it

About 1200 prisoners were taken, also a mountain battery and a machine gun

The W.M.R. casualties were :- Five officers and 19 other ranks wounded

Altogether the battle cost the British about 800 casualties - killed, wounded, and missing. Firing continued after dark all along the line, the enemy using artillery

The 3rd A.L.H. Brigade and the Inverness Battery arrived at Duiedar at 8.30, and halted there for the night. So far, this Brigade had not been engaged

Orders for next day's operations were then issued, they being briefly to the effect that a general advance would commence at daylight to dislodge and drive back the enemy, who had retired to a line of entrenched positions from Hod El Enna, his left, through Katia to Abu Hamra; the Anzac Division to thrust forward all along the line, with its right on Hod El Enna and its left with the 52nd Infantry Division. The latter was to strike at Abu Hamra and the 42nd Division on Katia, but after the initial attack the Infantry gave little assistance during the rest of the day. The 3rd A.L.H

Brigade was directed on Hamisah to turn the Turkish left and cut in behind the enemy, but it made little headway

The counter-attack commenced at four o'clock on the morning pf 5th August, the W.M.R., with the 7th A.L.H. Regiment on its right, and supported on the left by the Welsh Fusiliers, charging with fixed bayonets across the broken country which separated them from the main Turkish position on Wellington Ridge. They encountered heavy rifle and machine-gun fire, but, rushing up the slopes in an irresistible charge, they quickly broke through the Turkish front line. The enemy soon became demoralised, and our troops advanced from ridge to ridge without a stop and completely overwhelmed the Turks, who surrendered in hundreds. Without waiting to hand over the prisoners, Lieut.Colonel Meldrum ordered up his horses and remounted the Regiment, and, taking with him a section of machine-gunners from the 2nd A.L.H. Brigade under Lieutenant Zouch, pursued the retreating Turks towards Katia, gathering prisoners en route

Meanwhile the 1st A.L.H. Brigade on the right had moved south-east on Hod El Enna

At 6.35 General Chauvel was placed in command of all the mounted troops, and as the W.M.R. had commenced the pursuit of the demoralised retreating enemy without orders Divisional Headquarters were notified en route by helio of the Regiment's action and of its intention to push forward

The Regiment relentlessly pursued the enemy, capturing hundreds of prisoners, till it approached Katia, where it came under heavy fire. The eastern portion of Katia was found to be strongly held, and a fusillade of machine guns and rifle fire, supported by a mountain battery, held up the further advance of the Regiment

Dismounting two squadrons, the Officer Commanding took up a position with six machine guns. As the Regiment was unable to advance further without assistance, Headquarters were advised of the situation. The Regiment remained in this position till 9 a.m., closely observing the enemy. Although the numerical strength of the Regiment was very small in comparison with the force opposed to it, its presence so close on the heels of the enemy plainly agitated the latter, who maintained a most vigorous fire from battery machine guns and rifles

After the very successful advance from Romani, during which about 2000 Turks, some Germans, a battery, and six machine guns had been captured, the remainder of the mounted troops commenced to concentrate near Katia, where the W.M.R. were still holding their position close to the rearguard of the enemy and patrolling the surrounding country. These patrols were very successful, and one of them, under Lieutenant Allison, captured 93 prisoners and 80 camels, besides an ammunition supply dump

At 9 a.m., however, Lieut.-Colonel Meldrum received an urgent appeal for assistance from the C.R.A., who, was moving forward with two batteries, and who reported that he was being attacked from the north-east by Turks two miles east of Katib Gannit. Two squadrons of the W.M.R. were immediately withdrawn to protect the Artillery, the other squadron remaining in position to keep touch with the Turkish Main Body; but on their arrival at the position indicated it was found that the attack on the guns had not materialised, though one battery, the Leicesters, had retired. The Ayrshire Battery was brought up. and put into action against the Turkish rearguard, and the two W.M.R. Squadrons again took up their former positions

At 10 a.m. Lieut.-Colonel Meldrum received word that he was temporarily in command of the' 2nd A.L.H. Brigade, vice Brig.-General Royston, wounded, so, handing over the Regiment to Major Spragg, he set to work to gain touch with the 6th and 7th A.L.H. Regiments and to concentrate his Command

Colonel Meldrum's appointment proved a most popular one. His previous series of successes on Gallipoli and elsewhere won for him the confidence and respect of Australians and New Zealanders alike. He fully understood his men. He appreciated the splendid fighting qualities they possessed, and used then to the best advantage. He quickly recognised good work and promptly acknowledged it. The Colonel's indomitable determination and tenacity in defence, his aggressiveness in attack, and frequent use of the bayonet, prompted the Australians to refer affectionately to him as "Fix-Bayonets Bill" - surely a soubriquet to be proud of.

 
Additional Reading:

Battle of Romani, Sinai, August 4 to 5, 1916, Contents

Bir el Abd, Sinai, August 9, 1916


Citation: WMR, NZMRB account about Romani

Posted by Project Leader at 12:01 AM EAST
Updated: Tuesday, 7 April 2009 4:46 PM EADT
Friday, 9 January 2009
The Battle of Rafa, Sinai, 9 January 1917, Wellington Mounted Rifles Regiment, Roll of Honour
Topic: AIF - NZMRB - WMR

The Battle of Rafa

Sinai, 9 January 1917

Wellington Mounted Rifles Regiment

Roll of Honour


Poppies on the Auckland Cenotaph plinth


The Roll of Honour contains the names of all the men known to have served at one time with the Wellington Mounted Rifles Regiment and gave their lives in service of New Zealand during the Battle of Rafa, Sinai, 9 January 1917.


Roll of Honour


George Alexander MITCHELL, Killed in Action


Gordon (Clarence Gordon) ABERCROMBIE, Killed in Action


Jack CLARK, Killed in Action

Arthur Clarence COOK, Killed in Action

Michael Joseph CURTIS, Died of Wounds


Ewen ELMSLIE, Died of Wounds


John Fairly GRAHAM, Died of Wounds

Thomas Robert GRAHAM, Killed in Action


Stanley Whitmore KELSEY, Killed in Action

Harry KERSHAW, Killed in Action


Robert McPHUN, Killed in Action

George William MURRAY, Died of Wounds


William Alfred OTTAWAY, Killed in Action


Eion Alister ROBERTSON, Killed in Action


Lest We Forget


Further Reading:

Wellington Mounted Rifles Regiment

Wellington Mounted Rifles Regiment, Roll of Honour

The Battle of Rafa, Sinai, 9 January 1917

The Battle of Rafa, Sinai, 9 January 1917, Roll of Honour

The Palestine Campaign, 1917 - 1918

Battles where Australians fought, 1899-1920


Citation: The Battle of Rafa, Sinai, 9 January 1917, Wellington Mounted Rifles Regiment, Roll of Honour


Posted by Project Leader at 12:01 AM EAST
Updated: Saturday, 29 January 2011 12:41 PM EAST
Tuesday, 23 December 2008
The Battle of Magdhaba, Sinai, December 23, 1916, WMR Unit History Account
Topic: AIF - NZMRB - WMR

The Battle of Magdhaba

Sinai, 23 December 1916

WMR Unit History Account


Major Alexander Herbert Wilkie, Adjutant of the Wellington Mounted Rifles, a unit which was part of the New Zealand Mounted Rifles Brigade, wrote an account of this unit in 1924 called Official War History of the Wellington Mounted Rifles Regiment - 1914 - 1919, in which included a section specifically related to the Battle of Magdhaba and is extracted below. A copy of this book is available on the New Zealand Mounted Rifles Association website.


Wilkie, AH, Official War History of the Wellington Mounted Rifles Regiment - 1914 - 1919, (Auckland 1924).

Capture of El Arish and Battle of Magdhaba

The advance of the Desert Column against El Arish commenced at nightfall on 20th December, the plan being, briefly, to the effect that the town was to be surrounded by dawn next day - the 1st L.H. Brigade to cross the Wadi El Arish and, with the Camel Brigade on their left, to close all exits to the north and east, the N.Z.

Brigade and the 3rd L.H. Brigade to cover the town from the south, whilst the Yeomanry closed in on the west.

The going became very rough, and as the troops advanced in the darkness the horses, although at times buried almost belly-deep in the shifting sand, climbed the high and precipitous dunes and presented weird spectacles silhouetted against the sky.

The New Zealand Brigade was accompanied by Divisional Headquarters, and at dawn the column halted close to its objective. This was striking testimony to the excellent judgment and leadership of Lieutenant Finlayson of the A.M.R., in charge of the vanguard, and when visual communication was established with the other brigades it was ascertained that all had reached their positions. A complete cordon enveloped El Arish, and when our patrols entered the town they found that the Turks had left- The horses, assisted by the camels, were largely the cause of this bloodless victory, for the Turks feared the speed and wide striking range of the former, and preferred to leave rather than defend the well-prepared and excellently-sited trenches at El Arish and Masaid on the beach close by. They were anxious about the safety of their line of retreat, and left before the mounted troops could attack them in the rear and cut them off altogether. Their fears were quickly realised, however, at Magdhaba, where they were soon to be intercepted.

The inhabitants of El Arish were secured and the water of the town tested and found good, and then, at 10 a.m., information was received that 5,000 Turks had left El Arish three days previously for Magdhaba. At the same hour the Desert Column Commander, Lieut.-General Sir Philip Chetwode, arrived on El Arish beach by launch from Port Said, and urged the necessity of pursuing the retreating enemy immediately.

With this immediate pursuit in view, General Chetwode had already arranged for a special camel convoy, with rations and horse feed, to arrive at El Arish on that day.

Watering arrangements had already been made in the Wadi, and aeroplanes equipped to enable them to communicate direct with Headquarters.

The projected sudden attack on the retreating enemy reminded one of the "surprise" tactics adopted by General French, with great success, against the Boers during the South African campaign - viz., to catch the enemy unawares by utilising the mobility of mounted troops to harass, demoralise, and attack him from unexpected points.

The horses were already tired, after their long march from Mazar, but the element of surprise against Magdhaba was not to be lost. The Turks there probably knew that El Arish had fallen, but felt secure from immediate attack by tired troops with a possible three-days' march separating them. They were so sure of this, in fact, that they kept fires burning till morning, with the result that the position of their bivouac could be seen for miles by our troops, and our men responded most willingly to the order to continue the march. The bed of the Wadi El Arish, along which the column moved, is quite hard, and the ring of the horses' hoofs on it was like music to the men.

The weather was cold, but the going excellent, and good progress was made.

Each hour was divided into forty minutes' riding, ten minutes' leading to warm the men, and ten minutes' halt.

The fires at the enemy camp at Magdhaba having been seen at 3.50 a.m. the force continued to advance till 4.50 a.m., when it halted and dismounted in an open plain some four miles from its objective.

The number of bivouac fires indicated a considerable force, and the position appeared much closer than it really was, owing to the brightness of the lights being very misleading as to distance.

A personal reconnaissance of the position was then made by the General Officer Commanding and Staff, Brigadiers and Major Barlow, of the Intelligence Department, the last named having local knowledge. At daybreak the bivouac fires disappeared, and the valley was hidden for some time in a haze of smoke. The reconnaissance, therefore, could not be completed as soon as expected. The huts in the village, however, were located with the assistance of Major Barlow, and the hospital was seen a little later. A plan of attack was then decided upon.

About this time an aeroplane message was received, which had apparently not been despatched for official use. Its author had flown over the enemy position and bad been given such a warm reception there that his feelings prompted him to advise his friends - for home consumption only - that "the ---'s are there alright." This important message, however, fell near Divisional Headquarters, who at once acted on its main information without questioning the parentage of the Turks opposed to them.

The village of Magdhaba is surrounded on the west, south, and east by the Wadi El Arish, which affords splendid cover for riflemen and defensive purposes generally. Redoubts had been constructed to strengthen the position further, and to the north, where the country was fairly open, were two particularly strong redoubts with four mountain guns to support them. Towards these redoubts the New Zealanders were directed, and, pressing forward with great determination and co-operating with other troops in the final phases of the fight, the W.M.R. attacked and captured the strongest redoubt - No. 5.

At 8.22 a.m. orders for the attack were issued as follows:- The N.Z.M.R. and the 3rd A.L.H. Brigades, under General Chaytor, to move round by the north and north-east of Magdhaba, taking advantage of all cover, to attack' the enemy's right and rear, and to cut off his retreat. The attack to commence as soon as the Divisional Artillery opened and to be pressed home. The Camel Brigade to move straight on Magdhaba with its centre on the telegraph line. The C.R.A. to select a position to open fire on the enemy. The 1st A.L.H. Brigade to be in reserve and move south-east along the telegraph line. The Hong Kong and Singapore Mountain Battery to be in position on the left of the Camel Corps.

Whilst our troops were moving to their respective posts to attack, aeroplane reports were received from time to time reporting estimated positions, strength, and movements of the enemy at various points. The strongest position held by the Turks appeared to be Redoubt No. 5, which was surrounded by rifle pits at irregular intervals, strongly manned and being continually reinforced. The whole country favoured the enemy, who took full advantage of the many folds in the ground to conceal himself, and some manoeuvring was necessary before his positions could be located.

At 9.25 a.m. a reconnaissance was made by the Brigade Commander and Officers Commanding Regiments of the New Zealand Brigade, after which the Brigade occupied a new position at a point some three miles north of Magdhaba. From here the enemy was seen strongly holding a scrubby ridge running from Magdhaba eastwards, and covering the road and the Wadi. Behind this ridge clouds of dust were observed, on which our aeroplanes dropped several bombs, and at the same time small, scattered parties of horsemen and camels were seen retiring behind Hill 345 (two miles south-east of Magdhaba). The Camel Brigade was, therefore, requested to press forward to enable an attack to be made on the Hill. The enemy position was a strong one - on both sides of the Wadi El Arish, - his principal defences being five large well-sited works, between which were skilfully concealed trenches and rifle pits.

At 9.55 a.m. General Chaytor directed the C.M.R. on 345, and the W.M.R. against a ridge on the C.M.R.'s right, both regiments to swing round towards Magdhaba. The A.M.R. was held in reserve.

The Regiment's screen, which advanced at the gallop, immediately drew fire as it traversed the open country which lay between it and the Turkish positions, the two Regiments following in line of troop columns, accompanied by Vickers and Lewis guns. Stunted bushes and ant-hills afforded ample cover to enemy snipers, and when the main body arrived at a point about a mile from the Turkish position four enemy mountain guns opened fire on it, but the regiments pressed forward to a point 1600 yards from the enemy, where they dismounted to attack on foot.

Meanwhile, the screen, handled in masterly style by Lieutenant Levien, had displayed great boldness. It had advanced under heavy fire right up to the enemy trenches, but on drawing fire from the whole length of the line it returned to a dominating position 400 yards from the enemy, where it dismounted, opened fire, and prevented his escape. The success of this movement was due in a large measure to the determination and resourcefulness of Sergeant L. K. G. Bull, who had charge of a section. Shortly afterwards the screen was reinforced by two Lewis guns, under Lieutenant Herrick, and two Vickers guns, under Lieutenant D. E. Batchelar. A fire fight then ensued, and thus early in the day the enemy in front of the New Zealanders was pinned down and committed to battle.

Meanwhile, the main body of the New Zealanders was pressing forward towards its objective, supported by machine and Lewis gun fire, and taking advantage of the scanty cover afforded till it reached a point about 600 yards from the enemy trenches, where it encountered heavy machine-gun and rifle fire.

At 10 a.m. General Chaytor ordered the 3rd Brigade to move to a point a mile and a-half south-east of the New Zealand Headquarters to support the attack or to further envelop the enemy's right if the situation at Magdhaba had been cleared up in the meantime.

The dispositions of the enemy's forces having now become more clear, the Camel Brigade attack was deflected half-right, and its firing line reinforced to enable it to gain touch with the New Zealand Brigade on its left. The Hong Kong and Singapore Mountain Battery supported this attack, and at 11 a.m. the 9th W.M.R.

Squadron reinforced the left flank of the 6th Squadron, then 500 yards from the enemy.

At 11.15 a.m. the New Zealand Brigade reported that the enemy was retiring from the left, and half an hour later the General Officer Commanding the Division came forward to survey the general position, which at 11.50 a.m. was as follows:- The New Zealand Brigade (less the A.M.R., in reserve) was engaged with and had partially enveloped the enemy's right. The 3rd Brigade (less the 10th Regiment) was in reserve. The 10th A.L.H. Regiment was making a wide detour via Aulid Ali, three and a-half miles south-east of Magdhaba, round the enemy's right. Part of the Camel Brigade was moving direct on the village (one battalion in reserve). The 1st Brigade was working up against the enemy's left by way of the Wadi, but its 2nd Regiment had been sent to the south, and was now on high ground overlooking the enemy's rear.

On account of mirage and dust clouds, good observation was impossible.

These handicaps hindered our gunners very considerably, for, apart from the redoubts, no targets were visible.

As the attack developed, at 12.30 two regiments of the 3rd L.H. Brigade were sent forward to fill a gap of some eight hundred yards between the W.M.R. and C.M.R., and the advance continued; but progress was slow, for the Turks were stubbornly defending.

Half an hour later it was realised that the redoubts at Magdhaba were much stronger than had been anticipated, and General Chauvel wired to Desert Column pointing out that no progress was being made, that the horses had been a very long time without water, that the nearest water was at El Arish, if Magdhaba was not taken, and that the capture of the latter appeared improbable. General Chauvel therefore proposed to Desert Corps to issue orders for a withdrawal.

In answer to this, Desert Column strongly urged that the fight should not be abandoned, even at the cost of some horses. It suggested that as a preliminary the artillery should be conc6ntrated on one redoubt, and that the latter should be stormed with the bayonet after dark. A telephone communication between General Chetwode and General Chauvel followed, and orders were immediately issued to continue the pressure, and that a concerted effort should be made by all units at 4.30 p.m., the General Officer Commanding the Desert Column to arrange in the meantime that, if possible, horse water should be sent forward to meet the column on the return journey.

The capture of Magdhaba before nightfall was therefore a matter of dire necessity, and the troops responded magnificently to carry it out. Continuous pressure was brought to bear on the enemy, and by 2 p.m. a decided change had come over the situation. The New Zealanders and the 8th and 9th L.H. Regiments were in close proximity to the huts in the village; the 1st L.H. Brigade had captured a bridgehead and 100 prisoners, and the 10th L.H. Regiment had enveloped the enemy's right. At the same time, the attack was being vigorously pressed along the ridge and the enemy being driven back towards Magdhaba.

Every effort was made to overwhelm the enemy quickly, and one squadron of the 2nd A.L.H. Regiment was sent to the right to reinforce the line between the 3rd L.H. Regiment and a squadron of the 2nd LH. Regiment working round the enemy left.

The enemy apparently realised his precarious position, for at 2.50 p.m.

General Chaytor reported that the Turks were endeavouring to retire from the north of the buildings in the village. The New Zealanders and the 3rd L.H. Brigade were now pressing the enemy with great determination, and at 3.55 p.m. the W.M.R. fixed bayonets, and when they were within striking distance of the enemy in a redoubt facing them the Turks hoisted white flags. Some of our men, unfortunately, exposed themselves too quickly, under the impression that the whole line of Turks had surrendered, but they were fired on from the right, and the attack was immediately resumed. Lieutenant N. Harding, of the Regiment, was mortally wounded by this burst of fire. Machine-gun, Lewis gun and rifle fire was then directed for some minutes at the wavering Turks, who again hoisted white flags and, coming out of their trenches unarmed, surrendered.

At 4 p.m. Redoubt No. 2 was carried by the 1st Brigade. At the same time the Camel Brigade advanced to the assault. The 3rd Brigade was in close touch with the enemy, and the 10th A.L.H. Regiment was attacking him in the rear.

At 4.50 p.m. General Chaytor was able to report that our troops held the buildings and redoubts on the 1eft. Then the 10th A.L.H. Regiment charged, mounted, with fixed bayonets and captured two trenches to the south, cutting off the Turks. The latter then surrendered in batches, and by 4.40 p.m. all organised resistance had been overcome.

The wounded were then collected and evacuated. The horses were watered at the captured wells, the men were supplied with water brought from El Arish on camels, and at 8.30 the column commenced the return journey to El Arish, leaving the A.M.R. and the 1st L.H. Regiment to clear the battlefield.

Besides Lieutenant Harding, who fell close to the enemy position, four other ranks of the W.M.R. were killed, and one died of wounds.

The prisoners captured totalled 1282, these including Khadir Bey, commanding the 80th Regiment, and Izzet Bey and Rushti Bey, commanding the 2/80 and 3/80 Battalions respectively.

War material of all descriptions had been abandoned by the enemy and lay scattered about in disorder. When darkness came on a lot of it was lost sight of, and only a portion could therefore be salved, this including :- Four mountain guns, one broken machine gun, 1052 rifles, 180 bayonets, six boxes of shell ammunition, 100,000 rounds of small-arms ammunition, component parts of an oil engine, ten fantasses, telephone wire and equipment, number of plans of reservoirs, etc., Turkish orders and news, 40 horses, 51 camels.

The long night march which followed the fight at Magdhaba may safely be recorded as one of the most trying of the many wearisome marches experienced by the W.M.R. Apart from the intense cold, which penetrated the lightly-clad horsemen to the bone, the men were fatigued to such a degree that words fail adequately to describe their condition. They had been called upon to make a superhuman effort immediately following their long march from Mazar, and had succeeded in performing all that had been asked of them. They continued to march, and had then fought a strenuous fight without rest or sleep for an additional thirty hours, but on the long return journey nature reasserted itself, and many men fell asleep on their horses during their weird ride.

Here and there dense clouds of dust almost blinded the tired horses, which collided with one another in the dark and awakened their riders. The powers of endurance of the human brain have their limits, and rebel when overtaxed, and on this journey "visions" in various forms were seen by most of the riders. Instead of the actual route of bare ground, streets of houses and weirdly-shaped animals were seen.

The cause of these hallucinations was discussed later, and the most generally-accepted opinion was that the wearied brain had temporarily lost certain of its powers of concentration, which only sleep could restore. This phenomenon may account for the story told in France of "The Angels of Mons" during the early stages of the War, when the British troops were continuously fighting there.

The W.M.R. arrived at its bivouac on the beach at Masmi, near El Arish, where water, supplies, and fodder were available at about 5.30 a.m. on Christmas Eve.

Both men and horses were exhausted and ready for a rest, but the W.M.R. was detailed for outpost duty that night.

The fall of the Turkish base at Magdhaba was disastrous to the enemy. In addition to depleting his advanced forces of a large number of effectives, the result of the battle reflected detrimentally on the morale of the enemy generally.

The Turks fought tenaciously throughout, and took full advantage of the contours which the country afforded to conceal themselves. Their trenches were cleverly sited and covered all approaches, and in some cases could not be discerned at a distance of eighty yards.

In view of these advantages, the effect of enemy fire on our troops - who attacked principally over open country - was very small. The Turks had good targets, but failed to take advantage of them. Their fire was erratic, due, no doubt, to the boldness displayed by our troops.

The enemy vainly endeavoured to withstand the strong pressure which was continuously brought to bear on him, and defended his stronger positions with great stubbornness. The perseverance of our troops, however, ultimately placed them in a position to charge with the bayonet, and their object soon became apparent to the Turks. The sight of a line of glistening bayonets at close range, with determined men behind them, overcame the enemy and he quickly collapsed and surrendered. The New Zealanders fought with their usual determination during the day, undaunted by the difficulties which confronted them and the fact that the battle followed immediately after a long march. The nature of the raid on the Turks forbade the carrying of the usual kit, in order to reduce the weight on the horses to a minimum.

Only essentials were taken, and these included one bottle of water per man, to suffice for a whole day. Notwithstanding these disabilities, the keenness of the men to gain close contact with the enemy was most apparent during the fight, and they cheerfully advanced to accomplish this from the commencement. Cover from continuous enemy fire was scanty, and there was no protection at all against the intense heat of the sun which soon made itself felt, with little water to quench the men's thirst. Still they pressed on, tightening the grip on the enemy as they advanced, till their indomitable will to win and high spirits swept all obstacles aside and snatched up a victory when failure might have been anticipated.

General Chetwode was very pleased with the troops for their determination in the fight, and for the versatility which they displayed in charging with the bayonet - a characteristic in mounted troops which was quite new to the General, - and he availed himself of the first opportunity to express his appreciation of this at a parade held later.

The weather now, though warm in the day, was very cold at night, and, as no tents had been issued since leaving Romani, the question of extemporising cover against the extremes of heat and cold was left to the men themselves. Some were fortunate enough to possess "bivvies" captured with the well-equipped Turkish force at Romani, but the majority had to be content with any old piece of covering they could find, and it was wonderful to see the many uses to which an ordinary sack can be applied to keep off either cold or heat.


Further Reading:

Wellington Mounted Rifles Regiment

Wellington Mounted Rifles Regiment, Roll of Honour

New Zealand Mounted Rifles Brigade

The Battle of Magdhaba

The Battle of Magdhaba, Sinai, December 23, 1916, Roll of Honour, Australia and New Zealand

Battles where Australians fought, 1899-1920


Citation: The Battle of Magdhaba, Sinai, December 23, 1916, WMR, Unit History Account

Posted by Project Leader at 12:01 AM EAST
Updated: Sunday, 22 November 2009 12:03 PM EAST
Wednesday, 22 October 2008
The Battle of Beersheba, Palestine, 31 October 1917, Wellington Mounted Rifles Regiment, Unit History Account
Topic: AIF - NZMRB - WMR

The Battle of Beersheba

Palestine, 31 October 1917

WMR Unit History Account


Major Alexander Herbert Wilkie, Adjutant of the Wellington Mounted Rifles, a unit which was part of the New Zealand Mounted Rifles Brigade, wrote an account of this unit in 1924 called Official War History of the Wellington Mounted Rifles Regiment - 1914 - 1919, in which included a section specifically related to the Battle of Beersheba and is extracted below. A copy of this book is available on the New Zealand Mounted Rifles Association website.


Wilkie, AH, Official War History of the Wellington Mounted Rifles Regiment - 1914 - 1919, (Auckland 1924).

CHAPTER NINETEEN

The Attack on Beersheba

Towards the end of October the Commander-in-Chief commenced to concentrate his forces at prearranged starting points, prior to launching his offensive against the Gaza-Beersheba line, his plan of attack being: To capture Beersheba, with its essential water supplies, and form a base there from which to attack the enemy in flank and rear and crumple up his line towards Gaza. For the initial operation the 60th and 74h Divisions were to seize the enemy works between the Khalasa Road and the Wadi Saba, whilst the defences north of the Wadi were to be masked by the Imperial Camel Corps Brigade and two battalions of the 53rd Division. The Anzac Mounted Division, Australian Mounted Division, and 7th Mounted Brigade to attack the defences of the town from the north-east, east, and south-east, the XXIst Corps, supported by a Naval bombardment, to pin down the enemy on the Gaza front. The N.Z. Brigade, as part of the Desert Mounted Corps, was to make a wide flanking movement and attack Beersheba from the east and north-east; then to envelop the enemy's left rear, and to capture water supplies in order to form a base, preliminary to further operations northward in conjunction with the Infantry. Before the Mounted troops could move, however, the problem of procuring sufficient water for so many horses in the Esani-Khalasa area had to be overcome, the Turks having destroyed the wells there on 22nd October. Engineers and working parties were sent to restore them, and covering the parties were the 2nd A.L.H. and the Camel Brigades, these Brigades at the same time marking the various routes leading to Beersheba.

Of the enemy situation at this period, General Allenby's records state :-

The German Staff in Sinai had, so far back as August, decided that the British would make another effort to break through on that front, and with such forces that, unless the Turks were heavily reinforced, the result could only be in favour of the British. That the weaknesses of their position were its extent, and the exposed left flank at Beersheba, was fully realised by the Command in the field, and during August and September repeated requests were made to the Higher Command for a shortening of the line by with-drawing from Beersheba, or generous reinforcements so that Beersheba could be held a l'outrance.

The soundness of these demands was fully realised by the German advisers of the Turks, but there existed a policy which was a veritable millstone to those who wished to conduct the operations in accordance with clear strategic principles. This policy was directed towards the recovery of Baghdad. Baghdad, a former capital of the Khalifs, and therefore important to the pan-Islamic party, was ever before the Young Turk, soldier, and politician, and the plan had received the backing of Berlin. A composite German force had been formed, and one of the first of German soldiers, Marshal Erich von Falkenhayn, lent for the carrying through of this undertaking. If Baghdad was to be retaken, every man and gun must be sent to Irak, and every man sent to Sinai decreased the chance of success. But to this was the unanswerable argument of those who asked that reinforcements should be sent to Sinai. "If the Sinai front is broken, Palestine and Syria will fall into the enemy's hands, and not only will Baghdad not be retaken, but the armies in Irak will be caught like a rat in a trap, with the British across their lines of communication at Aleppo." It was not until mid-October that this argument prevailed, and then it was too late. Troops being diverted from Mesopotamia were still on the lines of communication, and the aircraft were still being unpacked and put together on their aerodromes, when the British troops attacked and captured Beersheba on October 31, 1917.

The German Command had, however, estimated the date of the British attack with fair accuracy, which they considered would take place, owing to weather conditions, early in November. But they were totally incorrect in their estimate of its direction.

Various circumstances made them believe that it would consist of a third and final assault on Gaza, combined with a landing to the north, which would turn their right flank and enable the British to occupy the fertile coastal plain. To meet this primarily, all defensive work was concentrated for many weeks on the Gaza sector, and their main reserves - the 7th and 19th Infantry Divisions - were concentrated behind Gaza.

Von Falkenhayn proposed, by a concentration of forces, to deliver an attack on the British right flank, and so drive back General Allenby out of Palestine into the waterless and difficult country east of the Wadi El Arish. In addition to its strategical effect, this would have had the political result of clearing that portion of the Turkish Empire from the invader.

This attack was originally timed for the latter half of October, to precede and forestall the British attack. Owing, however, to indecision, general procrastination, poor transport facilities, and, above all, to the jealousy and opposition of Ahmed Jemel Pasha, G.OC. of the Fourth Army and Governor of Syria, it had to be postponed, and was eventually timed for early December.

By October 28 the organisation of the Turkish forces under the Yildirim Army Group into the seventh and eighth armies was nearing completion. The headquarters of General Kress von Kressenstein (G.OC., Eighth Army) had moved back from Huj to Huleikat, so that the former, now connected to the main railway by a light line, might be used as a reserve area, and Fevzi Pasha (G.O.C., Seventh Army) was about to move forward his headquarters from Hebron to near Beersheba, finally to take over the troops allotted to his command. Marshal von Falkenhayn was at Aleppo, en route to Jerusalem.

The front had been strengthened by three fresh divisions, and the 20th Division was moving towards the front on the line of communication, south of Aleppo.

The Gaza sector was a network of trenches, wire entanglements and strongly-fortified posts, conveniently sited for mutual support and cross-fire, which extended to the south-east until the defences of Beersheba were reached. The German Staff appears to have been very well satisfied as to the security of the line against frontal attack, and any second-line system of defence had been almost totally neglected. A wide turning movement on the east was considered impossible, owing to the broken nature of the country and lack of water.

So much for the enemy's idea of the situation.

The concentration of our troops commenced under most favourable circumstances, for by that time the Turks had become so familiar with the sight of mounted men reconnoitring in front of their position that it was possible to effect it without arousing the suspicions of the enemy.

The advance of the N.Z. Brigade commenced on 24th October, when it proceeded to Esani, 15 miles south-east. At noon on the following day the W.M.R. occupied a line seven miles eastward, whilst the B.G.C. of 179th Infantry Brigade made observations of an important enemy position two and a-half miles southwest of Beersheba, which the Infantry were to attack during the early stages of the general advance.

The Squadron Commanders of the W.M.R. this time were:-

2nd, Major J. 0. Scott; 6th, Major C. L. Sommerville; 9th, Major A. S. Wilder.

On this date General Chaytor arrived at Esani and assumed command of all Desert Mounted Corps troops south of El Ghabi, Goz Mabruk, and El Buggar. Operation orders were then issued relative to the attack of Beersheba, that part of them dealing with the initial attack on the town being of particular interest to the W.M.R. The Anzac Division was to advance from Asluj at 6 p.m. on a date to be fixed, the W.M.R. to march with the advance guard for a distance of ten miles till the column reached a cross road leading to Beersheba; the Regiment was then to press forward and destroy an enemy post near Goz El Shegeib, eight miles south-east from Beersheba; the column to halt at the cross roads whilst the operation was being carried out. The post was to be rushed with the bayonet and no one allowed to escape, firing to be avoided, as it was important not to alarm the posts further north. As soon as the post had been dealt with, information was to be sent back to the head of the column, and in the meantime the Regiment was to await the arrival of the column. The Regiment was further instructed that on the arrival of the column at Goz El Shegeib it would act as advance guard for the march northwards, and that it would then take up a position astride a road about four miles north-west of Go! El Shegeib and be prepared to act either as advance or left flank guard to the Australian Mounted Division; also to endeavour to get signal communication with the 7th Mounted Brigade and locate the enemy's left flank about the vicinity of Ras Ghannam (three miles south-south-east of Beersheba).

On October 28th the N.Z. Brigade left Esani for Khalasa, eight miles further south-east, and on the following day it proceeded to Asluj, sixteen miles due south of Beersheba, where the troops were kept under cover as much as possible, so as not to disclose their presence.

The advance of the Anzac Division against Beersheba commenced at 6 p.m. on October 30th, the W.M.R., as part of the advance guard, marching in rear of the 6th A.L.H. Regiment, the latter leading the column. In order to guard against congestion during the march, special routes had been mapped out for the various arms of the force, metalled roads being reserved for wheeled transport and artillery. On reaching a cross road, previously mentioned, twelve miles north-east of Asluj, at 12.45 next morning, the W.M.R. proceeded to carry out its special mission, as mentioned above, the remainder of the column halting. Marching on a compass bearing in the darkness the Regiment pressed forward with the 9th Squadron as advance guard, two troops of the 2nd Squadron being right and left flank guard respectively, two sections of the 2nd Squadron acting as rear guard. At 3 a.m. the Regiment reported that it had occupied Goz El Shegeib, no enemy being found there, but a flare which had been sent up from the direction of Beersheba probably gave warning of the approach of the force. Having gained its objective, the Regiment awaited further orders. The N.Z. Brigade then moved forward. Some time later the W.M.R. was ordered to continue the advance, and at 6 a.m. the 9th Squadron came under fire from a party of about one hundred enemy cavalry, on an elevated position further north. Supported by three troops of the 2nd Squadron and with the 6th Squadron close at hand, the advance guard drove the enemy from his position towards Beersheba, the town being plainly seen in the distance. The Turks had obviously been surprised, as they had left a hot breakfast behind. From the position taken up, the Regiment moved forward to Khasim Zanna, about five miles east by south of Beersheba, where the N.Z. Brigade linked up on its right. Here the order of march for the further advance was changed as follows :- AM.R., C.M.R., W.M.R. Continuing, the N.Z. Brigade occupied Bir Salem Irgeig by eight o'clock, at which hour it gained touch with the 2nd A.L.H. Brigade on the right.

An hour later enemy troops and transport were observed moving northward from Beersheba, and at the same time enemy camelry were seen close to Tel El Saba. Orders were therefore issued to the two Brigades to press forward on the Tel El Sakaty Tel El Saba line, the Somerset Battery to join the N.Z. Brigade. A few minutes later the A.M.R., with the C.M.R. on its right, advanced towards the Saba Redoubt under covering fire from the battery. The redoubt was strongly held, it being defended by nests of machine guns and some 300 rifles, which covered all approaches, both Regiments coming under the fire of these and from an entrenched battery, one mile to the north of Tel El Saba. Having dismounted, the A.M.R. advanced to the cover of a wadi, 800 yards from their objective, the attack, supported by the

3rd A.L.H. Regiment on the south-east, being launched there later.

At noon the W.M.R., in reserve, advanced to Wadi Saba at Bir Salem Irgeig, where the all-important water was found for the horses, the Regiments moving later with the Brigade along the Wadi Saba to Khirbet El Watan, while our batteries pounded the enemy position. At 2 p.m. the A.MR. were preparing to advance against the first enemy position, the C.M.R. being then some distance to the north. Ten minutes later the A.M.R. had begun the advance by short rushes, covered by artillery and machine-gun fire, their objective - a hill some four hundred yards east of Tel El Saba - being captured at 240. The 2nd W.M.R. Squadron, under Major Scott, then reinforced the right of the A.M.R. and the attack on Tel El Saba commenced. Moving steadily forward at first, the line finally rushed and captured the redoubt at three o'clock, a machine gun and some seventy prisoners being taken. The gun was then used with telling effect against the Turks retiring towards Beersheba under cover of their artillery, which had commenced to bombard the captured positions.

The fall of Tel El Saba, the keystone of the Beersheba system of defences, jeopardised the other positions to such an extent that the enemy was soon overcome in that locality. But the Turkish batteries near Beersheba became more active than ever, the gunners apparently attempting to inflict as much damage as possible before losing their guns. At three o'clock they commenced to shell the horses of the W.M.R. in the Wadi Saba, the fire increasing in intensity, and at four o'clock the Regiment moved with the Brigade to the cover of a high cliff close to Saba Redoubt. There showers of shrapnel fell around the Regiment for some time, three horses being killed find thirty-two wounded before nightfall, the bluff preventing many more casualties.

Meanwhile the attack on the town of Beersheba had begun, the ancient city being occupied by two brigades of the A.L.H. at 5.30 in the afternoon. Thus the left flank of the main enemy line was exposed for the operations which were to be commenced on the following day against it.

For gallant conduct during the day, Trooper N. M. Douglas was awarded the Military Medal. Casualties: One other rank killed, five other ranks wounded, three horses being killed and thirty-two wounded.

The New Zealand Brigade consolidated and held Saba Redoubt during the night, and at seven o'clock next morning (1st November) the W.M.R. and C.M.R. moved, forward in the general advance northward - the W.M.R. on Khirbit El Likeyeh, seven miles north of Beersheba, there to establish communication with the I.C.C. on the left; the C.M.R. to continue the W.M.R. line one mile due east to Khirbit El Ras. About nine o'clock the 6th Squadron, as advanced guard, gained touch with a party of 100 cavalrymen, the latter supported by two machine guns, being on an elevated position, half a mile south of the W.M.R. objective. Closing up on its screen, the Squadron drove the Turks towards the Caves near Khirbit El Likiyeh, where the enemy, with reinforcements, took up a position. Continuing to advance, with the 9th Squadron in close support, the 6th Squadron dislodged the Turks and the W.M.R. occupied its objective. Communication was then established with the I.C. Brigade on the left, the Regiment remaining in the line till relieved at night, whereupon it returned to bivouac at Saba Redoubt. During these operations two 6th Squadron troops, under Captain Cotton, carried out a most successful dismounted reconnaissance, advancing doggedly over broken country and finally capturing a prominent knoll on which machine guns had been particularly active.

The W.M.R. casualties were: One officer and fifteen horses wounded, its captures including four cavalrymen, two hostile Bedouin, two horses, three mules, a range-finder, five boxes of machine-gun ammunition, and a Very pistol.

For gallant conduct during the reconnaissance, Corporal R. H. Graham was awarded the Military Medal.

A shortage of water for horses was keenly felt during the day, and, in consequence, only essential reconnaissances were undertaken in order to conserve the strength of the horses. Fortunately, a heavy downpour of rain had formed pools in wadis; otherwise the trying conditions which ultimately prevailed would have been more acute. A scanty supply of water in the Wadi Saba had served to slake the thirst of some of the horses, but this soon disappeared, and on November 2nd the Brigade proceeded to Bir Imshash, eleven miles eastward, where it occupied an outpost line facing east, covering a number of muddy pools which had been misrepresented as wells. There the puzzle to find water commenced, all ranks not otherwise engaged being sent broadcast for a couple of days to search for it, without any appreciable result.

THE FIGHT AT RAS EL NAGB


Meanwhile the troops in the line to the north had encountered stout opposition, and on the 4th, whilst the W.M.R. and A.M.R. were taking their turn in the search for water, the Brigade was hurried forward to relieve the 5th Mounted Brigade, the latter being heavily engaged in the general line facing Ras El Nagb, thirteen miles north-east of Beersheba. The C.M.R. effected the relief at 5.30 p.m., the two other regiments arriving later, the W.M.R. having meanwhile located a good well, where the water-cart and bottles were filled. The 6th Squadron was placed on tho left of the C.M.R. on a ridge facing Khuweilifeh, against which the Infantry were operating, two A.M.R. Squadrons reinforcing the right of the C.M.R., the strength of the enemy eight hundred yards in front of the New Zealanders being estimated at two thousand rifles and three batteries of artillery. The Turks commenced to attack at three o'clock next morning, their numerical strength, supported by the fire of cleverly concealed batteries, enabling them to maintain aggressiveness throughout the day. From Khuweilifeh, on the left, their guns born. barded our front line. From other directions shells were landed amongst the horses in the Wadi-Sultan, and long-range fire from the north of Khuweilifeh swept the position at intervals. The Somerset and an Indian Mountain Battery were in position south of Ras El Nagb, the fire of these being directed principally at Khuweilifeh. At eight o'clock the 9th Squadron relieved the 6th Squadron, and a couple of hours later the 2nd Squadron took up a position on a knoll west of Ras El Nagh. The enemy were trying to work round the flank there, but well-directed fire from the Squadron dispersed them.

By this time the fall of Beersheba and the forcing back of the Turkish left were taking effect along the Gaza-Beersheba line, from which the enemy had commenced to retire. Mounted troops were required to pursue the fleeting Turks, and the New Zealand Brigade received orders to hold itself in readiness to proceed with the Anzac Division and co-operate with the 20th Corps south of Sharia. The Imperial Camel Brigade was to relieve the New Zealanders at Ras El Nagb, but failed to arrive at the appointed hour, with the result that the departure of the Brigade was delayed for some time.

Meanwhile the left of the New Zealanders' line had been further strengthened by the 6th W.M.R. Squadron, the latter occupying the crest of a ridge on the left of the 2nd Squadron, where it checked an advance of a force of about four hundred Turks who were trying to work round the flank there.

The Turks were very aggressive on the left, and at about 1.30 p.m. the 2nd Squadron was heavily bombarded from the direction of Khuweilifeh, many casualties being inflicted. Major Scott and Captain Hine having been wounded, Captain A. H. Herrick assumed command of the Squadron. Later the Turks advanced with fixed bayonets to within two hundred yards of our line, but heavy cross-fire broke the attack, the Turks retiring to a position five hundred yards from the New Zealanders, where they maintained a vigorous machine-gun and rifle fire till dusk.

Water and rations had been brought forward on packs for the men during the afternoon, but the horses had not had a satisfying drink for at least two days. It therefore became necessary for the men not engaged in holding the line to lead the horses to Beersheba, a distance of fourteen miles, where the nearest water was to be obtained. Next morning the 6th Camel Brigade arrived, giving half a pint of much appreciated water to each of our men before taking over the line. Tired, and sorely in need of sleep as the result of a strenuous week of continuous trekking and fighting, the W.M.R. marched on foot over broken country to Likeyeh, six miles south, where the horses rejoined them later.

The powers of endurance which the horses were found to possess during these trying times in continuing to work under a blazing sun without water for periods ranging from forty-eight to seventy-two hours (the latter time refers to the Hotchkiss gun pack horses) are probably without parallel in the history of warfare. Only acclimatised animals could have survived such an ordeal, and the fact that none of the W.M.R. horses were lost from causes other than casualties speaks volumes for the horsemastership of the men. The Regiment's casualties were:-

Two officers and seven other ranks wounded, six horses killed and thirteen wounded.

For gallant conduct during this engagement the following decorations were awarded :-

Military Cross, Lieutenant C. J. Pierce; Military Medal, Sergeant J. A. Little, Sergeant T. H. Hulton, Lance-Corporal J. J. Austin, Trooper W. G. Fargie, Trooper W. Southern.

The Brigade remained in support of the 53rd Division in the waterless area close to Ras El Nagb till the night of 9th November, when it received welcome orders to move next day.

Gaza had fallen on 7th November, and the Turks had meanwhile been driven northward till the right of their line rested on the sea coast to the north of Hamameh, where the Anzac Division faced them. General Allenby's right, in the vicinity of Ras El Nagb was then firmly established, but strong forces opposed him on the left, so the New Zealanders were to join the Division there.
 

Further Reading:

Wellington Mounted Rifles Regiment

Wellington Mounted Rifles Regiment, Roll of Honour

New Zealand Mounted Rifles Brigade

The Battle of Beersheba, Palestine, 31 October 1917

Australian and New Zealand Roll of Honour

Battles where Australians fought, 1899-1920


Citation: The Battle of Beersheba, Palestine, 31 October 1917, Wellington Mounted Rifles Regiment, Unit History Account

Posted by Project Leader at 9:12 PM EADT
Updated: Wednesday, 7 October 2009 10:40 PM EADT
Sunday, 10 August 2008
Wellington Mounted Rifles Regiment, Roll of Honour, Jesse Samuel Bonham
Topic: AIF - NZMRB - WMR

WMR, NZEF

Wellington Mounted Rifles Regiment

Roll of Honour

Richard Burnside Mason


Richard Burnside Mason


A brief biography of Richard Burnside Mason extracted from the Cenotaph Database hosted by the Auckland Museum.

Full Name: Trooper Richard Burnside Mason
Rank Last Held: Trooper
Forename(s): Richard Burnside
Surname: Mason
War: World War I, 1914-1918
Serial No.: 11/1341
First Known Rank: Trooper
Next of Kin: Mrs Jessie Mason (mother), Koromiko Street, Gonville, Wanganui, New Zealand
Marital Status: Single
Enlistment Address: Koromiko Street, Gonville, New Zealand
Military District: Wellington
Body on Embarkation: 6th Reinforcements
Embarkation Unit: Wellington Mounted Rifles
Embarkation Date: 14 August 1915
Place of Embarkation: Wellington, New Zealand
Transport:
Vessel: Willochra or Tofua
Destination:
  • Suez, Egypt (19 September 1915)
  • Suez, Egypt
Page on Nominal Roll: 490
Last Unit Served: New Zealand Machine Gun Squadron
Place of Death: Egypt
Date of Death: 10 August 1916
Year of Death: 1916
Cause of Death: Died of wounds
Memorial Name: Kantara Memorial, Kantara War Memorial Cemetery, Egypt
Biographical Notes:
  • Son of Mrs J. Mason, of 38 River Bank, Wanganui.
  • According to Luxford (1923), Trooper Mason was buried at Oghratina, Sinai.
  • "Entered the School in 1909, and left after the second term of the following year. Remaining at home till 1912, he worked on his father s farm, subsequently going on to a station at Waipiro Bay in order to gain further experience. He returned home in 1915, waiting to be called up, and left with the 6th Reinforcements, joining the Wellington Mounted Rifles. While in Egypt he was transferred to the machine gun corps, and was killed on August 9th, 1916, while in pursuit of the Turks after the battle of Romani." (In Memoriam, 1914-1918 [Wanganui Collegiate School])
Description of Image: Portrait
Further References:
  • Luxford, J.H., 1923, With the Machine Gunners in France and Palestine : The Official History of the New Zealand Machine Corps in the Great World War 1914-1918, Whitcombe and Tombs, Auckland, p. 251.
  • In Memoriam, 1914-1918 [Wanganui Collegiate School], Wanganui Chronicle Co. Ltd. [printer], Wanganui, 1919[?]
  • Search http://www.archway.archives.govt.nz for information about this person's Military Personnel File. Use the Simple Search option.
Sources Used: Nominal Rolls of New Zealand Expeditionary Force Volume I. Wellington: Govt. Printer, 1914-1919


Lest we forget


Further Reading:

Wellington Mounted Rifles Regiment

Wellington Mounted Rifles Regiment, Roll of Honour

Battle of Romani, Sinai, August 4 to 5, 1916 

Bir el Abd, Sinai, 9 August 1916

Battles where Australians fought, 1899-1920


Citation: Wellington Mounted Rifles Regiment, Roll of Honour, Richard Burnside Mason

Posted by Project Leader at 12:01 AM EADT
Updated: Saturday, 19 September 2009 2:42 PM EADT

Newer | Latest | Older

Full Site Index


powered by FreeFind
Let us hear your story: You can tell your story, make a comment or ask for help on our forum.

Desert Column Forum

A note on copyright

The Australian Light Horse Studies Centre is a not for profit and non profit group whose sole aim is to write the early history of the Australian Light Horse from 1900 - 1920. It is privately funded and the information is provided by the individuals within the group and while permission for the use of the material has been given for this site for these items by various donors, the residual and actual copyright for these items, should there be any, resides exclusively with the donors. The information on this site is freely available for private research use only and if used as such, should be appropriately acknowledged. To assist in this process, each item has a citation attached at the bottom for referencing purposes.

Please Note: No express or implied permission is given for commercial use of the information contained within this site.

A note to copyright holders

The Australian Light Horse Studies Centre has made every endeavour to contact copyright holders of material digitised for this blog and website and where appropriate, permission is still being sought for these items. Where replies were not received, or where the copyright owner has not been able to be traced, or where the permission is still being sought, the Australian Light Horse Studies Centre has decided, in good faith, to proceed with digitisation and publication. Australian Light Horse Studies Centre would be happy to hear from copyright owners at any time to discuss usage of this item.

Contact

Australian Light Horse Studies Centre

eXTReMe Tracker