"At a mile distant their thousand hooves were stuttering thunder, coming at a rate that frightened a man - they were an awe inspiring sight, galloping through the red haze - knee to knee and horse to horse - the dying sun glinting on bayonet points..." Trooper Ion Idriess
The Australian Light Horse Studies Centre aims to present an accurate history as chroniclers of early Australian military developments from 1899 to 1920.
The Australian Light Horse Studies Centre site holds over 12,000 entries and is growing daily.
Contact:Australian Light Horse Studies CentreLet us hear your story:
You can tell your story, make a comment or ask for help on our Australian Light Horse Studies Centre Forum called:
WARNING: This site contains: names, information and images of deceased people; and, language which may be considered inappropriate today.
Sunday, 15 February 2009
Second Villers-Bretonneux, France, April 24 to 25, 1918 Topic: BatzWF - Westn Front
Second Villers-Bretonneux
France, 24-25 April 1918
Second Villers-Bretonneux, an action on 24-25 April 1918, precipitated when the village at the centre of the fight three weeks earlier was captured from British troops that had relieved the forces (including the Australian 9th Brigade) originally involved in its defence. The German attack, launched by four divisions in mist at dawn on the 24th, followed a heavy bombardment the preceding night in which various types of gas-especially mustard-were used; it was also supported by tanks, the first time the enemy had used armoured vehicles in this role. Initially the defenders had little answer to the German advance, apart from three tanks which engaged in a duel with an equal number of the enemy vehicles-another first in the history of warfare-and drove them off.
The commander of the British 3rd Corps borrowed two Australian brigades, the 13th of the 4th Division (Brig.-General William Glasgow) and the 15th of the 5th Division (Brig.-General Harold Elliott), and set them the main task of retaking the township. The plan of attack, settled after some dispute with the headquarters of the British 8th Division which was to control it, entailed Glasgow's brigade sweeping past Villers-Bretonneux to the south while Elliott's pushed past to the north. Setting off at 10 p.m., the 13th Brigade became engaged in an intense firelight with enemy machine guns in a wood before being able to proceed with its mission. During the succeeding hours of darkness the two brigades linked up east of the village, thereby largely completing the encirclement of the enemy inside although there was a gap through which part of the trapped garrison escaped.
The clearance of Villers-Bretonneux, undertaken after dawn on the 25th, was accomplished with extreme ferocity by the Australians entering from the east and British troops from the north and west. Few prisoners were taken, and those enemy not killed were driven out without difficulty. The counter-attack had cost 1,469 AIF casualties, and the 14th Brigade which was present also suffered 338 casualties-chiefly to enemy gas. The action had, however, restored stability to this portion of the battlefield, and as well added greatly to the reputation of the Australian infantry on the Western Front.
The next day the Moroccan Division of the French Army advanced through the Australian positions south of Villers-Bretonneux under orders to retake the Hangard Wood, which had also been lost to the enemy on 24 April. This attempt failed with heavy loss, as did an attack by the Australian 12th Brigade in the early hours of 3 May against Monument Wood close by the eastern edge of the township. The 48th Battalion which made the assault lost 155 men, but inflicted on the enemy Jäger troops it met an almost equal number of casualties.
Extracted from the book produced by Chris Coulthard-Clark, Where Australians Fought - The Encyclopaedia of Australia's Battles, Allen and Unwin, Sydney, 1998, pp. 145.
Additional References cited by Chris Coulthard-Clark:
C.E.W. Bean (1937) The Australian Imperial Force in France during the Main German Offensive, 1918, Sydney: Angus & Robertson.
Cocos Islands, Indian Ocean, November 9, 1914 Topic: BatzN - Cocos Is
Cocos Islands
Indian Ocean, 9 November 1914
Battle at the Cocos Islands
Cocos Islands, the first engagement fought by a warship of the Royal Australian Navy, occurred on 9 November 1914 off this British-ruled group of 27 small coral islands situated in the Indian Ocean 2,800 kilometres north-west of Perth, Western Australia. The action came about after the light cruiser Emden (3,600 tonnes), a unit of the German Pacific Squadron then enjoying a highly successful career raiding Allied shipping, anchored off Direction Island early on 9 November and sent ashore 43 officers and men to destroy the vital radio and cable station there which connected the Australian, African and Indian telegraph systems. Before this aim could be achieved, the staff of the station managed to send off warning messages of the presence of a `strange warship'.
Unknown to the Emden's commander, Captain Karl von Müller, a convoy of 38 transports carrying the first contingents of Australian and New Zealand troops overseas was at that moment passing just 80 kilometres to the east, escorted by the Australian light cruisers Melbourne and Sydney (5,400 tonnes) and the powerful Japanese battle-cruiser Ibuki (10,000 tonnes). Until the previous day the convoy had been led by the British armoured cruiser Minotaur, but, after that vessel was called away to Mauritius, Melbourne (under Captain Mortimer Silver, RN) had taken over this role. On receipt of the signals from Corns, Silver's first instinct was to himself go and investigate. Appreciating his wider responsibility, however, at 7 a.m. he detached Sydney-which was, in any event, then posted on the convoy's port side nearest to the reported trouble. He had to restrain Ibuki's captain, Vice-Admiral Kato Kanji, who wished to accompany Sydney.
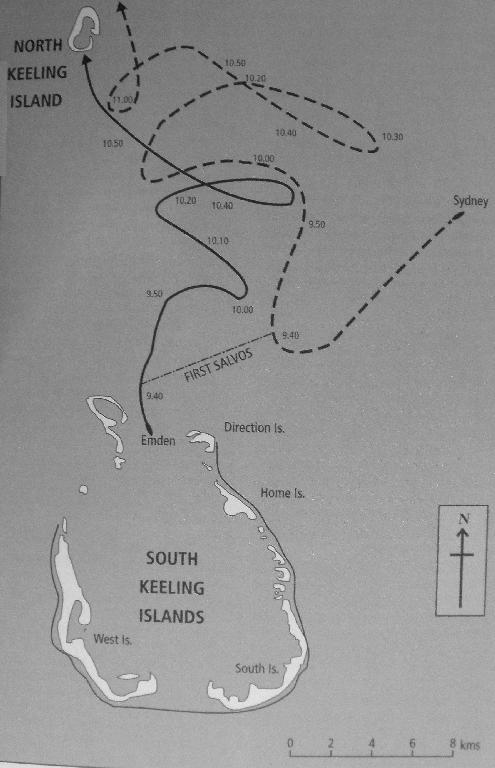
As Sydney steamed westward at 20 knots, her smoke was spotted on the horizon by Emden soon after 9 a.m. At first von Muffler thought this came from the collier, Buresk, which was supporting his operations, but less than fifteen minutes later he realised his mistake as what was plainly a British cruiser bore down on him from the north-east. Without waiting to collect the landing party ashore, he moved out to sea to gain room to manoeuvre and prepared for combat. On identifying the class of the enemy ship he had discovered, the commander of Sydney (Captain John Glossop, RN) consulted standard references on board and decided to close to 9,500 yards (8.7 kilometres) before engaging. lie believed that this would place him just outside the range of his opponent's 4.1 inch guns while bringing Emden fully under the fire of his own 6-inch armament. Unknown to him, however, was the fact that the mountings of the German's guns had undergone elevation modifications which increased their range.
No sooner had Glossop closed to 10,500 yards (9.6 kilometres) and swung onto a parallel course at 9.-10 a.m. than Emden opened fire at extreme range. The five shells of this first salvo passed over the top of Sydney but still splashed down within 200 metres of their target, and a hail of further rounds quickly followed. Von Müller had ordered rapid fire so that Emden was reportedly sending off a salvo every six seconds. At least fifteen shells thus found their mark on Sydney-al though fortunately no more than five of these actually exploded. All the Australian cruiser's casualties of four men killed and twelve wounded occurred during these first ten minutes of the action, before Glossop moved back out beyond his opponent's reach.
Initially hampered in returning effective fire through having both range-finders put out of action, Glossop used his superior speed of 27 knots (compared with Emden's seventeen) to thwart any attempt to get close enough to torpedo him. Once Sydney's shells began to find their mark, moreover, their effect was decisive, since each 6-inch shell weighed 45 kg (compared with the 17 kg of Emden's shells) and Sydney eventually succeeded in landing about 100 of these hammer blows upon her lighter adversary. Soon the German vessel was totally wrecked, with its hull holed at numerous points, its superstructure a blazing shambles, half the crew disabled, and steering only possible using the screws. But the Emden continued to fight, with at least one gun still firing at 11 a.m.
Realising the hopelessness of his position, von Müller chose to run his ship onto the reef at North Keeling Island to prevent it sinking with so many wounded on hoard. Once Emden was aground by 11.15 a.m., Glossop decided to go after the enemy's supply ship, Buresk, which had been hovering on the edge of the action apparently looking for an opportunity to ram him. When the collier was eventually overtaken shortly after noon, a prize crew put on hoard discovered that the German crew had already taken measures to sink the ship and it was beyond saving.
On returning to Emden's shattered remains at 4 p.m., Glossop found the enemy ship still flying its battle ensign. After demands to surrender were ignored, he considered that von Müller was declaring an intention to continue resistance by whatever means was still open to him; he accordingly ordered a further two salvos fired into the wreck. Only then was the white flag raised and the German colours hauled down. There was later some criticism of Glossop's action at this point, which inevitably caused needless casualties, but there was no doubting that he behaved correctly according to the usages of naval warfare.
Even now, Sydney was unable to move directly to the aid of Emden's surviving crew, since there was still the group of Germans ashore on Direction Island to be dealt with. It was subsequently discovered that this party had commandeered a schooner during the action and managed to sail away in the dusk; after an adventurous journey, they managed to reach Arabia and eventually made their way back to Germany. Not until late on 10 November was Sydney finally able to render medical assistance to the 190 of Emden's officers and men who had survived the fight. 65 of whom were wounded; eight officers and 126 other ranks had been killed, twenty of them during the final two salvos. After transhipping the survivors into Sydney, Glossop made for Colombo to rejoin the convoy.
Despite the immense and widespread jubilation at news of Emden's destruction, and especially the fact that this had been achieved by a warship of Australia's new navy it had been a markedly one-sided contest. Interviewed shortly after the action, Glossop expressed his horror at what he saw of the effects of his fire on his opponent, declaring
My God, what a sight! Her captain had been out of action ten minutes after the fight started from lydite fumes, and everybody on hoard was demented ... by shock, and fumes, and the roar of shells bursting among them. She was a shambles. Blood, guts, flesh, and uniforms were all scattered about. One of our shells had landed behind a gun shield, and had blown the whole gun-crew into one pulp. You couldn't even tell how many men there had been. They must have had forte minutes of hell on that ship.... and the survivors were practically madmen.
In reality, Emden's fate at Sydney's hands was almost comparable to that which befell HMAS Yarra in a clash with Japanese cruisers 28 years later (see South of Java).
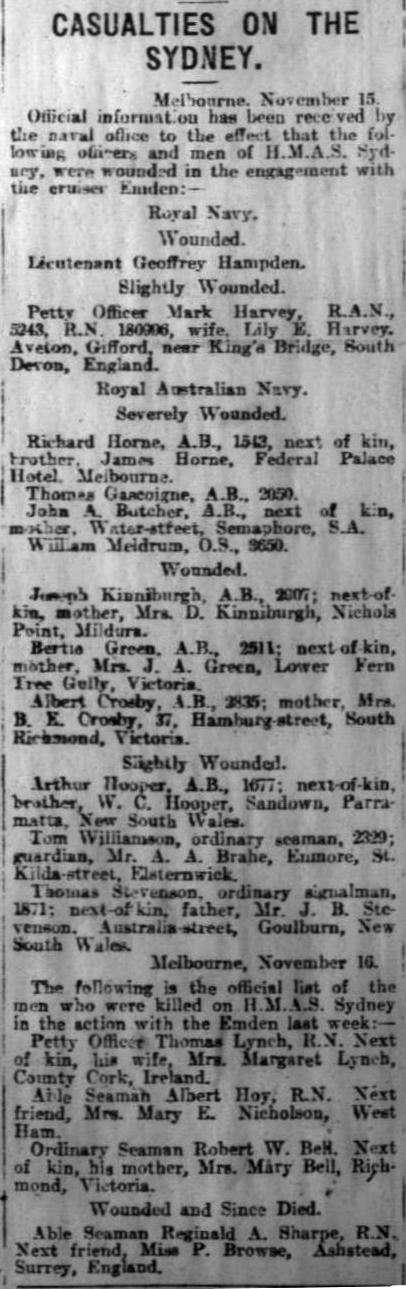
The Casualty List
The details of casualties from the HMAS Sydney
[From: Adelaide Chronicle, 21 November 1914, p. 42.]
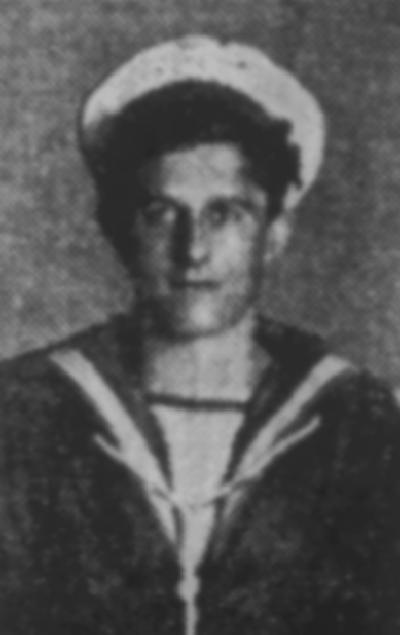
One of the severely wounded, James Arthur Butcher.
20 year old James Arthur Butcher who was severely wounded on the HMAS Sydney was born at Birkenhead, South Australia. He was the son of Captain Butcher, master of the coastal ship Echunga. His brother, William Butcher was the master of a trading boat in the Solomon Islands. James Butcher joined the Royal Navy and first sailed in the HMS Drake but transferred to the HMAS Sydney in February, 1914.
James Arthur Butcher
[From: Adelaide Chronicle, 21 November 1914, p. 45.]
Extracted from the book produced by Chris Coulthard-Clark, Where Australians Fought - The Encyclopaedia of Australia's Battles, Allen and Unwin, Sydney, 1998, pp. 97-100.
Additional References cited by Chris Coulthard-Clark:
Arthur W. Jose, (1928), The Royal Australian Navy, 1914-1918, Sydney Angus & Robertson.
A. B. Paterson, (1934), Happy Dispatches, Sydney: Angus & Robertson.
Flogging Germans, New Guinea, 30 November 1914 Topic: GW - Atrocities
Flogging Germans
New Guinea, 30 November 1914
The public flogging of 4 Germans at Rubaul
After the capture of the German Colony of New Guinea, the Australians were given stewardship over quite a sizable territory. The Australian government had already come to the conclusion that they would annex the territory and the press discussed the ways in which this new wealth could be carved up.
After the occupation, the most famous case of an atrocity was the flogging of 4 German civilians at Rabaul. Here is the copy of an article published in the Adelaide "The News", 10 November 1965:
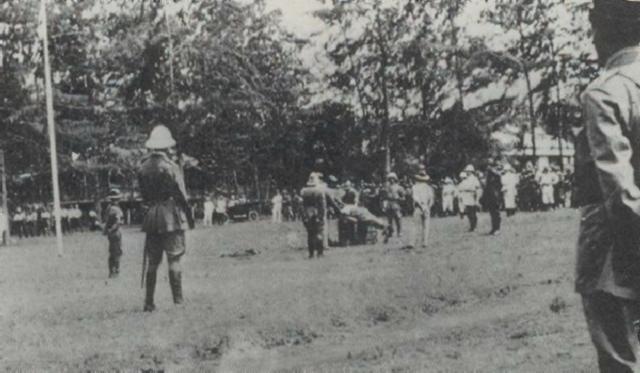
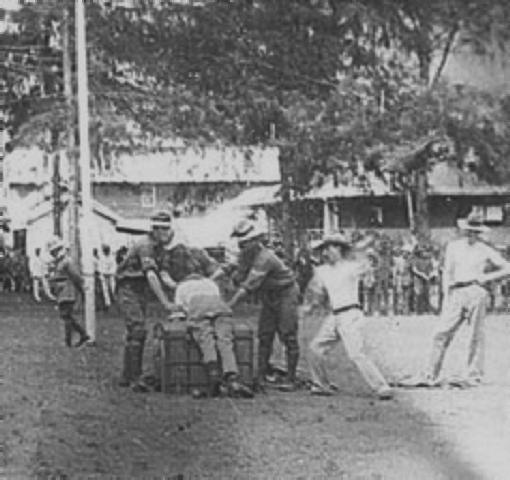
Flogging a German at Rubaul, Picture 1 of a 3 picture series
A graphic description of the flogging by Australian officials of four German civilians in Rabaul, in 1914, was given in Sydney today by a man who was an eyewitness of the incident.
He is Mr. A. McKay, a retired clerk, of Croydon, a western suburb, who, at the time, was a 20-year-old trooper with F. Company of the Australian Forces.
A photograph of the flogging found in New Guinea, this week, is similar to one held by Mr. McKay and is a postcard snap.
It shows the official who performed the flogging about to strike one German held over a trunk.
Australian officers wearing sun helmets and carrying swords are looking on.
Dozens of the postcard prints were made and sold around the islands for 3d.
Today Mr. McKay sat back in a chair, and told of the floggings and the events which led up to them. Brought in "I went to Rabaul on the troopship, Berrima," he said.
"I had been there only a couple of weeks when the military administrator of German New Guinea, Col. William Holmes, announced there would be a flogging of German civilians at Proclamation square.
"I learnt later a punitive squad had brought in four German civilians who were reported to have thrashed the Rev. William Henry Cox, chairman of the Methodist mission, in the Bismarck Archipelago.
"Mr. Cox was visiting at Namatanal, a Methodist mission on what is now New Ireland.
"The four Germans apparently heard the Australians were coming, so they decided to drink up all the booze before the troops arrived.
"They got really drunk, and that was when they decided to beat up the Rev. Cox.
"They accused him of being a spy -- he was no such thing of course.
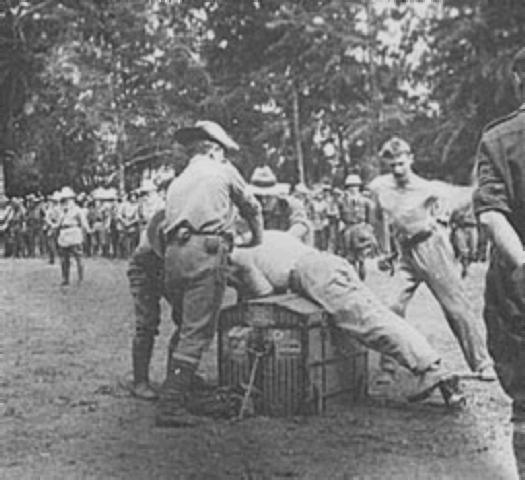
Flogging a German at Rubaul, Picture 2 of a 3 picture series
"He had a small lugger which he used for cruising about the island and I think it was this that had them worried.
"The group rushed into a house at the mission station, where Mr. Cox was sitting talking to the wife of the missionary.
"The medical officer, who was one of the German civilians, pointed a pistol at Cox and said, 'You are a prisoner'."
Mr. McKay said Cox was then seized by the neck, dragged out of the room and down the steps of the house, held over a wash-tub and given 30 or 40 strokes with a cane.
"After the Germans left, Mr. Cox sent a native boy to Rabaul to report the incident and that was when Col. Holmes sent out a party," he said.
"Col. Holmes ordered the Germans to be publicly flogged after his legal adviser, Capt. C.E. Manning, had conducted an inquiry, at Namatanal, and obtained confessions from them. Lined up
"He ordered the flogging to take place in Proclamation Square, Rabaul.
"Col. Holmes directed that natives and women were not to attend.
"He explained that it would have been bad for morale to see a white man flog another white man.
"All of we troops -- half a battalion at the garrison -- were marched to the square where we lined up in a three-sided square with German men ordered to attend the flogging making the fourth side.
"The four men to be punished were lined up by a flag pole in the centre of the square," Mr. McKay went on.
"The German medical officer, the ringleader of the assault on Cox, was placed across a trunk under the flagpole.
"His hands were handcuffed to two tent pegs driven into the ground. His ankles were chained with leg irons to two other tent pegs on the opposite side of the trunk.
"Before the flogging started, the German civilians protested vigorously to Col. Holmes who listened to two spokesmen for a few minutes, then stood back and made a dramatic speech.
"I can't remember it all ... memory fades in 50 years but he ended it by pointing to the flag and shouting, "This is a British flag. Under this flag you shall be given protection ... and you shall also be flogged.
"'Order, commence flogging.'
"Then a provost began wielding a cane about as thick as your thumb. He hit the medical officer at rights angles to the backside. They were really hard blows. The whack rang out across the parade ground.
"I remember that day clearly -- November 30, at 10 a.m. the medical officer was given 30 strokes of the cane and taken away.
"Another man then was lashed across the trunk and he was given 25 strokes, in the same manner.
"The next one also was given 25, but a young boy, the doctor's assistant, received only 10.
"They didn't utter one sound, during the punishment, but lay across the trunk and flinched with every stroke.
"A new provost was brought on for each caning so one man wouldn't tire out," Mr. McKay said.
"Cameras were prohibited and a couple were confiscated, but one of the troops in our battalion, a private T. Atkins, was standing in the second row behind me.
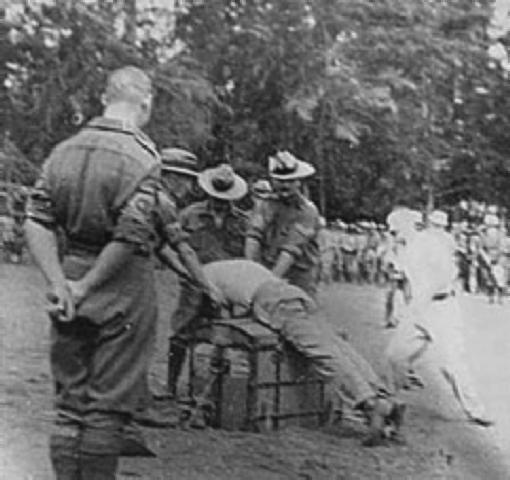
Flogging a German at Rubaul, Picture 3 of a 3 picture series
Hid camera
"He had a camera around his neck and hidden inside his shirt with just the lens poking through the shirt front.
"We, in the front row, covered up for him and stood aside as he clicked the shutter.
"After each flogging the victim was carried away, but not one of them made a sound," he added.
After the war years, Mr. McKay worked as a clerk and up till his retirement spent most of his time in the Commonwealth Public Service.
The following is a copy of the letter sent by William Holmes detailing the anticipated floggings of the Germans convicted for assaulting Reverend Cox. The letter is dated 28 November projecting the floggings to occur on 30 November 1914.
Details of the Flogging
Further information regarding this action may be found in the National Archives file on the subject:
Bert Schramm's Diary, 15 February 1919 Topic: Diary - Schramm
Diaries of AIF Servicemen
Bert Schramm
During part of the course of his military service with the AIF, 2823 Private Herbert Leslie Schramm, a farmer from White's River, near Tumby Bay on the Eyre Peninsular, kept a diary of his life. Bert was not a man of letters so this diary was produced with great effort on his behalf. Bert made a promise to his sweetheart, Lucy Solley, that he would do so after he received the blank pocket notebook wherein these entries are found. As a Brigade Scout since September 1918, he took a lead part in the September 1918 breakout by the Allied forces in Palestine. Bert's diary entries are placed alongside those of the 9th Light Horse Regiment to which he belonged and to the 3rd Light Horse Brigade to which the 9th LHR was attached. On this basis we can follow Bert in the context of his formation.
Bert Schramm's Diary, 15 February 1919
Bert Schramm's Handwritten Diary, 14 - 17 February 1919
[Click on page for a larger print version.]
Diaries
Bert Schramm
Saturday, February 15, 1919
Bert Schramm's Location - Tripoli, Lebanon.
Bert Schramm's Diary - Nothing doing. I heard a lecture tonight given by a native of the country and spoke on things that have happened in the past since the war and really some of the things are so astounding one seems almost inclined to doubt his word.
Second Morlancourt, France, May 4 to 9, 1918 Topic: BatzWF - Westn Front
Second Morlancourt
France, 4-9 May 1918
Second Morlancourt, a series of small thrusts carried out during 4-9 May 1918 against the new German forward line established between the Ancre and Somme rivers to protect Morlancourt. The operations, conducted by the 9th Brigade of the 3rd Australian Division, had the effect of capturing the enemy's front-line and taking 170 prisoners for the relatively low cost of 264 casualties. This success provoked a German response shortly before 4 a.m. on 14 May, but the 200 attackers were cut off after penetrating the Australian positions (now held by troops of the 5th Brigade of the 2nd Division) and lost another 48 men captured: Australian casualties were 60 killed or wounded.
Extracted from the book produced by Chris Coulthard-Clark, Where Australians Fought - The Encyclopaedia of Australia's Battles, Allen and Unwin, Sydney, 1998, pp. 146-147.
Additional References cited by Chris Coulthard-Clark:
C.E.W. Bean (1937) The Australian Imperial Force in France during the Main German Offensive, 1918, Sydney: Angus & Robertson.
The Australian Light Horse Studies Centre is a not for profit and non profit group whose sole aim is to write the early history of the Australian Light Horse from 1900
- 1920. It is privately funded and the information is provided by the individuals within the group and while permission for the use of the material has been given for this
site for these items by various donors, the residual and actual copyright for these items, should there be any, resides exclusively with the donors. The information on
this site is freely available for private research use only and if used as such, should be appropriately acknowledged. To assist in this process, each item has a citation
attached at the bottom for referencing purposes.
Please Note: No express or implied permission is given for commercial use of the information contained within this site.
A note to copyright holders
The Australian Light Horse Studies Centre has made every endeavour to contact copyright holders of material digitised for this blog and website and where
appropriate, permission is still being sought for these items. Where replies were not received, or where the copyright owner has not been able to be traced, or where
the permission is still being sought, the Australian Light Horse Studies Centre has decided, in good faith, to proceed with digitisation and publication. Australian Light
Horse Studies Centre would be happy to hear from copyright owners at any time to discuss usage of this item.