« February 2009 »
S M T W T F S
1 2 3 4 5 6 7
8 9 10 11 12 13 14
15 16 17 18 19 20 21
22 23 24 25 26 27 28
You are not logged in. Log in


Search the site:


powered by FreeFind
Volunteer with us.

Entries by Topic All topics  
A Latest Site News
A - Using the Site
AAA Volunteers
AAB-Education Centre
AAC-Film Clips
AAC-Photo Albums
AIF & MEF & EEF
AIF - Lighthorse
AIF - ALH - A to Z
AIF - DMC
AIF - DMC - Or Bat
AIF - DMC - Anzac MD
AIF - DMC - Aus MD
AIF - DMC - British
AIF - DMC - BWI
AIF - DMC - French
AIF - DMC - Indian
AIF - DMC - Italian
AIF - DMC - Medical
AIF - DMC - Remounts
AIF - DMC - Scouts
AIF - DMC - Sigs
AIF - DMC - Sigs AirlnS
AIF - DMC - 1 Sig Sqn
AIF - DMC - 2 Sig Sqn
AIF - DMC - Eng
AIF - DMC - Eng 1FSE
AIF - DMC - Eng 2FSE
AIF - DMC - GSR
AIF - 1B - 1 LHB
AIF - 1B - 6 MVS
AIF - 1B - 1 LHMGS
AIF - 1B - 1 Sig Trp
AIF - 1B - 1 LHFA
AIF - 1B - 1 LHR
AIF - 1B - 2 LHR
AIF - 1B - 3 LHR
AIF - 2B - 2 LHB
AIF - 2B - 7 MVS
AIF - 2B - 2 LHFA
AIF - 2B - 2 LHMGS
AIF - 2B - 2 Sig Trp
AIF - 2B - 5 LHR
AIF - 2B - 6 LHR
AIF - 2B - 7 LHR
AIF - 3B - 3 LHB
AIF - 3B - 8 MVS
AIF - 3B - 3 LHB Sigs
AIF - 3B - 3 LHFA
AIF - 3B - 3 LHMGS
AIF - 3B - 3 Sig Trp
AIF - 3B - 8 LHR
AIF - 3B - 9 LHR
AIF - 3B - 10 LHR
AIF - 4B - 4 LHB
AIF - 4B - 4 Sig Trp
AIF - 4B - 9 MVS
AIF - 4B - 4 LHFA
AIF - 4B - 4 LHMGS
AIF - 4B - 4 LHR
AIF - 4B - 11 LHR
AIF - 4B - 12 LHR
AIF - 5B - 5 LHB
AIF - 5B - 10 MVS
AIF - 5B - 5 LHFA
AIF - 5B - 5 Sig Trp
AIF - 5B - ICC
AIF - 5B - 14 LHR
AIF - 5B - 15 LHR
AIF - 5B - 1er Regt
AIF - 5B - 2 NZMGS
AIF - AASC
AIF - Aboriginal LH
AIF - Badges
AIF - Cars
AIF - Chinese LH
AIF - Double Sqns
AIF - Engineers
AIF - Fr - 22 Corps
AIF - Fr - 13 LHR
AIF - Honour Roll
AIF - HQ - 3rd Echelon
AIF - Marching Songs
AIF - Misc Topics
AIF - NZMRB
AIF - NZMRB - AMR
AIF - NZMRB - CMR
AIF - NZMRB - EFT
AIF - NZMRB - NZMFA
AIF - NZMRB - NZMGS
AIF - NZMRB - OMR
AIF - NZMRB - Sig-Trp
AIF - NZMRB - WMR
AIF - Ships
AIF - Ships - Encountr
AIF - Ships - Una
AIF - WFF
AIF - Wireless Sqn
Battles
BatzA - Australia
BatzA - Broken Hill
BatzA - Liverpool
BatzA - Merivale
BatzB - Boer War
BatzB - Bakenlaagte
BatzB - Belmont
BatzB - Bothaville
BatzB - Buffels Hoek
BatzB - Coetzees Drift
BatzB - Diamond Hill
BatzB - Driefontein
BatzB - Elands
BatzB - Graspan
BatzB - Grobelaar
BatzB - Grootvallier
BatzB - Hartebestfontn
BatzB - Houtnek
BatzB - Karee Siding
BatzB - Kimberley
BatzB - Koster River
BatzB - Leeuw Kop
BatzB - Mafeking
BatzB - Magersfontein
BatzB - Modder River
BatzB - Onverwacht
BatzB - Paardeberg
BatzB - Palmietfontein
BatzB - Pink Hill
BatzB - Poplar Grove
BatzB - Rhenoster
BatzB - Sannahs Post
BatzB - Slingersfontn
BatzB - Stinkhoutbm
BatzB - Sunnyside
BatzB - Wilmansrust
BatzB - Wolvekuil
BatzB - Zand River
BatzG - Gallipoli
BatzG - Anzac
BatzG - Aug 1915
BatzG - Baby 700
BatzG - Evacuation
BatzG - Hill 60
BatzG - Hill 971
BatzG - Krithia
BatzG - Lone Pine
BatzG - Nek
BatzJ - Jordan Valley
BatzJ - 1st Amman
BatzJ - 2nd Amman
BatzJ - Abu Tellul
BatzJ - Es Salt
BatzJ - JV Maps
BatzJ - Ziza
BatzM - Mespot
BatzM - Baghdad
BatzM - Ctesiphon
BatzM - Daur
BatzM - Kurna
BatzM - Kut el Amara
BatzM - Ramadi
BatzN - Naval
BatzN - AE1
BatzN - Cocos Is
BatzN - Heligoland
BatzN - Marmara
BatzN - Zeebrugge
BatzN - Zeppelin L43
BatzNG - Bitapaka
BatzO - Other
BatzO - Baku
BatzO - Egypt 1919
BatzO - Emptsa
BatzO - Karawaran
BatzO - Peitang
BatzO - Wassa
BatzP - Palestine
BatzP - 1st Gaza
BatzP - 2nd Gaza
BatzP - 3rd Gaza
BatzP - Aleppo
BatzP - Amwas
BatzP - Ayun Kara
BatzP - Bald Hill
BatzP - Balin
BatzP - Beersheba
BatzP - Berkusieh
BatzP - Damascus
BatzP - El Auja
BatzP - El Buggar
BatzP - El Burj
BatzP - Haifa
BatzP - Huj
BatzP - JB Yakub
BatzP - Kaukab
BatzP - Khan Kusseir
BatzP - Khuweilfe
BatzP - Kuneitra
BatzP - Megiddo
BatzP - Nablus
BatzP - Rafa
BatzP - Sasa
BatzP - Semakh
BatzP - Sheria
BatzP - Surafend
BatzP - Wadi Fara
BatzS - Sinai
BatzS - Bir el Abd
BatzS - El Arish
BatzS - El Mazar
BatzS - El Qatiya
BatzS - Jifjafa
BatzS - Magdhaba
BatzS - Maghara
BatzS - Romani
BatzS - Suez 1915
BatzSe - Senussi
BatzWF - Westn Front
BW - Boer War
BW - NSW
BW - NSW - 1ACH
BW - NSW - 1NSWMR
BW - NSW - 2NSWMR
BW - NSW - 3ACH
BW - NSW - 3NSWIB
BW - NSW - 3NSWMR
BW - NSW - 5ACH
BW - NSW - A Bty RAA
BW - NSW - AAMC
BW - NSW - Aust H
BW - NSW - Lancers
BW - NSW - NSW Inf
BW - NSW - NSWCBC
BW - NSW - NSWIB
BW - NSW - NSWMR_A
BW - NZ
BW - Qld
BW - Qld - 1ACH
BW - Qld - 1QMI
BW - Qld - 2QMI
BW - Qld - 3ACH
BW - Qld - 3QMI
BW - Qld - 4QIB
BW - Qld - 5QIB
BW - Qld - 6QIB
BW - Qld - 7ACH
BW - QLD - AAMC
BW - SA
BW - SA - 1SAMR
BW - SA - 2ACH
BW - SA - 2SAMR
BW - SA - 3SACB
BW - SA - 4ACH
BW - SA - 4SAIB
BW - SA - 5SAIB
BW - SA - 6SAIB
BW - SA - 8ACH
BW - SA - AAMC
BW - Tas
BW - Tas - 1ACH
BW - Tas - 1TIB
BW - Tas - 1TMI
BW - Tas - 2TB
BW - Tas - 2TIB
BW - Tas - 3ACH
BW - Tas - 8ACH
BW - Vic
BW - Vic - 1VMI
BW - Vic - 2ACH
BW - Vic - 2VMR
BW - Vic - 3VB
BW - Vic - 4ACH
BW - Vic - 4VIB
BW - Vic - 5VMR
BW - Vic - 6ACH
BW - Vic - AAMC
BW - Vic - Scot H
BW - WA
BW - WA - 1WAMI
BW - WA - 2ACH
BW - WA - 2WAMI
BW - WA - 3WAB
BW - WA - 4ACH
BW - WA - 4WAMI
BW - WA - 5WAMI
BW - WA - 6WAMI
BW - WA - 8ACH
BW Gen - Campaign
BW Gen - Soldiers
BW General
Cavalry - General
Diary - Schramm
Egypt - Heliopolis
Egypt - Mena
Gen - Ataturk Pk, CNB
Gen - Australia
Gen - Legends
Gen - Query Club
Gen - St - NSW
Gen - St - Qld
Gen - St - SA
Gen - St - Tas
Gen - St - Vic
Gen - St - WA
Gm - German Items
Gm - Bk - 605 MGC
GW - 11 Nov 1918
GW - Atrocities
GW - August 1914
GW - Biographies
GW - Propaganda
GW - Spies
GW - We forgot
Militia 1899-1920
Militia - Area Officers
Militia - Inf - Infantry
Militia - Inf - 1IB
Militia - Inf - 2IB
Militia - Inf - 3IB
Militia - Inf - NSW
Militia - Inf - Qld
Militia - Inf - SA
Militia - Inf - Tas
Militia - Inf - Vic
Militia - Inf - WA
Militia - K.E.Horse
Militia - LH
Militia - LH - Regts
Militia - LH - 1LHB
Militia - LH - 2LHB
Militia - LH - 3LHB
Militia - LH - 4LHB
Militia - LH - 5LHB
Militia - LH - 6LHB
Militia - LHN - NSW
Militia - LHN - 1/7/1
Militia - LHN - 2/9/6
Militia - LHN - 3/11/7
Militia - LHN - 4/6/16
Militia - LHN - 5/4/15
Militia - LHN - 6/5/12
Militia - LHN - 28
Militia - LHQ - Qld
Militia - LHQ - 13/2
Militia - LHQ - 14/3/11
Militia - LHQ - 15/1/5
Militia - LHQ - 27/14
Militia - LHS - SA
Militia - LHS - 16/22/3
Militia - LHS - 17/23/18
Militia - LHS - 24/9
Militia - LHT - Tas
Militia - LHT - 12/26
Militia - LHV - Vic
Militia - LHV - 7/15/20
Militia - LHV - 8/16/8
Militia - LHV - 9/19
Militia - LHV - 10/13
Militia - LHV - 11/20/4
Militia - LHV - 19/17
Militia - LHV - 29
Militia - LHW - WA
Militia - LHW-18/25/10
Militia - Military Orders
Militia - Misc
MilitiaRC - Rifle Clubs
MilitiaRC - NSW
MilitiaRC - NT
MilitiaRC - Qld
MilitiaRC - SA
MilitiaRC - Tas
MilitiaRC - Vic
MilitiaRC - WA
Militiaz - New Zealand
Tk - Turkish Items
Tk - Army
Tk - Bks - Books
Tk - Bks - 1/33IR
Tk - Bks - 27th IR
Tk - Bks - Air Force
Tk - Bks - Yildirim
Tk - POWs
Wp - Weapons
Wp - Hotchkiss Cav
Wp - Hotchkiss PMG
Blog Tools
Edit your Blog
Build a Blog
RSS Feed
View Profile
Open Community
Post to this Blog
Site Index
Education Centre
LH Militia
Boer War
Transport Ships
LH Battles
ALH - Units
ALH - General
Aboriginal Light H
Weapons
Ottoman Sources

"At a mile distant their thousand hooves were stuttering thunder, coming at a rate that frightened a man - they were an awe inspiring sight, galloping through the red haze - knee to knee and horse to horse - the dying sun glinting on bayonet points..." Trooper Ion Idriess

The Australian Light Horse Studies Centre aims to present an accurate history as chroniclers of early Australian military developments from 1899 to 1920.

The Australian Light Horse Studies Centre site holds over 12,000 entries and is growing daily.

Contact: Australian Light Horse Studies Centre

Let us hear your story: You can tell your story, make a comment or ask for help on our Australian Light Horse Studies Centre Forum called:

Desert Column Forum

WARNING: This site contains: names, information and images of deceased people; and, language which may be considered inappropriate today.

Tuesday, 24 February 2009
The First and Second Battles Of Gaza
Topic: Tk - Bks - Air Force

Pasha and Yildirim, the Palestine Front, 1915 to 1918
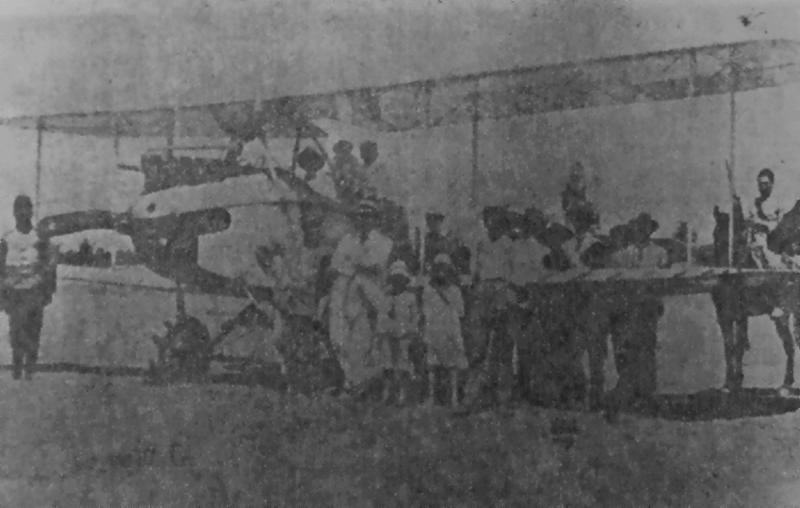
 

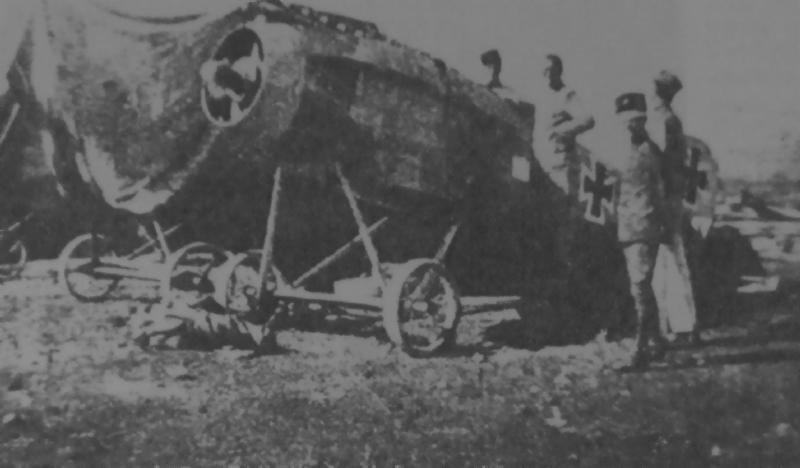
German Colonists visiting Ramle air field, May 1917.

[From: Ole Nikolajsen, Ottoman Aviation 1911 - 1919, p. 204.]


Part 4 - The First and Second Battles Of Gaza

By March 1917 the British forces moving through the Sinai desert had pushed forward the supporting railway line and moved enough forces and equipment forward to attempt an attack on the Turkish defence line between Beersheba and Gaza. These moves by the British forces were carefully observed and reported by the highly spirited and efficient crews of FA300, who had just arrived from Germany. A forward detachment of 2 Rumpler C.Is were maintained at Huj in close contact with the forward Army Headquarters so no time would be lost in forwarding new observations. To counter the British intentions, three Turkish divisions (the 3rd, 16th and 53rd) were rushed to the front.

When the British forces attacked in the early morning of the 26th of March 1917 the advance was dutifully reported by a Rumpler, flying low in the morning haze. While the 3 Turkish divisions hurried marched forward 6 Rumplers provided accurate artillery observations and attacked any British aircraft. Several air-battles ensued but neither side claimed any aircraft shot down. The British air units could call upon 21 BE2C's, 14 Martinsydes and 7 Bristol Scouts half of which were air worthy whereas FA300 possessed only 7 flyable Rumplers. The 2 Fokker E.III's being on charge were kept at Ramleh as the unreliable rotary engines made them unsuitable except for short flights over friendly territory. In the evening of the day of attack the British forces had to withdraw with more than 4,000 casualties. The war in the air continued for another 2 days.

After this battle the German commander of the front, General von Kress, officially gave credit to FA300 for having won the day [181] due to its timely and accurate observations and later artillery directions.

Meanwhile in the air the new Rumpler C.I's with their forward firing gun dominated the skies so effectively that they were widely reported by the Royal Flying Corps as "new Halberstadt fighters". Despite the fact that the Rumplers had orders to avoid battle to save precious machines for the vital reconnaissance duties, one BE.2C was downed on the 27th of March, another on 6 April and a Martinsyde on 19 April.


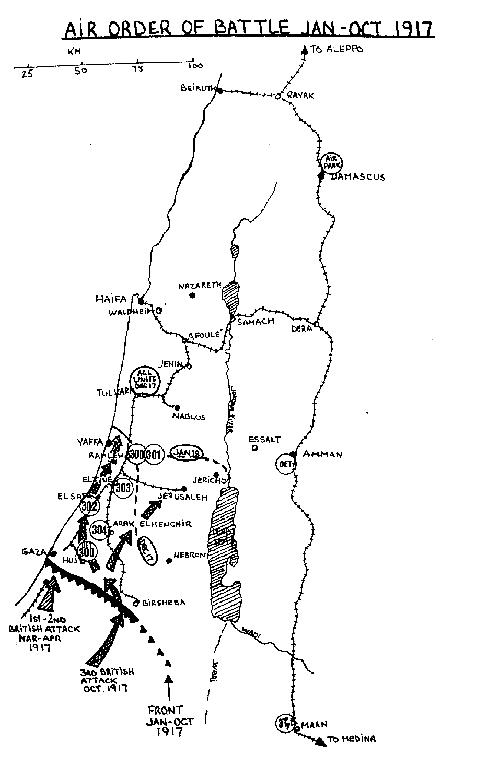
Map of air activities covered by this extract

[From: Ole Nikolajsen, Ottoman Aviation 1911 - 1919, p. 182.]

[Click on map for larger version.]


During the crucial period from mid March to mid April FA300 succeeded in almost completely keeping the British aircraft away from the Gaza lines while these were heavily fortified. In the process 210 flying hours were logged. In the first days of April keen aerial reconnaissance again revealed that a new attack on Gaza was eminent. Consequently two attacks by a force of 5 Rumplers were made on the main British airfield at Rafa inflicting heavy damage.

On 19 April, a British head-on attack was launched upon the by now well prepared Gaza lines. The assault was headed by a small force of armoured cars and therefore succeeded in penetrating the first lines. Now again excellent artillery direction by the wireless equipped Rumplers halted the attackers, wrecked the armoured cars and turned the assault into a complete failure.

On the day of attack an unorthodox attempt was made to stop the British advance by Captain Felmy (the Commanding Officer) and his observer Captain Falke. The British forces were dependent for their water supply on a pipeline following the railway track having been constructed through the desert. The two officers in a daring flight flew a Rumpler 150 km's behind the British lines, landed beside the railway track and blew up the pipeline with explosives. The damage was soon repaired but another similar attack made on 24 May was more successful.

Both on 20 and 21 April, the British tried to renew their attack but all attempts were quickly spotted by the “all present” Rumplers and dealt with by artillery or stubborn infantry counterattacks. The lines of Gaza remained unbroken despite the sacrifice of 6,444 British casualties. A Turkish follow-up counterattack failed to gain ground and was repulsed.

The British air units by this time were apparent completely demoralized and from May to September the small German unit, FA300 swept the sky around Gaza clear of enemy aircraft. The British airfields were also attacked at will and the railway track [183] bombed to such an extent that the traffic for long periods of time came to a standstill as the Indian and Egyptian workers refused to work.

During these five months of stalemate on the ground and German
air superiority, 7 more British aircraft fell to the Rumplers, the losses occurring on 11 May, 25 June, 26 June, 29 June, 8 July, 8 July and 13 September. After 20 June, when two Albatros D.III's were received, these fighters claimed a further 5 aircraft on 25 June, 26 June, 29 June, 8 July and 13 July. These successes were accomplished without any combat losses to FA300. Despite this fact the unit was in August down to only 2 airworthy Rumplers and the 2 Albatros fighters due to attrition and worn out aircraft.

Parallel to this far reaching changes had been made on the British side of the front where General Allenby had taken charge. New modern and more suitable British aircraft started to arrive at the front in August in large numbers.


Source: The above extract is obtained from a self published work by Ole Nikolajsen called Ottoman Aviation 1911 - 1919The First and Second Battles Of Gaza comes from Chapter 8, Pasha and Yildirim, the Palestine Front, 1915 to 1918, pp. 181-4. The text has been edited to remove errors and make it readable for an English speaking audience.


Further Reading:

The German Ottoman Air Force 

Air War on the Palestine Front, December 1915 to January 1917

Turkish Units - The Ottoman Air Force

Lieutenant Colonel Hüseyin Hüsnü Emir, Yildirim


Go To:

Previous Chapter: 3ncu Tayyare Boluk (The 3rd Aircraft Company)

Next Chapter: Yildirim Ordu (The "Lightning Army") 


Citation: The First and Second Battles Of Gaza

Posted by Project Leader at 11:01 PM EAST
Updated: Sunday, 1 March 2009 9:08 AM EAST
The Light Cars in the Libyan Desert
Topic: AIF - Cars

1st AUSTRALIAN ARMOURED CAR SECTION, AIF

THE LIGHT CARS IN THE LIBYAN DESERT

APPENDIX No. 2.


The following summary was extracted from: Bean, C.E.W., The Australian Imperial Force in France, 1916, Official History, Volume III:-

Appendix 2 – The Light Cars in the Libyan Desert.


APPENDIX No. 2.

THE LIGHT CARS IN THE LIBYAN DESERT

Although the main force of the Senussi had been beaten in the Sollum campaign, the Nile valley farther south continued to be threatened by congregations of tribesmen in the neighbouring oases. There is said to be evidence that not only the Senussi, but the Sultan of Darfur and possibly the Turks were working upon a concerted plan, It thus became necessary to safeguard the western edge of the Nile valley. The part played in this by the light horse and the Imperial Camel Corps has been mentioned in Volume VII

The British Official History states :

The Imperial Camel Corps (which, the authors say, "was predominantly Australian") was the backbone of the defence of Egypt from the west. But the use of camelry in war is ancient. and it was the internal-combustion engine which now completely altered the situation.

The reference is to the motor-car patrols, which were of two types - light car patrols of Ford cars, and light armoured motor batteries of Rolls Royce cars and tenders. It was to this service that Murray sent the Australian light-car patrol, which arrived in Egypt in the middle of 1916. This unit consisted of three armoured cars of the heavier type, armed with Colt guns; the bodies had been built by the members of the unit themselves in Melbourne to the plans of their commander, Captain James.

On August 15th they were sent from Ismailia to Minia, with the 11th and 12th British Light Armoured Car Batteries, they patrolled the line of blockhouses to the Baharia oasis which in October was re-occupied by a force under Major-General Watson. The Colt guns of the Australian cars worked well enough, but, though all the drivers were accustomed to bush driving in Australia, their cars proved much more difficult to work in sand than the British Rolls Royces. Apart from the possibility of breakdown in the desert - to which both cars and aeroplanes were liable - there was no great danger in the work.

On December 3rd the unit was ordered south. Its cars and guns were returned to Cairo, but the personnel went by railway to the Kharga oasis, which the British had re-occupied in April. Here cars and Lewis guns were taken over from a British unit. Extra drivers and some despatch riders (with motor-cycles) joined, and the unit became No. 1 Australian Light Car Patrol. Its first duty was to escort General Watson to the Dakhla oasis (reoccupied since October, 1916). At the end of the year the unit was employed in discovering new routes from the southern end of that oasis to Kharga, the ancient track (Darb el Gubari) being too flinty for tyres. A more southerly route was soon found - leading through a pass in some rocky hills, beyond which was firm sand allowing motors to travel at high speed to Kharga, which was their goal.

Meanwhile, all the important oases had been re-occupied except Siwa, where the Senussi himself was located. Hearing that he proposed to withdraw thence to Jaghbub, Sir Archibald Murray decided to raid Siwa from Matruh. This was done at the beginning of February, 1917, but the Senussi escaped. It was while these plans were in preparation that the Australian patrol, then at Dakhla, was asked to discover a route from Dakhla direct to the Kufra oasis, 400 miles to the west in the centre of the desert. The oasis had never been approached from this direction, access having always been from Cyrenaica in the north. Three cars started, with two despatch-riders. But the surface was found to be soft drift-sand; the cars had to be worked in low gear and constantly pushed. One broke down at the 80th mile, and a second when nearing the 200th. The country ahead, seen from a high hill, showed no sign of improvement, and the attempt was therefore abandoned. The patrol returned to Dakhla oasis just as its last water-can was emptied. A second attempt was about to be made when the unit was sent to Palestine.

The British, who were now raiding the Senussi's camps from the north in conjunction with the Italians, and destroying his ammunition, in April, 1917, made terms with Sayed Idris, the Senussi's cousin (and son of his predecessor). This leader was now recognised as occupying the Senussi's position; Sayed Ahmed himself was in August, 1918, smuggled by an Austrian submarine to Constantinople, where he for a time took a prominent part in the Pan-Islamic movement.


Further Reading:

1st AUSTRALIAN ARMOURED CAR SECTION, AIF, Contents 

Australian Light Horse Order of Battle - Outline 

The Australian Light Horse - Structure

Australian Light Horse Order of Battle

Battles where Australians fought, 1899-1920


Citation: The Light Cars in the Libyan Desert

Posted by Project Leader at 12:01 AM EAST
Updated: Monday, 13 April 2009 9:43 PM EADT
Bert Schramm's Diary, 24 February 1919
Topic: Diary - Schramm

Diaries of AIF Servicemen

Bert Schramm


During part of the course of his military service with the AIF, 2823 Private Herbert Leslie Schramm, a farmer from White's River, near Tumby Bay on the Eyre Peninsular, kept a diary of his life. Bert was not a man of letters so this diary was produced with great effort on his behalf. Bert made a promise to his sweetheart, Lucy Solley, that he would do so after he received the blank pocket notebook wherein these entries are found. As a Brigade Scout since September 1918, he took a lead part in the September 1918 breakout by the Allied forces in Palestine. Bert's diary entries are placed alongside those of the 9th Light Horse Regiment to which he belonged and to the 3rd Light Horse Brigade to which the 9th LHR was attached. On this basis we can follow Bert in the context of his formation.

 Bert Schramm's Diary, 24 February 1919


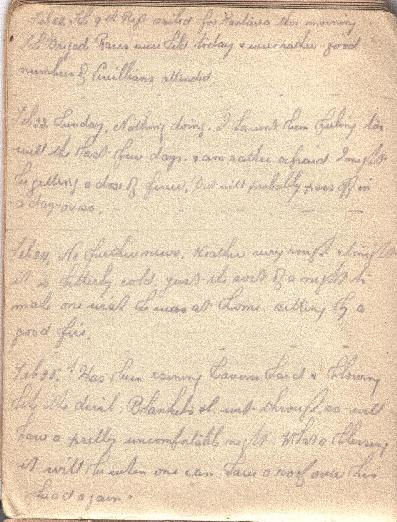
Bert Schramm's Handwritten Diary, 22 - 25 February 1919

[Click on page for a larger print version.]

Diaries

Bert Schramm

Monday, February 24, 1919

Bert Schramm's Location - Tripoli, Lebanon.

Bert Schramm's Diary - No further news. Weather very rough and tonight is bitterly cold, just the sort of night to make one wish he was at home sitting by a good fire.


9th Light Horse Regiment War Diary

9th Light Horse Regiment Location - Rafa, Egypt.

9th Light Horse Regiment War Diary -  0430 Reveilled and entrained at 0530 and moved to Rafa at 0630 arriving there at 1300.

Disentrained and marched to Empire Club [Directed by Miss McPhillamy] - 3/4 mile west of railway station. The three Regiments lunched here, then moved to bivouac area near by.


Darley

Darley, TH, With the Ninth Light Horse in the Great War, Adelaide, Hassell Press, 1924.

No Entry


Previous: Bert Schramm's Diary, 23 February 1919

Next: Bert Schramm's Diary, 25 February 1919


Further Reading:

9th Light Horse Regiment AIF War Diary - Complete day by day list

Bert Schramm Diary 

Bert Schramm Diary - Complete day by day list


Additional Reading:

Darley, TH, With the Ninth Light Horse in the Great War, Adelaide, Hassell Press, 1924.


Citation: Bert Schramm's Diary, 24 February 1919


Posted by Project Leader at 12:01 AM EAST
Updated: Wednesday, 6 May 2009 1:38 PM EADT
Monday, 23 February 2009
Yildirim Ordu (The "Lightning Army")
Topic: Tk - Bks - Air Force

Pasha and Yildirim, the Palestine Front, 1915 to 1918


Dismantling an Albatros DIII of FA304(b) for transport through the Taurus Mountains.

[From: Ole Nikolajsen, Ottoman Aviation 1911 - 1919, p. 207.]


Part 5 - Yildirim Ordu (The "Lightning Army")

The news of the fall of Baghdad to British forces on 11 March 1917 was received with shock and disbelief by the Turkish public. Immediately it was demanded that this important city should be retaken. The Turkish Army Command consequently drew up plans for the reconquering of the city by forming two new armies (the 7th and 8th) and by securing a new German Corps (the "Asian Corps") of 15,000 men. Four German and two Turkish aircraft units were to be formed for these armies. In Germany the former Commanding Officer of FA300, Major Heemskerck was promoted to "Kommandeur der Flieger" (KOFL) and entrusted with the formation of 3 Prussian and 1 Bavarian "Fliegerabteilung", FA301, FA302, FA303. and FA304(b).

During June and July these units with each 6 AEG C.IV's and 2 Albatros D.III's as well as 4 reserve AEG's and 2 Albatroses were formed. The large quantities of material and men for both the armies and flying units started to arrive in Istanbul in late July. At this point it realized that the Gaza force was so depleted of men and material that, drastic measures were needed. Consequently in the first week of August the "Yildirim Ordu" (the "Lightning Army"), as the venture was known, was ordered first to Gaza to defeat the British Army there and then to divert towards Baghdad.

The build-up of the entire force was painfully slow however as the railway through Anatolia and the unfinished tunnels [184] in the Tauras mountains were bottlenecks unable to absorb the flow of masses and material.

Major Heemskerck arrived, as the first of 80 officers and 800 NCO's and men in the beginning of September 1917 at Ramleh, the Headquarters of the FA300, together with the first aircraft unit, FA301 under command of Captain Bieneck. Initially 4 AEG C.IV's and 2 Albatros D.III were available. The rest of the units were held back at Istanbul when on 6 September the railway station at Haydarpasha on the Asian side of Istanbul was demolished in a devastating fire. FA304(b), the Bavarian unit, under Captain Walz had been caught by the fire at Haydarpasha and lost 5 of its aircraft.

FA302 with Commanding Officer Captain König and FA303 with Capt. Schumburg, each with 6 aircraft, arrived at the front on the 11th of October and they were based at new fields prepared near El Safid and El Tine. It was not until 25 October that FA304(b) arrived at its designated field close to the railway station of Arak el Menshiyeh. All aircraft units based in Palestine had their fields located alongside the railway line to facilitate supply.

At this time the former advantage of the German units at the front had deteriorated. New aggressive tactics in the air from squadrons of the recently formed Royal Air Force had resulted in the downing of a newly arrived AEG on 25 September and on 8 October one of FA300's Albatros D.III's was forced down by enemy fighters and captured. [See: Gustav Adolf Dittmar.] Four British SPAD fighters surprised a formation of AEG's on 15 October and shot down one. Soon large formations of British aircraft blocked any attempts by the German aircraft to reconnoitre the front as was a prerequisite for victory in March and April. Despite this, a few missions got through and on 22 October, ships were observed moving north along the coast. On 25 October an aircraft reported that large formations of British cavalry were moving towards the central Gaza lines. [See: The battle of El Buggar Ridge.] A British attack was evidently imminent. This time however every effort had been made by the British to hide the objective of attack. Large dummy camps had been constructed in Cyprus to make the Ottoman Army Command believe that the attack would be made behind the lines in Lebanon and the French navy aircraft launched an attack on Beirut. On 17 October this deception was revealed by a four hour reconnaissance performed over the island by 2 AEG's from FA302 from which had started out from Silifke, in southern Turkey. [185]

The cavalry formations observed on the 25th near Gaza were in fact also a plot conceived by the British to make the Turks believe that the attack would come there. The actual attack was initiated with complete surprise in the evening of the 27th on the feeble garrison at Beersheba and the post fell the next day. [Editor’s note: The battle fought on 27 October was at El Buggar Ridge. The Battle of Beersheba was fought on 31 October 1917 with the first attacks launched at about 8am.]


Map of air activities covered by this extract

[From: Ole Nikolajsen, Ottoman Aviation 1911 - 1919, p. 182.]

[Click on map for larger version.]


A Rumpler from FA300 had managed to spot this on 27 October, but luckily for the British, the aircraft was shot down on its way back and the crew taken prisoner. Its observer was the famed Captain Falke. The British attack now rolled towards Gaza from the flank and another German aircraft was lost on 28 October. In the next 2 days seven more air battles were fought without victors. The Gaza fortifications were attacked on the 2nd of November and on this day 5 British aircraft were claimed shot down by the able gunners of the Austrian anti-aircraft battery and two more by fighters. The British having learned from previous experience managed with fighters and anti-aircraft guns to keep the artillery spotting German aircraft away from the front. [Editor’s note: The breakthrough at Tel el Sheria and Gaza occurred on 7 November 1917.]

Then the British intensified their efforts and on the 8th of November a large formation of aircraft bombed the field at Arak el Menshiyeh, the newly arrived FA304(b) being taken by surprise. [See: 9th LHR AIF War Diary, 8 November.] One aircraft was destroyed and 4 others damaged. When the airfield was evacuated later in the afternoon, after the British had broken through the front, these aircraft had to be burned by its crews. While most of the personnel of FA304(b) were rescued by the unit's trucks, only two aircraft were flown to safety. On 9 November, FA303 was bombed at its field near El Tine and when this field was evacuated three aircraft were left behind. The FA300 did not possess trucks and was rescued with vehicles coming from the German colony at Sarona. The British advance had such momentum that Ramleh was overrun by 15 November and it was only on 21 November that it was stopped, 5 miles from Jerusalem. This mainly because of heavy rain.

During the advance an Albatros fighter was lost on 12 November and two AEG's were shot down by enemy ground fire on 17 November. By the 2 December the rain ceased to such a degree that the British advance was resumed. On the same day a formation of 20 AEG's escorted by 5 Albatrosses attacked the new British airfield at Julis. The formation was during its attack intercepted by SPAD's but no losses were suffered.

Jerusalem was taken by Allenby's forces on 7 December 1917.

At the beginning of December most of the German aircraft and their units had been relocated to Tul Karm, but this was [186] observed by the British and after having been bombed, the units retired further north. The FA300 went to Samach, FA301 and FA303 went to Jenin, FA302 went to the German Jewish colony at Waldheim and finally the FA304(b) went to Afuleh. From these new locations both an AEG and an Albatros were lost on 17 December.

The British attack finally came to a halt south of a line 20 km north of Jaffa to Jericho.

In the effort to halt the enemy advance, however, 10 German aircraft had been lost in the air and 8 on the ground, with 9 pilots and 2 observers killed and 8 pilots and 5 observers wounded. Against 18,000 British army casualties the Turkish and German forces lost about 25,000 men while another 12,000 were captured as Prisoners of War.

By the New Year, 1918, the front had stabilized and the German air units somewhat recovered and reorganized at their new bases. In order to counter the enemy fighter squadrons the 7 remaining Albatros D.III fighters were collected into a provisional fighter "staffel", called JASTA 1, at Jenin. The unit came under command of Lieutenant Felmy, younger brother of Captain Felmy, Commanding Officer of FA300 and personnel was drawn from the other units as well as FA300.


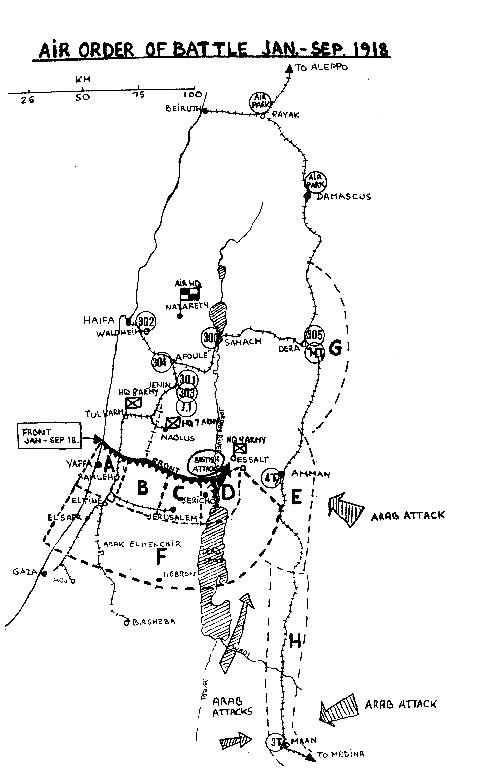
Map of air activities covered by this extract

[From: Ole Nikolajsen, Ottoman Aviation 1911 - 1919, p. 188.]

[Click on map for larger version.]


The JASTA 1 operations were organized with in conjunction with FA301 and FA303 from Jenin being attached to the 7th Army commanded by Fevzi Pasha (area C and D on map.). FA300 from Samach and FA302 from Waldheim were attached to Cevat Pasha's 8th Army (area A and B on map) whereas FA304(b) was entrusted with general reconnaissance (area F). The Turkish aircraft companies 3ncü and 4ncü Tay. Böl. as well as a detachment of FA302 were given duties on the eastern front (4th Army area E on map). From February onwards the new FA305 and 14ncü Tay. Böl. at Dera were assigned area G. For these large operational areas and numerous duties about 30 AEG C.IV's were available for the German units and 4 Albatros C.III, 6 Rumpler C.I’s and 10 AEG C.IV’s for the Turkish units.

 
Source: The above extract is obtained from a self published work by Ole Nikolajsen called Ottoman Aviation 1911 - 1919Part 5 - Yildirim Ordu (The "Lightning Army") comes from Chapter 8, Pasha and Yildirim, the Palestine Front, 1915 to 1918, pp. 184-7. The text has been edited to remove errors and make it readable for an English speaking audience.


Further Reading:

The German Ottoman Air Force 

Gustav Adolf Dittmar 

The Battle of Beersheba

The battle of El Buggar Ridge

9th LHR AIF War Diary, 8 November 

Air War on the Palestine Front, December 1915 to January 1917

Turkish Units - The Ottoman Air Force

Lieutenant Colonel Hüseyin Hüsnü Emir, Yildirim


Go To:

Previous Chapter: The First and Second Battles Of Gaza

Next Chapter: A Fight against Rising Odds


Citation: Yildirim Ordu (The "Lightning Army")

Posted by Project Leader at 11:01 PM EAST
Updated: Sunday, 1 March 2009 9:12 AM EAST
Bert Schramm's Diary, 23 February 1919
Topic: Diary - Schramm

Diaries of AIF Servicemen

Bert Schramm


During part of the course of his military service with the AIF, 2823 Private Herbert Leslie Schramm, a farmer from White's River, near Tumby Bay on the Eyre Peninsular, kept a diary of his life. Bert was not a man of letters so this diary was produced with great effort on his behalf. Bert made a promise to his sweetheart, Lucy Solley, that he would do so after he received the blank pocket notebook wherein these entries are found. As a Brigade Scout since September 1918, he took a lead part in the September 1918 breakout by the Allied forces in Palestine. Bert's diary entries are placed alongside those of the 9th Light Horse Regiment to which he belonged and to the 3rd Light Horse Brigade to which the 9th LHR was attached. On this basis we can follow Bert in the context of his formation.

 Bert Schramm's Diary, 23 February 1919


Bert Schramm's Handwritten Diary, 22 - 25 February 1919

[Click on page for a larger print version.]

Diaries

Bert Schramm

Sunday, February 23, 1919

Bert Schramm's Location - Tripoli, Lebanon.

Bert Schramm's Diary - Nothing doing. I haven't been feeling too well the last few days and am rather afraid I might be getting a dose of fever but will probably pass off in a day or so.


9th Light Horse Regiment War Diary

9th Light Horse Regiment Location - Port Said, Egypt.

9th Light Horse Regiment War Diary -  After a calm voyage down the coast arrived at Port Said at 0800, anchored near the Suez Canal offices for two hours and berthed at Sheriff's Quay where the Regiment disembarked at 1630 and marched to Port Said Railway Station.

Entrained at 1700 and moved out at 1800 and arrived Kantara West at 1930.

Disentrained here and marched to Kantara East and bivouacked near railway station for the remainder of night.

Heavy baggage was conveyed by this train across the Canal Bridge from Port Said to Rafa. Regimental personal baggage was unfortunately sent to Transit Shed at Kantara West instead of being dispatched to Kantara East and did not arrive at Kantara East until midnight.


Darley

Darley, TH, With the Ninth Light Horse in the Great War, Adelaide, Hassell Press, 1924.

No Entry


Previous: Bert Schramm's Diary, 22 February 1919

Next: Bert Schramm's Diary, 24 February 1919


Further Reading:

9th Light Horse Regiment AIF War Diary - Complete day by day list

Bert Schramm Diary 

Bert Schramm Diary - Complete day by day list


Additional Reading:

Darley, TH, With the Ninth Light Horse in the Great War, Adelaide, Hassell Press, 1924.


Citation: Bert Schramm's Diary, 23 February 1919


Posted by Project Leader at 12:01 AM EAST
Updated: Wednesday, 6 May 2009 1:41 PM EADT

Newer | Latest | Older

Full Site Index


powered by FreeFind
Let us hear your story: You can tell your story, make a comment or ask for help on our forum.

Desert Column Forum

A note on copyright

The Australian Light Horse Studies Centre is a not for profit and non profit group whose sole aim is to write the early history of the Australian Light Horse from 1900 - 1920. It is privately funded and the information is provided by the individuals within the group and while permission for the use of the material has been given for this site for these items by various donors, the residual and actual copyright for these items, should there be any, resides exclusively with the donors. The information on this site is freely available for private research use only and if used as such, should be appropriately acknowledged. To assist in this process, each item has a citation attached at the bottom for referencing purposes.

Please Note: No express or implied permission is given for commercial use of the information contained within this site.

A note to copyright holders

The Australian Light Horse Studies Centre has made every endeavour to contact copyright holders of material digitised for this blog and website and where appropriate, permission is still being sought for these items. Where replies were not received, or where the copyright owner has not been able to be traced, or where the permission is still being sought, the Australian Light Horse Studies Centre has decided, in good faith, to proceed with digitisation and publication. Australian Light Horse Studies Centre would be happy to hear from copyright owners at any time to discuss usage of this item.

Contact

Australian Light Horse Studies Centre

eXTReMe Tracker