« February 2009 »
S M T W T F S
1 2 3 4 5 6 7
8 9 10 11 12 13 14
15 16 17 18 19 20 21
22 23 24 25 26 27 28
You are not logged in. Log in


Search the site:


powered by FreeFind
Volunteer with us.

Entries by Topic All topics  
A Latest Site News
A - Using the Site
AAA Volunteers
AAB-Education Centre
AAC-Film Clips
AAC-Photo Albums
AIF & MEF & EEF
AIF - Lighthorse
AIF - ALH - A to Z
AIF - DMC
AIF - DMC - Or Bat
AIF - DMC - Anzac MD
AIF - DMC - Aus MD
AIF - DMC - British
AIF - DMC - BWI
AIF - DMC - French
AIF - DMC - Indian
AIF - DMC - Italian
AIF - DMC - Medical
AIF - DMC - Remounts
AIF - DMC - Scouts
AIF - DMC - Sigs
AIF - DMC - Sigs AirlnS
AIF - DMC - 1 Sig Sqn
AIF - DMC - 2 Sig Sqn
AIF - DMC - Eng
AIF - DMC - Eng 1FSE
AIF - DMC - Eng 2FSE
AIF - DMC - GSR
AIF - 1B - 1 LHB
AIF - 1B - 6 MVS
AIF - 1B - 1 LHMGS
AIF - 1B - 1 Sig Trp
AIF - 1B - 1 LHFA
AIF - 1B - 1 LHR
AIF - 1B - 2 LHR
AIF - 1B - 3 LHR
AIF - 2B - 2 LHB
AIF - 2B - 7 MVS
AIF - 2B - 2 LHFA
AIF - 2B - 2 LHMGS
AIF - 2B - 2 Sig Trp
AIF - 2B - 5 LHR
AIF - 2B - 6 LHR
AIF - 2B - 7 LHR
AIF - 3B - 3 LHB
AIF - 3B - 8 MVS
AIF - 3B - 3 LHB Sigs
AIF - 3B - 3 LHFA
AIF - 3B - 3 LHMGS
AIF - 3B - 3 Sig Trp
AIF - 3B - 8 LHR
AIF - 3B - 9 LHR
AIF - 3B - 10 LHR
AIF - 4B - 4 LHB
AIF - 4B - 4 Sig Trp
AIF - 4B - 9 MVS
AIF - 4B - 4 LHFA
AIF - 4B - 4 LHMGS
AIF - 4B - 4 LHR
AIF - 4B - 11 LHR
AIF - 4B - 12 LHR
AIF - 5B - 5 LHB
AIF - 5B - 10 MVS
AIF - 5B - 5 LHFA
AIF - 5B - 5 Sig Trp
AIF - 5B - ICC
AIF - 5B - 14 LHR
AIF - 5B - 15 LHR
AIF - 5B - 1er Regt
AIF - 5B - 2 NZMGS
AIF - AASC
AIF - Aboriginal LH
AIF - Badges
AIF - Cars
AIF - Chinese LH
AIF - Double Sqns
AIF - Engineers
AIF - Fr - 22 Corps
AIF - Fr - 13 LHR
AIF - Honour Roll
AIF - HQ - 3rd Echelon
AIF - Marching Songs
AIF - Misc Topics
AIF - NZMRB
AIF - NZMRB - AMR
AIF - NZMRB - CMR
AIF - NZMRB - EFT
AIF - NZMRB - NZMFA
AIF - NZMRB - NZMGS
AIF - NZMRB - OMR
AIF - NZMRB - Sig-Trp
AIF - NZMRB - WMR
AIF - Ships
AIF - Ships - Encountr
AIF - Ships - Una
AIF - WFF
AIF - Wireless Sqn
Battles
BatzA - Australia
BatzA - Broken Hill
BatzA - Liverpool
BatzA - Merivale
BatzB - Boer War
BatzB - Bakenlaagte
BatzB - Belmont
BatzB - Bothaville
BatzB - Buffels Hoek
BatzB - Coetzees Drift
BatzB - Diamond Hill
BatzB - Driefontein
BatzB - Elands
BatzB - Graspan
BatzB - Grobelaar
BatzB - Grootvallier
BatzB - Hartebestfontn
BatzB - Houtnek
BatzB - Karee Siding
BatzB - Kimberley
BatzB - Koster River
BatzB - Leeuw Kop
BatzB - Mafeking
BatzB - Magersfontein
BatzB - Modder River
BatzB - Onverwacht
BatzB - Paardeberg
BatzB - Palmietfontein
BatzB - Pink Hill
BatzB - Poplar Grove
BatzB - Rhenoster
BatzB - Sannahs Post
BatzB - Slingersfontn
BatzB - Stinkhoutbm
BatzB - Sunnyside
BatzB - Wilmansrust
BatzB - Wolvekuil
BatzB - Zand River
BatzG - Gallipoli
BatzG - Anzac
BatzG - Aug 1915
BatzG - Baby 700
BatzG - Evacuation
BatzG - Hill 60
BatzG - Hill 971
BatzG - Krithia
BatzG - Lone Pine
BatzG - Nek
BatzJ - Jordan Valley
BatzJ - 1st Amman
BatzJ - 2nd Amman
BatzJ - Abu Tellul
BatzJ - Es Salt
BatzJ - JV Maps
BatzJ - Ziza
BatzM - Mespot
BatzM - Baghdad
BatzM - Ctesiphon
BatzM - Daur
BatzM - Kurna
BatzM - Kut el Amara
BatzM - Ramadi
BatzN - Naval
BatzN - AE1
BatzN - Cocos Is
BatzN - Heligoland
BatzN - Marmara
BatzN - Zeebrugge
BatzN - Zeppelin L43
BatzNG - Bitapaka
BatzO - Other
BatzO - Baku
BatzO - Egypt 1919
BatzO - Emptsa
BatzO - Karawaran
BatzO - Peitang
BatzO - Wassa
BatzP - Palestine
BatzP - 1st Gaza
BatzP - 2nd Gaza
BatzP - 3rd Gaza
BatzP - Aleppo
BatzP - Amwas
BatzP - Ayun Kara
BatzP - Bald Hill
BatzP - Balin
BatzP - Beersheba
BatzP - Berkusieh
BatzP - Damascus
BatzP - El Auja
BatzP - El Buggar
BatzP - El Burj
BatzP - Haifa
BatzP - Huj
BatzP - JB Yakub
BatzP - Kaukab
BatzP - Khan Kusseir
BatzP - Khuweilfe
BatzP - Kuneitra
BatzP - Megiddo
BatzP - Nablus
BatzP - Rafa
BatzP - Sasa
BatzP - Semakh
BatzP - Sheria
BatzP - Surafend
BatzP - Wadi Fara
BatzS - Sinai
BatzS - Bir el Abd
BatzS - El Arish
BatzS - El Mazar
BatzS - El Qatiya
BatzS - Jifjafa
BatzS - Magdhaba
BatzS - Maghara
BatzS - Romani
BatzS - Suez 1915
BatzSe - Senussi
BatzWF - Westn Front
BW - Boer War
BW - NSW
BW - NSW - 1ACH
BW - NSW - 1NSWMR
BW - NSW - 2NSWMR
BW - NSW - 3ACH
BW - NSW - 3NSWIB
BW - NSW - 3NSWMR
BW - NSW - 5ACH
BW - NSW - A Bty RAA
BW - NSW - AAMC
BW - NSW - Aust H
BW - NSW - Lancers
BW - NSW - NSW Inf
BW - NSW - NSWCBC
BW - NSW - NSWIB
BW - NSW - NSWMR_A
BW - NZ
BW - Qld
BW - Qld - 1ACH
BW - Qld - 1QMI
BW - Qld - 2QMI
BW - Qld - 3ACH
BW - Qld - 3QMI
BW - Qld - 4QIB
BW - Qld - 5QIB
BW - Qld - 6QIB
BW - Qld - 7ACH
BW - QLD - AAMC
BW - SA
BW - SA - 1SAMR
BW - SA - 2ACH
BW - SA - 2SAMR
BW - SA - 3SACB
BW - SA - 4ACH
BW - SA - 4SAIB
BW - SA - 5SAIB
BW - SA - 6SAIB
BW - SA - 8ACH
BW - SA - AAMC
BW - Tas
BW - Tas - 1ACH
BW - Tas - 1TIB
BW - Tas - 1TMI
BW - Tas - 2TB
BW - Tas - 2TIB
BW - Tas - 3ACH
BW - Tas - 8ACH
BW - Vic
BW - Vic - 1VMI
BW - Vic - 2ACH
BW - Vic - 2VMR
BW - Vic - 3VB
BW - Vic - 4ACH
BW - Vic - 4VIB
BW - Vic - 5VMR
BW - Vic - 6ACH
BW - Vic - AAMC
BW - Vic - Scot H
BW - WA
BW - WA - 1WAMI
BW - WA - 2ACH
BW - WA - 2WAMI
BW - WA - 3WAB
BW - WA - 4ACH
BW - WA - 4WAMI
BW - WA - 5WAMI
BW - WA - 6WAMI
BW - WA - 8ACH
BW Gen - Campaign
BW Gen - Soldiers
BW General
Cavalry - General
Diary - Schramm
Egypt - Heliopolis
Egypt - Mena
Gen - Ataturk Pk, CNB
Gen - Australia
Gen - Legends
Gen - Query Club
Gen - St - NSW
Gen - St - Qld
Gen - St - SA
Gen - St - Tas
Gen - St - Vic
Gen - St - WA
Gm - German Items
Gm - Bk - 605 MGC
GW - 11 Nov 1918
GW - Atrocities
GW - August 1914
GW - Biographies
GW - Propaganda
GW - Spies
GW - We forgot
Militia 1899-1920
Militia - Area Officers
Militia - Inf - Infantry
Militia - Inf - 1IB
Militia - Inf - 2IB
Militia - Inf - 3IB
Militia - Inf - NSW
Militia - Inf - Qld
Militia - Inf - SA
Militia - Inf - Tas
Militia - Inf - Vic
Militia - Inf - WA
Militia - K.E.Horse
Militia - LH
Militia - LH - Regts
Militia - LH - 1LHB
Militia - LH - 2LHB
Militia - LH - 3LHB
Militia - LH - 4LHB
Militia - LH - 5LHB
Militia - LH - 6LHB
Militia - LHN - NSW
Militia - LHN - 1/7/1
Militia - LHN - 2/9/6
Militia - LHN - 3/11/7
Militia - LHN - 4/6/16
Militia - LHN - 5/4/15
Militia - LHN - 6/5/12
Militia - LHN - 28
Militia - LHQ - Qld
Militia - LHQ - 13/2
Militia - LHQ - 14/3/11
Militia - LHQ - 15/1/5
Militia - LHQ - 27/14
Militia - LHS - SA
Militia - LHS - 16/22/3
Militia - LHS - 17/23/18
Militia - LHS - 24/9
Militia - LHT - Tas
Militia - LHT - 12/26
Militia - LHV - Vic
Militia - LHV - 7/15/20
Militia - LHV - 8/16/8
Militia - LHV - 9/19
Militia - LHV - 10/13
Militia - LHV - 11/20/4
Militia - LHV - 19/17
Militia - LHV - 29
Militia - LHW - WA
Militia - LHW-18/25/10
Militia - Military Orders
Militia - Misc
MilitiaRC - Rifle Clubs
MilitiaRC - NSW
MilitiaRC - NT
MilitiaRC - Qld
MilitiaRC - SA
MilitiaRC - Tas
MilitiaRC - Vic
MilitiaRC - WA
Militiaz - New Zealand
Tk - Turkish Items
Tk - Army
Tk - Bks - Books
Tk - Bks - 1/33IR
Tk - Bks - 27th IR
Tk - Bks - Air Force
Tk - Bks - Yildirim
Tk - POWs
Wp - Weapons
Wp - Hotchkiss Cav
Wp - Hotchkiss PMG
Blog Tools
Edit your Blog
Build a Blog
RSS Feed
View Profile
Open Community
Post to this Blog
Site Index
Education Centre
LH Militia
Boer War
Transport Ships
LH Battles
ALH - Units
ALH - General
Aboriginal Light H
Weapons
Ottoman Sources

"At a mile distant their thousand hooves were stuttering thunder, coming at a rate that frightened a man - they were an awe inspiring sight, galloping through the red haze - knee to knee and horse to horse - the dying sun glinting on bayonet points..." Trooper Ion Idriess

The Australian Light Horse Studies Centre aims to present an accurate history as chroniclers of early Australian military developments from 1899 to 1920.

The Australian Light Horse Studies Centre site holds over 12,000 entries and is growing daily.

Contact: Australian Light Horse Studies Centre

Let us hear your story: You can tell your story, make a comment or ask for help on our Australian Light Horse Studies Centre Forum called:

Desert Column Forum

WARNING: This site contains: names, information and images of deceased people; and, language which may be considered inappropriate today.

Monday, 16 February 2009
Hazebrouck, France, April 14 to 17, 1918
Topic: BatzWF - Westn Front

Hazebrouck

France, 14-17 April 1918


Hazebrouck, an action during what is more generally called the Battle of the Lys in April 1918, caused when the Germans launched an extension of their offensive begun on 21 A-larch. The enemy aimed their blow between Armentieres and La Bassee, at a section of the front held by the Portuguese Corps-who they rightly assessed had little commitment to fighting for the Allies' cause. When attacked on 9 April, the Portuguese broke. A second stroke the next day, falling north of Armentieres, carried the German offensive towards Messines and placed in peril the whole of the British Front in Flanders. Also threatened was Hazebrouck, a crucial rail centre, some 30 kilometres west of Armentieres.

The defences of the Messines sector had been vacated barely a week earlier by the 1st and 2nd Australian divisions, these being sent to follow the rest of the Australian Corps towards Amiens. Even so, some Australian units which remained-artillery and tunnellers mostly-became caught up in this fighting associated with the British withdrawal. The 1st Division, under Major General Harold Walker, was hastily re-entrained and returned north. Arriving on 12 April, the Australians became part of the British Second Army reserve and took up defensive positions about eight kilometres east of Hazebrouck, extending south from Strazeele to in front of the Nieppe Forest. By dusk the next day, all retreating troops had passed through and the Australian posts were effectively_ the new front line; both the division's flanks touched with British formations--on the left the 33rd Division, on the right the 5th Division.

After an artillery barrage beginning at 6.30 a.m. on 14 April, the Germans launched their attacks. These were broken up by answering British guns, and by devastating rifle and machine-gun fire whenever the enemy ranks reached close range. Nowhere were the Australian posts seriously threatened. When the enemy attacks against the 33rd Division saw the town of Meteren fall on 16 April, the 1st Brigade (holding the left of the Australian front) was required to push out its flank in this direction, to support a counter-attack ordered to be made at dusk by the French 133rd Division but which never took place.

While the Australian front was thus extended, the next morning it was subjected to another heavy bombardment foretelling an attack to follow. The enemy were easily driven off, however, and repeated attempts to advance throughout the day were defeated before they could get underway. The next day, 18 April, the Australian Division was ordered to sideslip further north and relieve the French at Meteren. This was accomplished by inserting the 3rd Brigade (under Brig.-General Gordon Bennett), until then in reserve, on the 1st Brigade's left, and withdrawing the 2nd Brigade from the right into reserve after its positions were taken over by the 31st Division. Following this adjustment, an attempt was made by the 3rd Brigade to recapture Meteren in a two phase operation carried out over successive nights. The first phase (on 22-23 April) went smoothly, but the second was sharply repulsed-bringing casualties in the failed attempt to about 200. Nonetheless the Allied line in this area had been stabilised, and the Germans confined their efforts to seizing high ground west of Messines.


Extracted from the book produced by Chris Coulthard-Clark, Where Australians Fought - The Encyclopaedia of Australia's Battles, Allen and Unwin, Sydney, 1998, pp. 142-143.


Additional References cited by Chris Coulthard-Clark:

C.E.W. Bean (1937) The Australian Imperial Force in France during the Main German Offensive, 1918, Sydney: Angus & Robertson.


Further Reading:

Battles where Australians fought, 1899-1920


Citation: Hazebrouck, France, April 14 to 17, 1918

Posted by Project Leader at 11:01 PM EAST
Updated: Sunday, 5 April 2009 12:16 PM EADT
Baby 700, Turkey, May 2, 1915
Topic: BatzG - Baby 700

Baby 700

Turkey, 2 May 1915


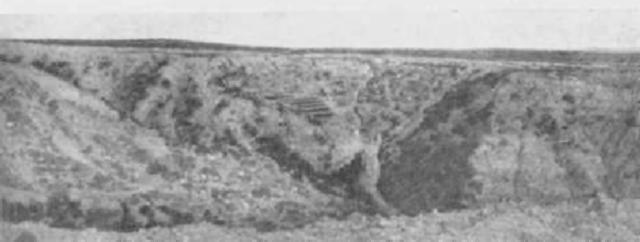
Looking towards Baby 700 from Plugge's Plateau.

[Baby 700 is the knoll on the left above the long thin white line near the horizon which marks the extent of the Allied advance at Gallipoli. In the centre of the picture are the terraces of Quinn's Post. From: Fred Waite, The New Zealanders at Gallipoli, Whitcombe and Tombs Limited, 1919, Christchurch, p. 102.]


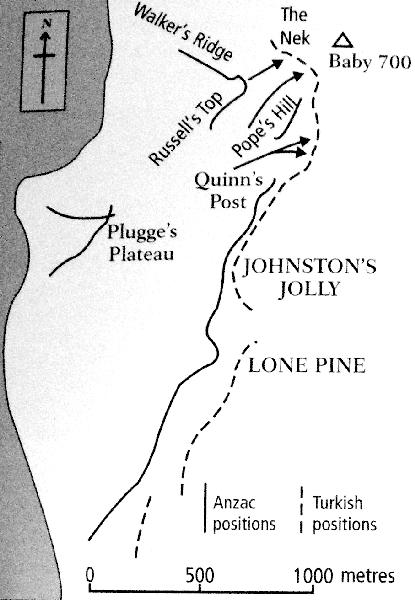
Baby 700, a height at the extreme north-eastern angle of the Allied beach-head gained at Anzac (q.v.) in April 1915, became the scene of a major attack by Australian and New Zealand troops on 2 Mm 1915. Because this feature-in many respects the key to the Anzac position-was in Turkish hands and enabled the enemy to dominate movement along the valley between the first and second line of ridges inland from the beach, the commander of the Australian and New Zealand Army Corps (Lieut.-General Sir William Birdwood) decided that it must be captured. He therefore ordered an attack by the New Zealand & Australian Division, with the Australian 4th Brigade (Colonel John Monash) climbing the southern slopes while the New Zealand Infantry Brigade scaled those on the western side, the movement of both brigades being preceded by a combined naval and artillery bombardment.


The attack on Baby 700 as seen by the Australians


While the Australians went forward at the appointed time of 7.15 p.m. with great gusto, the New Zealanders were delayed during their approach march and were not ready to attack until 90 minutes later. With a tremendous volume of enemy fire sweeping their unsupported left flank, the Australians became pinned down, and by the time the New Zealanders joined in they, too, could make no progress. Further efforts to carry out the plan were made during the night, but these proved futile. At dawn some British Marines were also pushed into the fight on the western slopes in a final useless attempt. No accurate tally of casualties was made (or was possible, particularly among the New Zealanders), but it is estimated that about 1,000 men were lost in this action. The effort was wholly in vain, as the crucial apex of Baby 700 stayed in enemy hands for the rest of the campaign.

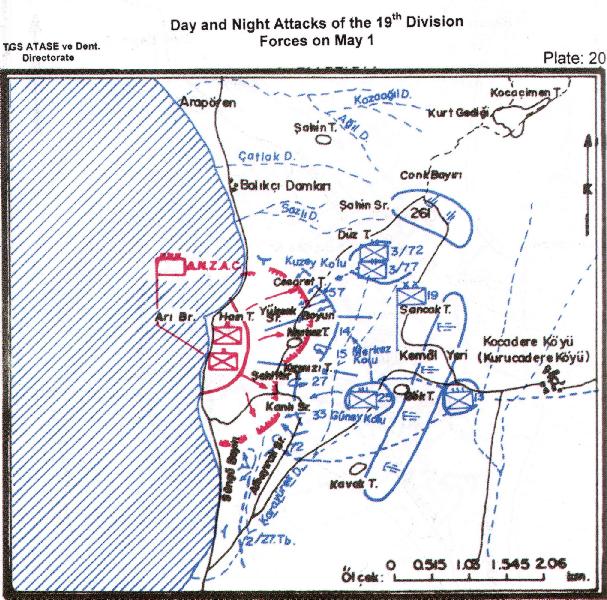
A map of the Turkish view of the attack on Baby 700.

[From: The Turkish General Staff, A Brief History of the Canakkale Campaign in the First World War, Ankara, The Turkish General Staff Printing House, 2004, Plate 20.]


Extracted from the book produced by Chris Coulthard-Clark, Where Australians Fought - The Encyclopaedia of Australia's Battles, Allen and Unwin, Sydney, 1998, pp. 104-105.


Additional References cited by Chris Coulthard-Clark:

C.E.W. Bean, (1921), The Story of Anzac, Vol. 1, Sydney: Angus & Robertson.

Christopher Pugsley, (1984), Gallipoli: The New Zealand Story,
Auckland: Hodder & Stoughton


Further Reading:

Battles where Australians fought, 1899-1920


Citation: Baby 700, Turkey, May 2, 1915

Posted by Project Leader at 3:28 PM EAST
Updated: Tuesday, 14 April 2009 1:49 PM EADT
Sea of Marmara, Turkey, April 25 to 30, 1915
Topic: BatzN - Marmara

Sea of Marmara

Turkey,  25 - 30 April 1915


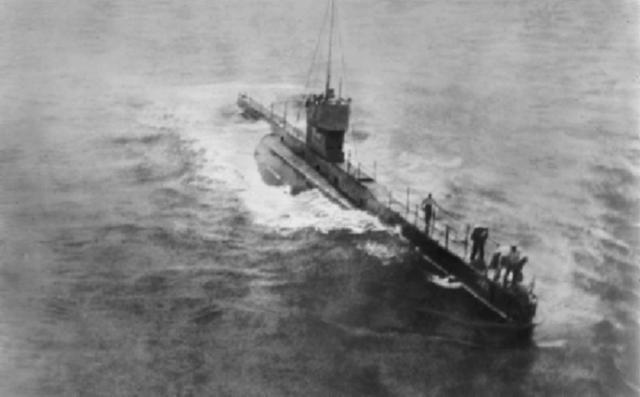
The AE2 on escort duty, Indian Ocean, 1915.


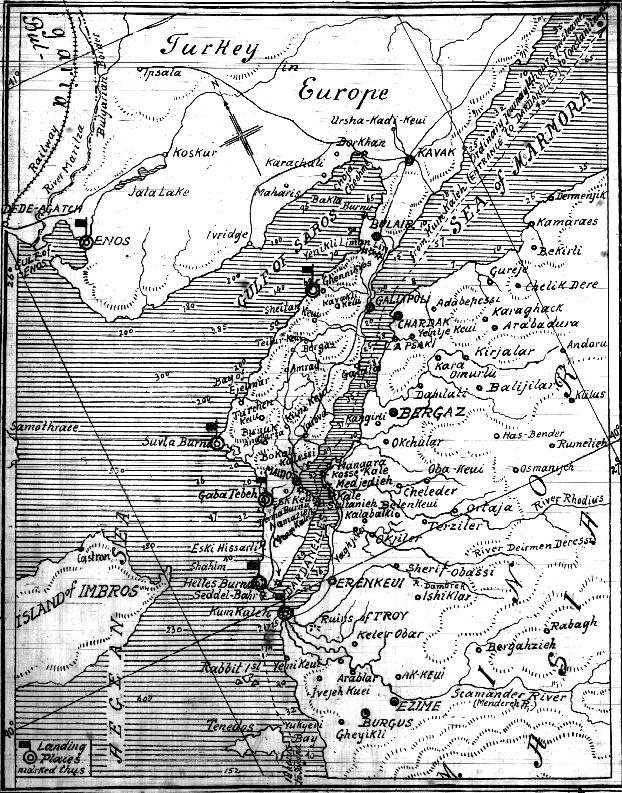
Sea of Marmara, a naval episode on 25-30 April 1915 in which the Australian submarine AE2 succeeded in penetrating Turkish defences and passing the length of the Dardanelles, the 60-kilometre channel linking the Sea of Marmara with the Aegean Sea, at the same time that an Allied expeditionary force was attempting to seize the Turkish land forts controlling the southern entrance to this strategic waterway (see Anzac). Two submarines (one French, one British) had previously been lost to the strait's hazards which----apart. from natural obstacles such as an unpredictable outward current which could render a submarine almost uncontrollable-included minefields, searchlights, shore batteries and naval patrols. If able to reach Chanak, on the eastern shore of the stretch known as the Narrows, the boat's captain, Lieut.-Commander Henry Stoker, RN, was ordered to 'run amok generally' by interfering with enemy shipping moving to support Turkish forces on the Gallipoli Peninsula.

An initial attempt made during the early morning hours of 24 April turned into a false start, after damage sustained to a hydroplane shaft during a hurried dive forced the submarine to return to base at Tenedos (an island near the mouth of the Dardanelles). Repairs were carried out in time to enable a second attempt to be made at the same time the next day. Cruising slowly on the surface under cover of darkness, AE2 made its way into the entrance of the strait at 2.30 a.m. Two hours later, after about nine kilometres had been covered, the boat's wash was spotted in the flat calm water by enemy lookouts on the north bank, a gun opened fire and it became necessary to dive.

Stoker proceeded through the enemy minefields while still submerged, with tethering wires constantly scraping against the submarine's hull. By 6 a.m., while approaching the Narrows off Chanak at periscope depth, the boat was engaged by gunfire from forts on both sides of the waterway, and by warships which attempted to ram it. AE2 sank a gunboat with a torpedo before again being forced to submerge during the rest of this critical part of the passage. Twice the vessel hit bottom and slid up on the bank, exposing part of its conning tower to enemy observation and fire, but the crew was able to extricate it on each occasion.


A 1915 map of the Dardanelles tracing out the possible route from Tendos to Constantinople.
[From: Sydney Mail, 5 May 1915, p. 13.]


When Stoker rose to periscope depth to check position a short time after the second grounding episode, he discovered that the Narrows were well behind but that AE2 was now at the centre of a flotilla of enemy craft which included destroyers and gunboats. At 8.30 a.m. he attempted to throw off his pursuers by lying submerged on the bottom, staying thus concealed until the movement of searching vessels overhead ceased during the early hours of the evening. After surfacing during the night to recharge batteries, by 9 a.m. the next day, 26 April, AE2 was able to complete its passage of the Dardanelles and gained the wider spaces of the Sea of Marmara.

For the next four days AE2 remained at large within waters which then formed vital lines of internal communication for the Turks. It several times made torpedo attacks on vessels-both warships and freighters -which were encountered, although without succeeding in sinking any of these. The submarine was itself frequently forced to take evasive action against small enemy craft which attacked it, since it lacked a gun with which to defend itself. On the morning of 29 April AE2 was joined off Kara Burnu (at the western end of Artaki Bay) by E14, a British submarine commanded by Lieut.-Commander Edward Boyle, which had followed the Australian boat in making the difficult passage. An arrangement was made to rendezvous again at 10 a.m. the next day, before Stoker took his vessel to a bay north of Marmara Island where the night was spent resting on the bottom.

When AE2 arrived at the rendezvous point the next morning, 30 April, it was approached by a torpedo-boat (Sultan Hissar) and forced to dive. At about 10.30 a.m. the submarine inexplicably lost trim, its nose suddenly rising to break the surface about 1.5 kilometres from its original pursuer and a gunboat which had come to its assistance. An attempt to dive became uncontrollable, and efforts to arrest what had become an alarming plummet only led to the submarine again bursting to the surface stern first. Enemy fire quickly holed the engine room, and with no ability to either resist or escape Stoker considered that he had no choice but to scuttle the vessel. After ordering his men onto the deck to be taken off by the Turkish torpedo-boat, he took action to flood AE2's tanks and send it to the bottom in 55 fathoms some 5.5 kilometres north of Kara Burnu at 10.45 a.m. The twenty-man crew became prisoners of the Turks for the next three years.

Although AE2 had caused little real damage before being sunk, its penetration of the Dardanelles was of immense psychological importance both for the Turks and the Allies-and notwithstanding that the feat was quickly duplicated by Boyle's boat, and also E11 commanded by Lieut.-Commander Martin Nasmith. Although the next two submarines were far more effective in disrupting Turkish maritime traffic, the fact is that Stoker's presence in the Sea of Marmara undoubtedly began that process. Strangely, though, while Boyle and Nasmith were both immediately awarded the Victoria Cross and promoted for their exploits, Stoker's achievement was recognised with only the Distinguished Service Order, belatedly awarded in 1919.

The success of AE2 in getting through had also played an indirect part in influencing the army operation at Gallipoli, being specifically mentioned on 26 April by General Sir Ian Hamilton, the commander of the army expedition, in refusing to countenance proposals from subordinates that his force should be immediately taken back off the peninsula. Although Hamilton had already made his decision to stay, the news of the Australian boat's success helped to lighten the gloom of events immediately following the Gallipoli landing.


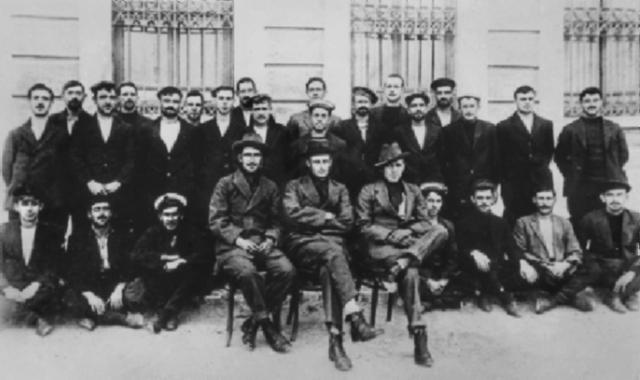
The crew of the AE2 as POWs in Turkey, 1915.


Extracted from the book produced by Chris Coulthard-Clark, Where Australians Fought - The Encyclopaedia of Australia's Battles, Allen and Unwin, Sydney, 1998, pp. 103-104.


Additional References cited by Chris Coulthard-Clark:

Robert Rhodes James, (1974), Gallipoli, London: Pan Books.

T.R. Frame & G.J. Swinden (1990), First In, Last Out: The Navy at Gallipoli, Kenthurst, NSW: Kangaroo Press.


Further Reading:

Battles where Australians fought, 1899-1920


Citation: Sea of Marmara, Turkey, April 25 to 30, 1915

Posted by Project Leader at 12:02 PM EAST
Updated: Tuesday, 14 April 2009 11:35 PM EADT
Bert Schramm's Diary, 16 February 1919
Topic: Diary - Schramm

Diaries of AIF Servicemen

Bert Schramm


During part of the course of his military service with the AIF, 2823 Private Herbert Leslie Schramm, a farmer from White's River, near Tumby Bay on the Eyre Peninsular, kept a diary of his life. Bert was not a man of letters so this diary was produced with great effort on his behalf. Bert made a promise to his sweetheart, Lucy Solley, that he would do so after he received the blank pocket notebook wherein these entries are found. As a Brigade Scout since September 1918, he took a lead part in the September 1918 breakout by the Allied forces in Palestine. Bert's diary entries are placed alongside those of the 9th Light Horse Regiment to which he belonged and to the 3rd Light Horse Brigade to which the 9th LHR was attached. On this basis we can follow Bert in the context of his formation.

 Bert Schramm's Diary, 16 February 1919


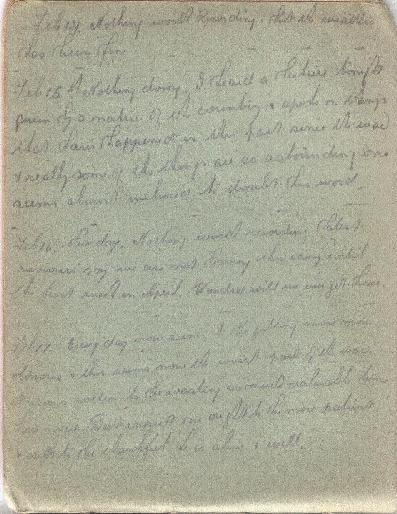
Bert Schramm's Handwritten Diary, 14 - 17 February 1919

[Click on page for a larger print version.]

Diaries

Bert Schramm

Sunday, February 16, 1919

Bert Schramm's Location - Tripoli, Lebanon.

Bert Schramm's Diary - Sun. Nothing worth recording. Latest rumour says we are not leaving this camp until the first week of April. Wonder will we ever get home.


9th Light Horse Regiment War Diary

9th Light Horse Regiment Location - Tripoli, Lebanon.

9th Light Horse Regiment War Diary -  1000 Short Church of England service in the YMCA Tent while other denominations were in the Recreation Tent.


Darley

Darley, TH, With the Ninth Light Horse in the Great War, Adelaide, Hassell Press, 1924.

No Entry


Previous: Bert Schramm's Diary, 15 February 1919

Next: Bert Schramm's Diary, 17 February 1919


Further Reading:

9th Light Horse Regiment AIF War Diary - Complete day by day list

Bert Schramm Diary

Bert Schramm Diary - Complete day by day list


Additional Reading:

Darley, TH, With the Ninth Light Horse in the Great War, Adelaide, Hassell Press, 1924.


Citation: Bert Schramm's Diary, 16 February 1919


Posted by Project Leader at 12:01 AM EAST
Updated: Sunday, 3 May 2009 9:27 PM EADT
The Battle of Magdhaba, Sinai, December 23, 1916, 10th LHR, AIF, Unit History Account
Topic: AIF - 3B - 10 LHR

The Battle of Magdhaba

Sinai, 23 December 1916

10th LHR, AIF, Unit History Account


Lieutenant Colonel Arthur Charles Niquet Olden produced the unit history for the 11th LHR in 1921 called the Westralian cavalry in the war: the story of the Tenth Light Horse Regiment, A.I.F., in the Great War, 1914-1918, which included a section specifically related to the Battle of Magdhaba is extracted below.

Olden, A.C.N., Westralian cavalry in the war: the story of the Tenth Light Horse Regiment, A.I.F., in the Great War, 1914-1918, (Melbourne 1921):


WESTRALIAN CAVALRY IN THE WAR p. 111

CHAPTER XVII. MAGHDABA.

At 6 o'clock on the morning of December 20th, 1916, the 10th Regiment received orders to march with other units of the 3rd Light Horse Brigade to the Divisional rendezvous at Bir Gympie. At ten o'clock that night the Anzac Mounted Division - less the 2nd Light Horse Brigade - marched for El Arish, the role of our own Brigade being to occupy Bir-el-Masmi. This place was reached at 5 a.m. the following morning (December 21st), and here word was received that El Arish had been entered by our troops without opposition. At 11 a.m. the 10th Regiment marched to Masaid, and thence to Bir-Abu-Zehari, where it bivouacked for the night. Shortly after daylight on the 22nd a further move was made to half a mile west of El Arish, where orders were received that the Anzac Mounted Division would concentrate at a point about two miles south of El Arish in preparation for a raid on the Turkish strong post at El Maghdaba. Arrived at the rendezvous, the Regiment remained in the Wadi El Arish, whilst three days' rations per horse and man were being issued. The weather being now extremely cold, the men carried sleeping blankets and overcoats on this occasion, and as much water as they could convey, as it was known that there was no available water excepting at Maghdaba, and even there - according to report - the wells had been mined by the Turks. El Maghdaba is situated on the banks of the Wadi El-Arish, about twenty-two miles, as the crow flies, from the sea. As a place of importance, in anything but a military sense, it is insignificant, but its commanding position, coupled with good communications by means of numerous tracks from the east leading to it, rendered it of extreme value as a jumping-off place for a flank movement against a force moving easterly along the coast route. Held resolutely by the enemy in conjunction with El Arish, a most serious obstacle would have been placed in the way of our forward move, and even with El Arish in our hands it was of vital necessity to clear up the Maghdaba situation before the advance could proceed. Consequently the High Command had decided

112 WESTRALIAN CAVALRY IN THE WAR

to send the Anzac Mounted Division - to which was attached the Imperial Camel Corps - to raid the enemy stronghold at Maghdaba, and, if possible, capture the garrison. The force, having completed rationing, commenced the approach march on Maghdaba, leaving the rendezvous shortly after midnight on December 23rd, 1916. The 3^ Light Horse Brigade, in the centre, marched along the Wadi bed, with the New Zealanders on the right and the Camel Corps on the left. The 1st Light Horse Brigade followed in reserve. On the flanks the country was ordinary desert of the sand-dune type, but the Wadi bed was of a chalky nature, and the 3rd Brigade became enveloped in clouds of fine white dust which settled on men and horses, giving them a phantom-like appearance in the morning. Soon after daylight our columns halted before Maghdaba, the approach march having been carried out with great rapidity in the circumstances. The Turkish defences were revealed, and consisted chiefly of two strong redoubts on the left bank of the Wadi, with ideal natural communication trenches along the deep washaways in the Wadi banks, skillfully improved by their engineers, so that they had effective communication not only between the redoubts, but also with the main Wadi bed and with the buildings on the right, or east, bank, where an excellent supply of water had been conserved in tanks. Almost completely surrounding the northern redoubt, and about 400 yards from it, was an arm of the main Wadi, about 25 feet in depth, which afforded excellent cover, and was held by enemy posts. To the south-west of the Turkish position were high, rough hills from which the Camel Corps eventually attacked. Reconnaissance reports from scouts showed that the positions covering Maghdaba were held in force by the enemy - our agents had previously estimated the Turkish strength at 4000, with some light field guns - and orders for an enveloping movement were received. At 9.30 a.m. the 3rd Light Horse Brigade commenced to push eastward round the enemy's right flank, the Camel Corps advanced frontally from the south-west, whilst the New Zealanders occupied a chain of high sand hills. The Inverness and Leicester Batteries (R.H.A.), in a saddle, filled the intervening gap. Our artillery immediately opened fire on the redoubts, and the troops moving towards their objectives gradually gained ground. The Turks, however, soon indicated that they were not to be easily dislodged, and as our advance proceeded,

WESTRALIAN CAVALRY IN THE WAR 113

they commenced in earnest to offer stout opposition with rifle and machine gun fire at a range of about 1200 yards. Casualties began to occur, amongst the first to be wounded being T./Major Timperley. Our aeroplanes now became active and rendered valuable assistance by reconnoitring the enemy positions, bombing and machine gunning them at a very low altitude. The 3rd Light Horse Brigade with the 8th Regiment on the right, and the 10th Regiment on the left - the extreme left of the Division - having previously moved easterly until nearly north of the enemy defences, now advanced dismounted in a south-easterly direction, supported by machine and Lewis guns, and successively

114 WESTRALIAN CAVALRY IN THE WAR

occupied the ridges approaching the redoubts. At 11.30 a body of Turks was seen to be advancing from east-south-east with the evident intention of enfilading our advance. Two troops of the 10th Regiment, with a Lewis gun and machine gun section, were sent forward to deal with this body. They drove back the enemy, who were seen to retire completely out of the fight. This movement cleared the whole left flank of our attack. By 12.30 the last ridge overlooking the wide plain through which the Wadi ran was in our hands, and all available troops were crowded on to it. Meanwhile, the Camel Corps and New Zealanders, despite stout opposition, had closed on the positions further south, and at 1.30 p.m. the 1st Light Horse Brigade, which had been left in reserve, attacked dismounted from the north-east, on our immediate right. Aerial contact patrols at this stage reported that the enemy had commenced to retreat. General Royston (commanding the 3rd Light Horse Brigade), a man of quick decision, decided that there was no time to be lost and ordered the 10th Regiment to take the occupied position of the Wadi arm by a mounted charge with fixed bayonets, whilst the 8th and 9th Regiments simultaneously attacked the northern redoubt dismounted. Issuing from behind the ridge, the Regiment galloped across the open plain in extended order under enemy rifle and machine gun fire. "A" Squadron (Captain Dunckley) on the right, "B" Squadron (Lieut. Rodsted) in the centre, and "C" Squadron (Captain Hamlin) on the left. The squadrons raced for the Wadi, holding their bayonet-tipped rifles like lances and cheering lustily. The Turks, paralysed by this novel form of attack, offered but a feeble resistance, and as the horsemen reached the outer edges of the Wadi, they threw up their hands in token of surrender - not, however, before several of their number had been bayoneted. This first onslaught yielded 90 prisoners (including 6 officers), 50 camels, 40 horses, and much ammunition and other war material. The squadrons dropped into the Wadi, and a party having been left to collect the prisoners, rapidly extended along its bed until "C" squadron on the left had swung right round to the south-eastern side of the redoubt. Flinging themselves from their horses, "A" and "B," with two troops of "C" Squadron, emerged from the west side of the Wadi, and pushed on dismounted towards the redoubt proper, whilst troops of the 1st Light Horse Brigade were seen attacking it from almost the opposite direction. Two troops under Lieut. F.W. Cox and Lieut. E. Ruse, had in the meantime ridden further round and had almost reached the Camel Corps, when suddenly they observed an opening leading straight to the redoubt.

WESTRALIAN CAVALRY IN THE WAR 115

With great gallantry these two troops charged right through the enemy outer line and reached the very heart of the redoubt. The balance of the Regiment rushed in support towards the objective, but the Turks, finding themselves attacked on all sides, and having suffered heavy losses, surrendered at a quarter-past four by hoisting numerous white flags. The raid had been completely successful, and the 10th Regiment had played a particularly brilliant part. Besides inflicting many casualties upon the Turks, the Regiment captured in all 722 prisoners, 57 camels, and 11 horses. In the final mounted charge on the redoubt, Lieut. Cox, in addition to leading his troop with consummate dash, performed a most gallant individual act in bringing up, under heavy fire, a spare horse for Lieut. A.W. Martin (whose mount had been shot under him) and assisting Lieut. Martin to remount. Lieut. Cox received the immediate reward of the Military Cross for his heroism on this occasion. The prisoners were collected and concentrated, and now came the most difficult undertaking of watering so large a number of thirsty horses and men. Fortunately the report as to the wells being mined proved incorrect, and the water supply and conveniences at Maghdaba were found intact. But even then the watering was no easy matter. The horses had not drunk for thirty hours, and the long, dusty march with the excitement of the final gallop had greatly intensified their thirst, and the water itself, though plentiful, was only accessible by a small number of animals at one time. However, it was completed soon after dark, and the Regiment, taking its prisoners along with it, joined the rest of the Brigade at the position of deployment, about three miles north-west of Maghdaba. At 11 o'clock that night the march back to El Arish commenced. The march continued throughout the night - a halt being made at 4.30 a.m. (December 24th), to draw rations from a camel convoy sent out to meet the column - and at 8.30 that morning Hod Masaid, a large oasis a few miles from El Arish, was reached. This splendid hod was to be our "home" for some weeks. Maghdaba, as far as the 10th Regiment was concerned, was a troop leader's triumph. Once the Wadi was captured, the broken nature of the terrain rendered concerted action on any large scale practically impossible, and here it was that the troops of the Regiment under their officers were afforded full opportunity of displaying initiative and dash. And well and worthily was this opportunity availed of. No finer performances exist in the Regimental records than those of Lieutenants Cox, Ruse, Palmer, J.K. Lyall, M.C., and Sweetapple on that day, and

116 WESTRALIAN CAVALRY IN THE WAR

it was greatly due to their efforts, splendidly backed by their men, that the 10th Regiment added to its laurels and played such a worthy part in the most brilliant cavalry raid of the war to date.


Further Reading:

10th Australian Light Horse Regiment, AIF

10th Australian Light Horse Regiment, Roll of Honour 

The Battle of Magdhaba

The Battle of Magdhaba, Sinai, December 23, 1916, Roll of Honour, Australia and New Zealand

Battles where Australians fought, 1899-1920


Citation: The Battle of Magdhaba, Sinai, December 23, 1916, 10th LHR, AIF, Unit History Account

Posted by Project Leader at 12:01 AM EAST
Updated: Tuesday, 10 November 2009 9:30 PM EAST

Newer | Latest | Older

Full Site Index


powered by FreeFind
Let us hear your story: You can tell your story, make a comment or ask for help on our forum.

Desert Column Forum

A note on copyright

The Australian Light Horse Studies Centre is a not for profit and non profit group whose sole aim is to write the early history of the Australian Light Horse from 1900 - 1920. It is privately funded and the information is provided by the individuals within the group and while permission for the use of the material has been given for this site for these items by various donors, the residual and actual copyright for these items, should there be any, resides exclusively with the donors. The information on this site is freely available for private research use only and if used as such, should be appropriately acknowledged. To assist in this process, each item has a citation attached at the bottom for referencing purposes.

Please Note: No express or implied permission is given for commercial use of the information contained within this site.

A note to copyright holders

The Australian Light Horse Studies Centre has made every endeavour to contact copyright holders of material digitised for this blog and website and where appropriate, permission is still being sought for these items. Where replies were not received, or where the copyright owner has not been able to be traced, or where the permission is still being sought, the Australian Light Horse Studies Centre has decided, in good faith, to proceed with digitisation and publication. Australian Light Horse Studies Centre would be happy to hear from copyright owners at any time to discuss usage of this item.

Contact

Australian Light Horse Studies Centre

eXTReMe Tracker