« May 2008 »
S M T W T F S
1 2 3
4 5 6 7 8 9 10
11 12 13 14 15 16 17
18 19 20 21 22 23 24
25 26 27 28 29 30 31
You are not logged in. Log in


Search the site:


powered by FreeFind
Volunteer with us.

Entries by Topic All topics  
A Latest Site News
A - Using the Site
AAA Volunteers
AAB-Education Centre
AAC-Film Clips
AAC-Photo Albums
AIF & MEF & EEF
AIF - Lighthorse
AIF - ALH - A to Z
AIF - DMC
AIF - DMC - Or Bat
AIF - DMC - Anzac MD
AIF - DMC - Aus MD
AIF - DMC - British
AIF - DMC - BWI
AIF - DMC - French
AIF - DMC - Indian
AIF - DMC - Italian
AIF - DMC - Medical
AIF - DMC - Remounts
AIF - DMC - Scouts
AIF - DMC - Sigs
AIF - DMC - Sigs AirlnS
AIF - DMC - 1 Sig Sqn
AIF - DMC - 2 Sig Sqn
AIF - DMC - Eng
AIF - DMC - Eng 1FSE
AIF - DMC - Eng 2FSE
AIF - DMC - GSR
AIF - 1B - 1 LHB
AIF - 1B - 6 MVS
AIF - 1B - 1 LHMGS
AIF - 1B - 1 Sig Trp
AIF - 1B - 1 LHFA
AIF - 1B - 1 LHR
AIF - 1B - 2 LHR
AIF - 1B - 3 LHR
AIF - 2B - 2 LHB
AIF - 2B - 7 MVS
AIF - 2B - 2 LHFA
AIF - 2B - 2 LHMGS
AIF - 2B - 2 Sig Trp
AIF - 2B - 5 LHR
AIF - 2B - 6 LHR
AIF - 2B - 7 LHR
AIF - 3B - 3 LHB
AIF - 3B - 8 MVS
AIF - 3B - 3 LHB Sigs
AIF - 3B - 3 LHFA
AIF - 3B - 3 LHMGS
AIF - 3B - 3 Sig Trp
AIF - 3B - 8 LHR
AIF - 3B - 9 LHR
AIF - 3B - 10 LHR
AIF - 4B - 4 LHB
AIF - 4B - 4 Sig Trp
AIF - 4B - 9 MVS
AIF - 4B - 4 LHFA
AIF - 4B - 4 LHMGS
AIF - 4B - 4 LHR
AIF - 4B - 11 LHR
AIF - 4B - 12 LHR
AIF - 5B - 5 LHB
AIF - 5B - 10 MVS
AIF - 5B - 5 LHFA
AIF - 5B - 5 Sig Trp
AIF - 5B - ICC
AIF - 5B - 14 LHR
AIF - 5B - 15 LHR
AIF - 5B - 1er Regt
AIF - 5B - 2 NZMGS
AIF - AASC
AIF - Aboriginal LH
AIF - Badges
AIF - Cars
AIF - Chinese LH
AIF - Double Sqns
AIF - Engineers
AIF - Fr - 22 Corps
AIF - Fr - 13 LHR
AIF - Honour Roll
AIF - HQ - 3rd Echelon
AIF - Marching Songs
AIF - Misc Topics
AIF - NZMRB
AIF - NZMRB - AMR
AIF - NZMRB - CMR
AIF - NZMRB - EFT
AIF - NZMRB - NZMFA
AIF - NZMRB - NZMGS
AIF - NZMRB - OMR
AIF - NZMRB - Sig-Trp
AIF - NZMRB - WMR
AIF - Ships
AIF - Ships - Encountr
AIF - Ships - Una
AIF - WFF
AIF - Wireless Sqn
Battles
BatzA - Australia
BatzA - Broken Hill
BatzA - Liverpool
BatzA - Merivale
BatzB - Boer War
BatzB - Bakenlaagte
BatzB - Belmont
BatzB - Bothaville
BatzB - Buffels Hoek
BatzB - Coetzees Drift
BatzB - Diamond Hill
BatzB - Driefontein
BatzB - Elands
BatzB - Graspan
BatzB - Grobelaar
BatzB - Grootvallier
BatzB - Hartebestfontn
BatzB - Houtnek
BatzB - Karee Siding
BatzB - Kimberley
BatzB - Koster River
BatzB - Leeuw Kop
BatzB - Mafeking
BatzB - Magersfontein
BatzB - Modder River
BatzB - Onverwacht
BatzB - Paardeberg
BatzB - Palmietfontein
BatzB - Pink Hill
BatzB - Poplar Grove
BatzB - Rhenoster
BatzB - Sannahs Post
BatzB - Slingersfontn
BatzB - Stinkhoutbm
BatzB - Sunnyside
BatzB - Wilmansrust
BatzB - Wolvekuil
BatzB - Zand River
BatzG - Gallipoli
BatzG - Anzac
BatzG - Aug 1915
BatzG - Baby 700
BatzG - Evacuation
BatzG - Hill 60
BatzG - Hill 971
BatzG - Krithia
BatzG - Lone Pine
BatzG - Nek
BatzJ - Jordan Valley
BatzJ - 1st Amman
BatzJ - 2nd Amman
BatzJ - Abu Tellul
BatzJ - Es Salt
BatzJ - JV Maps
BatzJ - Ziza
BatzM - Mespot
BatzM - Baghdad
BatzM - Ctesiphon
BatzM - Daur
BatzM - Kurna
BatzM - Kut el Amara
BatzM - Ramadi
BatzN - Naval
BatzN - AE1
BatzN - Cocos Is
BatzN - Heligoland
BatzN - Marmara
BatzN - Zeebrugge
BatzN - Zeppelin L43
BatzNG - Bitapaka
BatzO - Other
BatzO - Baku
BatzO - Egypt 1919
BatzO - Emptsa
BatzO - Karawaran
BatzO - Peitang
BatzO - Wassa
BatzP - Palestine
BatzP - 1st Gaza
BatzP - 2nd Gaza
BatzP - 3rd Gaza
BatzP - Aleppo
BatzP - Amwas
BatzP - Ayun Kara
BatzP - Bald Hill
BatzP - Balin
BatzP - Beersheba
BatzP - Berkusieh
BatzP - Damascus
BatzP - El Auja
BatzP - El Buggar
BatzP - El Burj
BatzP - Haifa
BatzP - Huj
BatzP - JB Yakub
BatzP - Kaukab
BatzP - Khan Kusseir
BatzP - Khuweilfe
BatzP - Kuneitra
BatzP - Megiddo
BatzP - Nablus
BatzP - Rafa
BatzP - Sasa
BatzP - Semakh
BatzP - Sheria
BatzP - Surafend
BatzP - Wadi Fara
BatzS - Sinai
BatzS - Bir el Abd
BatzS - El Arish
BatzS - El Mazar
BatzS - El Qatiya
BatzS - Jifjafa
BatzS - Magdhaba
BatzS - Maghara
BatzS - Romani
BatzS - Suez 1915
BatzSe - Senussi
BatzWF - Westn Front
BW - Boer War
BW - NSW
BW - NSW - 1ACH
BW - NSW - 1NSWMR
BW - NSW - 2NSWMR
BW - NSW - 3ACH
BW - NSW - 3NSWIB
BW - NSW - 3NSWMR
BW - NSW - 5ACH
BW - NSW - A Bty RAA
BW - NSW - AAMC
BW - NSW - Aust H
BW - NSW - Lancers
BW - NSW - NSW Inf
BW - NSW - NSWCBC
BW - NSW - NSWIB
BW - NSW - NSWMR_A
BW - NZ
BW - Qld
BW - Qld - 1ACH
BW - Qld - 1QMI
BW - Qld - 2QMI
BW - Qld - 3ACH
BW - Qld - 3QMI
BW - Qld - 4QIB
BW - Qld - 5QIB
BW - Qld - 6QIB
BW - Qld - 7ACH
BW - QLD - AAMC
BW - SA
BW - SA - 1SAMR
BW - SA - 2ACH
BW - SA - 2SAMR
BW - SA - 3SACB
BW - SA - 4ACH
BW - SA - 4SAIB
BW - SA - 5SAIB
BW - SA - 6SAIB
BW - SA - 8ACH
BW - SA - AAMC
BW - Tas
BW - Tas - 1ACH
BW - Tas - 1TIB
BW - Tas - 1TMI
BW - Tas - 2TB
BW - Tas - 2TIB
BW - Tas - 3ACH
BW - Tas - 8ACH
BW - Vic
BW - Vic - 1VMI
BW - Vic - 2ACH
BW - Vic - 2VMR
BW - Vic - 3VB
BW - Vic - 4ACH
BW - Vic - 4VIB
BW - Vic - 5VMR
BW - Vic - 6ACH
BW - Vic - AAMC
BW - Vic - Scot H
BW - WA
BW - WA - 1WAMI
BW - WA - 2ACH
BW - WA - 2WAMI
BW - WA - 3WAB
BW - WA - 4ACH
BW - WA - 4WAMI
BW - WA - 5WAMI
BW - WA - 6WAMI
BW - WA - 8ACH
BW Gen - Campaign
BW Gen - Soldiers
BW General
Cavalry - General
Diary - Schramm
Egypt - Heliopolis
Egypt - Mena
Gen - Ataturk Pk, CNB
Gen - Australia
Gen - Legends
Gen - Query Club
Gen - St - NSW
Gen - St - Qld
Gen - St - SA
Gen - St - Tas
Gen - St - Vic
Gen - St - WA
Gm - German Items
Gm - Bk - 605 MGC
GW - 11 Nov 1918
GW - Atrocities
GW - August 1914
GW - Biographies
GW - Propaganda
GW - Spies
GW - We forgot
Militia 1899-1920
Militia - Area Officers
Militia - Inf - Infantry
Militia - Inf - 1IB
Militia - Inf - 2IB
Militia - Inf - 3IB
Militia - Inf - NSW
Militia - Inf - Qld
Militia - Inf - SA
Militia - Inf - Tas
Militia - Inf - Vic
Militia - Inf - WA
Militia - K.E.Horse
Militia - LH
Militia - LH - Regts
Militia - LH - 1LHB
Militia - LH - 2LHB
Militia - LH - 3LHB
Militia - LH - 4LHB
Militia - LH - 5LHB
Militia - LH - 6LHB
Militia - LHN - NSW
Militia - LHN - 1/7/1
Militia - LHN - 2/9/6
Militia - LHN - 3/11/7
Militia - LHN - 4/6/16
Militia - LHN - 5/4/15
Militia - LHN - 6/5/12
Militia - LHN - 28
Militia - LHQ - Qld
Militia - LHQ - 13/2
Militia - LHQ - 14/3/11
Militia - LHQ - 15/1/5
Militia - LHQ - 27/14
Militia - LHS - SA
Militia - LHS - 16/22/3
Militia - LHS - 17/23/18
Militia - LHS - 24/9
Militia - LHT - Tas
Militia - LHT - 12/26
Militia - LHV - Vic
Militia - LHV - 7/15/20
Militia - LHV - 8/16/8
Militia - LHV - 9/19
Militia - LHV - 10/13
Militia - LHV - 11/20/4
Militia - LHV - 19/17
Militia - LHV - 29
Militia - LHW - WA
Militia - LHW-18/25/10
Militia - Military Orders
Militia - Misc
MilitiaRC - Rifle Clubs
MilitiaRC - NSW
MilitiaRC - NT
MilitiaRC - Qld
MilitiaRC - SA
MilitiaRC - Tas
MilitiaRC - Vic
MilitiaRC - WA
Militiaz - New Zealand
Tk - Turkish Items
Tk - Army
Tk - Bks - Books
Tk - Bks - 1/33IR
Tk - Bks - 27th IR
Tk - Bks - Air Force
Tk - Bks - Yildirim
Tk - POWs
Wp - Weapons
Wp - Hotchkiss Cav
Wp - Hotchkiss PMG
Blog Tools
Edit your Blog
Build a Blog
RSS Feed
View Profile
Open Community
Post to this Blog
Site Index
Education Centre
LH Militia
Boer War
Transport Ships
LH Battles
ALH - Units
ALH - General
Aboriginal Light H
Weapons
Ottoman Sources

"At a mile distant their thousand hooves were stuttering thunder, coming at a rate that frightened a man - they were an awe inspiring sight, galloping through the red haze - knee to knee and horse to horse - the dying sun glinting on bayonet points..." Trooper Ion Idriess

The Australian Light Horse Studies Centre aims to present an accurate history as chroniclers of early Australian military developments from 1899 to 1920.

The Australian Light Horse Studies Centre site holds over 12,000 entries and is growing daily.

Contact: Australian Light Horse Studies Centre

Let us hear your story: You can tell your story, make a comment or ask for help on our Australian Light Horse Studies Centre Forum called:

Desert Column Forum

WARNING: This site contains: names, information and images of deceased people; and, language which may be considered inappropriate today.

Friday, 16 May 2008
9th LHR, AIF, The peculiar case of Arthur Carrington Smedley
Topic: AIF - 3B - 9 LHR

9th LHR, AIF

9th Australian Light Horse Regiment

The peculiar case of Arthur Carrington Smedley


The Casualty Form for Arthur Carrington Smedley


Introduction

The disappearance of Arthur Carrington Smedley from Gallipoli creates an intriguing mystery that lingers to this day. His circumstances were covered by much contradictory testimony gathered from eye witnesses at Gallipoli. Because of the diverse nature of each item of testimony, the fate of Corporal Smedley remains as one of the more peculiar stories from Gallipoli.


The Family


Telegram from Alice Smedley to the Department of Defence, 21 October 1915


The underlying story is the slow and protracted torture of Smedley's family which they underwent, not knowing the fate of their relative. The letters from the various family members are horrowing and point to the daily, and ongoing anguish they suffered until the matter was put to rest, if indeed it ever was for the family.


Enlistment Details

Enlisted on 28 December 1914 as 605 Private Arthur Carrington Smedley, 28, an auctioneer by trade and single. He lived with his mother North Adelaide South Australia Mother Alice C Mrs Smedley at a house called “Ranfurley” in Brougham Place, North Adelaide in the state of South Australia. His denomination was Church of England.


Service

He embarked on A10 "Karoo", 11 February 1915 from Melbourne as part of D Troop, B Squadron, 9th Light Horse Regiment. Sometime in 1915 he was promoted to Corporal.


Events


Walkers Ridge at Gallipoli, August 1915.


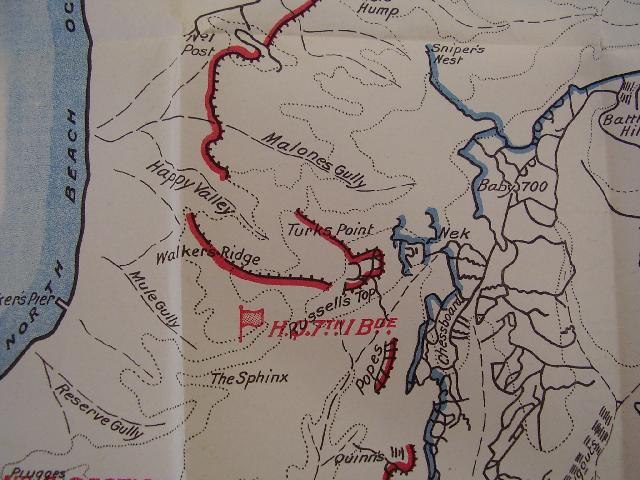
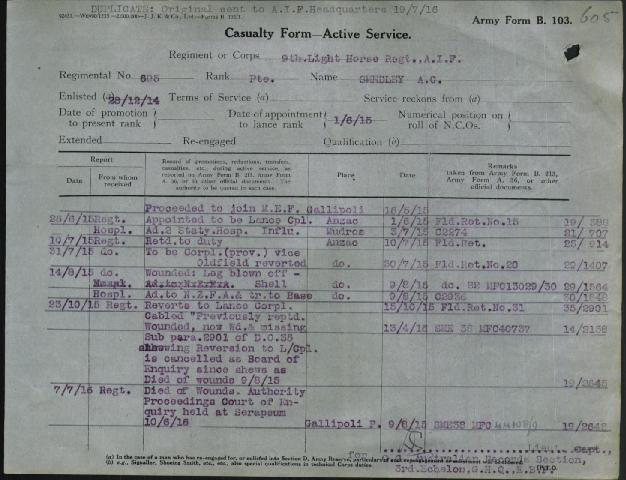
It was on the main track of Walker’s Ridge that Smedley was struck by a high calibre shell which tore off an arm and a leg and left another leg in a precarious situation.


Witness Reports

Below are the witness reports of the situation.

287 Private Alfred John Jolliffe

287 Private Alfred John Jolliffe, 9 ALHR, 25 November 1915:
Statement re Smedley 605:

"Saw him after he had been badly wounded one leg blown off at thigh, the other lower down, was taken to Clearing Station. Informant heard he was dead."


331 Private Louis William Saler

331 Private Louis William Saler, 9 ALHR, 25 November 1915:

"Report on Smedley 605 - Informant said that Smedley was struck by a shell which destroyed both his legs. He died on the Peninsula but informant could not say exactly where."


562 Sergeant E Collette

562 Sergeant E Collette, 1st ALH, Gezira Hospital, Cairo, 9 December 1915:

"Informant states that about the 8th or 9th of August an 11.3 shell landed amongst four men together on the main track of Walker’s Ridge. He saw Smedley soon afterwards in a dying condition with an arm and a leg blown off. He was taken abourd a hospital ship."


341 Sergeant Stephen Henry

341 Sergeant Stephen Henry, 9 ALHR, Ghain Tuffieha, 14 December 1915:

"He was promoted Corporal. He was wounded on Walker’s Ridge by a 9” shell, and his left leg blown off. He died on the way down to the base hospital. The stretcher bearers told witness this. He came from Adelaide, S. Australia."


754 Pte CH Hutchinson

754 Pte CH Hutchinson 9 ALHR, Lowland Converlescent Camp, Mudros, 24 December 1915:

"About August 10 Smedley was badly wounded by a shell and stretcher bearer J Forman of B Squad who took him down told witness he lost both legs, one having been taken off by doctor on the beach before putting him on Hosp Ship."


244 Trooper CT Cotton

Letter written by 244 Trooper CT Cotton, Abbey Wood, Kent, 5 February 1916.

Hut K.2.
Australian Camp,
Abbey Wood,
Kent.
Feb. 5th 1916.

The late Corporal Smedley joined the 9th Light Horse Regiment while we were in training at Broadmeadows Camp, Victoria, where I got to know him well, being in the same troop and tent.

He was promoted to Lance Corporal at Heliopolis Camp a few days before he left Egypt for the Dardanelles with the regiment and on July 30th, in the rest camp below Walker's Ridge, he was promoted to fall Corporal, and on August 9th on Walker's Ridge he was badly wounded by 9 inch shell while in charge of fatigue party.    Smedley although badly wounded seemed to be suffering very little pain and was as cheerful as ever when he was taken down to the dressing station by stretcher party and he passed way at the dressing station at Anzac Cove.  The last man I know to have seen Corporal Smedley was Trooper Wainwright of the same troop and of Corporal Smedley's section and he would no doubt be able to give more information than myself. Trooper Wainwright was still with the Regiment when I saw him last on August 27th.

244 Trooper CT Cotton
9th Austrailian Light Horse


Testimony from Letters

Correspondence was also examined where references were made to Smedley.

218 Trooper George Ernest Aikeman

Extract from letter from - George Aikeman, 9th Light Horse, King George Hospital.    12.9.15. Waterloo, London.

"Well Floss poor Arthur Smedley had his leg blown off and reported wounded. He died some time later."


148 Lance Corporal Edmund Neville London

Extract from letter received by Mr. McEwin, C/o Dalgety & Co. Adelaide, from Lance Corporal London of the 4th Aust. Field Ambulance

"You mention seeing a letter from Arthur Smedley. The poor fellow was severely wounded by a shell - eventually died from its effects. He was terribly, knocked about I believe receiving a goodly share- of the force of the shell."


Mr G.W.F. Prince Coulter

Extract from, letter from G.W.F. Prince Coulter, 28 Grenfell St. Adelaide. (Dalgety & CO. Ltd.)

"It was only a few days ago that in conversation with Mr. A. Codlee of Prospect he mentioned that his son Lister was with Arthur and knows he was wounded badly - one leg lost - and died 5 days later."


260 Corporal Francis Arnold Gillen

Extract of letter from 260 Corporal Francis Arnold Gillen, No. 3 General Hospital Lemnos Island, dated 21.8.15. (Letter from Brother P.S. Gillen, 36 Ward St. North. Adelaide).

"He, Arthur Smedley, and I were in a main trench ---- without any warning, the shell - a big 8 inch from the Turkish forts - burst right in front of Smed, hurled him into the air and dropped him over a chain away into another trench. Poor old Smed did'nt live long, both his legs and right arm were terribly injured and had to be amputated. He was conscious after the amputations but never knew he lost his limbs. Before he died he was talking about seeing the Flemington National next year".


Mr Ray Turner

Extract from letter from Ray Turner, Rayville Park, Snowtown,

"I had a letter from Frank Rice the other day telling me that poor old Smed had died of wounds at Gallipoli they were friends, also a boy named Cameron said he and Frank buried dear old Smed and had put a little wooden cross with a few words on it on his grave Rice's address is - Q.M.S. F.E. Rice C. Cc. 10th Infantry Bat. 1st. A.I.F. (No. 10135).


Official Treatment

On 22 January 1916, he was declared absent from unit on account of wounds for a period of over three months and placed on the super-numerary list. Later on a Board of Enquiry found that Corporal Smedley had died of wounds on the 9 August 1915.

This all seems rather straight forward although rather peculiar that he should be considered missing when he was in the hands of the medical authorities. Missing is usually attributed to someone who is either obliterated by a bomb or dies in some unknown place. But not in this case. Yet he went missing.

Apparently he was recorded as having boarded the ship and placed under medical care. Then nothing. Smedley disappears and so does his record. Everything just vanishes. No one has the slightest idea where Smedley is except that he wasn’t where the schedule stated – in Cairo. It was the cross to Cairo in which the disappearing act occurred.

This statement of account was sent to the grieving family:

"We have received your inquiry for 605 Tpr AC Smedley, 9 ALH. The 3rd AGH infom us by telephone he was never in their hospital. We already had an inquiry for him and on our evidence he must have died on board a hospital ship about 10th Aug. He had been promoted to Cpl and was badly wounded on Walker’s Ridge by a shell, one of his legs being afterwards amputated by the Dr on the beach. Though we have no evidence by an eye witness of his death, several men told us he was already in dying condition when he was carried to the beach, and he was so badly wounded – both an arm and a leg being blown off – that no one could wish him to have lived."


This is indeed one case of nobody being there. It was conjectured that he died while at sea and they buried him at sea, a common practice. It is one thing to lose a body but quite another to lose his papers. The reality is that no one knew what happened to Smedley, a poor fellow doomed to roam the Mediterranean like the Marie Celeste, finding no home and no answers from and to the living.

Despite all the information available, it still remains a mystery today as to what actually happened to Smedley. We can only guess at the truth but no more than that.


Source of Information

Service File of Arthur Carrington Smedley held at National Archives of Australia, Bar Code - 8086630.


Further Reading:

9th Light Horse Regiment, AIF

9th Australian Light Horse Regiment, Roll of Honour 

Battles where Australians fought, 1899-1920


Citation: 9th LHR, AIF, The peculiar case of Arthur Carrington Smedley

Posted by Project Leader at 7:03 PM EADT
Updated: Sunday, 31 January 2010 10:18 AM EAST

View Latest Entries

Full Site Index


powered by FreeFind
Let us hear your story: You can tell your story, make a comment or ask for help on our forum.

Desert Column Forum

A note on copyright

The Australian Light Horse Studies Centre is a not for profit and non profit group whose sole aim is to write the early history of the Australian Light Horse from 1900 - 1920. It is privately funded and the information is provided by the individuals within the group and while permission for the use of the material has been given for this site for these items by various donors, the residual and actual copyright for these items, should there be any, resides exclusively with the donors. The information on this site is freely available for private research use only and if used as such, should be appropriately acknowledged. To assist in this process, each item has a citation attached at the bottom for referencing purposes.

Please Note: No express or implied permission is given for commercial use of the information contained within this site.

A note to copyright holders

The Australian Light Horse Studies Centre has made every endeavour to contact copyright holders of material digitised for this blog and website and where appropriate, permission is still being sought for these items. Where replies were not received, or where the copyright owner has not been able to be traced, or where the permission is still being sought, the Australian Light Horse Studies Centre has decided, in good faith, to proceed with digitisation and publication. Australian Light Horse Studies Centre would be happy to hear from copyright owners at any time to discuss usage of this item.

Contact

Australian Light Horse Studies Centre

eXTReMe Tracker