« May 2008 »
S M T W T F S
1 2 3
4 5 6 7 8 9 10
11 12 13 14 15 16 17
18 19 20 21 22 23 24
25 26 27 28 29 30 31
You are not logged in. Log in


Search the site:


powered by FreeFind
Volunteer with us.

Entries by Topic All topics  
A Latest Site News
A - Using the Site
AAA Volunteers
AAB-Education Centre
AAC-Film Clips
AAC-Photo Albums
AIF & MEF & EEF
AIF - Lighthorse
AIF - ALH - A to Z
AIF - DMC
AIF - DMC - Or Bat
AIF - DMC - Anzac MD
AIF - DMC - Aus MD
AIF - DMC - British
AIF - DMC - BWI
AIF - DMC - French
AIF - DMC - Indian
AIF - DMC - Italian
AIF - DMC - Medical
AIF - DMC - Remounts
AIF - DMC - Scouts
AIF - DMC - Sigs
AIF - DMC - Sigs AirlnS
AIF - DMC - 1 Sig Sqn
AIF - DMC - 2 Sig Sqn
AIF - DMC - Eng
AIF - DMC - Eng 1FSE
AIF - DMC - Eng 2FSE
AIF - DMC - GSR
AIF - 1B - 1 LHB
AIF - 1B - 6 MVS
AIF - 1B - 1 LHMGS
AIF - 1B - 1 Sig Trp
AIF - 1B - 1 LHFA
AIF - 1B - 1 LHR
AIF - 1B - 2 LHR
AIF - 1B - 3 LHR
AIF - 2B - 2 LHB
AIF - 2B - 7 MVS
AIF - 2B - 2 LHFA
AIF - 2B - 2 LHMGS
AIF - 2B - 2 Sig Trp
AIF - 2B - 5 LHR
AIF - 2B - 6 LHR
AIF - 2B - 7 LHR
AIF - 3B - 3 LHB
AIF - 3B - 8 MVS
AIF - 3B - 3 LHB Sigs
AIF - 3B - 3 LHFA
AIF - 3B - 3 LHMGS
AIF - 3B - 3 Sig Trp
AIF - 3B - 8 LHR
AIF - 3B - 9 LHR
AIF - 3B - 10 LHR
AIF - 4B - 4 LHB
AIF - 4B - 4 Sig Trp
AIF - 4B - 9 MVS
AIF - 4B - 4 LHFA
AIF - 4B - 4 LHMGS
AIF - 4B - 4 LHR
AIF - 4B - 11 LHR
AIF - 4B - 12 LHR
AIF - 5B - 5 LHB
AIF - 5B - 10 MVS
AIF - 5B - 5 LHFA
AIF - 5B - 5 Sig Trp
AIF - 5B - ICC
AIF - 5B - 14 LHR
AIF - 5B - 15 LHR
AIF - 5B - 1er Regt
AIF - 5B - 2 NZMGS
AIF - AASC
AIF - Aboriginal LH
AIF - Badges
AIF - Cars
AIF - Chinese LH
AIF - Double Sqns
AIF - Engineers
AIF - Fr - 22 Corps
AIF - Fr - 13 LHR
AIF - Honour Roll
AIF - HQ - 3rd Echelon
AIF - Marching Songs
AIF - Misc Topics
AIF - NZMRB
AIF - NZMRB - AMR
AIF - NZMRB - CMR
AIF - NZMRB - EFT
AIF - NZMRB - NZMFA
AIF - NZMRB - NZMGS
AIF - NZMRB - OMR
AIF - NZMRB - Sig-Trp
AIF - NZMRB - WMR
AIF - Ships
AIF - Ships - Encountr
AIF - Ships - Una
AIF - WFF
AIF - Wireless Sqn
Battles
BatzA - Australia
BatzA - Broken Hill
BatzA - Liverpool
BatzA - Merivale
BatzB - Boer War
BatzB - Bakenlaagte
BatzB - Belmont
BatzB - Bothaville
BatzB - Buffels Hoek
BatzB - Coetzees Drift
BatzB - Diamond Hill
BatzB - Driefontein
BatzB - Elands
BatzB - Graspan
BatzB - Grobelaar
BatzB - Grootvallier
BatzB - Hartebestfontn
BatzB - Houtnek
BatzB - Karee Siding
BatzB - Kimberley
BatzB - Koster River
BatzB - Leeuw Kop
BatzB - Mafeking
BatzB - Magersfontein
BatzB - Modder River
BatzB - Onverwacht
BatzB - Paardeberg
BatzB - Palmietfontein
BatzB - Pink Hill
BatzB - Poplar Grove
BatzB - Rhenoster
BatzB - Sannahs Post
BatzB - Slingersfontn
BatzB - Stinkhoutbm
BatzB - Sunnyside
BatzB - Wilmansrust
BatzB - Wolvekuil
BatzB - Zand River
BatzG - Gallipoli
BatzG - Anzac
BatzG - Aug 1915
BatzG - Baby 700
BatzG - Evacuation
BatzG - Hill 60
BatzG - Hill 971
BatzG - Krithia
BatzG - Lone Pine
BatzG - Nek
BatzJ - Jordan Valley
BatzJ - 1st Amman
BatzJ - 2nd Amman
BatzJ - Abu Tellul
BatzJ - Es Salt
BatzJ - JV Maps
BatzJ - Ziza
BatzM - Mespot
BatzM - Baghdad
BatzM - Ctesiphon
BatzM - Daur
BatzM - Kurna
BatzM - Kut el Amara
BatzM - Ramadi
BatzN - Naval
BatzN - AE1
BatzN - Cocos Is
BatzN - Heligoland
BatzN - Marmara
BatzN - Zeebrugge
BatzN - Zeppelin L43
BatzNG - Bitapaka
BatzO - Other
BatzO - Baku
BatzO - Egypt 1919
BatzO - Emptsa
BatzO - Karawaran
BatzO - Peitang
BatzO - Wassa
BatzP - Palestine
BatzP - 1st Gaza
BatzP - 2nd Gaza
BatzP - 3rd Gaza
BatzP - Aleppo
BatzP - Amwas
BatzP - Ayun Kara
BatzP - Bald Hill
BatzP - Balin
BatzP - Beersheba
BatzP - Berkusieh
BatzP - Damascus
BatzP - El Auja
BatzP - El Buggar
BatzP - El Burj
BatzP - Haifa
BatzP - Huj
BatzP - JB Yakub
BatzP - Kaukab
BatzP - Khan Kusseir
BatzP - Khuweilfe
BatzP - Kuneitra
BatzP - Megiddo
BatzP - Nablus
BatzP - Rafa
BatzP - Sasa
BatzP - Semakh
BatzP - Sheria
BatzP - Surafend
BatzP - Wadi Fara
BatzS - Sinai
BatzS - Bir el Abd
BatzS - El Arish
BatzS - El Mazar
BatzS - El Qatiya
BatzS - Jifjafa
BatzS - Magdhaba
BatzS - Maghara
BatzS - Romani
BatzS - Suez 1915
BatzSe - Senussi
BatzWF - Westn Front
BW - Boer War
BW - NSW
BW - NSW - 1ACH
BW - NSW - 1NSWMR
BW - NSW - 2NSWMR
BW - NSW - 3ACH
BW - NSW - 3NSWIB
BW - NSW - 3NSWMR
BW - NSW - 5ACH
BW - NSW - A Bty RAA
BW - NSW - AAMC
BW - NSW - Aust H
BW - NSW - Lancers
BW - NSW - NSW Inf
BW - NSW - NSWCBC
BW - NSW - NSWIB
BW - NSW - NSWMR_A
BW - NZ
BW - Qld
BW - Qld - 1ACH
BW - Qld - 1QMI
BW - Qld - 2QMI
BW - Qld - 3ACH
BW - Qld - 3QMI
BW - Qld - 4QIB
BW - Qld - 5QIB
BW - Qld - 6QIB
BW - Qld - 7ACH
BW - QLD - AAMC
BW - SA
BW - SA - 1SAMR
BW - SA - 2ACH
BW - SA - 2SAMR
BW - SA - 3SACB
BW - SA - 4ACH
BW - SA - 4SAIB
BW - SA - 5SAIB
BW - SA - 6SAIB
BW - SA - 8ACH
BW - SA - AAMC
BW - Tas
BW - Tas - 1ACH
BW - Tas - 1TIB
BW - Tas - 1TMI
BW - Tas - 2TB
BW - Tas - 2TIB
BW - Tas - 3ACH
BW - Tas - 8ACH
BW - Vic
BW - Vic - 1VMI
BW - Vic - 2ACH
BW - Vic - 2VMR
BW - Vic - 3VB
BW - Vic - 4ACH
BW - Vic - 4VIB
BW - Vic - 5VMR
BW - Vic - 6ACH
BW - Vic - AAMC
BW - Vic - Scot H
BW - WA
BW - WA - 1WAMI
BW - WA - 2ACH
BW - WA - 2WAMI
BW - WA - 3WAB
BW - WA - 4ACH
BW - WA - 4WAMI
BW - WA - 5WAMI
BW - WA - 6WAMI
BW - WA - 8ACH
BW Gen - Campaign
BW Gen - Soldiers
BW General
Cavalry - General
Diary - Schramm
Egypt - Heliopolis
Egypt - Mena
Gen - Ataturk Pk, CNB
Gen - Australia
Gen - Legends
Gen - Query Club
Gen - St - NSW
Gen - St - Qld
Gen - St - SA
Gen - St - Tas
Gen - St - Vic
Gen - St - WA
Gm - German Items
Gm - Bk - 605 MGC
GW - 11 Nov 1918
GW - Atrocities
GW - August 1914
GW - Biographies
GW - Propaganda
GW - Spies
GW - We forgot
Militia 1899-1920
Militia - Area Officers
Militia - Inf - Infantry
Militia - Inf - 1IB
Militia - Inf - 2IB
Militia - Inf - 3IB
Militia - Inf - NSW
Militia - Inf - Qld
Militia - Inf - SA
Militia - Inf - Tas
Militia - Inf - Vic
Militia - Inf - WA
Militia - K.E.Horse
Militia - LH
Militia - LH - Regts
Militia - LH - 1LHB
Militia - LH - 2LHB
Militia - LH - 3LHB
Militia - LH - 4LHB
Militia - LH - 5LHB
Militia - LH - 6LHB
Militia - LHN - NSW
Militia - LHN - 1/7/1
Militia - LHN - 2/9/6
Militia - LHN - 3/11/7
Militia - LHN - 4/6/16
Militia - LHN - 5/4/15
Militia - LHN - 6/5/12
Militia - LHN - 28
Militia - LHQ - Qld
Militia - LHQ - 13/2
Militia - LHQ - 14/3/11
Militia - LHQ - 15/1/5
Militia - LHQ - 27/14
Militia - LHS - SA
Militia - LHS - 16/22/3
Militia - LHS - 17/23/18
Militia - LHS - 24/9
Militia - LHT - Tas
Militia - LHT - 12/26
Militia - LHV - Vic
Militia - LHV - 7/15/20
Militia - LHV - 8/16/8
Militia - LHV - 9/19
Militia - LHV - 10/13
Militia - LHV - 11/20/4
Militia - LHV - 19/17
Militia - LHV - 29
Militia - LHW - WA
Militia - LHW-18/25/10
Militia - Military Orders
Militia - Misc
MilitiaRC - Rifle Clubs
MilitiaRC - NSW
MilitiaRC - NT
MilitiaRC - Qld
MilitiaRC - SA
MilitiaRC - Tas
MilitiaRC - Vic
MilitiaRC - WA
Militiaz - New Zealand
Tk - Turkish Items
Tk - Army
Tk - Bks - Books
Tk - Bks - 1/33IR
Tk - Bks - 27th IR
Tk - Bks - Air Force
Tk - Bks - Yildirim
Tk - POWs
Wp - Weapons
Wp - Hotchkiss Cav
Wp - Hotchkiss PMG
Blog Tools
Edit your Blog
Build a Blog
RSS Feed
View Profile
Open Community
Post to this Blog
Site Index
Education Centre
LH Militia
Boer War
Transport Ships
LH Battles
ALH - Units
ALH - General
Aboriginal Light H
Weapons
Ottoman Sources

"At a mile distant their thousand hooves were stuttering thunder, coming at a rate that frightened a man - they were an awe inspiring sight, galloping through the red haze - knee to knee and horse to horse - the dying sun glinting on bayonet points..." Trooper Ion Idriess

The Australian Light Horse Studies Centre aims to present an accurate history as chroniclers of early Australian military developments from 1899 to 1920.

The Australian Light Horse Studies Centre site holds over 12,000 entries and is growing daily.

Contact: Australian Light Horse Studies Centre

Let us hear your story: You can tell your story, make a comment or ask for help on our Australian Light Horse Studies Centre Forum called:

Desert Column Forum

WARNING: This site contains: names, information and images of deceased people; and, language which may be considered inappropriate today.

Monday, 19 May 2008
87th Battalion, B Area, 1914
Topic: Gen - St - WA

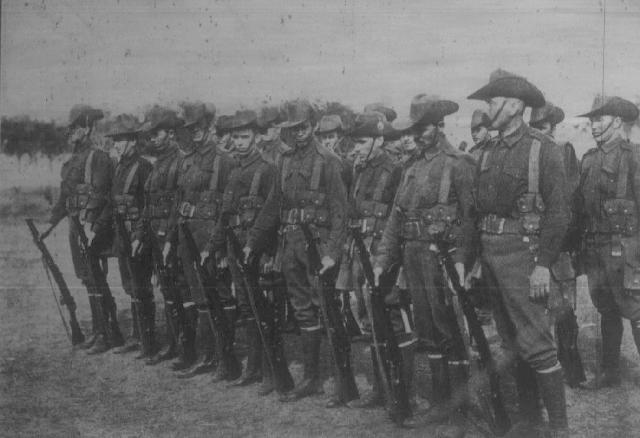
I came across this wonderful pic of the the officer Cadets of the 87th Battalion, B Area (Subiaco) 22nd Brigade, 5th Military District. The 87th Infantry Regiment was raised in outer Perth but during the reforms of 1912 the Regt was downgraded to a Battalion and used by the cadets to train future soldiers for the Milita.

They are so young and fresh with the world to look forward to as they posed for this picture which was taken in October 1914 at Bartletto Studio, Hay Street, Perth and published in the Western Mail, 30 October 1914 at p. 30.

The sitting men from left to right are:

2/Lt TV Taylor

Theodore Vallaney Taylor enlisted as a Lieutenant on 19 February 1915 in the 12th Infantry Battalion and finished service as a Captain in the 16th Infantry Battalion. He was wounded by shrapnell to the thigh on 26 May 1915. He was evacuated with neurasthimia 19 August 1915. Returned to Australia by Karoola, 30 October 1915. He was discharged as medically unfit for active service, 21 May 1916.

http://naa12.naa.gov.au/scripts/imagine.asp?B=1932530&I=1&SE=1

Capt FH Sherlock;

Lt EH Knight [Area Officer]

Lieutenant ETH Knight was appointed the senior officer on 16 August 1913 who along with Captain WR Annear from the Cottesloe based 87th Battalion, "A" Area, commanded the 87th Battalion. 

Lt G Stroud; 

Walter Gregory Stroud enlisted as a Lieutenant on 24 March 1915 and finished service as a Captain in the 28th Infantry Battalion. He arrived at Gallipoli on 4 September 1915. On 20 October 1915 he was evacuated to the 7th Field Ambulance with tonsolitis which developed into influenza which later was diagnosed as enteric fever. Returned to Australia by Karoola, 19 January 1916. He was discharged as medically unfit for active service, 17 November 1917. Prior to the war, he had been a Second Lieutenant with  "H" Company, 87th Battalion, Cadets, 1913-14; and, Lieutenant with "B" Company, 88th Infantry Regiment 1914-15.

http://naa12.naa.gov.au/scripts/imagine.asp?B=8095429&I=1&SE=1

Lt Kirkpatrick

The standing men from left to right are:

2/Lt G Mann

George Lionel Claude Mann who joined in July 1916 aged 19 and served in France with 4 DAC (35276)

2/Lt AH Jose;

2/Lt AF Gwynne

Andrew Flinders Gwynne joined in Jan 1917 aged 20 and fought in France with 43Bty 11 FAB (31187) and was wounded in April 1918 and DOW 9th April 1918.

2/Lt JW Franklyn;

John William Franklyn Second Lieutenant, enlisted on 10 February 1915 in the 11th Battalion, arriving at Gallipoli on 22 June 1915. He died of wounds on 6 August 1915 suffered during the attack on what would become Leane's Trench, on the spurs to the south of Lone Pine, and died aboard a hospital ship.

http://naa12.naa.gov.au/scripts/imagine.asp?B=4019807&I=1&SE=1

The extract from the 11th Infantry Battalion War Diary describing the action at Lone Pine led by John William Franklyn.

http://www.awm.gov.au/cms_images/AWM4/23/AWM4-23-28-5.pdf

Additional information may be found at the site: Officers of the Australian and New Zealand Army Corps Died at Gallipoli, 1915; an excellent website produced by Bryn Dolan. Here is the specific address:

http://www.anzacs.org/index_efg.html#FNames

Bryn Dolan has kindly provided the additional information about John William Franklyn at Comment 1:

https://alh-research.tripod.com/Light_Horse/index.blog/1814823/87th-battalion-b-area-1914/

Lt AT Williams;

2/Lt Seaton;

2/Lt AC Henville;

Archibald Clarence Henville enlisted on 9 September 1915, aged 19, with 1st Field Company Engineers, Service Number 590. He saw service at Anzac, France and Belgium.

http://naa12.naa.gov.au/scripts/imagine.asp?B=5476285&I=1&SE=1

2/Lt AJ Pate

Alfred James Pate enlisted on 17 February 1916 aged 19 and served with the 27th Infantry Battalion and 50th Infantry Battalion, Service Number 6277. He saw service in France and Belgium. He was wounded in action by shrapnel to his face at Broodeseinde Ridge during the Third Battle of Ypres. He returned to Australia on the Ascanius, leaving London on 14 January 1919.

http://naa12.naa.gov.au/scripts/imagine.asp?B=8009272&I=1&SE=1

Extract from 50th Infantry Battalion War Diary, 11 October 1917.

http://www.awm.gov.au/cms_images/AWM4/23/AWM4-23-67-16.pdf

Regarding the picture, one can clearly see the "87" marked on their hats. The leather leggings are also a keen feature.

This is the last glimpse of the old order for these men. After this photograph was taken, life changed dramatically for all the men. Some never reached the end of the decade. The comfortable re-assurance in this picture was to disappear amidst the carnage and horror of the trenches.

[Thanks to Steve Becker and Bryn Dolan who provided additional information]


Citation: 87th Battalion, B Area, 1914


Posted by Project Leader at 8:00 PM EADT
Updated: Wednesday, 18 June 2008 2:08 PM EADT
9th LHR AIF War Diary, 19 May
Topic: AIF - 3B - 9 LHR

9th LHR, AIF

9th Light Horse Regiment

War Diary, 19 May

Pro Gloria et Honore - For Glory and Honour

Regimental March -  Marching Through Georgia


The following entries are extracted and transcribed from the 9th Light Horse Regiment War Diary, the originals of which are held by the Australian War Memorial. There are 366 entries on this site. Each day has entries as they occurred from 1914 to 1919. In addition to the 9th Light Horse Regiment War Diary, when appropriate, entries from the 3rd Light Horse Brigade War Diary and other regiments with the Brigade will also appear. Entries from the unit history, Darley, TH, With the Ninth Light Horse in the Great War, Adelaide, Hassell Press, 1924 will also appear from time to time. The aim is to give the broadest context to the story and allow the reader to follow the day to day activities of the regiment. If a relative happened to have served in the regiment during the Great War, then this provides a general framework in which the individual story may be told.


The Diary


1914

Tuesday, May 19, 1914

See 4th Military District, South Australia for militia activities.


1915
Wednesday, May 19, 1915

9th Light Horse Regiment Location - Cape Helles

9th Light Horse Regiment War Diary - 1000 Transport arrived and anchored about 1800 yards from the shore.

1700 Transport sailed for Lemnos without having landed any troops. Arrived 2200.

3rd Light Horse Brigade War Diary - 1300 Arrived at Cape Helles. Left for Lemnos 1800. Mudros Bay 2200.

Carew Reynell Diary - Reached Cape Helles at 1300 and anchored. Watched the cannonading by warships, our own batteries and Turkish batteries all the afternoon.

Aeroplanes making reconnaissance all the afternoon. Turks fire about 40 shells at a British aeroplane which continues its reconnaissance undisturbed. About 1800 ordered back to Lemnos as two submarines have got out of Dardenelles. The Lutsow [carrying our 10th Regiment and the 2nd Brigade] at the same time left in the direction of Kape Tepe. Arrived at Lemnos before midnight a very disappointed crowd.


1916

Friday, May 19, 1916
9th Light Horse Regiment Location - Roadhead Serapeum
9th Light Horse Regiment War Diary - Until further notice, the Regiment will not stand to arms.
The undermentioned Officers absented on the strength:
Lieutenant AH Nelson sick, seniority next after Darley dated 16 April 1916.
Lieutenant HS Pender sick, seniority next after Luxmoore dated 16 April 1916.
Second Lieutenant KEH Pascoe sick, seniority next after Robertson dated 16 April 1916.
Second Lieutenant AT Watt sick, seniority next after Pascoe dated 16 April 1916.
Second Lieutenant Hardy sick, seniority next after Watt dated 16 April 1916.


1917

Saturday, May 19, 1917
9th Light Horse Regiment Location - El Fukhari
9th Light Horse Regiment War Diary - The Regiment undertook routine work for the day.
Five horses - three rides and two light draughts for cart received. The weather was exceptionally bad. Khamsin blowing from the south with clouds of dust commenced early in the morning and continued right through the night.
The watering at Abasan el Kebir broke down and horses could not be watered in the afternoon.
 

1918

9th Light Horse Regiment Location - Auja Bridgehead defences
9th Light Horse Regiment War Diary - 0330 Stood to arms. Regiment mounted reserve.
Sharp, Lieutenant RC, patrolled to 127F14, 15, and 21. He captured two Turkish prisoners with two pack mules and four water fantasis.
1800 All available men in "A", "B", and “C” Squadrons moved up to Defences Line for digging and wiring during night.


1919

Monday, May 19, 1919
9th Light Horse Regiment Location - Tel el Kebir
9th Light Horse Regiment War Diary - Hannaford, Lieutenant E; Gibney, Lieutenant BE; and, 54 Other Ranks proceeded to Alexandria as escort to Turkish prisoners of war for repatriation.


Previous: 9th LHR AIF War Diary, 18 May

Next: 9th LHR AIF War Diary, 20 May


Sources:

See: 9th Australian Light Horse Regiment, Contents
Australian Light Horse Studies Centre, AIF War Diaries of the Great War, Site Transcription Policy


Further Reading:

9th Light Horse Regiment AIF

Bert Schramm Diary

9th Australian Light Horse Regiment, Roll of Honour 

Battles where Australians fought, 1899-1920


Citation: 9th LHR AIF War Diary, 19 May

Posted by Project Leader at 12:01 AM EADT
Updated: Monday, 26 July 2010 10:28 AM EADT
Sunday, 18 May 2008
Brighton and Pontville Camps, Tasmania
Topic: Gen - St - Tas

Brighton Camp

Here is the AWM commentary:

Brighton is a small town 28 kilometres from the Tasmanian capital of Hobart. Brighton was one of five sites selected for townships in Tasmania by the Governor of New South Wales, Lachlan Macquarie, in 1821 and for a while was spoken of as a potential capital. A military post was established on the main Hobart-Launceston road at Brighton in 1826 beginning a military presence there that would last for over 170 years. Troops were prepared at Brighton Camp for service in both the First and Second World Wars, and it was also a site familiar to Tasmania's citizen soldiers throughout the Twentieth Century. In the later years of the Second World War Brighton Camp was also used to house prisoners of war and after the war it became a reception camp for refugees from Europe. From the early 1950s onwards, Brighton's primary use was for the training of members of the Citizens Military Forces and Later the Army Reserve. Such usage declined after 1993, and in 1999 it was one of several military camps across Australia used as a save haven for refugees from the conflict in Kosovo. Brighton Camp was closed and sold off soon after.


http://www.awm.gov.au/units/place_1673.asp

To give an idea as to the nature of Brighton Camp, here is a pic of some horsemen watering their horses at the camp. It was part of a series of pix taken by William Williamson, a respected Hobart photographer, during September 1914. This picture was published in the Tasmanian Mail, 10 September 1914, p. 19.

This was also the camp for the Medical Corps.

Pontville Camp

From the Aussie Heritage site:

Pontville`s involvement in the First World War included volunteers and the establishment of the Australian Imperial Force (AIF) in Tasmania. The Pontville Army Camp was renamed Brighton Army Camp, becoming the focus of military training in Tasmania on 13 August 1914. An ordnance depot was established and volunteers trained as members of the Light Horse, the Field Artillery, Infantry, Engineers and Army Medical Corps. Prior to embarkation South Australian Troops were also in camp at Pontville, and with the Tasmanian Infantry were formed into the 12th Battalion. Historical photographs c.1914 clearly delineate the use of the area by Light Horse Soldiers and it is likely that the name of Rifle Hill, which occupies the centre of the range was named at that time, and that the rifle range was also completed at that time. The rifle range may also incorporate an earlier range used by the Derwent Company of volunteers, since it was usual to retain and develop existing ranges.

http://www.aussieheritage.com.au/listings/tas/Pontville/PontvilleSmallArmsRangeGrasslandSite/13747

Below is a pic of "A" Company drilling at Pontville camp. This picture was published in the Tasmanian Mail, 3 September 1914, p. 18.

Both camps were instrumental in training many thousands of Tasmanian volunteers for the Great War.

Citation: Brighton and Pontville Camps, Tasmania

Posted by Project Leader at 6:12 PM EADT
Updated: Wednesday, 18 June 2008 2:00 PM EADT
The Second Es Salt Raid - General Comments
Topic: BatzJ - Es Salt

Just some thoughts on the Es Salt Raid of 30 April-3 May 1918.

Most people know about the Es Salt Raid and the role played by the 4th LHB. The lads in the Brigade copped a pasting from the Turks. Donald Cameron, CO of the 12th LHR let's us know in no uncertain terms about the role played by Grant during those tense moments. Here are his comments from his 1928 letter:

"General Grant had ceased to exist as far as we were concerned. We couldn't find him, and had to work out our own salvation. Also, there was the vital importance of blocking the enemy progress south. The brigadier had lost his nerve, as we had good reason to know in the days to follow. I regret that loyalty to my leader caused me to withhold information that should have appeared in my report after the operation. I appreciate the difficulty you must have in getting accurate information when reports following operations were often made to read much better from the CO’s point of view than the facts warranted."

This is as close to calling his CO a coward as one could ever get.

There are two conclusions one can draw from the above - the first is that Grant was not all that good as his publicity makes him out to be or Grant has an awful lot of back stabbing enemies.

At Es Salt, Chauvel left it up to Grant to call the shots regarding the holding of the vital roadway. 3rd LHB was made available for part of this holding operation. Grant indicated that he would not need their help. Then things went pear shaped from there for Grant causing almost the loss of a whole division - although through the hard work of General Chaytor who took over from Grant and some courageous defensive work on behalf of the individual regiments and the ICC, the Australian Mounted Division was saved. According to Lieut Col Scott, CO of the 9th LHR, it was a close run thing.

We also know that the raid was predicated upon a joining up with the Arabs under Lawrence who never showed up.

The official story of the Second Es Salt Raid written by Gullett may be read at these locations:

http://www.awm.gov.au/cms_images/histories/8/chapters/35.pdf
http://www.awm.gov.au/cms_images/histories/8/chapters/36.pdf

 This is the first of many posts on this subject. There are many documents that will shed light onto this event that were suppressed when the official history was written. The suppression of the documents was for political reasons - Grant was decorated as the hero of Beersheba for political reasons - and thus to actually characterise him as a dud General and a coward would have created immense problems for the AIF in terms of public perception of the legends. So while Gullett's account is reasonably accurate in the description, it is what he didn't add that makes all the difference.

I will aim to develop the unrecorded version of the Es Salt Raid which raises many questions about the official history and the fitness of General Grant to have a command in the first place. Indeed, it raises questions about Chauvel's leadership, the Australian  Government's propaganda campaign and the creation of the Beersheba myth.  It all comes apart at Es Salt.


Citation: The Second Es Salt Raid - General Comments


Posted by Project Leader at 12:03 PM EADT
Updated: Wednesday, 18 June 2008 2:05 PM EADT
9th LHR AIF War Diary, 18 May
Topic: AIF - 3B - 9 LHR

9th LHR, AIF

9th Light Horse Regiment

War Diary, 18 May

Pro Gloria et Honore - For Glory and Honour

Regimental March -  Marching Through Georgia


The following entries are extracted and transcribed from the 9th Light Horse Regiment War Diary, the originals of which are held by the Australian War Memorial. There are 366 entries on this site. Each day has entries as they occurred from 1914 to 1919. In addition to the 9th Light Horse Regiment War Diary, when appropriate, entries from the 3rd Light Horse Brigade War Diary and other regiments with the Brigade will also appear. Entries from the unit history, Darley, TH, With the Ninth Light Horse in the Great War, Adelaide, Hassell Press, 1924 will also appear from time to time. The aim is to give the broadest context to the story and allow the reader to follow the day to day activities of the regiment. If a relative happened to have served in the regiment during the Great War, then this provides a general framework in which the individual story may be told.


The Diary


1914

Monday, May 18, 1914

See 4th Military District, South Australia for militia activities.


1915
Tuesday, May 18, 1915
9th Light Horse Regiment Location - At sea
9th Light Horse Regiment War Diary - 3rd Light Horse Brigade War Diary - General Bridges died at sea en route Alexandria.
3rd Light Horse Brigade Details Routine Orders No. 3
4. Orderly Officer - The Orderly Officer will visit all Guards and Stable Piquets at least once between 'Lights Out' and Reveille.
6. Stable Piquets - A general slackness and in some cases gross carelessness exists in the conduct of NCOs and men in charge of horses. OsC will see that this matter is attended to and that proper supervision is given to ensure these duties being properly carried out.

Carew Reynell Diary - Reached Grecian archipelago and passed by islands all afternoon.


1916

Thursday, May 18, 1916
9th Light Horse Regiment Location - Roadhead, Serapeum.
9th Light Horse Regiment War Diary - No entry.


1917

Friday, May 18, 1917
9th Light Horse Regiment Location - El Fukhari
9th Light Horse Regiment War Diary - The Regiment paraded dismounted at 1000 for gas instruction under the Divisional Gas Officer and was marched through a gas cloud with helmets on.
 

1918

Saturday, May 18, 1918
9th Light Horse Regiment Location - Auja Bridgehead defences
9th Light Horse Regiment War Diary - In bivouac reorganising horse lines and sanitary arrangements.
Two Officers per squadron proceeded on reconnaissance to 5th Mounted Brigade sector.


1919

Sunday, May 18, 1919
9th Light Horse Regiment Location - Tel el Kebir
9th Light Horse Regiment War Diary - 1000 voluntary church service in YMCA conducted by Turner, Captain Chaplain RC.


Previous: 9th LHR AIF War Diary, 17 May

Next: 9th LHR AIF War Diary, 19 May


Sources:

See: 9th Australian Light Horse Regiment, Contents
Australian Light Horse Studies Centre, AIF War Diaries of the Great War, Site Transcription Policy


Further Reading:

9th Light Horse Regiment AIF

Bert Schramm Diary

9th Australian Light Horse Regiment, Roll of Honour 

Battles where Australians fought, 1899-1920


Citation: 9th LHR AIF War Diary, 18 May

Posted by Project Leader at 12:01 AM EADT
Updated: Monday, 26 July 2010 10:30 AM EADT

Newer | Latest | Older

Full Site Index


powered by FreeFind
Let us hear your story: You can tell your story, make a comment or ask for help on our forum.

Desert Column Forum

A note on copyright

The Australian Light Horse Studies Centre is a not for profit and non profit group whose sole aim is to write the early history of the Australian Light Horse from 1900 - 1920. It is privately funded and the information is provided by the individuals within the group and while permission for the use of the material has been given for this site for these items by various donors, the residual and actual copyright for these items, should there be any, resides exclusively with the donors. The information on this site is freely available for private research use only and if used as such, should be appropriately acknowledged. To assist in this process, each item has a citation attached at the bottom for referencing purposes.

Please Note: No express or implied permission is given for commercial use of the information contained within this site.

A note to copyright holders

The Australian Light Horse Studies Centre has made every endeavour to contact copyright holders of material digitised for this blog and website and where appropriate, permission is still being sought for these items. Where replies were not received, or where the copyright owner has not been able to be traced, or where the permission is still being sought, the Australian Light Horse Studies Centre has decided, in good faith, to proceed with digitisation and publication. Australian Light Horse Studies Centre would be happy to hear from copyright owners at any time to discuss usage of this item.

Contact

Australian Light Horse Studies Centre

eXTReMe Tracker