« June 2009 »
S M T W T F S
1 2 3 4 5 6
7 8 9 10 11 12 13
14 15 16 17 18 19 20
21 22 23 24 25 26 27
28 29 30
You are not logged in. Log in


Search the site:


powered by FreeFind
Volunteer with us.

Entries by Topic All topics
A Latest Site News
A - Using the Site
AAA Volunteers
AAB-Education Centre
AAC-Film Clips
AAC-Photo Albums
AIF & MEF & EEF
AIF - Lighthorse
AIF - ALH - A to Z
AIF - DMC
AIF - DMC - Or Bat
AIF - DMC - Anzac MD
AIF - DMC - Aus MD
AIF - DMC - British
AIF - DMC - BWI
AIF - DMC - French
AIF - DMC - Indian
AIF - DMC - Italian
AIF - DMC - Medical
AIF - DMC - Remounts
AIF - DMC - Scouts
AIF - DMC - Sigs
AIF - DMC - Sigs AirlnS
AIF - DMC - 1 Sig Sqn
AIF - DMC - 2 Sig Sqn
AIF - DMC - Eng
AIF - DMC - Eng 1FSE
AIF - DMC - Eng 2FSE
AIF - DMC - GSR
AIF - 1B - 1 LHB
AIF - 1B - 6 MVS
AIF - 1B - 1 LHMGS
AIF - 1B - 1 Sig Trp
AIF - 1B - 1 LHFA
AIF - 1B - 1 LHR
AIF - 1B - 2 LHR
AIF - 1B - 3 LHR
AIF - 2B - 2 LHB
AIF - 2B - 7 MVS
AIF - 2B - 2 LHFA
AIF - 2B - 2 LHMGS
AIF - 2B - 2 Sig Trp
AIF - 2B - 5 LHR
AIF - 2B - 6 LHR
AIF - 2B - 7 LHR
AIF - 3B - 3 LHB
AIF - 3B - 8 MVS
AIF - 3B - 3 LHB Sigs
AIF - 3B - 3 LHFA
AIF - 3B - 3 LHMGS
AIF - 3B - 3 Sig Trp
AIF - 3B - 8 LHR
AIF - 3B - 9 LHR
AIF - 3B - 10 LHR
AIF - 4B - 4 LHB
AIF - 4B - 4 Sig Trp
AIF - 4B - 9 MVS
AIF - 4B - 4 LHFA
AIF - 4B - 4 LHMGS
AIF - 4B - 4 LHR
AIF - 4B - 11 LHR
AIF - 4B - 12 LHR
AIF - 5B - 5 LHB
AIF - 5B - 10 MVS
AIF - 5B - 5 LHFA
AIF - 5B - 5 Sig Trp
AIF - 5B - ICC
AIF - 5B - 14 LHR
AIF - 5B - 15 LHR
AIF - 5B - 1er Regt
AIF - 5B - 2 NZMGS
AIF - AASC
AIF - Aboriginal LH
AIF - Badges
AIF - Cars
AIF - Chinese LH
AIF - Double Sqns
AIF - Engineers
AIF - Fr - 22 Corps
AIF - Fr - 13 LHR
AIF - Honour Roll
AIF - HQ - 3rd Echelon
AIF - Marching Songs
AIF - Misc Topics
AIF - NZMRB
AIF - NZMRB - AMR
AIF - NZMRB - CMR
AIF - NZMRB - EFT
AIF - NZMRB - NZMFA
AIF - NZMRB - NZMGS
AIF - NZMRB - OMR
AIF - NZMRB - Sig-Trp
AIF - NZMRB - WMR
AIF - Ships
AIF - Ships - Encountr
AIF - Ships - Una
AIF - WFF
AIF - Wireless Sqn
Battles
BatzA - Australia
BatzA - Broken Hill
BatzA - Liverpool
BatzA - Merivale
BatzB - Boer War
BatzB - Bakenlaagte
BatzB - Belmont
BatzB - Bothaville
BatzB - Buffels Hoek
BatzB - Coetzees Drift
BatzB - Diamond Hill
BatzB - Driefontein
BatzB - Elands
BatzB - Graspan
BatzB - Grobelaar
BatzB - Grootvallier
BatzB - Hartebestfontn
BatzB - Houtnek
BatzB - Karee Siding
BatzB - Kimberley
BatzB - Koster River
BatzB - Leeuw Kop
BatzB - Mafeking
BatzB - Magersfontein
BatzB - Modder River
BatzB - Onverwacht
BatzB - Paardeberg
BatzB - Palmietfontein
BatzB - Pink Hill
BatzB - Poplar Grove
BatzB - Rhenoster
BatzB - Sannahs Post
BatzB - Slingersfontn
BatzB - Stinkhoutbm
BatzB - Sunnyside
BatzB - Wilmansrust
BatzB - Wolvekuil
BatzB - Zand River
BatzG - Gallipoli  
BatzG - Anzac
BatzG - Aug 1915
BatzG - Baby 700
BatzG - Evacuation
BatzG - Hill 60
BatzG - Hill 971
BatzG - Krithia
BatzG - Lone Pine
BatzG - Nek
BatzJ - Jordan Valley
BatzJ - 1st Amman
BatzJ - 2nd Amman
BatzJ - Abu Tellul
BatzJ - Es Salt
BatzJ - JV Maps
BatzJ - Ziza
BatzM - Mespot
BatzM - Baghdad
BatzM - Ctesiphon
BatzM - Daur
BatzM - Kurna
BatzM - Kut el Amara
BatzM - Ramadi
BatzN - Naval
BatzN - AE1
BatzN - Cocos Is
BatzN - Heligoland
BatzN - Marmara
BatzN - Zeebrugge
BatzN - Zeppelin L43
BatzNG - Bitapaka
BatzO - Other
BatzO - Baku
BatzO - Egypt 1919
BatzO - Emptsa
BatzO - Karawaran
BatzO - Peitang
BatzO - Wassa
BatzP - Palestine
BatzP - 1st Gaza
BatzP - 2nd Gaza
BatzP - 3rd Gaza
BatzP - Aleppo
BatzP - Amwas
BatzP - Ayun Kara
BatzP - Bald Hill
BatzP - Balin
BatzP - Beersheba
BatzP - Berkusieh
BatzP - Damascus
BatzP - El Auja
BatzP - El Buggar
BatzP - El Burj
BatzP - Haifa
BatzP - Huj
BatzP - JB Yakub
BatzP - Kaukab
BatzP - Khan Kusseir
BatzP - Khuweilfe
BatzP - Kuneitra
BatzP - Megiddo
BatzP - Nablus
BatzP - Rafa
BatzP - Sasa
BatzP - Semakh
BatzP - Sheria
BatzP - Surafend
BatzP - Wadi Fara
BatzS - Sinai
BatzS - Bir el Abd
BatzS - El Arish
BatzS - El Mazar
BatzS - El Qatiya
BatzS - Jifjafa
BatzS - Magdhaba
BatzS - Maghara
BatzS - Romani
BatzS - Suez 1915
BatzSe - Senussi
BatzWF - Westn Front
BW - Boer War
BW - NSW
BW - NSW - 1ACH
BW - NSW - 1NSWMR
BW - NSW - 2NSWMR
BW - NSW - 3ACH
BW - NSW - 3NSWIB
BW - NSW - 3NSWMR
BW - NSW - 5ACH
BW - NSW - A Bty RAA
BW - NSW - AAMC
BW - NSW - Aust H
BW - NSW - Lancers
BW - NSW - NSW Inf
BW - NSW - NSWCBC
BW - NSW - NSWIB
BW - NSW - NSWMR_A
BW - NZ
BW - Qld
BW - Qld - 1ACH
BW - Qld - 1QMI
BW - Qld - 2QMI
BW - Qld - 3ACH
BW - Qld - 3QMI
BW - Qld - 4QIB
BW - Qld - 5QIB
BW - Qld - 6QIB
BW - Qld - 7ACH
BW - QLD - AAMC
BW - SA
BW - SA - 1SAMR
BW - SA - 2ACH
BW - SA - 2SAMR
BW - SA - 3SACB
BW - SA - 4ACH
BW - SA - 4SAIB
BW - SA - 5SAIB
BW - SA - 6SAIB
BW - SA - 8ACH
BW - SA - AAMC
BW - Tas
BW - Tas - 1ACH
BW - Tas - 1TIB
BW - Tas - 1TMI
BW - Tas - 2TB
BW - Tas - 2TIB
BW - Tas - 3ACH
BW - Tas - 8ACH
BW - Vic
BW - Vic - 1VMI
BW - Vic - 2ACH
BW - Vic - 2VMR
BW - Vic - 3VB
BW - Vic - 4ACH
BW - Vic - 4VIB
BW - Vic - 5VMR
BW - Vic - 6ACH
BW - Vic - AAMC
BW - Vic - Scot H
BW - WA
BW - WA - 1WAMI
BW - WA - 2ACH
BW - WA - 2WAMI
BW - WA - 3WAB
BW - WA - 4ACH
BW - WA - 4WAMI
BW - WA - 5WAMI
BW - WA - 6WAMI
BW - WA - 8ACH
BW Gen - Campaign
BW Gen - Soldiers
BW General
Cavalry - General
Diary - Schramm
Egypt - Heliopolis
Egypt - Mena
Gen - Ataturk Pk, CNB
Gen - Australia
Gen - Legends
Gen - Query Club
Gen - St - NSW
Gen - St - Qld
Gen - St - SA
Gen - St - Tas
Gen - St - Vic
Gen - St - WA
Gm - German Items
Gm - Bk - 605 MGC
GW - 11 Nov 1918
GW - Atrocities
GW - August 1914
GW - Biographies
GW - Propaganda
GW - Spies
GW - We forgot
Militia 1899-1920
Militia - Area Officers
Militia - Inf - Infantry
Militia - Inf - 1IB
Militia - Inf - 2IB
Militia - Inf - 3IB
Militia - Inf - NSW
Militia - Inf - Qld
Militia - Inf - SA
Militia - Inf - Tas
Militia - Inf - Vic
Militia - Inf - WA
Militia - K.E.Horse
Militia - LH
Militia - LH - Regts
Militia - LH - 1LHB
Militia - LH - 2LHB
Militia - LH - 3LHB
Militia - LH - 4LHB
Militia - LH - 5LHB
Militia - LH - 6LHB
Militia - LHN - NSW
Militia - LHN - 1/7/1
Militia - LHN - 2/9/6
Militia - LHN - 3/11/7
Militia - LHN - 4/6/16
Militia - LHN - 5/4/15
Militia - LHN - 6/5/12
Militia - LHN - 28
Militia - LHQ - Qld
Militia - LHQ - 13/2
Militia - LHQ - 14/3/11
Militia - LHQ - 15/1/5
Militia - LHQ - 27/14
Militia - LHS - SA
Militia - LHS - 16/22/3
Militia - LHS - 17/23/18
Militia - LHS - 24/9
Militia - LHT - Tas
Militia - LHT - 12/26
Militia - LHV - Vic
Militia - LHV - 7/15/20
Militia - LHV - 8/16/8
Militia - LHV - 9/19
Militia - LHV - 10/13
Militia - LHV - 11/20/4
Militia - LHV - 19/17
Militia - LHV - 29
Militia - LHW - WA
Militia - LHW-18/25/10
Militia - Military Orders
Militia - Misc
MilitiaRC - Rifle Clubs
MilitiaRC - NSW
MilitiaRC - NT
MilitiaRC - Qld
MilitiaRC - SA
MilitiaRC - Tas
MilitiaRC - Vic
MilitiaRC - WA
Militiaz - New Zealand
Tk - Turkish Items
Tk - Army
Tk - Bks - Books
Tk - Bks - 1/33IR
Tk - Bks - 27th IR
Tk - Bks - Air Force
Tk - Bks - Yildirim
Tk - POWs
Wp - Weapons
Wp - Hotchkiss Cav
Wp - Hotchkiss PMG
Blog Tools
Edit your Blog
Build a Blog
RSS Feed
View Profile
Open Community
Post to this Blog
Site Index
Education Centre
LH Militia
Boer War
Transport Ships
LH Battles
ALH - Units
ALH - General
Aboriginal Light H
Weapons
Ottoman Sources

"At a mile distant their thousand hooves were stuttering thunder, coming at a rate that frightened a man - they were an awe inspiring sight, galloping through the red haze - knee to knee and horse to horse - the dying sun glinting on bayonet points..." Trooper Ion Idriess

The Australian Light Horse Studies Centre aims to present an accurate history as chroniclers of early Australian military developments from 1899 to 1920.

The Australian Light Horse Studies Centre site holds over 12,000 entries and is growing daily.

Contact: Australian Light Horse Studies Centre

Let us hear your story: You can tell your story, make a comment or ask for help on our Australian Light Horse Studies Centre Forum called:

Desert Column Forum

WARNING: This site contains: names, information and images of deceased people; and, language which may be considered inappropriate today.

Wednesday, 24 June 2009
Gallipoli Campaign - 1915, Bridges Disembarkation Orders, 18 April 1915, Part 1
Topic: BatzG - Gallipoli

Gallipoli Campaign - 1915

Bridges Disembarkation Orders, 18 April 1915, Part 1


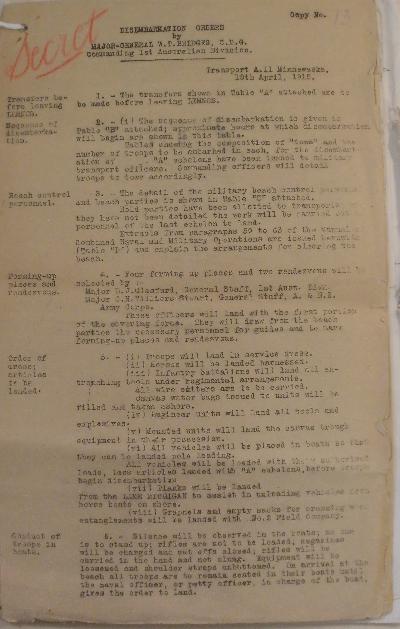
Disembarkation Orders, 18 April 1915, p. 1.


DISEMBARKATION ORDERS

By Major General W. T. BRIDGES, C.M.G., Commanding 1st Australian Division.

Transport A11 Minnewaska, 18th April, 1915.


Transfers before leaving Lemnos.

1. - The transfers shown in Table "A" attached are to be made before leaving LEMNOS.


Sequence of disembarkation.

2.(i) The sequence of disembarkation is given in Table "B" attached; approximate hours at which disembarkation will begin are shown in this table,

Tables showing the composition of "tows", and the number of troops to be embarked in each, for the disembarkation of "A" echelons have been issued to military transport officers. Commanding officers will detail troops to tows accordingly.


Beach control personnel.

3. - The detail of the military beach control personnel and beach parties is shown in Table "C" attached.

Hold Parties have been allotted to transports; when they have not been detailed the work will be carried out by personnel of the last echelon to land.

Extracts from Paragraphs 59 to 63 of the Manual of Combined Naval and Military Operations are issued herewith (Table "D") and explain the arrangements for clearing the beach.


Forming-up places and rendezvous.

4. - Four forming up places and two rendezvous will be selected by

Major DJ Glasfurd, General Staff, 1st Australian Division
Major CH Villiers-Stuart, General Staff, A & NZ Army Corps.

These officers will land with the first portion of the covering force. They will draw from the beach parties the necessary personnel for guides and to mark forming-up places and rendezvous.


Order of dress; articles to be landed.

5. –
(i ) Troops will land in service dress.

(ii) Horses will be landed harnessed.

(iii) Infantry battalions will land all entrenching tools under regimental arrangements.

All wire cutters are to be carried.

Canvas water bags issued to units will be filled and taken ashore.

(iv) Engineer units will land all tools and explosives.

(v) Mounted units will land the canvas trough equipment in their possession.

(vi) All vehicles will be placed in boats so that they can be landed pole leading.

All vehicles will be with their authorised loads, less articles landed with "A" echelons, before troops begin disembarkation.

(vii) Planks will be landed from the LAKE MICHIGAN to assist in unloading vehicles from horse boats on shore.

(viii) Grapnels a empty sacks for crossing wire entanglements will be landed with No. 2 Field Company.


Conduct of troops in boats

6. -- Silence will be observed in the boats, no one is to stand up; rifles are not to be loaded; magazines will be charged and cut offs closed; rifles will be carried in the hand and not slung. Equipment will be loosened and shoulder straps unbuttoned. On arrival at the beach all troops are to remain seated in their boats until the naval officer, or petty officer, in charge of the boat, gives the order to land.


Previous: Gallipoli Campaign

Next: Gallipoli Campaign - 1915, Bridges Disembarkation Orders, 18 April 1915, Part 2


Further Reading:

Gallipoli Campaign


Citation: Gallipoli Campaign - 1915, Bridges Disembarkation Orders, 18 April 1915, Part 1


Posted by Project Leader at 12:01 AM EADT
Updated: Friday, 3 July 2009 9:47 AM EADT
Tuesday, 23 June 2009
Gallipoli Campaign - 1915, Bridges Disembarkation Orders, 18 April 1915, Part 2
Topic: BatzG - Gallipoli

Gallipoli Campaign - 1915

Bridges Disembarkation Orders, 18 April 1915, Part 2


Disembarkation Orders, 18 April 1915, p. 2.


DISEMBARKATION ORDERS

By Major General W. T. BRIDGES, C.M.G., Commanding 1st Australian Division.

Transport A11 Minnewaska, 18th April, 1915.

Rations

7(i) A hot meal will be arranged for all troops as late as possible before leaving their ships.

(ii) Troops will land with the current day's rations and two iron rations. The iron rations are for consumption on the second and third days.

(iii) Under Army Corps arrangements seven days' suppies will be landed - that for the lst Australian Division will be taken over subsequently by the Officer Commanding Divisional Train who will arrange for landing the necessary supply details from the Atlantian.


Ammunition

8(i) Infantry will carry two hundred (200) rounds on the man: artillery and engineers  fifty (50) rounds per man; A.S.C twenty (20) rounds per man.

(ii) Machine guns and belt boxes will be carried by hand; (3,500) rounds per machine gun will be carried in belt boxes.

(iii) The regimental reserve now in possession of units will be left in regimental vehicles and landed with them.

(iv) 176 rounds per gun will be landed with each battery.

(v) Arrangements have been made by the Army Corps to 1and a reserve of small arm and gun ammunition on the beach. The DADOS will take over from this depot the ammunition for the Division.


Disposal of unfit personnel and animals etc.

9. - ( i ) All men unfit for disembarkation will be transferred to the stationary hospital before leaving MUDROS; those becoming unfit subsequently will, as opportunity offers be transferred to the transport CLAN McGILLIVRAY, by the military transport officer of the transport.

(ii) Unfit animals will be left on transports in charge of a party detailed under regimental arrangements.

(iii) After tho disembarkation of "A" echelons military transport officers will see that remaining personnel is divided in proper prorortions to the "B" and "C" echelons.

(iv) The extra blankets will he baled, labelled, and left on transports in charge of military transport officers, who will apply for instructions as to their disposal before ships are finally cleared.

(v) Hold parties, military transport officers, and their signals parties, will remain on board until all echelons are landed. They will then be transferred under divisional arrangements to the DERFFLINGER, taking with them any sick remaining in their transports.


C.B.B. WHITE

Lieut.Colonel 1st Australian Division.


Previous: Gallipoli Campaign - 1915, Bridges Disembarkation Orders, 18 April 1915, Part 1

Next: Gallipoli Campaign


Further Reading:

Gallipoli Campaign


Citation: Gallipoli Campaign - 1915, Bridges Disembarkation Orders, 18 April 1915, Part 2


Posted by Project Leader at 12:01 AM EADT
Updated: Friday, 3 July 2009 9:46 AM EADT
Saturday, 20 June 2009
Gallipoli Campaign - 1915, Questions to the Turkish General Staff, Part 1
Topic: BatzG - Gallipoli

Gallipoli Campaign - 1915

Questions to the Turkish General Staff, Part 1


The Turkish General Staff Answers


During 1919, after the defeat of Turkey, a unique opportunity was opened up for CEW Bean to question the members of the Turkish General Staff about the Gallipoli Campaign. Bean presented a list of 111 questions. In June 1919, he received the answers. In the following transcription, the answers given by the Turkish General Staff will be qualified by the questions asked by Bean.


Questions 1 – 4

1. Where were the Turks expecting us to land?

2. Were they expecting us to land troops at Gaba Tepe?

3. Were they expecting us to land at Ari Burnu?

4. What did they think our intentions as to landing were?
 
The landing was expected from Seddulbahr and Gaba Tepe, also landings were expected a n the Asiatic side, and on the North of the Peninsula in the Gulf of Xeros. No landing was expected at Anzac. The Turkish Staff thought that the British intention had been to land at Gaba Tepe and that the landing at Anzac was made in error.

Our appreciation of the situation was that attempts would be made to take the forts by surprise attack and so open the Straits.


Questions 5 - 6

5. Approximately at what date did they first hear of our proposed landings?

6. When were they expecting the force at Mudros to land?
 
The Turkish General Staff considered that after the failure of the Naval attack of March 18th, a combined naval and Military attack would be made to endeavour to open the Straits, join the Russians, and separate the East from the West. We had information by the end of March that 50,000 British, Australian, and New Zealand soldiers, under General Hamilton, and 30,000 French, under General D'Amade, were concentrating in Mudros, but the date or week of the landing was unknown.


Questions 7 - 8

7. On April 25th what forces were there between Ari Burnu and Gaba Tepe? And where?

8. How many troops did they amount to in all and what were the numbers in reserve, and where were the reserves?


On April 25th, between Anzac and Gaba Tepe - in other words between Anafarta Asmak and Kum Tepe - there was the 2nd Battalion, 27th Regiment with its centre at Gaba Tepe. 1 Q.F. Mountain Battery of the 8th Artillery Regiment was attached to this Battalion. The other two battalions formed the reserve. They were under cover of the olive trees in Maidos. The 19th Regular Division was in the area Bighali - Mal Tepe. At Ari Burnu point there was a Coy of the 2nd Battalion, 27th Regiment, and the whole of the above-mentioned Mountain Battery.


Previous: Gallipoli Campaign

Next: Gallipoli Campaign - 1915, Questions to the Turkish General Staff, Part 2


Further Reading:

Gallipoli Campaign


Citation: Gallipoli Campaign - 1915, Questions to the Turkish General Staff, Part 1 


Posted by Project Leader at 12:01 AM EADT
Updated: Wednesday, 1 July 2009 11:29 PM EADT
Friday, 19 June 2009
Gallipoli Campaign - 1915, Questions to the Turkish General Staff, Part 2
Topic: BatzG - Gallipoli

Gallipoli Campaign - 1915

Questions to the Turkish General Staff, Part 2


The Turkish General Staff Answers


During 1919, after the defeat of Turkey, a unique opportunity was opened up for CEW Bean to question the members of the Turkish General Staff about the Gallipoli Campaign. Bean presented a list of 111 questions. In June 1919, he received the answers. In the following transcription, the answers given by the Turkish General Staff will be qualified by the questions asked by Bean.


Questions 11 - 14

11. On April 25th what was the first report of the Ari Burnu landing?

12. Were our troops seen in the boats before reaching the shore?

13. What was the first sign seen? What was the alarm?

14. How did the news come to the reserves?


The first report was that the British troops were landing at Gaba Tepe and to the North of it. This report reached A.H.Q., Gallipoli, at 6 a.m., April 25th. An hour or two later, news arrived that landings were also being made in the Gulf of Saros, Seddulbahr, Morto Bay, Sighin Dere, Kum Kale, and Beshika. The report of the landing at Beshika was false.


Questions 16 - 20.

16. How far did the Australian troops advance at ARI BURNU or, April 25th, and how did they fight?

17. What were the casualties of the Turks?

18. What reserves were sent to CAPE HELLES and what was the strength of these reserves?

19. What Turkish artillery was there at CAPE HELLES?

20. What was the Turkish artillery at ARI BURNU on April 25th? How many land guns and ships guns were used, respectively?


At first the 2 battalions of the 27th Regiment at Maidos were sent to Ari Burnu via Kodja Dere. They started at 7.30 a.m. after the Australians had landed. A Mountain Battery of the 19th Division was sent from Bighali towards Chunuk Bahr. The Australians that day advanced as far as the Western hillocks of Kamalyeri and in the direction of Chunuk Bahr as far as the Line between Duz Tepe and Chunuk Bahr. The Australians succeeded well in throwing back our advanced troops and in reaching the points they did. Their first effort in this difficult country was beyond praise. But when the 27th and 57th Regiments began to make their counter attack, the advance was checked and the first attack broken. On counting the casualties of these two Regiments it was realised how well the Australians had fought in their efforts to hold the line they had reached. The casualties of these two Regiments during the day and following night were 50% of their strength. The two Regiments were together slightly more than 4,000 strong. The three Australian Brigades which landed were estimated at 12,000.

The Turkish. Artillery in Ari Burnu consisted of 2 Mountain Batteries of which one was captured but retaken in the counter attack.    2 Field Batteries took up positions in the afternoon but remained in observation. On 26th April, 2 more Mountain Batteries took up positions in Kamalyere. There were no Naval guns.


Questions 22 - 23

22. Where were the guns stationed later?

23. What did they think of our Naval Artillery? What did they think of our land guns?


The effect of the British Naval Artillery was moral without being material. The effect of the land guns was to force our infantry to keep out of view in the centre and also prevented free movement.


Questions 24 - 28

24. What were the first counter attacks delivered by the Turkish Force at Anzac on April 25th, April 26th, April 27 - May 1?

25. What was the idea of the Turkish Staff as to the plan and motive of our attack at ARI BURNU?

26. When did they estimate that our attack was checked?

27. What apprehension had they of any further attacks?

28. When did they realise that the British attack at Helles had been checked?


No demonstration or counter attack was made by us on the 26th April. Real counter attacks were made on the 25th and 27th April, and 1st May, the aim being to drive the Anzac Corps into the sea. In all these attacks the Anzac troops were superior in number and consequently no decisive result was obtained, though the Anzac troops were pressed back to the line that they remained in up to the evacuation of the Peninsula. The distance between opposing trenches was very small. During the counter attack of April 25th, 5 more battalions were put in to the line, and on April 27th six more were put in, making a total of 16 battalions against the 6 British brigades.

In the counter attack of May 1st, 5 more battalions joined the line. By that time the British Naval Brigade had also landed.

The tactics of the Turks were to prevent the British from landing or if not, to prevent lodgements being made.

We imagined the tactics of the Anzac landing to be as follows :


By landing in two different places the result would be more of a surprise and the allotted task effected quicker, further, by drawing more troops to Anzac the task at Seddulbahr would be more easily effected.

By holding the Kavak Tepe - Sanjak Tepe - Chunuk Bahr - Koja Chimen - Abdul Rahman Bahr line, communication between Gallipoli and the rest of the Peninsula would be cut. The command of the Straits would also be gained. The above mentioned line was marked on maps found on dead Australian or New Zealand officers.

It was realised that the attack was checked in April but it was always expected that further attacks would take place.


Previous: Gallipoli Campaign - 1915, Questions to the Turkish General Staff, Part 1 

Next: Gallipoli Campaign - 1915, Questions to the Turkish General Staff, Part 3


Further Reading:

Gallipoli Campaign


Citation: Gallipoli Campaign - 1915, Questions to the Turkish General Staff, Part 2


Posted by Project Leader at 12:01 AM EADT
Updated: Wednesday, 1 July 2009 11:29 PM EADT
Thursday, 18 June 2009
Gallipoli Campaign - 1915, Questions to the Turkish General Staff, Part 3
Topic: BatzG - Gallipoli

Gallipoli Campaign - 1915

Questions to the Turkish General Staff, Part 3


The Turkish General Staff Answers


During 1919, after the defeat of Turkey, a unique opportunity was opened up for CEW Bean to question the members of the Turkish General Staff about the Gallipoli Campaign. Bean presented a list of 111 questions. In June 1919, he received the answers. In the following transcription, the answers given by the Turkish General Staff will be qualified by the questions asked by Bean.


Questions 29 - 31

29. What importance was attached to the head of Monash Valley, Baby 700, Popes Hill and Quinns Post?

30. What importance did they attach to our attack in the Bloody Angle and BABY 700 on May 2nd?

31. When did they begin to mine?


Monash Valley, Baby 700, and Popes Hill were looked upon as very important positions if Kojak Chimen mountain was to be menaced. It was always realised that the British effort was to take Koja Chimen. Quinn’s Post was looked upon as a poor position as it was commanded. The attack on May 2nd was evidently made to better this position.

Mining was started near Quinn’s Post after the attack on May 11th, and the mine exploded o n the morning of May 29th.


Questions 37 - 44

37. What was the Turkish estimate of the position on the Peninsular before they delivered their great counter attack on May 19 at Anzac, and why did they choose Anzac for this attack? When did this plan originate?

38. What was the plan of attack?

39. What units were employed in this attack and who commanded them?

40. Were these battalions good battalions?

41. What was the actual result of the attack?

42. Were the Turkish casualties heavy? Where were they heaviest?

43. Against what part of our line was the attack most strongly thrown?

44. What points of our line were attacked on May 19th, what was the opinion of our defence, and what guns were employed in the preparation for this attack? What was the reason for the tremendous outburst of rifle fire before midnight May 18th?


The position at Anzac was without parallel in History. The opposing trenches were so close together and the Anzac Corps line was very close to the sea, consequently they were much confined and would make every effort to enlarge their position. It was therefore better for the Turks to have the initiative and attack before the Anzac troops attacked. This they did on May 19th. If this attack succeeded, a force of some 4 of 5 Turkish divisions would be freed and available to deal with Seddulbahr. The proximity of the trenches was an advantage in making a surprise attack. The plan was to attack before daybreak, drive the Anzac troops from their trenches and follow them down to the sea.

The following troops were used in this attack:

Facing the British left: 19th Division (12 Battalions. O.C. Lieut. Col Mustafa Kemal

Facing the British left centre: 5th Division (9 Battalions. O.C. Lieut.-Col. Hassan Basri Bey)

Facing the British right centre: 2nd Division (9 Battalions. O.C. Col. Hassan Askeri Bey.)

Facing the British right: 16th Division (12 Battalions. O.C Col. Rushdi Bey.)

The whole force was commanded by the 3rd Army Commander (Maj.Gen. Essad Pasha.) The total force numbered about 30,000 rifles, The Divisions were good. The 2nd 16th were fresh divisions; the other two had taken part in all the previous fighting. Everywhere the British trenches were entered but the attack was held up by machine gun fire from the flanks and became abortive. The Turkish casualties were much heavier than was expected. More importance was attached to the capture of Lone Pine and the ground North of it. In this attack the worth of the Anzac soldiers in defence was realised; they shot well and used their machine guns to the best advantage. Our artillery was small - only 6 Mountain Batteries, 4 Field Batteries, Howitzer Battery Without much ammunition, and 1 Mortar Battery being available for the preparation of the attack.

The outburst of fire before midnight May 18th was due to the excitement of the troops. Similar outbursts used to occur on both sides.


Previous: Gallipoli Campaign - 1915, Questions to the Turkish General Staff, Part 2

Next: Gallipoli Campaign - 1915, Questions to the Turkish General Staff, Part 4


Further Reading:

Gallipoli Campaign


Citation: Gallipoli Campaign - 1915, Questions to the Turkish General Staff, Part 3


Posted by Project Leader at 12:01 AM EADT
Updated: Wednesday, 1 July 2009 11:30 PM EADT

Newer | Latest | Older

Full Site Index


powered by FreeFind
Let us hear your story: You can tell your story, make a comment or ask for help on our forum.

Desert Column Forum

A note on copyright

The Australian Light Horse Studies Centre is a not for profit and non profit group whose sole aim is to write the early history of the Australian Light Horse from 1900 - 1920. It is privately funded and the information is provided by the individuals within the group and while permission for the use of the material has been given for this site for these items by various donors, the residual and actual copyright for these items, should there be any, resides exclusively with the donors. The information on this site is freely available for private research use only and if used as such, should be appropriately acknowledged. To assist in this process, each item has a citation attached at the bottom for referencing purposes.

Please Note: No express or implied permission is given for commercial use of the information contained within this site.

A note to copyright holders

The Australian Light Horse Studies Centre has made every endeavour to contact copyright holders of material digitised for this blog and website and where appropriate, permission is still being sought for these items. Where replies were not received, or where the copyright owner has not been able to be traced, or where the permission is still being sought, the Australian Light Horse Studies Centre has decided, in good faith, to proceed with digitisation and publication. Australian Light Horse Studies Centre would be happy to hear from copyright owners at any time to discuss usage of this item.

Contact

Australian Light Horse Studies Centre

eXTReMe Tracker