« February 2009 »
S M T W T F S
1 2 3 4 5 6 7
8 9 10 11 12 13 14
15 16 17 18 19 20 21
22 23 24 25 26 27 28
You are not logged in. Log in


Search the site:


powered by FreeFind
Volunteer with us.

Entries by Topic All topics
A Latest Site News
A - Using the Site
AAA Volunteers
AAB-Education Centre
AAC-Film Clips
AAC-Photo Albums
AIF & MEF & EEF
AIF - Lighthorse
AIF - ALH - A to Z
AIF - DMC
AIF - DMC - Or Bat
AIF - DMC - Anzac MD
AIF - DMC - Aus MD
AIF - DMC - British
AIF - DMC - BWI
AIF - DMC - French
AIF - DMC - Indian
AIF - DMC - Italian
AIF - DMC - Medical
AIF - DMC - Remounts
AIF - DMC - Scouts
AIF - DMC - Sigs
AIF - DMC - Sigs AirlnS
AIF - DMC - 1 Sig Sqn
AIF - DMC - 2 Sig Sqn
AIF - DMC - Eng
AIF - DMC - Eng 1FSE
AIF - DMC - Eng 2FSE
AIF - DMC - GSR
AIF - 1B - 1 LHB
AIF - 1B - 6 MVS
AIF - 1B - 1 LHMGS
AIF - 1B - 1 Sig Trp
AIF - 1B - 1 LHFA
AIF - 1B - 1 LHR
AIF - 1B - 2 LHR
AIF - 1B - 3 LHR
AIF - 2B - 2 LHB
AIF - 2B - 7 MVS
AIF - 2B - 2 LHFA
AIF - 2B - 2 LHMGS
AIF - 2B - 2 Sig Trp
AIF - 2B - 5 LHR
AIF - 2B - 6 LHR
AIF - 2B - 7 LHR
AIF - 3B - 3 LHB
AIF - 3B - 8 MVS
AIF - 3B - 3 LHB Sigs
AIF - 3B - 3 LHFA
AIF - 3B - 3 LHMGS
AIF - 3B - 3 Sig Trp
AIF - 3B - 8 LHR
AIF - 3B - 9 LHR
AIF - 3B - 10 LHR
AIF - 4B - 4 LHB
AIF - 4B - 4 Sig Trp
AIF - 4B - 9 MVS
AIF - 4B - 4 LHFA
AIF - 4B - 4 LHMGS
AIF - 4B - 4 LHR
AIF - 4B - 11 LHR
AIF - 4B - 12 LHR
AIF - 5B - 5 LHB
AIF - 5B - 10 MVS
AIF - 5B - 5 LHFA
AIF - 5B - 5 Sig Trp
AIF - 5B - ICC
AIF - 5B - 14 LHR
AIF - 5B - 15 LHR
AIF - 5B - 1er Regt
AIF - 5B - 2 NZMGS
AIF - AASC
AIF - Aboriginal LH
AIF - Badges
AIF - Cars
AIF - Chinese LH
AIF - Double Sqns
AIF - Engineers
AIF - Fr - 22 Corps
AIF - Fr - 13 LHR
AIF - Honour Roll
AIF - HQ - 3rd Echelon
AIF - Marching Songs
AIF - Misc Topics
AIF - NZMRB
AIF - NZMRB - AMR  
AIF - NZMRB - CMR
AIF - NZMRB - EFT
AIF - NZMRB - NZMFA
AIF - NZMRB - NZMGS
AIF - NZMRB - OMR
AIF - NZMRB - Sig-Trp
AIF - NZMRB - WMR
AIF - Ships
AIF - Ships - Encountr
AIF - Ships - Una
AIF - WFF
AIF - Wireless Sqn
Battles
BatzA - Australia
BatzA - Broken Hill
BatzA - Liverpool
BatzA - Merivale
BatzB - Boer War
BatzB - Bakenlaagte
BatzB - Belmont
BatzB - Bothaville
BatzB - Buffels Hoek
BatzB - Coetzees Drift
BatzB - Diamond Hill
BatzB - Driefontein
BatzB - Elands
BatzB - Graspan
BatzB - Grobelaar
BatzB - Grootvallier
BatzB - Hartebestfontn
BatzB - Houtnek
BatzB - Karee Siding
BatzB - Kimberley
BatzB - Koster River
BatzB - Leeuw Kop
BatzB - Mafeking
BatzB - Magersfontein
BatzB - Modder River
BatzB - Onverwacht
BatzB - Paardeberg
BatzB - Palmietfontein
BatzB - Pink Hill
BatzB - Poplar Grove
BatzB - Rhenoster
BatzB - Sannahs Post
BatzB - Slingersfontn
BatzB - Stinkhoutbm
BatzB - Sunnyside
BatzB - Wilmansrust
BatzB - Wolvekuil
BatzB - Zand River
BatzG - Gallipoli
BatzG - Anzac
BatzG - Aug 1915
BatzG - Baby 700
BatzG - Evacuation
BatzG - Hill 60
BatzG - Hill 971
BatzG - Krithia
BatzG - Lone Pine
BatzG - Nek
BatzJ - Jordan Valley
BatzJ - 1st Amman
BatzJ - 2nd Amman
BatzJ - Abu Tellul
BatzJ - Es Salt
BatzJ - JV Maps
BatzJ - Ziza
BatzM - Mespot
BatzM - Baghdad
BatzM - Ctesiphon
BatzM - Daur
BatzM - Kurna
BatzM - Kut el Amara
BatzM - Ramadi
BatzN - Naval
BatzN - AE1
BatzN - Cocos Is
BatzN - Heligoland
BatzN - Marmara
BatzN - Zeebrugge
BatzN - Zeppelin L43
BatzNG - Bitapaka
BatzO - Other
BatzO - Baku
BatzO - Egypt 1919
BatzO - Emptsa
BatzO - Karawaran
BatzO - Peitang
BatzO - Wassa
BatzP - Palestine
BatzP - 1st Gaza
BatzP - 2nd Gaza
BatzP - 3rd Gaza
BatzP - Aleppo
BatzP - Amwas
BatzP - Ayun Kara
BatzP - Bald Hill
BatzP - Balin
BatzP - Beersheba
BatzP - Berkusieh
BatzP - Damascus
BatzP - El Auja
BatzP - El Buggar
BatzP - El Burj
BatzP - Haifa
BatzP - Huj
BatzP - JB Yakub
BatzP - Kaukab
BatzP - Khan Kusseir
BatzP - Khuweilfe
BatzP - Kuneitra
BatzP - Megiddo
BatzP - Nablus
BatzP - Rafa
BatzP - Sasa
BatzP - Semakh
BatzP - Sheria
BatzP - Surafend
BatzP - Wadi Fara
BatzS - Sinai
BatzS - Bir el Abd
BatzS - El Arish
BatzS - El Mazar
BatzS - El Qatiya
BatzS - Jifjafa
BatzS - Magdhaba
BatzS - Maghara
BatzS - Romani
BatzS - Suez 1915
BatzSe - Senussi
BatzWF - Westn Front
BW - Boer War
BW - NSW
BW - NSW - 1ACH
BW - NSW - 1NSWMR
BW - NSW - 2NSWMR
BW - NSW - 3ACH
BW - NSW - 3NSWIB
BW - NSW - 3NSWMR
BW - NSW - 5ACH
BW - NSW - A Bty RAA
BW - NSW - AAMC
BW - NSW - Aust H
BW - NSW - Lancers
BW - NSW - NSW Inf
BW - NSW - NSWCBC
BW - NSW - NSWIB
BW - NSW - NSWMR_A
BW - NZ
BW - Qld
BW - Qld - 1ACH
BW - Qld - 1QMI
BW - Qld - 2QMI
BW - Qld - 3ACH
BW - Qld - 3QMI
BW - Qld - 4QIB
BW - Qld - 5QIB
BW - Qld - 6QIB
BW - Qld - 7ACH
BW - QLD - AAMC
BW - SA
BW - SA - 1SAMR
BW - SA - 2ACH
BW - SA - 2SAMR
BW - SA - 3SACB
BW - SA - 4ACH
BW - SA - 4SAIB
BW - SA - 5SAIB
BW - SA - 6SAIB
BW - SA - 8ACH
BW - SA - AAMC
BW - Tas
BW - Tas - 1ACH
BW - Tas - 1TIB
BW - Tas - 1TMI
BW - Tas - 2TB
BW - Tas - 2TIB
BW - Tas - 3ACH
BW - Tas - 8ACH
BW - Vic
BW - Vic - 1VMI
BW - Vic - 2ACH
BW - Vic - 2VMR
BW - Vic - 3VB
BW - Vic - 4ACH
BW - Vic - 4VIB
BW - Vic - 5VMR
BW - Vic - 6ACH
BW - Vic - AAMC
BW - Vic - Scot H
BW - WA
BW - WA - 1WAMI
BW - WA - 2ACH
BW - WA - 2WAMI
BW - WA - 3WAB
BW - WA - 4ACH
BW - WA - 4WAMI
BW - WA - 5WAMI
BW - WA - 6WAMI
BW - WA - 8ACH
BW Gen - Campaign
BW Gen - Soldiers
BW General
Cavalry - General
Diary - Schramm
Egypt - Heliopolis
Egypt - Mena
Gen - Ataturk Pk, CNB
Gen - Australia
Gen - Legends
Gen - Query Club
Gen - St - NSW
Gen - St - Qld
Gen - St - SA
Gen - St - Tas
Gen - St - Vic
Gen - St - WA
Gm - German Items
Gm - Bk - 605 MGC
GW - 11 Nov 1918
GW - Atrocities
GW - August 1914
GW - Biographies
GW - Propaganda
GW - Spies
GW - We forgot
Militia 1899-1920
Militia - Area Officers
Militia - Inf - Infantry
Militia - Inf - 1IB
Militia - Inf - 2IB
Militia - Inf - 3IB
Militia - Inf - NSW
Militia - Inf - Qld
Militia - Inf - SA
Militia - Inf - Tas
Militia - Inf - Vic
Militia - Inf - WA
Militia - K.E.Horse
Militia - LH
Militia - LH - Regts
Militia - LH - 1LHB
Militia - LH - 2LHB
Militia - LH - 3LHB
Militia - LH - 4LHB
Militia - LH - 5LHB
Militia - LH - 6LHB
Militia - LHN - NSW
Militia - LHN - 1/7/1
Militia - LHN - 2/9/6
Militia - LHN - 3/11/7
Militia - LHN - 4/6/16
Militia - LHN - 5/4/15
Militia - LHN - 6/5/12
Militia - LHN - 28
Militia - LHQ - Qld
Militia - LHQ - 13/2
Militia - LHQ - 14/3/11
Militia - LHQ - 15/1/5
Militia - LHQ - 27/14
Militia - LHS - SA
Militia - LHS - 16/22/3
Militia - LHS - 17/23/18
Militia - LHS - 24/9
Militia - LHT - Tas
Militia - LHT - 12/26
Militia - LHV - Vic
Militia - LHV - 7/15/20
Militia - LHV - 8/16/8
Militia - LHV - 9/19
Militia - LHV - 10/13
Militia - LHV - 11/20/4
Militia - LHV - 19/17
Militia - LHV - 29
Militia - LHW - WA
Militia - LHW-18/25/10
Militia - Military Orders
Militia - Misc
MilitiaRC - Rifle Clubs
MilitiaRC - NSW
MilitiaRC - NT
MilitiaRC - Qld
MilitiaRC - SA
MilitiaRC - Tas
MilitiaRC - Vic
MilitiaRC - WA
Militiaz - New Zealand
Tk - Turkish Items
Tk - Army
Tk - Bks - Books
Tk - Bks - 1/33IR
Tk - Bks - 27th IR
Tk - Bks - Air Force
Tk - Bks - Yildirim
Tk - POWs
Wp - Weapons
Wp - Hotchkiss Cav
Wp - Hotchkiss PMG
Blog Tools
Edit your Blog
Build a Blog
RSS Feed
View Profile
Open Community
Post to this Blog
Site Index
Education Centre
LH Militia
Boer War
Transport Ships
LH Battles
ALH - Units
ALH - General
Aboriginal Light H
Weapons
Ottoman Sources

"At a mile distant their thousand hooves were stuttering thunder, coming at a rate that frightened a man - they were an awe inspiring sight, galloping through the red haze - knee to knee and horse to horse - the dying sun glinting on bayonet points..." Trooper Ion Idriess

The Australian Light Horse Studies Centre aims to present an accurate history as chroniclers of early Australian military developments from 1899 to 1920.

The Australian Light Horse Studies Centre site holds over 12,000 entries and is growing daily.

Contact: Australian Light Horse Studies Centre

Let us hear your story: You can tell your story, make a comment or ask for help on our Australian Light Horse Studies Centre Forum called:

Desert Column Forum

WARNING: This site contains: names, information and images of deceased people; and, language which may be considered inappropriate today.

Tuesday, 10 February 2009
AMR, NZMRB account about Romani
Topic: AIF - NZMRB - AMR

Auckland Mounted Rifles

Battle of Romani, Sinai, August 4 to 5, 1916


Auckland Mounted Rifles account about the Battle of Romani


Romani, Mount Royston in background - Painting by George Lambert

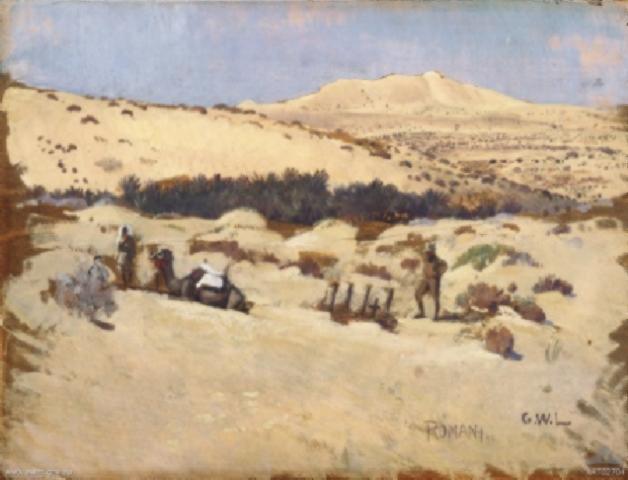
[From: AWM ART02704]


For a contour map of the area drawn by Lambert, see:

1:40,000 map of Mt Royston area


13/112 Sergeant Charles Gordon Nicol, a member of the Auckland Mounted Rifles, a unit which was part of the New Zealand Mounted Rifles Brigade, wrote an account of this unit called The Story of Two Campains”  Official war history of the Auckland Mounted Rifles Regiment, 1914 - 1919 in the Battlefields  of Gallipoli, Sinai and Palestine during WWI, in which included a section specifically related to the battle of Beersheba and is extracted below. A copy of this book is available on the New Zealand Mounted Rifles Association website.

Nicol, CG, The story of two campaigns : official war history of the Auckland Mounted Rifles Regiment, 1914-1919, (Auckland 1921).


CHAPTER XVII.

Romani Opens.


Notwithstanding the fact that it was the height of summer, the Turk was about to challenge. His first concentrations, a few miles east of Katia, were observed on July 19 by General Chaytor and an airman who had taken him out for a “joy ride” after the desert had been reported clear. The force was estimated at 9,000 men with guns. The bringing of heavy guns over the desert for so many miles was a remarkable feat. It was afterwards found that in many places the Turks had made a gun road by digging ditches where the wheels were to run, and filling them with brush, which prevented the wheels sinking in the soft sand.

The Turks started to dig in on a line from Oghratina to Mageibra. All the vital eminences were held in strength, and our patrols were frequently fired on, in some cases by machine-guns. Patrols of the A.M.R., under Lieutenants Reed and Martin, were sent to Bir Nagid, some 15 to 20 miles to the south, to keep a secret watch against the enemy’s left. Secrecy demanded that this little post, so far from assistance, must be supplied with rations and water and fodder during the hours of darkness. Camels, of course, had to be used to transport the supplies, and as they took four or five hours to cover the outward journey, this was a matter of some difficulty. The fact that the camel drivers were Mohammedan Indians, under a superb looking individual who wore a sword, and that the escort was a party of A.M.R. troopers under a corporal, led to an amusing incident the first night, or rather morning. Dawn was just about to break when the loads had been taken off, and there was need for haste if the camels were to be out of sight by sunrise. The Indians did not appreciate the position, and instead of turning back at once, they washed their hands and made ready to pray as the sun came up, the individual with the sword not excepted. The A.M.R. corporal tried persuasion, but that being of no avail, he used the toe of his boot on the head Indian. This form of persuasion was quite effectual.

At the time the enemy’s intentions were not known. He was certainly expected to move forward and gain the advantages of the Katia system of oases, but there seemed every possibility that there he would wait for the British to dislodge him. The Commander-in-Chief decided to give him battle on August 13. A considerable force of infantry was in position, but the chief activity for some days was among the mounted troops of both sides. The enemy did not wait to be attacked, however. On July 27 his force, estimated now to number about 20,000 men, made an advance to Abu Darem, in the south, but was checked to some extent in the north by Light Horse and the W.M.R., with whom the latter were then brigaded.

So far the A.M.R. had remained at Hill 70 “standing by.” Important patrol duties were daily carried out. On August 1, part of the 11th squadron was sent to establish a strong post to Bir En Nuss, some miles to the east of Dudar, to sink sufficient wells to water a brigade, and part was sent to Bir Nagid to keep a watch on, the Turks. These hods were opposite the Turkish left, which was “in the blue,” the desert being its only protection, and the troopers looked forward with the liveliest anticipation to what they hoped would be a rapid out—flanking movement, the eternal dream of cavalry. The troops of Finlayson and Alsopp were in touch with enemy patrols, and were able to send in valuable information as to the activities of the enemy at Hamisah. On August 3 the remaining two squadrons relieved some Light Horse at Dueidar. That night the enemy force made a general advance, one of the fiercest fights being a delaying action by a small body of Light Horse at Hod “El Enna”. On the morning of the 4th, the Turks commenced to push forward their left flank, in a north-west direction, towards the high ground west of Bir Etmaler, and soon were on Mount Royston, a high sand dune, three miles north of Romani. This hill now became the key to the whole action. Whatever side held it would have possession of Romani, and it fell to the New Zealanders to take a prominent part in the action which regained the hill and put the seal of failure upon the hopes of the German led Turks.

At 7 a.m. the New Zealand Brigade, in which the 5th Light Horse had taken the place of the W.M.R. who had been detached for some time, got orders to move forward. The A.M.R. was at Dueidar, and got orders to join the brigade as strong as possible. The 3rd squadron and two troops of the 4th squadron rejoined the column a mile and a-half south- east of Canterbury Hill, the 11th squadron and the balance of the 4th squadron remaining to patrol the Dueidar-Katia road. About 11.30 a.m. a force of Turks, numbering 2,000, was observed on Mount Royston. About midday, after being heavily shelled by the skilful German or Austrian gunners on the ridge, a dismounted advance was ordered, the C.M.R. being on the left, the 3rd squadron of the A.M.R. in the centre, and yeomanry on the right. It was actually an enveloping movement, the New Zealanders moving against the Turkish front and the yeomanry against their southern flank. Enemy advanced posts were driven back, and the 3rd squadron, now supported by Major McCarroll with the two troops and the machine-gun section, again moved forward across the sandy “waves.” The warm fire of the Turks was returned vigor- ously by the A.M.R. machine-guns and the supporting battery, which had brought up its guns with twelve horse teams. Steadily the line moved forward, but surprisingly few casualties were suffered, one of the reasons being the advantage taken by the men of the cover offered by slight depressions, while the dangerous ruts, running parallel with the advance, were avoided. It was to be a race against time. If the hill did not fall before nightfall all the effort of the day would be lost, so a general advance was ordered for 4.45 p.m. When the moment arrived, the Turks had begun to feel the pressure of the enfilade fire from the south, and they had already evacuated a position slightly in advance of the base of the hill, and also the left end of their trenches on the ridge itself.

As soon as the final rush began the attackers were met by white flags instead of bullets. About 250 Turks were taken by the A.M.R., including a complete hospital. With the south section of the position taken, it was merely a matter of

moments before the whole position was occupied, over 1,000 prisoners being secured besides a battery of mountain guns. The first man to reach the guns was  Lieutenant 0. Johnson, of the A.M.R., who was killed a few days later. In the latter stages of the action some infantry gave support on the left.

Altogether it was a very satisfactory day’s work, and the results were of the highest importance, seeing that the Turkish retirement began almost immediately. The Regiment had carried itself according to its Gallipoli traditions, and they were very tired but very satisfied men who rode back that night to rest after handing over the position to the infantry. But perhaps the proudest man of all was the padre, who had the distinction of getting a piece of metal through his hat without receiving any injury.


Additional Reading:

Battle of Romani, Sinai, August 4 to 5, 1916, Contents

Bir el Abd, Sinai, August 9, 1916


Citation: AMR, NZMRB account about Romani

Posted by Project Leader at 12:01 AM EAST
Updated: Tuesday, 7 April 2009 4:51 PM EADT
Friday, 9 January 2009
The Battle of Rafa, Sinai, 9 January 1917, Auckland Mounted Rifles Regiment, Roll of Honour
Topic: AIF - NZMRB - AMR

The Battle of Rafa

Sinai, 9 January 1917

Auckland Mounted Rifles Regiment

Roll of Honour


Poppies on the Auckland Cenotaph plinth


The Roll of Honour contains the names of all the men known to have served at one time with the Auckland Mounted Rifles Regiment and gave their lives in service of New Zealand during the Battle of Rafa, Sinai, 9 January 1917.


Roll of Honour


Albert John CROSS, Killed in Action

John CUNNINGHAM, Died of Wounds


William Thomas HARRIS, Killed in Action

John Robert HUESTON, Killed in Action


Henry Cecil McNAMARA, Died of Wounds


Eric Howard PERRY, Killed in Action


Charles Manfred ROPE, Died of Wounds


Thomas TURNBULL, Died of Wounds


Lest We Forget


Further Reading:

Auckland Mounted Rifles

Auckland Mounted Rifles Regiment, Roll of Honour

The Battle of Rafa, Sinai, 9 January 1917

The Battle of Rafa, Sinai, 9 January 1917, Roll of Honour

The Palestine Campaign, 1917 - 1918

Battles where Australians fought, 1899-1920


Citation: The Battle of Rafa, Sinai, 9 January 1917, Auckland Mounted Rifles Regiment, Roll of Honour


Posted by Project Leader at 12:01 AM EAST
Updated: Saturday, 29 January 2011 12:37 PM EAST
Tuesday, 23 December 2008
The Battle of Magdhaba, Sinai, December 23, 1916, AMR Unit History Account
Topic: AIF - NZMRB - AMR

The Battle of Magdhaba

Sinai, 23 December 1916

AMR Unit History Account


13/112 Sergeant Charles Gordon Nicol, a member of the Auckland Mounted Rifles, a unit which was part of the New Zealand Mounted Rifles Brigade, wrote an account of this unit called The Story of Two Campains”  Official war history of the Auckland Mounted Rifles Regiment, 1914 - 1919 in the Battlefields  of Gallipoli, Sinai and Palestine during WWI, in which included a section specifically related to the Battle of Magdhaba and is extracted below. A copy of this book is available on the New Zealand Mounted Rifles Association website.

Nicol, CG, The story of two campaigns : official war history of the Auckland Mounted Rifles Regiment, 1914-1919, (Auckland 1921).


CHAPTER XXI.

Descent on El Arish and Magdhaba.

On the afternoon of December 20, the A.M.R., again under the command of Lieutenant-Colonel Mackesy, General Chaytor having resumed command of the New Zealand Brigade, left Mustagidda, and after watering at New Zealand Valley, four miles to the north-east, moved on to Gimai, where it joined up with the rest of the brigade. The Regiment, which had been detailed to form the advance guard, had barely time to draw rations, drinking water, and fodder, the latter being the mobile ration of pure barley, before it had to move off into the night. The distance to be covered was over 20 miles, and it had to be done solely by compass bearing. The first 15 miles had to be due east (90 degrees) and the remainder at 40 degrees. The route led across trackless desert covered with sand hills, which all looked alike.

The task of guiding the Anzac Division fell to the lot of Captain Finlayson, of the A.M.R. The difficulties of his job that night cannot be overestimated. In the first place he had to estimate the distance covered. Further, he had to be guided by the stars, but, unfortunately, stars have a habit of moving across the heavens, there-fore a new star had to be chosen every now and again. The system adopted was that they should ride at an even walking pace for 50 minutes and then halt for 10 minutes, when bearings were to be checked. From this the distance covered could be estimated with some accuracy. Every 25 minutes the officer and his assistant had to select a fresh star as the guiding mark. They also had to make allowances for detours, which sand hills sometimes made necessary. This was before the days of the oil bath compass, which may be read with accuracy while riding, therefore the bearings could only be checked when they dismounted every hour.

Notwithstanding the tremendous difficulties the march continued throughout the night with absolute precision, and at dawn the brigade was at Masmi, a truly remarkable achievement. From Masmi the brigades moved to their places, and by dawn El Arish was completely invested, Yeomanry being on its west side, the New Zealand Mounted Rifles and the 3rd Light Horse Brigade on tile south-west, the Camel Corps on the’ south, and the 1st Light Horse Brigade on the east. It was found clear of the enemy, and immediately occupied. The town, which consisted of the usual mud brick buildings, covers a considerable area, and is only about one mile from the sea. Besides a mosque and a number of well built public buildings it had once had a fort, but this had already been reduced to ruins by shells from monitors out at sea.

With El Arish in our hands it was possible to take immediate action against Magdhaba, some 24 miles up the Wadi El Arish (the Biblical River of Egypt), which had a garrison of 2,000. The mounted troops turned south to this new “job” the following day. At 10.30 a.m., on December 22, the 3rd squadron was ordered to proceed up the wadi Bir Lahfan, and there await the arrival of the brigade if water was plentiful. The squadron’s report being favourable the brigade moved out from El Arish at midnight. Every effort was made to preserve silence, and smoking was not allowed. The guns, however, made a tremendous row on the hard surface of the wadi. But the noise was not sufficient to keep the troopers from sleeping in their saddles, seeing that they had had no sleep the previous night.

Early that morning Magdhaba was surrounded, and it fell to a bayonet attack at 4 p.m. Some 1,200 Turks were made prisoners, and all the guns and material in the post captured. Great difficulty was experienced in getting water that night, but at 10 p.m. the Regiment had secured wells. The A.M.R. was left to clear up the field of action and destroy the serviceable buildings. Apart from the six field guns captured, which were sent into El Arish, there was a four wheeled buggy, and there was wild mirth among the men when two troop horses were yoked into it. “Make the old nags think of market day at Pukekohe,” remarked one man as two spare horses gaily trotted off with the vehicle. ‘The Regiment left for Masmi at 2 p.m., and, after a’ halt at 5 o’clock, continued the march which was to bring them “home” for Christmas Day.

A mistake was made in leaving the wadi too soon, and the Regiment got lost and had to wait through the intensely cold hours until dawn before it could find itself. It was rather an unfortunate Christmas morning, and it has been recorded that the cheerful trooper who suggested that they might employ the time by singing carols got a frigid reception. Even the horses seemed to realise that they were missing something, for one officer who went to sleep at his horse’s head was wakened by the beast banging him with the empty nose bag.

The A.M.R. did not have a cheerful Christmas. Utterly worn out by the work of the previous days and nights, they spent the day in slumber. The cooks did their best to put on something out of the ordinary, but the plum pudding was hardly sufficient to keep the thoughts of everyone from wandering to the desert route from Musta-gidda, along which they had had to discard the parcels that had arrived from home just before the ride began.

Periodically the Sinai Army was, in the language of the service, deloused. This very necessary operation was simple, each man’s clothing and blankets being placed in a steam disinfector for 20 minutes, at the end of which time the “Bedouins of the seams “ were done with this life — or theoretically so. But a delousing parade of the A.M.R. at El Arish had perils for the men as well as for the creatures for which it was called. A party of men, more or less naked, were waiting for their clothes to come out of the disinfector when a Turkish aeroplane came over and dropped a bomb not far away. The Regiment, as usual, scattered with their horses, and the rather bare party had to gallop off as they were.

At El Arish the mounted men rested in great discomfort, for the weather turned wet and cold. The nights were most uncomfortable, because all the shelter that was possible was what could be obtained by rigging up ground sheets or blankets over the holes the men scraped in the sand. After a few days the A.M.R. moved to a new bivouac Close to the beach, passing on the way a long convoy of the prisoners taken at Magdhaba, and the wounded, who were conveyed on sledges or in covered-in sand carts. It had been intended to take the prisoners and the wounded to Egypt by sea, but the heavy weather made that impossible. It was a memorable sight, which contrasted sharply with the scenes of the previous months. Twenty yards away from the long column of defeated Turks the breakers rushed up the sandy shore. In the mist out at sea lay a number of vessels of the Royal Navy, recalling Gallipoli memories.

At the new bivouac site, wells were speedily sunk only 100 yards from the breakers, but the generous supply of water obtained was almost free of salt. The reason appeared to be that there was a hard strata below the sand which held the rain water.

On December 29, General Chetwode, who had been in command of the Desert Column during the recent operations, inspected the New Zealand Mounted Rifles, and in addressing the men said that in the history of mounted war the recent action of the division created a record. He said he had expected big things of the division, but not so much as it had accomplished. For the first time in history, British cavalry had reconnoitred, attacked, assaulted, and stormed a position. Afterwards lie expressed his personal thanks to Brigadier-General Chaytor for the good work of the New Zealand Brigade.

The weather continued bad. On the last day of this eventful year there was a howling gale, which turned the beach into a boiling, seething, roaring line of white foam. One of the small steamers which had been landing stores on the beach was driven ashore. During the gale a supply of fresh meat for the A.M.R. was buried by the wind shifted sand, and it had to be dug out. The stew on that occasion was more gritty than usual


Further Reading:

Auckland Mounted Rifles Regiment

Auckland Mounted Rifles Regiment, Roll of Honour

New Zealand Mounted Rifles Brigade

The Battle of Magdhaba

The Battle of Magdhaba, Sinai, December 23, 1916, Roll of Honour, Australia and New Zealand

Battles where Australians fought, 1899-1920


Citation: The Battle of Magdhaba, Sinai, December 23, 1916, AMR, Unit History Account

Posted by Project Leader at 12:01 AM EAST
Updated: Sunday, 22 November 2009 12:33 PM EAST
Tuesday, 28 October 2008
AMR Regiment, Foote's Beersheba March Photograph
Topic: AIF - NZMRB - AMR

AMR Regiment

Auckland Mounted Rifles Regiment

Foote's Beersheba March Photograph


Frederick James Foote


The Photographer

Full Name: Frederick James Foote
Serial No.: 13/2187
First Known Rank: Trooper
Next of Kin: Mrs W.M.E. Foote (mother), Helena Bay, Whangarei, North Auckland, New Zealand
Marital Status: Single
Enlistment Address: Helena Bay, Whangarei, North Auckland, New Zealand
Military District: Auckland
Body on Embarkation: 6th Reinforcements
Embarkation Unit: Auckland Mounted Rifles
Embarkation Date: 14 August 1915
Place of Embarkation: Wellington, New Zealand
Transport: HMNZT 28 Tofua
Destination: Suez, Egypt


The Photograph


The New Zealand Mounted Rifles Brigade at Esani crossing Wadi el Esani in preparation for the march to Khalassa


This remarkable photograph shows the New Zealand Mounted Rifles Brigade baggage train in a waggon park in the foreground while in the background a Regiment is seen crossing Wadi el Esani and essembling on the southern bank at Esani during the late afternoon of 28 October 1917. Each Troop of every Squadron is clearly separated giving the ability to determine the number of troops approaching the crossing in the picture. The men in the photograph have received their final orders for the attack on Beersheba and are moving to their jump off point, a march of two nights to arrive on the morning of 31 October 1917.


Auckland Mounted Rifles Regiment War Diary


Auckland Mounted Rifles War Diary Entry, 28 October 1917.


The transcription:

The Regiment stood to Arms at 0400 till 0600, and remained in bivouac all morning. At 1330 orders were received that the Brigade would move out to Khalassa at 1700. Wadi Imal Aaga was crossed at Malassa at 1800, and the Brigade moved to Khalassa via Esani - Khalassa Road on East side of Wadi. At 2030 the Regiment reached a Point 1 mile north of Junction Esani - Khalassa and Beersheba - Khalassa roads, and bivouaced there for the night.


The road map of the route taken by the NZMR


The road from Esani to Khalassa

 [Click on map for larger version.]


The Journey

Following the directions given in the AMR War Diary entry, the crossing in the photograph was the crossing of Wadi el Esani at Esani, 28 October 1917. In finding the crossing on the map, it is the segment of road marked "D1" to the north of Esani following the route over Wadi el Esani along the road markded "C". Later on, the Brigade crossed Wadi Imal Aaga at Malassa, This is found on the segment between the portions marked "C" in the west and "E" on the east of Wadi Imal Aaga with the figure "E2" in the centre of these two marks but to the north. The men then followed the road marked "E" south to Khalassa.


Acknowledgements:

Many thanks to the following two people -

Judith Brown, the daughter of Trooper Frederick Foote, who has kindly given permission to use the photograph taken by her father.

Steve Butler from New Zealand Mounted Rifles Association who supplied the photographs.  

It is through the generosity and spirit of such people that the people of Australia and New Zealand know and understand the history of these brave men.


Further Reading:

Auckland Mounted Rifles

New Zealand Mounted Rifles Brigade

The Battle of Beersheba, Palestine, 31 October 1917

Australian and New Zealand Roll of Honour

Battles where Australians fought, 1899-1920


Citation: AMR Regiment, Foote's Beersheba March Photograph

Posted by Project Leader at 12:01 AM EADT
Updated: Tuesday, 26 January 2010 9:48 AM EAST
Sunday, 12 October 2008
The Battle of Beersheba, Palestine, 31 October 1917, AMR Unit History Account
Topic: AIF - NZMRB - AMR

The Battle of Beersheba

Palestine, 31 October 1917

AMR Unit History Account


Lieutenant Colonel James Neil McCarroll Auckland Mounted Rifles


13/112 Sergeant Charles Gordon Nicol, a member of the Auckland Mounted Rifles, a unit which was part of the New Zealand Mounted Rifles Brigade, wrote an account of this unit called The Story of Two Campains”  Official war history of the Auckland Mounted Rifles Regiment, 1914 - 1919 in the Battlefields  of Gallipoli, Sinai and Palestine during WWI, in which included a section specifically related to the battle of Beersheba and is extracted below. A copy of this book is available on the New Zealand Mounted Rifles Association website.

Nicol, CG, The story of two campaigns : official war history of the Auckland Mounted Rifles Regiment, 1914-1919, (Auckland 1921).


CHAPTER XXV.

Tel El Saba.


About October 20, General Allenby began to make his concentrations for his attack against the Gaza-Beersheba  line. The New Zealanders formed part of the Desert Mounted Corps concentrating about Khalasa and Asluj, from 15 to  20 miles south of Beersheba.

  At 5 p.m. on the evening of October 25, the brigade started for Esani, 15 miles to the south-east, and after a cold  ride reached their destination at 1 a.m. In this locality was seen a new ration dump, which was being built up by night by  steam tractors. A few nights later the brigade moved to Khalasa, 10 miles further south, and the next night continued on  another 15 miles to Asluj, due south of Beersheba. No fires were allowed this night, and water and bully beef formed the  supper. At 6 p.m. the following evening, the brigade started on the trek north to the attack on Beersheba from the east.

The route for the first 10 miles followed a splendid metalled road, over which the guns and wheeled transport held  exclusive rights, the column being a triple one. The road was left when the Wadi Imshash was reached, the column then  moving almost due east along the bank of the wadi for another 10 miles, when it turned due north along a winding track.

At 2 a.m. a halt was made while the W.M.R. went forward to surround a post at Goz El Shegeib, where a body of enemy  cavalry was suspected to be. The post was found clear of the enemy, and the march was resumed at 3 a.m. At dawn the  brigade was three or four miles south of the Beersheba-Bir Arara Road, to the south-east of Tel El Saba, a strongly held  peak over 1,000 feet high, which dominated the eastern approach to Beersheba. At 8.30 the road line was reached, the  A.M.R. then being in reserve. At 9 o’clock the A.M.R., with the Somerset Battery attached, received orders to advance on  Saba, the C.M.R. being on their right and the 3rd Light Horse on their left. The advance was started immediately, the 11th  squadron, under Major Whitehorn, forming the advanced guard. The advance followed the line of a wadi, which offered  good cover, and in which pools of water were found for the thirsty horses. The discovery of this water was of great  importance. Leaving the wadi the 11th squadron came under long-range machine-gun fire from Saba. The ground  traversed was flat and open, but it was intersected with many watercourses, which gave good cover.

At 1,800 yards from the enemy position the 11th squadron dismounted, and continued to advance on foot; the other  two squadrons (the 3rd being under Captain Asliton and the 4th under Major Munro) rode on under cover of the north  bank of the wadi to a point 800 yards from the objective. From this point the 3rd and 4th squadrons moved on foot into  position on the left front of the 11th. The advances were made a troop at a time, the machine-guns being pushed on to  give covering fire. The 3rd Light Horse regiment came into action on the south side of the wadi, and brought covering fire  to bear on the position. The Somerset Battery gave considerable assistance with a well directed fire against machinegun  positions, the exact locations of which were communicated from the attacking line. It was the first time the experiment  of putting a battery under the commander of an attacking line was tried, and it proved highly successful. The  battery commander received his orders direct from the regimental commander, who was never far from the firing line,  and always in a position to see the effect of the covering shells. Thus no time was lost in correcting the range of the guns,  a signaller with flags passing on the messages given to him orally by the Auckland colonel. It was only a matter of  minutes before several changes in the range were flagged back, and the shells were bursting right over the machine-gun  emplacements of the enemy. “That’s the stuff to give ‘em,” ejaculated Lieutenant-Colonel McCarroll as he saw the  goodly sight.

Immediately this remark was sent back as a message by Lieutenant Hatrick, who doubtless had his tongue in his  cheek as he did so. After the fight the battery commander, an Imperial officer, inquired who sent this message. “I could  not find it in my book of signals,” he said, “but I would like to say that we understood it perfectly, don’t you know. It was —  eh——rather novel for the service. What! It is to be preserved in the record of the battery as a memory of you fellows.”  At 2 p.m., when the Regiment was in line, orders were issued for a general attack ten minutes later. Promptly to the  second the line moved forward in short rushes, the covering fire of our artillery and machine-guns being excellent. At  2.40 a hill 400 yards east of Saba was rushed, and 60 prisoners were taken, and also three machine-guns, which were  immediately turned against Saba with splendid effect. After a short “breather” the Regiment moved on against Saba.

Steadily the line moved on, the old indomitable spirit sending joy to the heart of the colonel, who knew that nothing could  stop that line of bayonets. At the exact moment the Regiment rose for the charge, but already the hill was won, the  garrison retiring precipitately. A total of 122 unwounded and 10 wounded prisoners were taken by the Regiment, besides  four machine-guns and a large amount of war material.

The A.M.R. suffered practically the whole of the brigade’s casualties, having held the post of honour. It lost six killed,  including Captain S. C. Ashton, and 22 wounded, including Lieutenant W. H. John, a Main Body man, who had been  promoted from the ranks. His injuries proved fatal. Captain G. S. Cheéseman assumed command of the 3rd squadron  upon the death of Captain Asliton.

How the tide of battle rolled on, crumpling the Turkish left, and within a few days carrying the whole of the line from  Gaza to Beersheba, has been related in other histories. During these wonderfully successful operations the New  Zealanders were used in pressing the left flank of the enemy. After spending a night and day in consolidating the Saba  position, which was shelled and bombed from the air, the A.M.R. sent for-ward the 3rd and 11th squadrons to take a turn  of duty on the outpost line. The water trouble now began to reach the severe stage. So far the horses had been watered  in surface pools in the Wadi Saba, but this supply soon gave out. The men had by now consumed their iron rations, but  their greatest concern was for their horses, which had carried them so far and endured so nobly. On November 2, the  W.M.R. and the C.M.R., which had been engaged with a force of 400 cavalry to the north-west of Kh El Ras, and the 4th  squadron of the A.M.R., moved to fir Imshash and took up an outpost line facing east and covering the wells in that  locality, the other two squadrons of the A.M.R. arriving that evening. In this area some dozen wells were located, but they  contained only a few inches of muddy water, and this had to be drawn up in buckets, which were filled by men who  descended. It can be readily imagined how slow a process this method of watering was, but when everything possible  had been done the thirst of the poor animals was only stimulated.

During the next few days the Regiment, when not out on the outpost line, was ranging the countryside in search for  a little water. On the 4th, the brigade was rushed to the Wadi El Sultan to support yeomanry who had come into action.

This day neither the men nor the horses had any water. The following day the C.M.R. and the Waikatos pushed forward  their line some 800 yards, and were heavily shelled. A counter-attack was attempted against the left of the C.M.R., and  the 3rd squadron of the A.M.R. was ordered to support, but the attack was repulsed. During the day, water for the men  was brought up on pack horses, but there was none for the horses, which by midnight had been without a drink for 48  hours. The “Camels” were due to relieve the mounted rifles, but as they did not materialise, it was decided to lead the  horses to Beersheba, 14 miles distant, to get a drink. This day the Regiment lost one man killed and four wounded, but  the C.M.R. suffered heavily.

On the morning of November 6, the Camel Brigade arrived, and the sorely tried New Zealanders moved back on  foot to Mikreh, a distance of five miles. The Camel Brigade did not have too much water for themselves, but the New  Zealanders were in such dire straits that they gave them 150 gallons. This worked out at half-a-pint per man. Everyone  was tempted to gulp the water, but most took only a sip, and boiled the rest for tea. The state of fatigue of most of the men  after this rigorous week of trekking and fighting, revived memories of the Gallipoli August. That night the led horses  arrived back from Beersheba, and the Hotchkiss gun pack horses, which by this time had not had a drink for 72 hours,  had to start on the 10 miles journey to Beersheba to be watered. Truly the horses of the mounted rifles “ did their bit “  towards the defeat of the Turks. On the 7th, 8th, and 9th the Regiment had to send the horses to water at Beersheba,  and it says a good deal for their stamina that only 50 had to go to hospital.

On the 10th, the W.M.R. and the C.M.R. moved back to Beersheba, but the A.M.R. had to remain for another day on  the outpost line, watering horses with the greatest difficulty at Mak-runeh. On the morning of the 11th, the Westminster Dragoons arrived at the inevitable trot, to relieve the A.M.R., and never were the Dragoons more popular.


Further Reading:

Auckland Mounted Rifles Regiment

Auckland Mounted Rifles Regiment, Roll of Honour

The Battle of Beersheba, Palestine, 31 October 1917

Battles where Australians fought, 1899-1920


Citation: The Battle of Beersheba, Palestine, 31 October 1917, AMR Unit History Account

Posted by Project Leader at 10:05 AM EADT
Updated: Saturday, 3 October 2009 11:19 AM EADT

Newer | Latest | Older

Full Site Index


powered by FreeFind
Let us hear your story: You can tell your story, make a comment or ask for help on our forum.

Desert Column Forum

A note on copyright

The Australian Light Horse Studies Centre is a not for profit and non profit group whose sole aim is to write the early history of the Australian Light Horse from 1900 - 1920. It is privately funded and the information is provided by the individuals within the group and while permission for the use of the material has been given for this site for these items by various donors, the residual and actual copyright for these items, should there be any, resides exclusively with the donors. The information on this site is freely available for private research use only and if used as such, should be appropriately acknowledged. To assist in this process, each item has a citation attached at the bottom for referencing purposes.

Please Note: No express or implied permission is given for commercial use of the information contained within this site.

A note to copyright holders

The Australian Light Horse Studies Centre has made every endeavour to contact copyright holders of material digitised for this blog and website and where appropriate, permission is still being sought for these items. Where replies were not received, or where the copyright owner has not been able to be traced, or where the permission is still being sought, the Australian Light Horse Studies Centre has decided, in good faith, to proceed with digitisation and publication. Australian Light Horse Studies Centre would be happy to hear from copyright owners at any time to discuss usage of this item.

Contact

Australian Light Horse Studies Centre

eXTReMe Tracker