"At a mile distant their thousand hooves were stuttering thunder, coming at a rate that frightened a man - they were an awe inspiring sight, galloping through the red haze - knee to knee and horse to horse - the dying sun glinting on bayonet points..." Trooper Ion Idriess
The Australian Light Horse Studies Centre aims to present an accurate history as chroniclers of early Australian military developments from 1899 to 1920.
The Australian Light Horse Studies Centre site holds over 12,000 entries and is growing daily.
Contact:Australian Light Horse Studies CentreLet us hear your story:
You can tell your story, make a comment or ask for help on our Australian Light Horse Studies Centre Forum called:
WARNING: This site contains: names, information and images of deceased people; and, language which may be considered inappropriate today.
Saturday, 21 February 2009
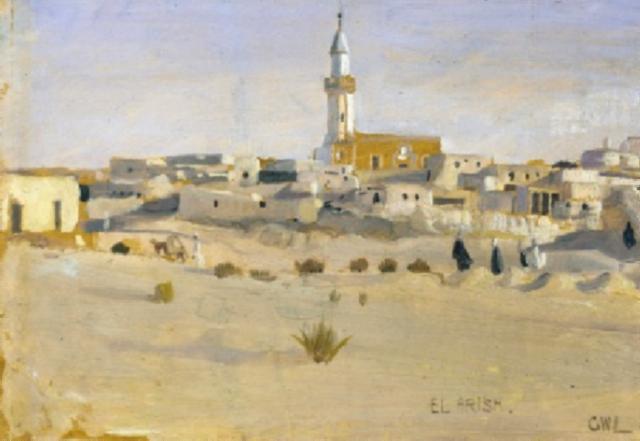
El Arish, Sinai, December 20, 1916 Topic: BatzS - El Arish
El Arish
Sinai, 20 December 1916
El Arish, a painting by George Lambert.
At dawn on 20 December 1916, the 1st Brigade of the ANZAC Mounted Division (less the 2nd Brigade) reached the Mediterranean coast on the far side of El Arish and suddenly the horses stepped off the sand onto the wide, firm flat that flanks the great Wadi (streambed) El Arish. They started prancing and Brigadier General 'Fighting Charlie' Cox called a halt just to watch them. That night,' Cox said, 'will always seem to me the most wonderful of the whole campaign. The hard going for the horses seemed almost miraculous after the months of sand; and, as their shoes struck fire on the stones in the bed of the wadi, the men laughed with delight.
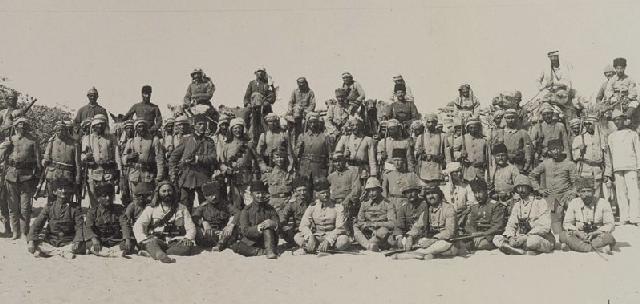
Kress and his officers at El Arish.
Sinai was behind them. It was a perfect dawn arrival: the 1st Brigade to the east with its flank on the silver sea, the Camel Brigade to the south, the New Zealanders to the south-west and the 3rd Brigade at Masaid, a Turkish post five miles west. Each brigade was on time, none more than 200 yards out of position and they didn't have to fire a shot. The substantial Turkish army of occupation that had held the place for over two years had gone.
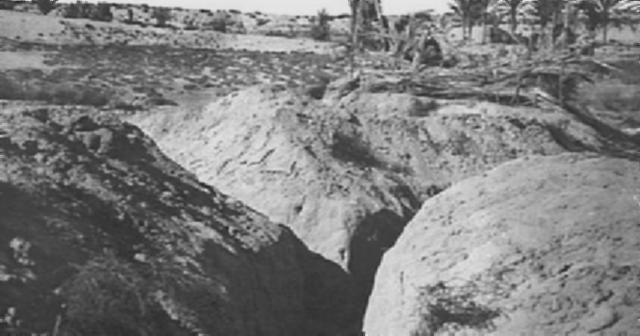
Abandoned Turkish trenches at El Arish.
The dramatic appearance at dawn of this ring of tough-looking foreign horsemen right round the town sparked wild excitement and apparent demonstrations of delight, from the Arab villagers, whatever their true loyalties or feelings. Bearded elders in many-coloured, flowing dresses crowded round the grinning Anzacs, grasping their stirrups and kissing their boots, while women and children swarmed around them, shouting. The chief sheikh formally surrendered the town and handed over one hapless Turk and some alleged Turkish spies.
The troopers wandered down the evil-smelling alleyways between the squalid mud huts. After the great region of nothing, the village was at least a place of human habitation and there were some mosques and minarets. Besides the familiar dale palm oases, they came upon planted crops and fields of melons, vegetables, and an orange grove. Fig trees! This was more like it.
The Anzacs camped in the wadi bed and set up a series of strong outposts. They were on Turkish territory now, invaders not defenders, and could be attacked - and so to keep the enemy off balance, should strike first. And how much more effective they would be on firm ground, with good water and better feed for horse and man.
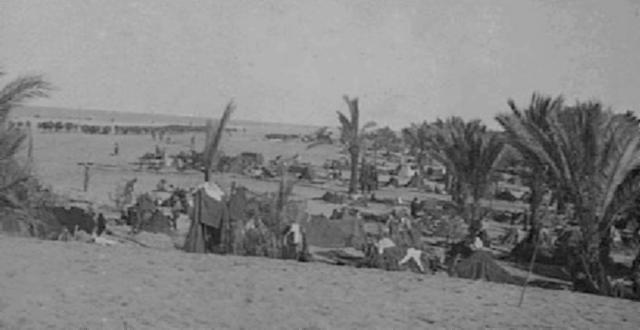
Light Horsemen bivouacked by Hod Masaid near the sea at El Arish, December 1916.
Extracted from the book produced by Lindsay Baly, Horseman, Pass By, East Roseville, N.S.W. : Simon & Schuster, 2003, Ch. 7.
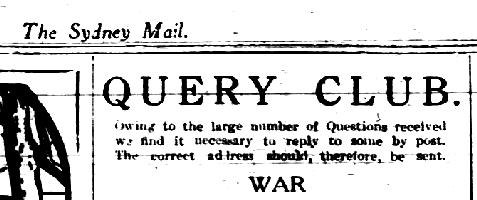
Query Club, 2 February 1916 Topic: Gen - Query Club
The Query Club
2 February 1916
The large scale of the Great War often gave people a sense of alienation from the activities of the government and the army. To overcome this, newspapers of the day commenced columns called Query Club or similar names, where ordinary people could clarify their understanding of the complex processes. They also provide us, the historians, an insight into witnessing first hand, the responses of the various bodies to public concerns. The end product is a window into a society now almost out of living memory.
This is the Query Club from the Sydney Mail, 2 February 1916, p. 31.
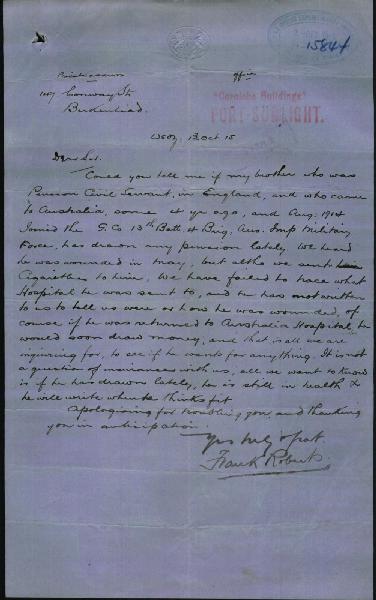
Frank Roberts letter to the Army, 13 October 1915.
[Click on picture for larger version.]
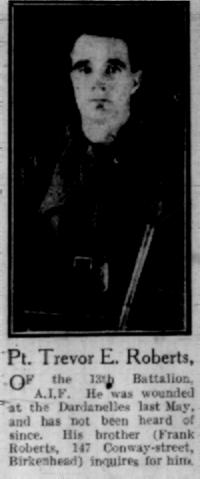
PTE TREVOR E. ROBERTS
Of the 13th Battalion, AIF. He was wounded at the Dardanelles last May, and has not been heard of since. His brother (Frank Roberts, 147 Conway Street, Birkenhead) inquires for him.
[The person referred to here was 774 Private Trevor Evans Roberts, 13th Battalion, G Company. Later transferred to D Company, XIV Platoon, 13th Section. On the night of 2 May 1915, the Company assaulted "Dead Man's Ridge" at Gallipoli. He was wounded during the assault but he was not recovered along with a further 100 men who were left in no man's land. on 28 April 1915 determined by a Court of Enquiry to have been killed in action, 3 May 1915.]
LOST WARSHIPS
E.V.N.
No complete list of warships lost by the different Powers has ever been published officially. The censor will not permit us to give the details regarding Great Britain. Most of the losses are admitted; there are others regarding which there is a good deal of mystery. A few weeks ago we published a full page illustrating Germany's admitted losses.
PHYSICALLY UNFIT "RW"
No badges are issued to men who have offered themselves as recruits and have been rejected by the medical officers. Certificates are obtainable, however, they should be applied for at the barracks.
UNDER AGE
"Paroo" asks if boys of 17 years and 9 months can enlist in the A.I.Forces and do three months' training until they are 18.
No; 18 is the minimum age at which recruits are accepted, and even then it is necessary to have the consent of their parents.
SEPARATION ALLOWANCE
"Mac"
The separation allowance for a married man ceases on his embarkation; instead, three-fifths of his pay is reserved for his wife.
COMMANDS
"G.S."
There have been so many changes in commands, and probably will be others before our troops again go into action, that we cannot give you the particulars you desire at present.
NOT DISCHARGED
"H.H."
A soldier who has been sent home on sick leave and has not got his discharge must report himself to the authorities when asked to do so. If he recovers sufficiently to be again fit for active service he has no option but to return to the front when ordered to do so.
Bert Schramm's Diary, 21 February 1919 Topic: Diary - Schramm
Diaries of AIF Servicemen
Bert Schramm
During part of the course of his military service with the AIF, 2823 Private Herbert Leslie Schramm, a farmer from White's River, near Tumby Bay on the Eyre Peninsular, kept a diary of his life. Bert was not a man of letters so this diary was produced with great effort on his behalf. Bert made a promise to his sweetheart, Lucy Solley, that he would do so after he received the blank pocket notebook wherein these entries are found. As a Brigade Scout since September 1918, he took a lead part in the September 1918 breakout by the Allied forces in Palestine. Bert's diary entries are placed alongside those of the 9th Light Horse Regiment to which he belonged and to the 3rd Light Horse Brigade to which the 9th LHR was attached. On this basis we can follow Bert in the context of his formation.
Bert Schramm's Diary, 21 February 1919
Bert Schramm's Handwritten Diary, 18 - 21 February 1919
[Click on page for a larger print version.]
Diaries
Bert Schramm
Friday, February 21, 1919
Bert Schramm's Location - Tripoli, Lebanon.
Bert Schramm's Diary - The Eighth Regiment embarked today and the Ninth are to embark tomorrow for Kantara. We handed our horses over today. I was sorry to lose my pony but everyone else was the same.
9th Light Horse Regiment War Diary
9th Light Horse Regiment Location - El Mina, Lebanon.
The Regiment handed over all horses to 5th Cavalry Division, 10th Light Horse Regiment and 3rd Machine Gun Squadron.
All tents taken down and heavy baggage transported by camels and wagons to embarkation pier El Mina. All ranks had to work at top speed to get the work completed in daylight. Orders received that the Regiment would embark 0830, 22nd February 1919.
Darley
Darley, TH, With the Ninth Light Horse in the Great War, Adelaide, Hassell Press, 1924.
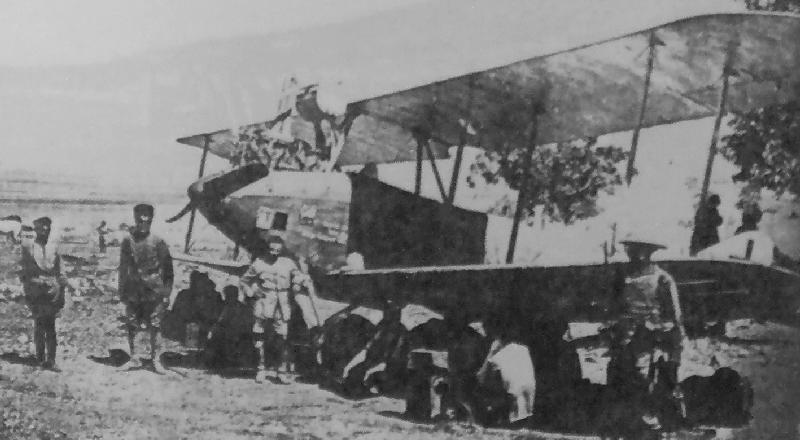
Pasha and Yildirim, the Palestine Front, 1915 to 1918
A DFW D.V of FA304(b) at Afuleh, September 1918
[From: Ole Nikolajsen, Ottoman Aviation 1911 - 1919, p. 210.]
Part 8 - The Final Destruction
The preparations for the final British breakthrough of the Turkish fronts in Palestine began with Arab attacks on the railway junction at Dera on 15 September 1918. This was a move to make the defenders believe that the main attack would come upon the widely dispersed 4th Army.
In order to secure the lines of supply and retreat for the whole front, on 16 September, 8 aircraft from Jenin were flown to Dera. This was a fortunate move as Jenin was attacked by two waves of enemy aircraft in the same afternoon. Two new aircraft however which just had arrived from Rayak were destroyed. During the whole day of 18 September, large formations of RAF aircraft prevented any German reconnaissance flights from being made. In the night, a Handley Page bomber dropped 2 tonnes of bombs on the Afuleh Junction, completely wrecking the important telephone and telegraph stations as well as the railway station and airfield. The Headquarters at Nazareth was thereby cut off from the front. The attack on the 4th Army was a feint and in the morning of 19 September, 3 cavalry divisions assisted by armoured cars first cut through the 8th Army, which was down to 8,000 fighting men and so hardly an army, in the coastal area and then swung towards Nablus in the south and Nazareth to the north.
Map of air activities covered by this extract
[From: Ole Nikolajsen, Ottoman Aviation 1911 - 1919, p. 194.]
[Click on map for larger version.]
The airfield at Afuleh was overrun and the personnel and 4 unserviceable aircraft of FA304(b) were captured together with the Commanding Officer Major Walz. The Major was particularly unfortunate in that he had just landed after a reconnaissance mission in an Albatros fighter. Almost at the same time, at Jenin, most of the personnel of FA301, under command of Captain Bieneck, was captured, together with 11 wrecked aircraft, 3 reconnaissance and 8 fighters of JASTA1. A major part of the personnel of FA303 and JASTA 1 had deployed to Dera on 15 September, but the ground crew under command of the Commanding Officer Capt. Steiner escaped north. FA302 under command of Captain König at Waldheim received sufficient warning to escape north along the coast in their Lorries. The two serviceable aircraft of the unit were both flown to Dera.
Already the next day, 20 September, the 8th Army had been [195] completely overrun. In order to avoid encirclement, on 21 September, the 7th Army began a withdrawal north in good order. Such was the power of the RAF squadrons that they were able to catch this army in Wadi el Fara and bomb and machine-gun almost all of its 10,000 men into destruction.
Meanwhile the remnants of the Pasha units in the 4th Army area had been taken under command of Captain Elias and operated as a single unit. At Dera, with 10 barely operational aircraft, it managed to keep Arab forces far enough away from the station and the railway line to save a large part of the fleeing troops, who were sent by train to Damascus. On 21 September, 2 DFW's were shot down, whereas 2 Pfalz fighters were forced to surrender when they ran out of ammunition. The next day one more DFW and one Pfalz were lost.
Most of the personnel of the Turkish units, 3ncü and 4ncü Tayyare Bölük were killed or captured when their evacuation train from Amman was attacked at Mafraq on 21 September and still more personnel of both 14ncü Tayyare Bölük and the German units were captured in a train outside Damascus on 30 September. Major Beltz, the KOFL, was taken prisoner after a forced landing outside Damascus.
Map of air activities covered by this extract
[From: Ole Nikolajsen, Ottoman Aviation 1911 - 1919, p. 196.]
[Click on map for larger version.]
A quick reorganization was affected at the Rayak Aircraft Park on 30 September and, despite the fact that many aircraft were serviceable, only 15 could be flown north to Homs due to shortage of aircrew. One AEG, 1 LVG and 4 DFW's being flyable were destroyed in addition to a score of aircraft in more or less derelict condition. Two DFW's were sent north to Iskenderun (Alexandretta) to cover the sea-flank against attacks and two reconnaissance flights were made over Cyprus. During the withdrawal two aircraft were lost between the 1st and 5th of October on flights from Homs. Between the 6th and 23rd October, another three were lost while operating from a field north of Aleppo near the railway junction at Mouslimiye.
At this time the front froze after newly formed Turkish units dug in near Islahiye where the terrain prevented the British from using their greater mobility. The Commander of this new front was Mustafa Kemal Pasha. When operating from a field near Islahiye between the 23rd and the armistice on the 30th, further two aircraft were destroyed by British bombing attacks and three in landing accidents on the rather unsuitable field.
Before this on the 12th of October a small force of Turkish mechanics had been ordered to the depot at Konya Aircraft Station in the middle of Anatolia to prepare aircraft for the front. Only 2 Albatros C.III's and 4 AEG C.IV's were found and prepared for flight but no pilots were at the station.
When the German Asian Corps under Command of General Liman von Sanders surrendered on 2 November at Adana only 600 aviation personnel including 20 officers were present out of an original force of 190 pilots and observers and 1400 other personnel which had been sent to Palestine since September 1917. Of the 155 aircraft delivered 3 were handed over to the 7 surviving Turkish pilots and observers and 8 mechanics the day before. They managed to escape to Konya and later formed the nucleus of the new air force of the independence forces in 1919.
Source: The above extract is obtained from a self published work by Ole Nikolajsen called Ottoman Aviation 1911 - 1919. The Final Destruction comes from Chapter 8, Pasha and Yildirim, the Palestine Front, 1915 to 1918, pp. 195-8. The text has been edited to remove errors and make it readable for an English speaking audience.
El Mazar, Sinai, September 17, 1916 Topic: BatzS - El Mazar
El Mazar
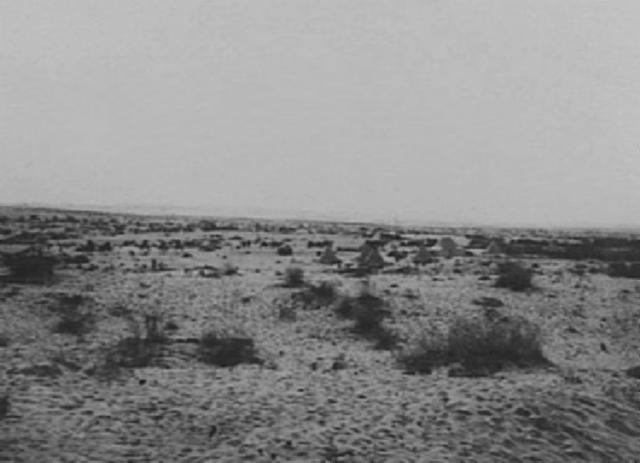
Sinai, 17 September 1916
Bir el Mazar looking towards the Mazar Hills in the distance.
There was a Turkish garrison at Bir el Mazar, only twenty miles short of El Arish on the direct track, believed to be 2200 strong and made up of Romani survivors. It was decided to mount an attack on this on 17 September, but there was no water supply for horses between Mazar and Salmana and it was necessary to improvise one to avoid a dry round trip of 37 miles. The mid-September weather was still hot.
Seven hundred camels no less, each carrying a twenty-gallon fantass of water, were to rendezvous with Chauvel's troops ten miles east of Salmana on their return journey. This was only one oddity in this untypical and, in the end, controversial operation.
On 15 September, Chauvel's three Australian brigades marched to Salmana. They were sighted there on the 16th and machine-gunned by a German aircraft which no doubt informed the garrison at Mazar of its discovery. After dark, the 2nd Brigade, now once more under Brigadier General Ryrie and the 3rd Brigade under Royston, marched on Mazar while the 1st Brigade followed about seven miles in rear.
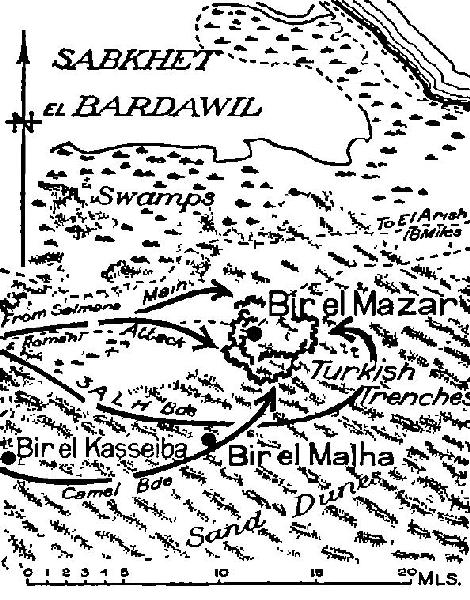
The attack on Bir el Mazar.
[From: Gullett, The Australian Imperial Force in Sinai and Palestine.]
At dawn, Ryrie's 5th and 7th Regiments dismounted and advanced to within 700 yards north and west of the Turkish trenches. There was stiff resistance from enemy mountain batteries and rifles. The 3rd Brigade swept right round the position and began attacking it from the south and east so that the Turks were virtually defending on all sides, A battalion of the Imperial Camel Corps should have attacked with them, but was late due to a difficult passage through single-file gullies and soft sand.
That was the situation soon after daylight, according to Gullett's Official History. Despite the absence of the camels, all ranks were confident of carrying the position. They had carried harder ones. From this point, however, differences in reported events and perceptions appear in Gullett's account and Colonel Richardson's history of the 7th Regiment.
Richardson said the regiment was checked close to the Mazar ruins where the enemy was strongly entrenched in commanding positions, but it seemed possible to assault the place and preparations were in progress, Then the 7th received a message that the 3rd Brigade had been held up and was withdrawing. 'Some of their troops crossed our frontage and being in close formation, received concentrated fire from the enemy and sustained a number of casualties. Our field guns had opened fire, but although the enemy were firing in plain view from our position, and messages were sent to that effect, no attempt was made to shell them.'
Gullett said that the Anzacs' field guns had not up to this time come into action, but Richardson said he saw them firing. According to Gullett, Royston had advised Chauvel of his 'unfavourable view of the project' and after the 3rd Brigade had been held up for 'nearly three hours', at 7 am Chauvel decided to break off the engagement. But Richardson sounds as it the 3rd Brigades withdrawal was a surprise to him: he was not preparing to leave, but was preparing to assault the enemy. This begs the question of whether the 7th got the message to break off at the same time.
When the order did come, the 7th could not leave the front line until they got a man, badly wounded in the abdomen, away in a sand cart. In the rescue three more men were wounded and 'our casualties for this ineffective little action were 1 killed 5 wounded: and two men subsequently died of wounds'. Richardson was not happy. 'As no bivouac had been indicated, it was presumed that Ge’eila would be the place, but we arrived there only to find it deserted. Much trouble was experienced watering the horses from buckets and at 8 p.m., it was decided to return to Salmana.' He concludes:
The Mazar stunt was most strenuous and tested the endurance of men whose vitality had been greatly decreased by the fighting, fatigue and heat of the last few months'. One suspects he wanted to add, 'for nothing'.
Gullett acknowledges the engagement was always afterwards referred to in terms of strong disapproval by regimental officers who participated. Not only officers. Idriess says:
'We retired at midday furious about it all, certain that a determined gallop would have ridden down the redoubts ... We swore at the Heads, whomever they might be. With this little lot, we should have eaten Mazar.'
It seems that different beholders, Rashomon-like, interpreted the same things in different ways, and as a whole the abortive battle could be seen in two ways. Either as an unimportant sideshow, not worth the sacrifice of any more lives, or, however it was, the Light Horse should not have been committed if it was not intended to win. The withdrawal diminished their proud service.
Chauvel has absolute right to the last word. He had categorical orders from General Lawrence that if 'the garrison was not taken by surprise and overrun in the first rush, he was to consider the operation a reconnaissance in force and withdraw'. On no account was he to seriously involve his brigades. When 'Galloping Jack' Royston, the last man in the army to vacillate before unfavourable odds, took a poor view of his chances after being held up for three hours, Chauvel’s duty was clear to him. He would doubtless also have been influenced by the wretched prospects for his wounded, so far from aid, should the engagement prove expensive. He acted, and a commander in battle does not argue his case.
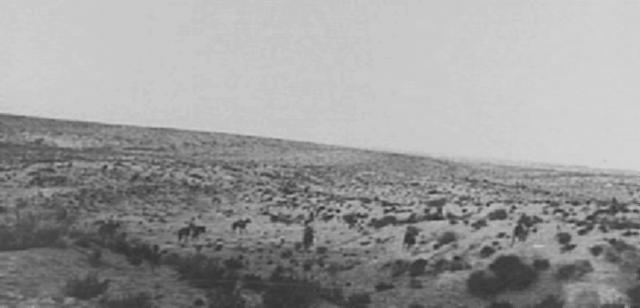
Returning from Mazar riding in Artillery Formation.
But there could be no equivocation over the scheme for watering the horses. It was a shambles.
That the 700 camels were in place and on time says something for the project, but the watering of 3000 desperate horses calls for expert handling, experience and skill. The Light Horse had their own methods and equipment, in which long canvas troughs were instrumental, but the supply camels carried only buckets. At one or two horses per bucket, it seems an entangling, burdensome method, even with quiet and biddable animals. Idriess described it:
By Jove. I was thirsty. The heat of the sand rose up to a man's face.
After another nine miles, we were surprised to see a long convoy of camels coming towards us between the hills. I don't know whether the horses sighted the fantasses or smelt the water in them but a faint ripple of neighing, seldom heard now, broke out down the column. Horses threw up their heads, open-mouthed, sniffing eagerly...
We met the convoy - the horses went mad - they rushed it - at sight of the water we could not hold them - they swarmed like mad things, pawing, panting, jostling, straining. Two of us held back the sections horses while the other two vied around the fantasses for water, but immediately we got our buckets full, all horses rushed us. A dozen gasping mouths into one bucket, struggling animals, shouting men, rattling of stirrup irons, pressure of horses' bodies, spilled water - open-mouthed men trying to catch the splashes - plunging circle after circle around each fantass, horse holders with straining arms finally dragged over the sand ... the horses struggled to lick wet sand, frantic-eyed, swollen-tongued.
There was not sufficient water - not even a squadron in our regiments got a drink! And the regiments coming behind - there had been other regiments in front.
The regiment pushed on rapidly and ... passed all the Camel Corps making for water, water, water! How my bones ached! I thanked Christ when the sun went down. Eventually, we saw lights among the black palms of Salmana. The horses were frantic - they couldn't go faster than they did. Within the oasis, spelling troops had filled the water troughs - the horses rushed these troughs, their heads in rows went down, stayed down. We could not drag them away. They felt like the weight of elephants. The water was brackish, too.
Two days later, the Turks abandoned Mazar. Some strange imperative caused them to throw away the fruits of victory: this was the third time.
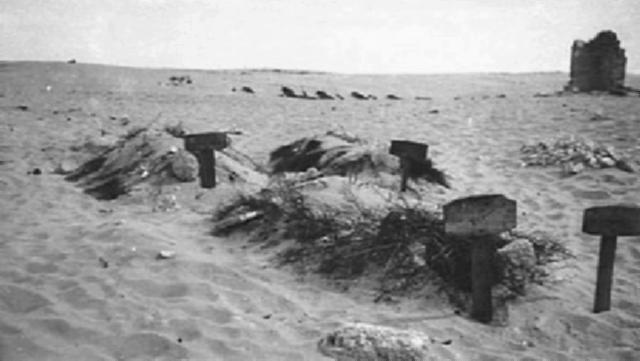
Ottoman military cemetery at Mazar.
Extracted from the book produced by Lindsay Baly, Horseman, Pass By, East Roseville, N.S.W. : Simon & Schuster, 2003, Ch. 6.
The Australian Light Horse Studies Centre is a not for profit and non profit group whose sole aim is to write the early history of the Australian Light Horse from 1900
- 1920. It is privately funded and the information is provided by the individuals within the group and while permission for the use of the material has been given for this
site for these items by various donors, the residual and actual copyright for these items, should there be any, resides exclusively with the donors. The information on
this site is freely available for private research use only and if used as such, should be appropriately acknowledged. To assist in this process, each item has a citation
attached at the bottom for referencing purposes.
Please Note: No express or implied permission is given for commercial use of the information contained within this site.
A note to copyright holders
The Australian Light Horse Studies Centre has made every endeavour to contact copyright holders of material digitised for this blog and website and where
appropriate, permission is still being sought for these items. Where replies were not received, or where the copyright owner has not been able to be traced, or where
the permission is still being sought, the Australian Light Horse Studies Centre has decided, in good faith, to proceed with digitisation and publication. Australian Light
Horse Studies Centre would be happy to hear from copyright owners at any time to discuss usage of this item.