« June 2009 »
S M T W T F S
1 2 3 4 5 6
7 8 9 10 11 12 13
14 15 16 17 18 19 20
21 22 23 24 25 26 27
28 29 30
You are not logged in. Log in


Search the site:


powered by FreeFind
Volunteer with us.

Entries by Topic All topics  
A Latest Site News
A - Using the Site
AAA Volunteers
AAB-Education Centre
AAC-Film Clips
AAC-Photo Albums
AIF & MEF & EEF
AIF - Lighthorse
AIF - ALH - A to Z
AIF - DMC
AIF - DMC - Or Bat
AIF - DMC - Anzac MD
AIF - DMC - Aus MD
AIF - DMC - British
AIF - DMC - BWI
AIF - DMC - French
AIF - DMC - Indian
AIF - DMC - Italian
AIF - DMC - Medical
AIF - DMC - Remounts
AIF - DMC - Scouts
AIF - DMC - Sigs
AIF - DMC - Sigs AirlnS
AIF - DMC - 1 Sig Sqn
AIF - DMC - 2 Sig Sqn
AIF - DMC - Eng
AIF - DMC - Eng 1FSE
AIF - DMC - Eng 2FSE
AIF - DMC - GSR
AIF - 1B - 1 LHB
AIF - 1B - 6 MVS
AIF - 1B - 1 LHMGS
AIF - 1B - 1 Sig Trp
AIF - 1B - 1 LHFA
AIF - 1B - 1 LHR
AIF - 1B - 2 LHR
AIF - 1B - 3 LHR
AIF - 2B - 2 LHB
AIF - 2B - 7 MVS
AIF - 2B - 2 LHFA
AIF - 2B - 2 LHMGS
AIF - 2B - 2 Sig Trp
AIF - 2B - 5 LHR
AIF - 2B - 6 LHR
AIF - 2B - 7 LHR
AIF - 3B - 3 LHB
AIF - 3B - 8 MVS
AIF - 3B - 3 LHB Sigs
AIF - 3B - 3 LHFA
AIF - 3B - 3 LHMGS
AIF - 3B - 3 Sig Trp
AIF - 3B - 8 LHR
AIF - 3B - 9 LHR
AIF - 3B - 10 LHR
AIF - 4B - 4 LHB
AIF - 4B - 4 Sig Trp
AIF - 4B - 9 MVS
AIF - 4B - 4 LHFA
AIF - 4B - 4 LHMGS
AIF - 4B - 4 LHR
AIF - 4B - 11 LHR
AIF - 4B - 12 LHR
AIF - 5B - 5 LHB
AIF - 5B - 10 MVS
AIF - 5B - 5 LHFA
AIF - 5B - 5 Sig Trp
AIF - 5B - ICC
AIF - 5B - 14 LHR
AIF - 5B - 15 LHR
AIF - 5B - 1er Regt
AIF - 5B - 2 NZMGS
AIF - AASC
AIF - Aboriginal LH
AIF - Badges
AIF - Cars
AIF - Chinese LH
AIF - Double Sqns
AIF - Engineers
AIF - Fr - 22 Corps
AIF - Fr - 13 LHR
AIF - Honour Roll
AIF - HQ - 3rd Echelon
AIF - Marching Songs
AIF - Misc Topics
AIF - NZMRB
AIF - NZMRB - AMR
AIF - NZMRB - CMR
AIF - NZMRB - EFT
AIF - NZMRB - NZMFA
AIF - NZMRB - NZMGS
AIF - NZMRB - OMR
AIF - NZMRB - Sig-Trp
AIF - NZMRB - WMR
AIF - Ships
AIF - Ships - Encountr
AIF - Ships - Una
AIF - WFF
AIF - Wireless Sqn
Battles
BatzA - Australia
BatzA - Broken Hill
BatzA - Liverpool
BatzA - Merivale
BatzB - Boer War
BatzB - Bakenlaagte
BatzB - Belmont
BatzB - Bothaville
BatzB - Buffels Hoek
BatzB - Coetzees Drift
BatzB - Diamond Hill
BatzB - Driefontein
BatzB - Elands
BatzB - Graspan
BatzB - Grobelaar
BatzB - Grootvallier
BatzB - Hartebestfontn
BatzB - Houtnek
BatzB - Karee Siding
BatzB - Kimberley
BatzB - Koster River
BatzB - Leeuw Kop
BatzB - Mafeking
BatzB - Magersfontein
BatzB - Modder River
BatzB - Onverwacht
BatzB - Paardeberg
BatzB - Palmietfontein
BatzB - Pink Hill
BatzB - Poplar Grove
BatzB - Rhenoster
BatzB - Sannahs Post
BatzB - Slingersfontn
BatzB - Stinkhoutbm
BatzB - Sunnyside
BatzB - Wilmansrust
BatzB - Wolvekuil
BatzB - Zand River
BatzG - Gallipoli
BatzG - Anzac
BatzG - Aug 1915
BatzG - Baby 700
BatzG - Evacuation
BatzG - Hill 60
BatzG - Hill 971
BatzG - Krithia
BatzG - Lone Pine
BatzG - Nek
BatzJ - Jordan Valley
BatzJ - 1st Amman
BatzJ - 2nd Amman
BatzJ - Abu Tellul
BatzJ - Es Salt
BatzJ - JV Maps
BatzJ - Ziza
BatzM - Mespot
BatzM - Baghdad
BatzM - Ctesiphon
BatzM - Daur
BatzM - Kurna
BatzM - Kut el Amara
BatzM - Ramadi
BatzN - Naval
BatzN - AE1
BatzN - Cocos Is
BatzN - Heligoland
BatzN - Marmara
BatzN - Zeebrugge
BatzN - Zeppelin L43
BatzNG - Bitapaka
BatzO - Other
BatzO - Baku
BatzO - Egypt 1919
BatzO - Emptsa
BatzO - Karawaran
BatzO - Peitang
BatzO - Wassa
BatzP - Palestine
BatzP - 1st Gaza
BatzP - 2nd Gaza
BatzP - 3rd Gaza
BatzP - Aleppo
BatzP - Amwas
BatzP - Ayun Kara
BatzP - Bald Hill
BatzP - Balin
BatzP - Beersheba
BatzP - Berkusieh
BatzP - Damascus
BatzP - El Auja
BatzP - El Buggar
BatzP - El Burj
BatzP - Haifa
BatzP - Huj
BatzP - JB Yakub
BatzP - Kaukab
BatzP - Khan Kusseir
BatzP - Khuweilfe
BatzP - Kuneitra
BatzP - Megiddo
BatzP - Nablus
BatzP - Rafa
BatzP - Sasa
BatzP - Semakh
BatzP - Sheria
BatzP - Surafend
BatzP - Wadi Fara
BatzS - Sinai
BatzS - Bir el Abd
BatzS - El Arish
BatzS - El Mazar
BatzS - El Qatiya
BatzS - Jifjafa
BatzS - Magdhaba
BatzS - Maghara
BatzS - Romani
BatzS - Suez 1915
BatzSe - Senussi
BatzWF - Westn Front
BW - Boer War
BW - NSW
BW - NSW - 1ACH
BW - NSW - 1NSWMR
BW - NSW - 2NSWMR
BW - NSW - 3ACH
BW - NSW - 3NSWIB
BW - NSW - 3NSWMR
BW - NSW - 5ACH
BW - NSW - A Bty RAA
BW - NSW - AAMC
BW - NSW - Aust H
BW - NSW - Lancers
BW - NSW - NSW Inf
BW - NSW - NSWCBC
BW - NSW - NSWIB
BW - NSW - NSWMR_A
BW - NZ
BW - Qld
BW - Qld - 1ACH
BW - Qld - 1QMI
BW - Qld - 2QMI
BW - Qld - 3ACH
BW - Qld - 3QMI
BW - Qld - 4QIB
BW - Qld - 5QIB
BW - Qld - 6QIB
BW - Qld - 7ACH
BW - QLD - AAMC
BW - SA
BW - SA - 1SAMR
BW - SA - 2ACH
BW - SA - 2SAMR
BW - SA - 3SACB
BW - SA - 4ACH
BW - SA - 4SAIB
BW - SA - 5SAIB
BW - SA - 6SAIB
BW - SA - 8ACH
BW - SA - AAMC
BW - Tas
BW - Tas - 1ACH
BW - Tas - 1TIB
BW - Tas - 1TMI
BW - Tas - 2TB
BW - Tas - 2TIB
BW - Tas - 3ACH
BW - Tas - 8ACH
BW - Vic
BW - Vic - 1VMI
BW - Vic - 2ACH
BW - Vic - 2VMR
BW - Vic - 3VB
BW - Vic - 4ACH
BW - Vic - 4VIB
BW - Vic - 5VMR
BW - Vic - 6ACH
BW - Vic - AAMC
BW - Vic - Scot H
BW - WA
BW - WA - 1WAMI
BW - WA - 2ACH
BW - WA - 2WAMI
BW - WA - 3WAB
BW - WA - 4ACH
BW - WA - 4WAMI
BW - WA - 5WAMI
BW - WA - 6WAMI
BW - WA - 8ACH
BW Gen - Campaign
BW Gen - Soldiers
BW General
Cavalry - General
Diary - Schramm
Egypt - Heliopolis
Egypt - Mena
Gen - Ataturk Pk, CNB
Gen - Australia
Gen - Legends
Gen - Query Club
Gen - St - NSW
Gen - St - Qld
Gen - St - SA
Gen - St - Tas
Gen - St - Vic
Gen - St - WA
Gm - German Items
Gm - Bk - 605 MGC
GW - 11 Nov 1918
GW - Atrocities
GW - August 1914
GW - Biographies
GW - Propaganda
GW - Spies
GW - We forgot
Militia 1899-1920
Militia - Area Officers
Militia - Inf - Infantry
Militia - Inf - 1IB
Militia - Inf - 2IB
Militia - Inf - 3IB
Militia - Inf - NSW
Militia - Inf - Qld
Militia - Inf - SA
Militia - Inf - Tas
Militia - Inf - Vic
Militia - Inf - WA
Militia - K.E.Horse
Militia - LH
Militia - LH - Regts
Militia - LH - 1LHB
Militia - LH - 2LHB
Militia - LH - 3LHB
Militia - LH - 4LHB
Militia - LH - 5LHB
Militia - LH - 6LHB
Militia - LHN - NSW
Militia - LHN - 1/7/1
Militia - LHN - 2/9/6
Militia - LHN - 3/11/7
Militia - LHN - 4/6/16
Militia - LHN - 5/4/15
Militia - LHN - 6/5/12
Militia - LHN - 28
Militia - LHQ - Qld
Militia - LHQ - 13/2
Militia - LHQ - 14/3/11
Militia - LHQ - 15/1/5
Militia - LHQ - 27/14
Militia - LHS - SA
Militia - LHS - 16/22/3
Militia - LHS - 17/23/18
Militia - LHS - 24/9
Militia - LHT - Tas
Militia - LHT - 12/26
Militia - LHV - Vic
Militia - LHV - 7/15/20
Militia - LHV - 8/16/8
Militia - LHV - 9/19
Militia - LHV - 10/13
Militia - LHV - 11/20/4
Militia - LHV - 19/17
Militia - LHV - 29
Militia - LHW - WA
Militia - LHW-18/25/10
Militia - Military Orders
Militia - Misc
MilitiaRC - Rifle Clubs
MilitiaRC - NSW
MilitiaRC - NT
MilitiaRC - Qld
MilitiaRC - SA
MilitiaRC - Tas
MilitiaRC - Vic
MilitiaRC - WA
Militiaz - New Zealand
Tk - Turkish Items
Tk - Army
Tk - Bks - Books
Tk - Bks - 1/33IR
Tk - Bks - 27th IR
Tk - Bks - Air Force
Tk - Bks - Yildirim
Tk - POWs
Wp - Weapons
Wp - Hotchkiss Cav
Wp - Hotchkiss PMG
Blog Tools
Edit your Blog
Build a Blog
RSS Feed
View Profile
Open Community
Post to this Blog
Site Index
Education Centre
LH Militia
Boer War
Transport Ships
LH Battles
ALH - Units
ALH - General
Aboriginal Light H
Weapons
Ottoman Sources

"At a mile distant their thousand hooves were stuttering thunder, coming at a rate that frightened a man - they were an awe inspiring sight, galloping through the red haze - knee to knee and horse to horse - the dying sun glinting on bayonet points..." Trooper Ion Idriess

The Australian Light Horse Studies Centre aims to present an accurate history as chroniclers of early Australian military developments from 1899 to 1920.

The Australian Light Horse Studies Centre site holds over 12,000 entries and is growing daily.

Contact: Australian Light Horse Studies Centre

Let us hear your story: You can tell your story, make a comment or ask for help on our Australian Light Horse Studies Centre Forum called:

Desert Column Forum

WARNING: This site contains: names, information and images of deceased people; and, language which may be considered inappropriate today.

Wednesday, 1 July 2009
The Volunteer Movement in Western Australia, Armament
Topic: Militia - LHW - WA

Western Australian Militia

Armament


The following is an extract from the book written in 1962 by George F. Wieck called The Volunteer Movement in Western Australia 1861-1903, pp. 68 - 70:

 
Armament

The Volunteers of Western Australia were destined, in common with most Australian Volunteers, to be armed with weapons which had become obsolete elsewhere. The British Army necessarily kept abreast with foreign armies as regards armament and rapidly accumulated stocks of obsolete and discarded weapons. The necessity to keep abreast did not apply so strongly in the Colonies and in any case it was a question of finance. Replacements were costly and the Colonies were glad to accept at a lower price weapons no longer standard in the British Army. Whatever came was a step-up on what they had and represented progress.


Artillery

Smooth-bore muzzle-loading guns of various types and sizes were carried by most ships arriving at Australian Ports and dumped there. Advertisements appeared offering guns for sale as suitable anchors for buoys, navigation marks, etc.

The first mention of Field Artillery occurs in connection with the W.A. Troop of Volunteer Horse Artillery formed on 1 July 1872. The Troop was armed with two 12Pr. B. L. [12 pounder breach loading] Armstrong-Whitworth guns, complete with limbers and stores. This type of gun was quite new and was then on trial in the British Army : it was not finally adopted, having to make way for the 9Pr. R.M.L. [9 pounder rifled muzzle loading.] These two guns appear to have belonged to the Enrolled Pensioner Force, although no record as to how or when they were received can be traced. The guns were unsuitable being too heavy for the type of corps but as the Commander of the corps was a "Horse Artilleryman" and no other guns were available, the guns had no choice. A photo taken about 1870 shows the guns, manned by Enrolled Pensioners, firing a Salute. They remained on issue until 1894 when they were replaced by two 9Prs; they remained in obscurity until World War II when they were used as dummy anti-aircraft guns on the local sea-front. (It is believed they are now in the loving care of a sentimental old-time gunner).

The next outbreak of artillery ardour occurred at Fremantle when the newly formed Naval Artillery Volunteers, in 1879, proudly paraded with two 6Pr. smooth-bore muzzle-loading guns (minus limbers or other form of draught). So far as can be traced these pieces left their depot on only one occasion, i.e., the 1884 Camp at Albion; they were replaced in 1889 by two 9Pr. R.M.L. [9 pounder rifled muzzle loading.] guns, valued with limbers and wagons at over £850, a gift from the War Office.

In 1902 the 9Pdrs on issue at Perth and Fremantle were replaced by 15Pdr B.L. [15 pounder breach loading] guns of the type in general use by the British Forces through the Anglo-Boer War of 1899-1902.

Coast or Heavy Artillery first appeared in 1893 when a Fort was erected at Albany. Mounted at that time were two 6in. R.B.L. [rifled breach loading.] guns plus some light pieces. It was to assist with the manning of these guns that the Albany Volunteer Garrison Artillery was raised in 1899.


Muskets and Rifles

In the Commissariat Store maintained by the British Government at Perth were 40-50 muskets (including "flintlocks") which that Government magnanimously (?) presented to the Colony. One hundred new Enfield M.L. Rifles received as a gift from England were issued to the Perth corps in June 1862, the Commissariat stock going to the Fremantle corps.

Whenever the Colony could afford to buy new weapons it did so and issued them to the more needy of the Perth and Fremantle corps, the displaced weapons being handed down to those more recently formed. Thus it happened that within some of the corps different types of firearms were in use at one and the same time.

The various types of firearm made their first appearance among the Volunteers on the following dates:

Enfield musket (from stock) - 1861

Enfield rifle - 1862

Martini-Henri rifle - 1874

Snider rifle - 1883

Martini-Metford rifle - 1892

Martini-Enfield rifle - 1898

Lee-Speed Magazine rifle - 1898


Previous:  West Australian Highlanders 

Next: Forts and Fixed Defences 


Further Reading:

Western Australian Militia, Light Horse

Western Australian Militia, Infantry


Citation: The Volunteer Movement in Western Australia, Armament

Posted by Project Leader at 12:01 AM EADT
Updated: Friday, 4 September 2009 6:56 PM EADT
Gallipoli Campaign - 1915-16, Outline
Topic: BatzG - Gallipoli

Gallipoli Campaign - 1915-16

Outline


Turkish force dispositions at Anzac, 24 April 1915.


At the urging of Winston Churchill, First Lord of the Admiralty, the Allies decided on a campaign to seize the strategic Dardanelles. A fleet commanded first by Vice Admiral Sackville Carden and then, after his physical breakdown, by Rear Admiral John de Robeck, began a blockade and bombardment of the forts guarding the entrance to and passage of the Dardanelles in February 1915. These Dardanelles defences included 176 medium and heavy guns, 11 mine belts containing 373 mines, and an antisubmarine net. Long-range bombardments on February 19 and 25 succeeded in silencing the Turkish outer works. On March 18 the Allied fleet tackled the main forts along the Narrows of the Dardanelles.

Twelve British and 4 French battle ships made the assault. The most powerful of the battleships was the super dreadnought Queen Elizabeth, carrying eight 15-inch guns. The Turkish batteries included 42 guns of 8-inch bore or more, 6 of which were 14-inch guns. The Allied battlewagons succeeded in largely silencing the Ottoman guns, but then 3 of the capital ships struck mines and sank. The French battleship Bouvet went under with all but 66 of her crew of 630 and the British battleships Ocean and Irresistible met the same fate. Two more battleships were damaged by mines and a third by Turkish coastal batteries and under with all but 66 of her crew of 630 and the British battleships Ocean and Irresistible met the same fate. Two more battleships were damaged by mines and a third by Turkish coastal batteries and 47 more Allied sailors were killed. The Allied naval command decided to with draw, unaware that the Turks had nearly exhausted their ammunition stocks, having fired about 1,600 rounds, and that the enemy's fire direction control, their communications, and many of their batteries had been demolished, aware only that they were suffering appalling and crippling losses from the mines. Turkish personnel losses in repulsing the Allied naval attack were 40 killed and 70 wounded.

On the western end of the Sea of Marmora, the Russian Black Sea Fleet of 5 battleships, 2 cruisers, and 10 destroyers attacked the Bosphorus forts on March. 28. The German battle cruiser Goeben defended Istanbul by sinking 2 Russian destroyers, thus forcing the rest of the Russian fleet to withdraw The battleships having failed, the Allies decided on an amphibious attack on Gallipoli, the small peninsula on the :north side of the Narrows. Turkey at the time of its declaration of war in October 1914 had 36 divisions, deployed thus: 12 around Constantinople, 1 on Gallipoli, 1 on the Asian side of the Dardanelles, 5 along the rest of the Asia Minor coast, 11 in the Caucasus, 2 in Yemen, 2 in the Hejaz, 2 in Mesopotamia. During the course of the conflict another 70 divisions would be raised by the Ottoman Empire. By the time that the Allied amphibious expedition, long delayed by logistical difficulties, approached Gallipoli, the Turkish Fifth Army, commanded by German General Liman von Sanders, deployed 84,000 men in 6 divisions on or near the peninsula.

The Allied expeditionary force, commanded by General Ian Hamilton, consisted of 84 ships, 75,056 troops, including 30,638 ANZACs (Australian and New Zealand Army Corps), commanded by General William Birdwood, and the men of 1 French division, 16,481 animals, and 3,104 vehicles. While the French division made a diversionary landing on the Asian side of the Narrows, the main landings were made on Gallipoli on April 25. The ANZACs landed at Ari Burnu, 15 miles north of the peninsula's tip on the west side. They then attempted to seize the Chunuk Bair height dominating the peninsula, but the Turkish 19th Division, commanded by General Mustafa Kemal (Atatürk), the future father of the Turkish Republics, drove the ANZACs back to the beach. In six days of fighting that cost the men from "down under" 1,252 killed and 4,302 wounded.

At Cape Helles on the tip of the peninsula the 29th Division, commanded by General Alymer Hunter-Weston, came ashore in a poorly managed landing on five beaches. At W Beach 950 men of the Lancaster Fusiliers (who won six Victoria Crosses that day) landed from the steamer Euryalus and ran into murderous Turkish fire that killed 189 British soldiers, wounded 283, and left 61 more missing in action. At V Beach over 1,000 of the 2,000 men disgorged from the collier River Clyde were killed or wounded.

The landings at the other beaches were more successful, but on their way to occupy the commanding height of Achi Baba the men of the 29th Division stopped to brew tea. That teatime cost the British dearly, for the Turks beat them to the height and, as a consequence, kept the landing force pinned to a narrow beach perimeter through all the miserable months ahead. Total British Empire losses for the day were 2,000 at Cape Helles and 2,000 at what was thereafter called ANZAC Cove.

The French landed at Kum Kale on the Asian side of the Dardanelles across from Gallipoli. They killed or wounded 1,700 Turks and captured 500 at a cost of 800 casualties of their own, but were then withdrawn on April 26.

There followed three months of at tack and counterattack, of attrition and stalemate. Allied attempts to break out of their beachheads failed utterly. Their losses in the first four days after the landings were 8,900, including 2,650 killed.

The litany of loss went on. The First Battle of Krithia (also called the Battle of Achi Baba Hill), April 28-30, cost the Allies 3,000 casualties out of 14,000 engaged. The Second Battle of Krithia, May 6-8, added another 6,500 casualties (from 25,000 engaged to the attackers' toll. The Australian 2nd Brigade alone lost 1,056 out of 2,900 engaged. The third battle, June 4, cost the British 4,500 killed or wounded out of 16,000 initiating the attack, including 1,600 lost out of a naval brigade of 2,850 (2 battalions from that brigade lost 60 of its 70 officers). French losses (from 14,000 engaged) in this Third Battle of Krithia added 2,000 more names to this bloody measurement of Allied failure and frustration. (Between April 25-May 12 the French had already lost 12,610 of 22,450 men landed.) Other attacks at Cape Helles on June 21, June 28, and July 12-13 cost 7,700 British and 4,600 French casualties. Turkish counterattacks were no more successful. The Ottoman army lost 10,000 men of 40,000 engaged in attacks on May 1 and May 19, compared to only 600 ANZAC casualties out of 17,000 engaged. Another Ottoman counterattack, June 6, also failed, with total Turkish losses from June 4-6 numbering 9,000.

At sea the situation was no more favourable for the Allies as they lost 3 more battleships to enemy destroyers or subs.

The Goliath was put under on the night of May 12 by torpedoes from a Turkish destroyer, with 570 crewmen dying. The Triumph was sunk on May 25 by U-21, with 73 deaths. And the Majestic fell victim to another U-boat on May 27 and sank with 40 of its crew. The Allies got in a few blows at sea. On May 1 a British sub sank the Turkish troopship Guj Djemal, drowning 2,000 soldiers.

The Allied influx of troops onto the peninsula continued, but some attempts at reinforcement met with disaster. Far from Gallipoli, the 7th Battalion, Royal Scots was shattered before it left En gland. In the worst railroad disaster in British history, the troop train carrying the battalion for eventual service on Gallipoli crashed at Gretna Green on May 22, 1915, killing 214 soldiers and 12 other people, and injuring 246. In the Aegean, on September 17, a U-boat sank the troop transport Ramazan and 311 Indian soldiers drowned.

Reinforced by 3 more divisions, Hamilton determined to break the stale mate by outflanking the Turks with a landing at Suvla Bay farther to the north.

To hold the enemy's attention, Hamilton attacked at Cape Helles on August 6, sending 4 British divisions, totalling 26,000 men, and 13,000 French soldiers against 40,000 Turks. British losses at Cape Helles, Krithia, and Achi Baba on the first day numbered 3,480; the Turks lost 7,510. By August 22 Allied losses surpassed 6,000.

The ANZACs also attacked, one Australian unit of 1,250 losing 650 in an assault on a position called The Nek on August 7. The 600 men of the 8th and 10th Light Horsemen lost 234 killed and 141 wounded. Another 1,700 Aussies fell and seven Victoria Crosses were won on August 6 in fighting around Lone Pine, where 5,000 Turks were also killed or wounded. The general ANZAC assault on Chunuk Bair and Sari Bair Ridge (of which the actions at The Nek and Lone Pine were a part) ended in failure and cumulative casualties of 14,000 by August 22.

The landings at Suvla Bay, August 6-8, commanded by general Frederick Stopford, were at first successful, but the 22,000 attackers in 25 battalions failed to exploit their initial success and were soon bogged down before Chocolate Hill. On August 12, 267 men of the 1st Battalion of the 5th Norfolk Regiment (mostly men from the king's staff at Sandringham Palace) disappeared in the mist during an attack at Suvla. Their fate was unknown for more than 70 years, before evidence was discovered that those who did not die in the attack were executed after capture by the Turks.

A resumption of the Suvla offensive on August 15 went nowhere. On August 21, 14,300 Allied troops assaulted Turkish positions at Hill 60 and Scimitar Hill. One Australian unit of 150 men lost 110 killed or wounded on the slopes of Hill 60. Lord Longford, commanding the attack on Scimitar Hill, fell fatally wounded. Total Allied losses in the Suvla attacks on August 21 were 0 the Turks lost 2,500. Total Allied losses on all the Gallipoli battlegrounds, August 6-29, were 29,000 out of 126,700 engaged. The 37,000 ANZACs taking part in the battles accounted for 7,000 of the Allied toll. The 76,000 Ottoman soldiers engaged suffered 10,000 casualties.

The Gallipoli campaign ground on through the fall of 1915, becoming a smaller version of the Western Front, with all its trenches and torment and a day-to day terror so common that it became al most mundane. A thunderstorm accompanied by hail, for example, drowned 100 men on November 27. General Charles Monro replaced Hamilton on October 15 and, together with General William Birdwood, made plans for an evacuation from the peninsula. That evacuation was carried out in stages from December 10 to the night of January 8-9, 1916, with the Turks successfully deceived and the last 35,268 troops pulled out without loss.

The statistics of the Gallipoli side show are appalling. Of 410,000 soldiers of the British Empire who served on that peninsula in purgatory, 31,389 were killed in battle, 9,708 were reported missing most of whom were believed to have died and 78,749 were wounded. Including the sick, British casualties totalled 198,340. The 29th Infantry Division alone suffered 34,012 casualties - 9,042 KIA and MIA, 10,993 WIA, 13,977 sick. (In all of the Great War the 29th Division suffered cumulative casualties seven times its original strength.) Out of the British Empire and Commonwealth total, Australian casualties totalled 26,094, including 7,594 battle deaths. New Zealand losses were 7,571, including 2,431 battle deaths. The 79,000 French troops who served in Gallipoli suffered 27,000 combat casualties, including 9,000 dead, and 20,000 illnesses. Altogether, including the sick, Allied losses in the Dardanelles endeavour were about 252,000, including 46,000 battle deaths.

Of some 500,000 Turks in 14 divisions who fought in the campaign, 251,309 became casualties - 55,127 KIA, 100,177 WIA, 10,067 MIA, 21,498 dead of disease, 64,440 sick who recovered.


[From: Michael Clodfelter, Warfare and Armed Conflicts, 2nd Edition, pp. 464-5.]


Further Reading:

Battles where Australians fought, 1899-1920

Light Horse Battles

Gallipoli Campaign 


Citation: Gallipoli Campaign - 1915-16, Outline

Posted by Project Leader at 12:01 AM EADT
Updated: Thursday, 2 July 2009 3:50 PM EADT
Tuesday, 30 June 2009
El Burj, Palestine, 1 December 1917, Darley, 9th Light Horse Account
Topic: AIF - 3B - 9 LHR

El Burj

Palestine, 1 December 1917

9th LHR, AIF, Unit History Account


9th LH troopers on El Burj Ridge after the battle.
 
[Schramm picture.]


Major Thomas Henry Darley produced a unit history of the 9th Light Horse Regiment, AIF, called With the Ninth Light Horse in the Great War, in which included a section specifically related to the Battle of El Burj and is extracted below.

Darley, TH, With the Ninth Light Horse in the Great War, Adelaide, Hassell Press, 1924, pp. 111 - 112.


At 4 p.m. orders were received to the effect that the 4th Light Horse Brigade would take over a portion of the line, and these troops relieved the 8th Regiment which in turn took over the position occupied by the Regiment.

As soon as these moves were effected "A" Squadron relieved the Gloucester Yeomanry and "B" took up a new position 800 yards to the north-west. The new position was splendidly placed, as in the event of attack both these posts could direct their fire right across the front of the central position occupied by the 8th Regiment.

All these posts were quickly joined up by duplicate telephone lines with Regimental Headquarters and from there to the 54th Division. A section of the Machine Gun Squadron was attached to both "A" and "B" Squadrons. During the night enemy shelling was intense, the telephone wires being repeatedly cut, but owing to the foresight of Lieut. A. Burns, Signalling Officer, in duplicating the wires communication was never lost, whilst the 8th Regiment, using single wires, were often compelled to send their messages through our lines. As the night advanced the shell fire of the enemy increased, and by midnight had reached a stage which clearly indicated that an infantry attack was pending.

Our men had made the most of the short time they had occupied these positions by building stone sangars and getting a good knowledge of the nature of the ground in their immediate front, especially with reference to points of concentration for enemy attacks.

On the 1st December, at 1.20 a.m., an enemy force of approximately 1,000 made a most determined attack. The night was very dark and strong gusty winds were blowing, thereby greatly assisting them in concealing their advance. On getting to close quarters, a sudden rush was made against the small hill held by a flank post of the 8th Regiment, who were compelled to fall back to a position about 300 yards in rear. The enemy immediately occupied the position and opened a heavy rifle, bomb, and machine gun fire on the 8th Light Horse Regiment.

"A" Squadron of the 9th were ordered to put down as heavy a barrage as possible across the front of the position held by the 8th Regiment. Fire was immediately opened and inflicted severe casualties on the enemy and also prevented reinforcements moving up in support. It also prevented the enemy advanced troops from withdrawing. Lying behind the stone sangars which had been erected across the tops of the hills held by the Regiment, the squadrons poured a destructive fire on the enemy who had advanced bravely across the open and had actually taken up positions on the small hills held by our troops. Lying as low as possible they contented themselves with throwing stick bombs, of which an enormous number had been carried forward.


Frequent calls were made on the Regiment by the 8th Light Horse for supplies of ammunition as their reserves were not at hand, and RSM Aikman, who had his supplies well organised, was able to meet all demands.

A party of the 4th Royal Scots closed up to the support of the Brigade and did excellent work, their bombers being exceptionally good. Gradually the fire of the enemy died down, and all movement in front seemed to have ceased, but in spite of this all ranks remained at their posts until daybreak. At dawn the 8th Regiment moved forward and took the surrender of 150 unwounded Turks amongst whom was their Commanding Officer. A large number of automatic rifles and bombs were also collected.

The determination of the Turkish attack was established by the fact that large numbers of dead were lying within 30 yards of our sangars, where they had taken cover to throw their bombs. The liberal use they made of their stick bombs, which have a cap on the handle that must be taken off before the cord which sets the mechanism in motion can be pulled, was shown by the fact that one dead Turk, who was seen to be a wearer of the famous Iron Cross, had 60 caps lying in a heap by his side. The enemy dead numbered 200 whilst 300 wounded were stated to have passed back to their dressing station.

Information was gained from an officer prisoner to the effect that their commander was determined to drive the Brigade from its position at all costs, and with this end in view had sent forward a body of picked troops, recent arrivals from the Galician Front. Then were certainly a fine body of men, their physique being the best we had seen amongst the enemy forces. They were well dressed and wore the new pattern German steel helmet. Their equipment appeared to be a recent issue, and all carried the latest pattern Mauser rifle.

The enemy maintained a heavy shell fire throughout the day, whilst the Regiment cleared up the position and buried the dead. Towards evening the fire slackened and died away, the following day was spent in peace and quietness. Our casualties had been slight but the 8th Light Horse suffered severely through being compelled to fall back, but this was unavoidable under the circumstances.


Further Reading:

9th Light Horse Regiment, AIF

9th Australian Light Horse Regiment, Roll of Honour 

The Battle of El Burj, 1 December 1917

Battles where Australians fought, 1899-1920


Citation: El Burj, Palestine, 1 December 1917, Darley, 9th Light Horse Account

Posted by Project Leader at 12:01 AM EADT
Updated: Saturday, 10 October 2009 12:16 AM EADT
The Oxford Companion to Australian Military History, Gallipoli
Topic: BatzG - Gallipoli

Gallipoli Campaign - 1915-16

Gallipoli Summary


The scene of action at Gallipoli


The following is an extract is an excellent summary detailing the history of the Australian light horse movement. It comes from Dennis, P., et al, The Oxford Companion to Australian Military History, 2nd Ed, OUP 2008, pp. 223 - 232.


The commitment of troops from Australia and New Zealand to the Gallipoli Peninsular arose out of the deliberations of the War Council in London and the desire of the First Lord of the Admiralty, Winston Churchill, to seek a more offensive role for the RN. The War Council was a committee of the British Cabinet, formed to advise the Prime Minister (Herbert Asquith) on matters concerning the War. It consisted of Asquith himself, Field Marsha Lord Kitchener (Secretary of State for War), Churchill (First Lord of the Admiralty), David Lloyd George (Chancellor of the Exchequer), Sir Edward Grey (Foreign Secretary), Arthur Balfour (former Conservative prime minister) and a floating group of other ministers and service advisers.

In December 1914 various members of this body had expressed concern about the lack of progress of military operations against the Germans on the Western Front. The French counter-attack after the Marne had stalled; Britain's original six divisions had suffered heavy casualties around Ypres; trench lines had now been dug from the channel to the Swiss border; and no Allied military figure seemed to have a clear plan of how the war was to be won. Into this strategic vacuum stepped the politicians. Lloyd George suggested that Germany could best be defeated by attacks on her weaker allies-Austria-Hungary and Turkey. Maurice Hankey, who was a Royal Marines Colonel and Secretary of the War Council, also suggested an attack upon Turkey in combination with such Balkan states as could be rallied to the Allied cause.

The most prolific source of ideas was Churchill. Since the outbreak of war he had been dissatisfied with what he determined to be the passive role played by the RN. Even before the Western Front had solidified he had put forward schemes to capture an island off the German coast, thus forcing the German Fleet to sally forth to retake it. The consequent great naval battle would see the Germans crushed, and the British Fleet enter the Baltic where in combination with Russian forces it would dominate the north German coast and force the German High Command to divert troops from the Western Front. That scheme had met with stiff resistance from Churchill's naval advisers. It would risk the Grand Fleet in shallow waters dominated by mines and submarines; the Germans might not come out and get sunk; and Russia had no troops to spare nor the expertise to carry out combined operations against the German north coast. Churchill then suggested using the Navy to blockade Holland into the war, or using the firepower of the battleships to assist the British and French armies with operations along the Belgian coast.

He also suggested using some of the older battleships to attack Turkey on the Gallipoli Peninsula.

The first two schemes soon collapsed for much the same reason as the German island scheme they risked the Grand Fleet in mine and submarine dominated waters. The Gallipoli scheme, however, received some impetus from an outside source. On 2 January the Russians asked the British to mount a diversionary operation against the Turks who were pressing them hard in the Caucasus. Churchill seized on this message to ask the Commander of the British squadron in the Aegean, Admiral Carden, if the Dardanelles could be forced and Constantinople dominated by ships alone.

Churchill later stated in his memoirs that he detected a remarkable convergence of opinion at this time in favour of operations against Turkey. Lloyd George, Hankey, the Russians, Kitchener (who had passed on the Russian request to Churchill) and himself, he wrote, all favoured such action.

In fact there was no such major convergence. The scheme put forward by Lloyd George was mainly concerned with operations against Austria-Hungary. Hankey's plan involved large-scale military operations carried out by a coalition of Balkan states with minor Allied assistance. The Russian request soon vanished in the mists, as the Tsar's armies pushed back the Turks in the Caucasus. Only Churchill had suggested a purely naval operation centred on forcing the Dardanelles and overawing Constantinople.

Nevertheless, for reasons that are not hard to identify, it was the latter scheme that recommended itself to the War Council. It promised the defeat of a significant enemy for very little cost. It would not require many British troops, the vast majority of which were committed to the Western Front as reinforcements for the shattered remains of the British Expeditionary Force. The only troops required would be occupation forces needed to garrison the Gallipoli Peninsula and Constantinople following the success of the fleet. It would not risk the Grand Fleet, as Churchill had assured the War Council that only Britain's old, surplus battleships would be used. The operation was also said to have the advantages of opening a supply route to Russia and galvanising the Balkan states into action on the Allied side. This last action could see a mighty army of Allied states advancing up the Danube and attacking the Central Powers from the rear.

On 3 January 1915 the War Council heard from Churchill that Admiral Carden was also in favour of the plan. In fact Carden had placed many reservations on the practicality of the plan. But these reservations that a great many ships would be needed, that the minefields in the straits would prove difficult to sweep, that the whole affair could be a protracted one were not passed on to the War Council by Churchill. So the War Council sanctioned the naval attack on the Dardanelles. Operations commenced on 19 February.

By mid-March it had failed decisively. The fleet proved incapable of overcoming the combination of minefields and mobile howitzers that protected the forts at the narrows. On 18 March a concerted attack on the defences by 18 battle ships resulted in one-third of them being sunk or disabled.

While naval operations were in progress, a debate had sprung up in the War Council concerning the role of troops in the campaign. This debate was instigated by Churchill who, immediately the naval attack commenced, started calling for troops to ‘reap the fruits' of the fleet's operations. It will be recalled that Churchill had sold the Gallipoli idea to the War Council largely on the fact that no troops would be needed.

What had changed his mind? This can never be known with any certainty. But it is possible that Churchill, who had some knowledge of military matters, had attempted to convert the government to a major operation in stages first the naval attack which would appeal because of its limited liability.

Then, when the fleet was engaged, call for troops of which were always going to be needed even if the fleet succeeded but which might also be required to help the fleet through the straits and to convert the whole operation into a real alternative to the Western Front.

If this was Churchill's motivation he can certainly be accused of involving the government by stealth in a much larger undertaking than they originally contemplated.

And it would be an operation to some extent under his own control and for which he would get the credit if it succeeded. To this extent his policy in initiating the Gallipoli campaign can be said to be self-serving. However, there is little doubt that his motives were more complex than this.

He had been one of the few members of the War Council to visit the Western Front, and to have witnessed firsthand the carnage that resulted from operations there. He had also been mightily unimpressed by the plans of the generals to break the deadlock. So Gallipoli seemed to him a way of waging war without the frightful toll of the Western Front.

Sea power and a few troops and Britain's (alleged) traditional way of warfare could be restored. Gradually the War Council became convinced that troops would have to be landed on the Gallipoli Peninsula to eliminate the forts and mobile howitzers. This would enable the minefields to be swept and the fleet to proceed to Constantinople whereupon the Turks would no doubt surrender.

What troops were to be used for these purposes and who would command them? Churchill insisted that the 29th Division (the only British Regular Army division not committed to the Western. Front) be an integral part of the force. Kitchener at first refused to release this division. Eventually, under pressure from other members of the War Council, he agreed that it should go. In addition Churchill promised the Royal Naval Division (a miscellaneous collection of surplus officers and men from the RN). The French (wary of British post-war aims in the Middle East) also offered a division. These forces were still deemed insufficient however. The only other troops on offer were the Australian and New Zealand troops in Egypt. These men (approximately two divisions), under the command of General Birdwood, were training in Egypt (because of lack of suitable facilities in Britain) before being sent to the Western Front.

In all the forces to be arrayed against the Turks amounted to approximately 70,000 men. The fact that at an earlier War Council meeting Kitchener had considered 150,000 men insufficient to defeat Turkey had apparently been forgotten.

Seventy thousand were available and 70,000 were therefore deemed to be enough. As Birdwood was considered too junior to command even a force of this size, Sir Ian Hamilton, a retired general then in command of home forces in Britain, was despatched on the rather inappropriately named HMS Foresight to take charge.

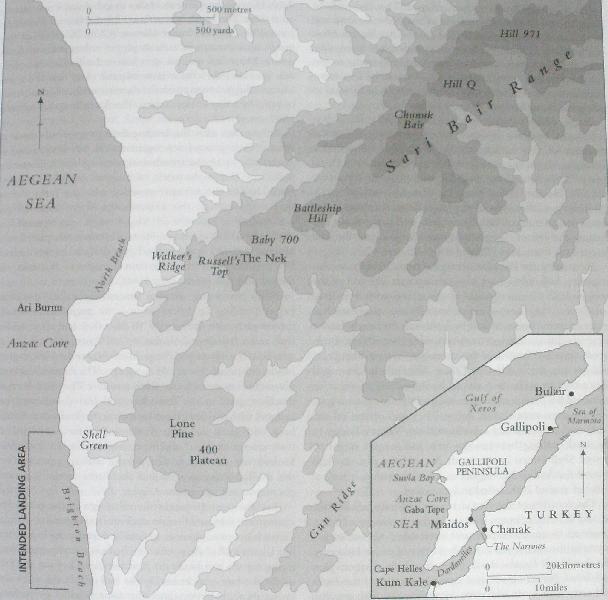
Hamilton's main problem was how to dispose his forces on the narrow confines of the Gallipoli Peninsula, the southern section of which was just over 20 miles long and five miles across at its widest point. In selecting areas to land Hamilton was very circumscribed. Much of the coastline consisted of rugged cliffs with few beaches or paths through the cliffs which could provide exit routes for large bodies of troops. He finally decided to make his main landing with the 29th Division on five beaches at the toe of the peninsula around Cape Helles. Once a landing had been established they would be assisted by the gunfire of the fleet to advance on the Narrows forts. To the north, the Anzac forces would make a secondary landing. A covering force would first seize the rugged Sari Bair Ridge. Then the remaining troops (protected by the troops on the heights from Turkish intervention to the north) would dash across the peninsula to Maidos. This would prevent reinforcements from being sent to the Turks at Helles, cut off any troops being driven back by the British, and assist the attack on the Narrows. Meanwhile the Royal Naval Division would attempt to deceive the Turks by a feint landing at Bulair (an obvious place to land at the narrow neck of the peninsula but because of that heavily defended). Meanwhile the French would land on the Asiatic coast at Kum Kale to destroy some heavy batteries which might interfere with the British landings at Helles.

This was an imaginative plan possibly the best that could have been devised in the circumstances. However, little thought was given as to whether 70,000 men were sufficient to defeat the Turkish Army or whether such forces as the Anzacs had provided enough men to occupy a long, precipitous ridge and advance across the peninsula.

Hamilton, who had been Kitchener's Chief of Staff in the South African War, never questioned his chief about the sufficiency of his force. Nor did anyone else in authority. It was merely assumed that the force at hand would defeat the incompetent Turks.

Because the troops for the assault had to be tactically loaded on the transports in the order in which they were to disembark, the landings could not take place until the end of April. Much has been made of this. It is claimed that the Turks greatly strengthened their defences in the five-week interval. In fact the Turks were remarkably supine in this period - a few extra troops were placed on the peninsula, and some extra defences constructed. However, rough weather in March and April would have almost certainly delayed the landings anyway. Troops could not have been landed or reinforced and supplied in a gale.

Meanwhile Birdwood was given the task of developing the Australian plan in detail. He had at his disposal one Australian division (Bridges) and the New Zealand and Australian Division (Godley), about 25,000 men in all.

Birdwood decided that to achieve surprise the forces must be assembled at night and landed at dawn. The 3rd Brigade (Sinclair-MacLagan) would land first as the covering force, push inland and establish positions on Gun Ridge.

The 2nd Brigade (McCay) would then land and seize the higher points on the Sari Bair Ridge (including the highest, Hill 971). The 1st Brigade (MacLaurin) would land immediately after the 2nd and act as a divisional reserve. Finally the New Zealand and Australian Division would be landed and a force assembled for the advance across the peninsula.

The Anzac forces began leaving Egypt in early April to join the 3rd Brigade on the Island of Lemnos, where it had been since 4 March. On the 12th they arrived and carried out some rudimentary practice landings. But there was little time for much training. The operation was to commence on the 23rd. In the event bad weather delayed it until the 25th.

On the eve of battle the 3rd Brigade was loaded on battle ships and destroyers the remaining brigades on conventional transports. From these ships the troops would first be loaded in ships' boats and then towed by steamboats until they were close to the coast. They would then be rowed ashore and landed on a 3000-yard front, the left of which was located just south of Ari Burnu Point.

At 3.30 a.m. on the morning of 25 April the battleships anchored about 3,500 yards off the coast of the Gallipoli Peninsula. It was pitch dark; not even the outline of the coast was visible. The order was given to land and the steamboats set off. At 4.00 a.m. the tows were cast off and the naval ratings began to row towards the beaches. As the troops approached it became obvious that the tows had bunched together and that the landing was about to take place about a mile to the north of the designated beaches, in a small bay to the south of Ari Burnu later known as Anzac Cove.

The reason for this mistake has given rise to endless speculation. It was suggested that the tides had carried the tows to the north, then it was found that in this area there were no tides of any significance. The battleship commanders were blamed for anchoring in the wrong spot. Naval charts show this was not the case; their navigation was correct. It has even been. suggested that Birdwood unilaterally changed the plan at the last moment to avoid under water obstructions protecting the original landing beaches.

The evidence for this is weak. The best explanation seems to be that the naval ratings guiding the tows lost direction in the dark and veered to the left. The result was that the whole force was landed on a narrow front with units bunched and intermixed from the start. The troops were also confronted by steeply rising ground instead of the more open country to the south.

In the event the covering forces failed to achieve their original purpose the capture of Gun Ridge. In the first instance this was not because of strong Turkish opposition.

Confronting the Anzacs were just two companies of enemy troops armed only with rifles. (Because of their commanding position, however, these men managed to inflict many casualties before they were driven back.) What prevented a coherent drive inland was the country rather than the enemy. The area the Anzacs found themselves in was unfamiliar. The maps available were so inaccurate as to be useless. So tangled and tortuous were the ravines and spurs in front of them that the groups that began to advance inland were soon split into small sections which lost contact with each other almost immediately. A few parties did manage to advance to the second ridge and a smaller number still reached their objective. But they were isolated and scattered and could provide no nucleus for any follow-up force.

Back on the beaches chaos reigned. The 2nd and 1st Brigades and later the formations of the New Zealand and Australian divisions had all landed around Ari Burnu. Most of the efforts of the officers were expended, not in organising a force for a drive inland as intended, but in trying to sort out the men into their original units. When some semblance of order was established, groups of men were sent forward to where the firing line was thought to be.

From mid-morning, however, the whole force was confronted by Turks in much increased numbers. On the morning of the landing the local Turkish commander, Mustapha Kemal (later, as Kemal Ataturk, to become President of Turkey), had been intending to exercise his force near Hill 971. He now redistributed his units for counter-attack.

At 10.30 a.m. the right of the small Anzac perimeter was driven in and most of 400 Plateau lost. In the afternoon and evening the left of the position was assaulted and the line driven back from Baby 700 and the Nek.

By evening the situation seemed serious. Bridges and his brigadiers had only a hazy idea of the exact position of the troops inland. Counter-attacks by the enemy were obviously under way. Many men, separated from their units and unclear of the situation, began to drift back towards the beach. Under these conditions Bridges recommended evacuation. Bird wood, who had landed in the afternoon, agreed. Hamilton, offshore on the battleship Queen Elizabeth, under naval advice that an evacuation would be impossible to organise, overruled his commanders and ordered the troops to dig in

This the men were already doing. They had driven off the Turks and were holding a position from Walker's Ridge in the north starting between the first and second ridges to around Shell Green in the south. All told the first day had secured the Anzacs 2.25 square miles of Turkish territory at a cost of around 2000 killed and wounded.

The tenacity of the Anzac troops, fighting in unfamiliar and difficult country, split up into a confusion of units, subjected to counter-attack and overlooked almost every where by the enemy, was certainly worthy of praise. However, this should not disguise the fact that the whole northern plan had failed. Before an advance could be organised the Turks had arrived in force and were occupying the high ground.

Nevertheless, it may be doubted if Birdwood and Hamilton's plan ever had a chance of success. It was absurdly ambitious to expect a force of two divisions to capture a succession of difficult positions along a ridge four or five miles long, advance four miles across the peninsula, capture more difficult positions and beat off counter-attacks after this had been done. Walking over the ground after the war C. E. W. Bean found the objectives almost impossible to attain in reason able time, even with the help of a Turkish guide.

While the Anzac landing was stalled the 29th Division was faring no better at Helles. They had suffered heavy casualties on the 25th and while the Turks had proved incapable of driving them into the sea, the regulars had proved just as incapable as the Anzacs of mounting a major advance. For the moment, however, Hamilton decided to concentrate his efforts in the south. A mixed force of Australian and New Zealand troops was sent to Helles to spearhead a new attack on 8 May. The result was a fiasco. Under the incompetent control of General Hunter-Weston (GOC 29 Division) the troops were thrown in without proper orders and with little notice. Many had no idea as to where the Turkish front line was situated. After the war it became clear that the main advance did not even reach the enemy trenches but had been stopped by a line of skirmishers. The Anzac brigades suffered 1800 casualties for no result.

In the days after the landing little progress was made at Anzac. Some ground was regained near 400 Plateau and in general the perimeter trenches were strengthened. There was never any chance, however, of a significant advance being made. In fact the initiative now lay with the Turks. Before they could exercise this initiative, the Anzac force suffered a considerable loss. On 15 May Bridges was wounded in the leg by a Turkish sniper. He was immediately placed on a hospital ship and evacuated to Egypt. Before the ship arrived, Bridges had died. His body was brought to Australia and buried on a hill overlooking RMC Duntroon.

With the Anzac advance successfully stalled, the Turks began building up forces around the perimeter to throw the invaders into the sea. By 18 May they had accumulated four and a half divisions, about 42,000 men. Next day they attacked. The result was the greatest disaster for Turkish arms in the course of the whole campaign. The Anzacs had been given time to consolidate their position. They had brought machine guns to the front line and had coordinated fire support with the fleet. By these means the Turks were beaten back with great slaughter. At the end of the day 10,000 of their troops lay dead and wounded on the battlefield.

So bad was the stench that a truce was arranged to bury the dead. Never again would the Turks mount a general counter-attack against the Anzacs.

For the next 10 weeks the campaign in the north was characterised by small-scale operations designed to capture a trench here and there or generally improve the line. It was not these small-scale operations, however, that proved most trying for the troops. As the heat increased in June and July so did the rate of sickness. By the end of July, the force was losing through illness about the same number every fort night as were lost in the initial assault. The major problem was dysentery. Sanitary conditions were poor; flies gathered in millions around latrines and rotting corpses. The medical services were overwhelmed by the number of cases and because the entire peninsula could be brought under enemy fire, had difficulty in setting up substantial hospital facilities. Nor was the food provided appropriate. The main fare was salty stew, hard biscuit and jam. Under these conditions the physical condition of the troops (superb at the landing) began gradually to deteriorate. This would have some effect on the next series of operations which were being planned.

Hamilton had decided as early as May that the growth of trench lines in front of the 29th Division and the French made large-scale operations at Helles prohibitive. The problem was essentially one of artillery. As had been discovered on the Western Front, entrenched defenders could only be blasted from their positions by a deluge of heavy artillery shells. At Gallipoli, there was never enough artillery to mount a considerable bombardment. The guns of the fleet, which were supposed to make up for this deficiency, could not fire shells with the plunging trajectory necessary to destroy trenches. Nor were their armour-piercing shells the optimum type to fire against earthen defences. So Hamilton's attention turned towards Anzac. Here, in the centre and the south there were trenches aplenty. But to the north the flank was open no defences barred the way to Hill 971. If columns could outflank the Turkish defences by stealth, there would be no need to bombard their trenches. The short age of artillery might be overcome. The next attack therefore would be launched from Anzac.

Reluctantly the War Council (now known as the Dardanelles Committee after the reconstitution of the Asquith Government in May) agreed. As a result of much debate it was decided to reinforce Hamilton by no less than five divisions (three from the Kitchener armies and two Territorial divisions). They would arrive in time to commence the attack in early August.

The main attack would be made from Anzac and was planned by Birdwood. His principal aim was to seize the high ground between Hill 971 and Chunuk Bair. Once this ridge was secure a drive across to the straits would be made and the Narrows forts captured. For the operation Birdwood was reinforced by the 13th Division and a brigade from 10th Division (both New Army formations raised by Kitchener from 1914) and one Indian brigade.

At the same time Hamilton made preparations for the continued supply of the northern forces through the winter.

Anzac Cove was very small and most supplies had to be landed at one pier. With rough weather in prospect and additional troops to supply, Hamilton proposed a second landing of two divisions on the flatter ground around Suvla Bay.

This area could then be used to accommodate stores to supply the Anzacs to the south. To the confusion of almost all historians since, who have not appreciated that the primary aim of the operation was to establish a base at Suvla Bay, Hamilton specified that when it had secured Suvla Bay as a base, this force should, if circumstances permitted, aid Bird wood's attack in any way possible.

The main attack was launched from Anzac on the night of 6 August. The plan was for two columns of troops to seize the foothills that commanded the routes to the summit of the ridge. Then two more columns would pass through them and capture the three major heights (from north to south, Hill 971, Hill Q and Chunuk Bair). Once these summits had been taken a force would move along the crest line down towards the Old Anzac perimeter. At the same time troops from Old Anzac would attack towards the main ridge. In this way the formidable positions of Baby 700, Battleship Hill and the Nek would come under simultaneous assault from two directions. When these attacks joined hands all of the main ridge would be in Allied hands and a drive towards the Narrows could be organised.

A diversion at Lone Pine by the 1st Brigade began on the 6th. It was designed to draw Turkish reserves away from the main battle. In every way it was a debacle. The attack was costly (over 2000 men killed) and by the time the Turkish reserves arrived it was clear that they were only facing a diversion. The Turkish troops attracted to Lone Pine were eventually used to help thwart the main advance. As for the main attack, the covering force succeeded in clearing the foothills, but the incredibly rugged nature of the country, the lack of good maps and the sheer confusion caused by a night attack ensured that the operation was well behind schedule when the main columns began their approach march. The left column, which was to capture Hill 971 and which had the furthest to go, never had a chance. The leading troops (4th Australian Brigade, commanded by Monash) were soon lost in the unmapped gullies and by dawn were nowhere near their objective. The right column (29th Indian Brigade and a New Zealand brigade) eventually got within a few yards of Chunuk Bair but was too weak to advance further. The first attempt on the ridge had failed.

After resting the exhausted troops on the 7th, a new assault on the summit was organised for the 8th. Some success was obtained with a New Zealand force actually occupying Chunuk Bair. On the 9th a further attempt saw Hill Q fall to a contingent of Gurkhas. Two summits of the ridge were now in Birdwood's hands. Neither was to remain so for long. The Gurkhas were shelled off the ridge by the Navy who in attempting to support the troops dropped a salvo of shells short. Then the Turks counter-attacked in strength and drove the New Zealanders from Chunuk Bair.

The main ridge was now completely in Turkish hands and was to remain so.

One further action of the August attack has burnt itself into Australian consciousness. This was the attack on the Nek. In the early morning of 7 August the 10th and 8th Light Horse, who acted as infantry, assembled for the attack.

A bombardment of the Turkish positions commenced. Then seven minutes before the attack was to go in the bombardment stopped. The operation was ordered by the local command to go ahead anyway, despite the lack of protecting shellfire and the absence of the New Zealand infantry who were supposed to assault simultaneously down the ridge.

Three lines of light horsemen went over the top only to be shot down immediately by the unhampered Turks. At the end of the day 375 of the 600 attackers had become casual ties. Of these 234 were dead. Their sacrifice was useless. The New Zealanders, as, we have seen, were not in any position to attack down the ridge to support them.

On the August operation as a whole there has been much debate. Some authorities have claimed that the August attack came within a narrow margin of success. While it is true that for short intervals troops did hold two of the key summits of the Sari Bair Range, these troops were very few in number.

In no sense can it be said that these forces ‘occupied the ridge'. After the machine guns of the New Zealanders on Chunuk Bair had been knocked out, they had nothing more than rifles with which to defend themselves. There was of course no artillery support. In these circumstances it was only a matter of time before these positions were lost to Turkish counter-attacks. To hold the positions in strength almost the entire force at Anzac would have been needed on the crest of the ridge, and given the nature of the country this would have taken many more days to organise than Birdwood had at his disposal. Turkish reinforcements could always reach the high ground faster from their side of the range than the Anzacs could from theirs.

The point also needs to be considered that it would have taken a very large force to occupy the entire range from Hill 971 to Battleship Hill. Even if this had been accomplished, supplying such a force with food and ammunition across the rugged and twisted ravines might have proved impossible.

The small number of men above the Apex on Chunuk Bair had received little food, less water, a negligible amount of rifle ammunition and no bombs. In any case, capturing the ridge and supplying the troops would not have marked the end of the battle. Birdwood's original plan saw this only as the first stage. The second stage involved pushing reinforcements across the peninsula under the cover of the force on Sari Bair. In August no reinforcements were available for that task, but it is doubtful if they could have been supplied with water had Hamilton been able to offer Birdwood an extra division. Finally, pushing forward from Sari Bair would not have been a simple matter. Although Sari Bair Ridge was the highest on that sector of the peninsula, there were still many difficult ridges to traverse before the Narrows were reached.

And the Anzac troops had proved that an enemy in control of the high ground did not necessarily mean that the troops lower down the slopes were automatically doomed.

The other debate concerns the role of the British forces landed at Suvla Bay. The troops landed on the night of 7 August. They suffered heavy casualties in the initial phase, especially among junior officers, and this factor, along with lack of water and clear instructions, delayed their advance on the hills overlooking the bay. By the time an organised advance was attempted the Turks were in control of the heights. Any further British advance was blocked. The fail ure of this force has often been said to have denied the Anzacs the support they needed to succeed. This scenario misunderstands both operations. As has been shown, the Anzac attack had not even come close to success. In addition, it was the main task of the Suvla force to establish a base for the winter. Then they were to secure the overlooking ridge. Only when they had accomplished these tasks were they to turn their attention to Anzac. In fact there was never any chance even if these objectives had been taken with expedition that troops in sufficient strength would have been available to negotiate the tortuous country between Suvla and Hill 971 and make a material contribution to Birdwood's operations.

The attempt to capture the Sari Bair Ridge in early August was really the last hurrah of the Gallipoli expedition-There was a great deal of confused fighting around Hill ,60 at the end of August badly handled and causing high casualties for a feature of dubious tactical value. But there ere to be no more large attacks.

Back in London the Dardanelles Committee debated the possibility of evacuation. In October they replaced Hamilton with General Sir Charles Monro who recommended that the whole force be removed. Hesitation in the face of this resolute advice led to Kitchener being sent out to confirm that Monro was correct. After further hesitation he did. Once more the politicians baulked this time because of a naval opinion that after all they could force the straits unaided.

This was rejected for the nonsense it was and it was finally decided in December to withdraw the troops. The wisdom of this decision had already been confirmed by a great storm which struck Anzac in November. Gales, sleet and finally snow caused over 3,000 cases of frostbite and trench foot, washing away some of the trenches and causing a great deal of discomfort and misery.

The evacuation, which was largely planned by Bird wood's Chief of Staff, Brigadier-General C. B. B. White, has been hailed as the best-executed operation of the campaign.

It was certainly a masterpiece of planning. The troops were removed over a period of several weeks, various ruses being employed to convince the Turks that the line was still solidly held. Eventually, on 19 and 20 December, the evacuation of Anzac and Suvla was complete. There was hardly a casualty. Whether the success of the operation was due to the planning or whether the Turks, remembering their experience of 19 May, were reluctant to attack in the open an enemy that was in any case departing, cannot be stated for certain.

Whatever the reason, the Gallipoli experiment was at an end.

The Gallipoli operation cost 26,111 Australian casualties of whom 8,141 were killed. In addition New Zealand lost 7,571 men of whom 2,431 were killed. (Britain lost a total of 120,000 casualties at Gallipoli and the French 27,000. The Turkish total is very speculative probably about 220,000 with a much higher percentage killed.) To what end did these men die? It has to be said that Gallipoli had no influence on the course of the war as a whole. More depressing still, even if the expedition had succeeded in its aims, it is doubtful if the war would have been shortened by a single day. The problem was that the premises upon which the operation was based were very dubious. The planners never doubted that if the fleet got through to Constantinople the Turks would surrender. There seems to be no evidence for this. The Turkish government was certainly making every sign of defending its capital.

What would have happened had the fleet arrived and the Turks fought on? Could the fleet have been supplied? Would the British have reduced Constantinople to rubble? Even had the city fallen little need have followed. The Turkish government might have decamped into the interior of Anatolia and fought on. In this scenario would the Balkan states have been so impressed by the fall of Constantinople that they would have rallied to the Allied side? It seems unlikely. It is far more likely that they would have been impressed by the series of mighty defeats inflicted on the Russian armies to their near north by the Germans in this period.

Even had the Balkan states joined the Allies, their accession would have been a dubious advantage. Their peasant armies were under-equipped (and the Allies had no surplus equipment with which to supply them), ill-trained, poorly led and fractious to a degree that must have placed any long-term cooperation between them in doubt. Nor were communications along the Danube sufficient to sustain large armies for considerable periods of time. In any case the Austrians had the line of the Alps to sustain them in the unlikely event of these peasant levies driving them back.

Finally, none of this had any implications for the German Army on the Western Front. This Army was the main engine of the war for the central powers and the Western Front was the main theatre. The Germans would have to be defeated in north-western Europe before the war could end.

As far as the Anzac troops were concerned, the only thing to be said for the Gallipoli operation was that it kept them away from the Western Front for at least a year. Had they arrived in France in early 1915 their casualty list (as operations around Pozieres would subsequently prove) would certainly have been much higher than it was at Gallipoli.


Further Reading:

Battles where Australians fought, 1899-1920

Light Horse Battles

Gallipoli Campaign


Citation: The Oxford Companion to Australian Military History, Gallipoli

Posted by Project Leader at 12:01 AM EADT
Updated: Thursday, 26 July 2012 5:12 PM EADT
El Burj, Palestine, 1 December 1917, 8th Light Horse Regiment War Diary Account
Topic: AIF - 3B - 8 LHR

El Burj, Palestine, 1 December 1917

8th Light Horse Regiment War Diary Account


8th Light Horse Regiment War Diary, Saturday, 1 December 1917, page 1.


War Diary of the 8th Australian Light Horse Regiment, AIF

The War Diary provides an excellent reference to the day to day activities of note that occurred within a particular unit. They were never designed to be histories in themselves but aids to future historians who wish to write about their deeds. The War Diary was often written up at the end of the day when most men were weary and seen as just another useless activity demanded by "the Heads" in far off places. It was only years later when unit histories were produced that the value of the War Diaries became to be realised by the men. The result is that the War Diary is usually light on detail. These details can be supplemented by Routine Orders and signals where these may exist.


The entry for Saturday, 1 December 1917 is transcribed below.


War Diary Entry


Saturday, 1 December 1917

8th Light Horse Regiment Location -

El Burj.

8th Light Horse Regiment War Diary -


Line was all quiet until 0030 on 1 December 1917 when Captain Walker, MC, "B" Squadron, reported enemy concentration on his immediate front. Brigade Headquarters were wired immediately, priority, for reinforcements.

The enemy attacked about 250 strong with many bombs at 0045 and after half an hour's heavy fighting at very close quarters, "B" Squadron were compelled to fall back to (Major Crawford's) "C" Squadron's position. Here a fresh line was made, every available man being in the firing line.

48 men of the Gloucester Yeomanry, under Lieutenant Colonel Palmer, arrived at 0200 and the enemy just then made a fresh assault. One company of the 4th Royal Scottish Fusiliers under Captain Henry arrived at 0230 and all were immediately sent into the line.

The enemy made two distinct rushes with about 500 men, and were each time held off with a very heavy close range fire.

The fighting gradually diminished and the enemy position was rendered absolutely safe by the arrival at 0430 of another Royal Scottish Fusiliers company who were kept in supports. "B" Squadron took possession of their original position and touch was again made with 4th Light Horse Brigade on right flank.


8th Light Horse Regiment War Diary, Saturday, 1 December 1917, page 2.


Throughout the hours of fighting there was much heavy bombing, especially on the part of the enemy who were evidently well supplied. Our Mills Grenades were very superior and effective. The 9th Light Horse Regiment had managed to get a rearguard machine gun fire and this partly had the effect of cutting the enemy off from Shilta Village.

At daybreak the survivors surrendered amounting approximately to:-

6 Officers (including the Battalion Commander), and 112 Other Ranks, and about 20 wounded.
The enemy dead amounted to approximately 100. (20 on "B" Squadron's ridge and 80 on "C" Squadron's ridge.) 
The Royal Scottish Fusiliers and Yeomanry did splendid work and had it not been for their very quick arrival after the alarm, the Regiment would have received a very severe handling.
Our casualties were (approximately) 2 Officers - Captain Fay and Lieutenant SK Moore killed and 5 Other Ranks and 2 Officers and 35 Other Ranks wounded (one of them since died). All ranks displayed great intrepidity and dash throughout.
Major General Hodgson visited the Regiment next morning and personally expressed his pleasure and congratulations. The two attached telegrams are copies of those received from Desert Corps and 20th Army Corps.
During the morning the Royal Scottish Fusiliers were withdrawn and the Regiment continued to hold the line with the Gloucester Yeomanry in supports. Much booty was collected throughout the day included in which were 8 new type automatic rifles.

The 6th Nottinghamshire Battalion (2 Companies) reported to Regimental Headquarters as reserves at 2030 and retired at 0500 on 2 December 1917.

During the day a wire was received containing the following awards:

405 Lance Corporal J Kerr, Military Medal
1176 Trooper ES Ackland, Military Medal
3103 Trooper L Taylor, Military Medal

Regiment held firing line as taken over on night of 30 November / 1 December, with Gloucester Yeomanry in supports. At 0230, 1 Company South Nottinghamshires reported at Reserve Troops and remained in vicinity of Regimental Headquarters until 0500, 2 December 1917.


Roll of Honour

8th LHR, AIF, Roll of Honour, Ernest Bell

8th LHR, AIF, Roll of Honour, James Egan

8th LHR, AIF, Roll of Honour, George Fay

8th LHR, AIF, Roll of Honour, Charles John Grachan

8th LHR, AIF, Roll of Honour, Thomas Lister Grove

8th LHR, AIF, Roll of Honour, Alexander McKinnon

8th LHR, AIF, Roll of Honour, Samuel Vincent Moore

8th LHR, AIF, Roll of Honour, Stanley John Turner

Lest we forget


Further Reading:

Battles where Australians fought, 1899-1920

The Battle of El Burj, 1 December 1917

8th Light Horse Regiment, AIF


The War Diary of the 8th Australian Light Horse Regiment, AIF is held by the Australian War Memorial and available online at no cost.


Citation: El Burj, Palestine, 1 December 1917, 8th Light Horse Regiment War Diary Account

Posted by Project Leader at 12:01 AM EADT
Updated: Monday, 13 July 2009 10:54 PM EADT

Newer | Latest | Older

Full Site Index


powered by FreeFind
Let us hear your story: You can tell your story, make a comment or ask for help on our forum.

Desert Column Forum

A note on copyright

The Australian Light Horse Studies Centre is a not for profit and non profit group whose sole aim is to write the early history of the Australian Light Horse from 1900 - 1920. It is privately funded and the information is provided by the individuals within the group and while permission for the use of the material has been given for this site for these items by various donors, the residual and actual copyright for these items, should there be any, resides exclusively with the donors. The information on this site is freely available for private research use only and if used as such, should be appropriately acknowledged. To assist in this process, each item has a citation attached at the bottom for referencing purposes.

Please Note: No express or implied permission is given for commercial use of the information contained within this site.

A note to copyright holders

The Australian Light Horse Studies Centre has made every endeavour to contact copyright holders of material digitised for this blog and website and where appropriate, permission is still being sought for these items. Where replies were not received, or where the copyright owner has not been able to be traced, or where the permission is still being sought, the Australian Light Horse Studies Centre has decided, in good faith, to proceed with digitisation and publication. Australian Light Horse Studies Centre would be happy to hear from copyright owners at any time to discuss usage of this item.

Contact

Australian Light Horse Studies Centre

eXTReMe Tracker