"At a mile distant their thousand hooves were stuttering thunder, coming at a rate that frightened a man - they were an awe inspiring sight, galloping through the red haze - knee to knee and horse to horse - the dying sun glinting on bayonet points..." Trooper Ion Idriess
The Australian Light Horse Studies Centre aims to present an accurate history as chroniclers of early Australian military developments from 1899 to 1920.
The Australian Light Horse Studies Centre site holds over 12,000 entries and is growing daily.
Contact:Australian Light Horse Studies CentreLet us hear your story:
You can tell your story, make a comment or ask for help on our Australian Light Horse Studies Centre Forum called:
Bir el Mazar, Sinai, 17 September 1916, Idriess Account Topic: BatzS - El Mazar
Bir el Mazar
Sinai, 17 September 1916
Outline
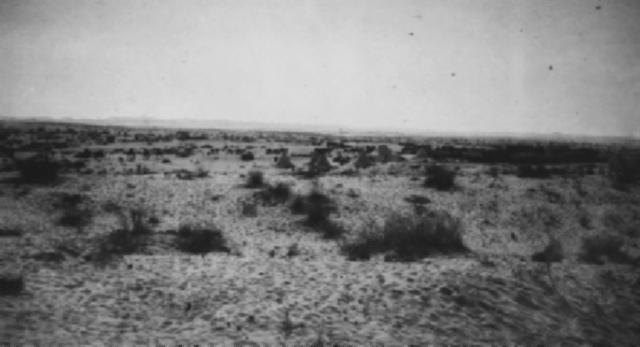
View of Mazar with the hills in the background
[H Maunder, January 1917.]
The following outline was extracted from the book written by Lindsay Baly, Horseman, Pass By, East Roseville, N.S.W.: Simon & Schuster, 2003, Ch. 6.
There was a Turkish garrison at Bir el Mazar, only twenty miles short of El Arish on the direct track, believed to be 2200 strong and made up of Romani survivors. It was decided to mount an attack on this on 17 September, but there was no water supply for horses between Mazar and Salmana and it was necessary to improvise one to avoid a dry round trip of 37 miles. The mid-September weather was still hot.
Seven hundred camels no less, each carrying a twenty-gallon fantass of water, were to rendezvous with Chauvel's troops ten miles east of Salmana on their return journey. This was only one oddity in this untypical and, in the end, controversial operation.
On 15 September, Chauvel's three Australian brigades marched to Salmana. They were sighted there on the 16th and machine-gunned by a German aircraft which no doubt informed the garrison at Mazar of its discovery. After dark, the 2nd Brigade, now once more under Brigadier General Ryrie and the 3rd Brigade under Royston, marched on Mazar while the 1st Brigade followed about seven miles in rear.
At dawn, Ryrie's 5th and 7th Regiments dismounted and advanced to within 700 yards north and west of the Turkish trenches. There was stiff resistance from enemy mountain batteries and rifles. The 3rd Brigade swept right round the position and began attacking it from the south and east so that the Turks were virtually defending on all sides, A battalion of the Imperial Camel Corps should have attacked with them, but was late due to a difficult passage through single-file gullies and soft sand.
That was the situation soon after daylight, according to Gullett's Official History. Despite the absence of the camels, all ranks were confident of carrying the position. They had carried harder ones. From this point, however, differences in reported events and perceptions appear in Gullett's account and Colonel Richardson's history of the 7th Regiment.
Richardson said the regiment was checked close to the Mazar ruins where the enemy was strongly entrenched in commanding positions, but it seemed possible to assault the place and preparations were in progress, Then the 7th received a message that the 3rd Brigade had been held up and was withdrawing. 'Some of their troops crossed our frontage and being in close formation, received concentrated fire from the enemy and sustained a number of casualties. Our field guns had opened fire, but although the enemy were firing in plain view from our position, and messages were sent to that effect, no attempt was made to shell them.'
Gullett said that the ANZACs' field guns had not up to this time come into action, but Richardson said he saw them firing. According to Gullett, Royston had advised Chauvel of his 'unfavourable view of the project' and after the 3rd Brigade had been held up for 'nearly three hours', at 7 am Chauvel decided to break off the engagement. But Richardson sounds as it the 3rd Brigades withdrawal was a surprise to him: he was not preparing to leave, but was preparing to assault the enemy. This begs the question of whether the 7th got the message to break off at the same time.
When the order did come, the 7th could not leave the front line until they got a man, badly wounded in the abdomen, away in a sand cart. In the rescue three more men were wounded and 'our casualties for this ineffective little action were 1 killed 5 wounded: and two men subsequently died of wounds'. Richardson was not happy. 'As no bivouac had been indicated, it was presumed that Ge' Ella would be the place, but we arrived there only to find it deserted. Much trouble was experienced watering the horses from buckets and at 8 p.m., it was decided to return to Salmana.' He concludes:
The Mazar stunt was most strenuous and tested the endurance of men whose vitality had been greatly decreased by the fighting, fatigue and heat of the last few months'. One suspects he wanted to add, 'for nothing'.
Gullett acknowledges the engagement was always afterwards referred to in terms of strong disapproval by regimental officers who participated. Not only officers. Idriess says, 'We retired at midday furious about it all, certain that a determined gallop would have ridden down the redoubts ... We swore at the Heads, whomever they might be. With this little lot, we should have eaten Mazar.'
It seems that different beholders, Rashomon-like, interpreted the same things in different ways, and as a whole the abortive battle could be seen in two ways. Either as an unimportant sideshow, not worth the sacrifice of any more lives, or, however it was, the Light Horse should not have been committed if it was not intended to win. The withdrawal diminished their proud service.
Chauvel has absolute right to the last word. He had categorical orders from General Lawrence that if 'the garrison was not taken by surprise and overrun in the first rush, he was to consider the operation a reconnaissance in force and withdraw'. On no account was he to seriously involve his brigades. When 'Galloping Jack' Royston, the last man in the army to vacillate before unfavourable odds, look a poor view of his chances after being held up for three hours, Chauvel s duty was clear to him. He would doubtless also have been influenced by the wretched prospects for his wounded, so far from aid, should the engagement prove expensive. He acted, and a commander in battle does not argue his case.
But there could be no equivocation over the scheme for watering the horses. It was a shambles.
That the 700 camels were in place and on time says something for the project, but the watering of 3000 desperate horses calls for expert handling, experience and skill. The Light Horse had their own methods and equipment, in which long canvas troughs were instrumental, but the supply camels carried only buckets. At one or two horses per bucket, it seems an entangling, burdensome method, even with quiet and biddable animals.
Bir el Mazar, Sinai, 17 September 1916, 1:40,000 map of Bir el Mazar Topic: BatzS - El Mazar
Bir el Mazar
Sinai, 17 September 1916
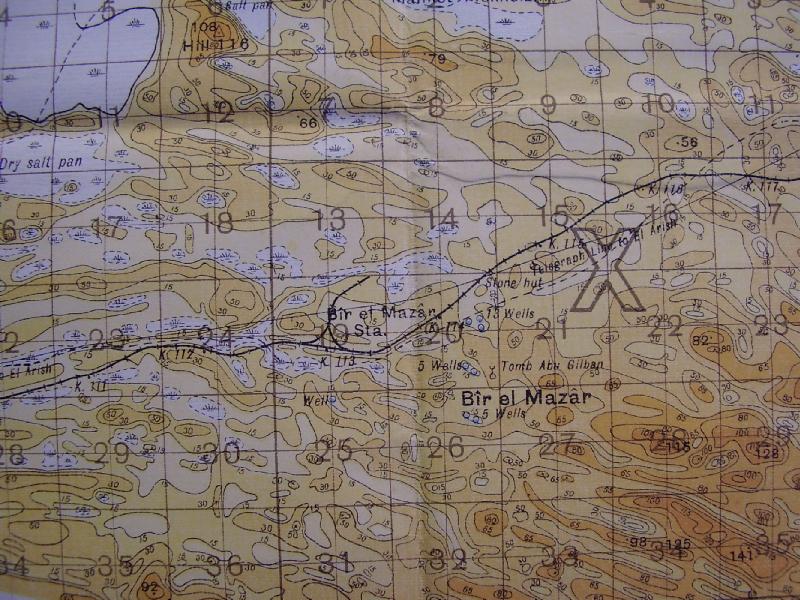
1:40,000 map of Bir el Mazar
Contour Map of the Area around Bir el Mazar
[Click on map for larger version.]
The above map was drawn up by the Aerial Mapping Section in Cairo, 8 February 1917. This map illustrates the area surrounding Bir el Mazar where the Light Horse and Ottoman forces fought each other on 17 September 1916. The nature of the terrain is well demonstrated as well as the emerging mapping skills derived from aerial photography, a skill in its infancy but becoming increasingly sophisticated. The map enables a reader to follow the details given in the various accounts to pin point accuracy.
Calculating distances on this map is simple. Each numbered square is 1,000 yards by 1,000 yards.
Bir el Mazar, Sinai, 17 September 1916, Roll of Honour Topic: BatzS - El Mazar
Bir el Mazar
Sinai, 17 September 1916
Roll of Honour
Poppies on the Roll of Honour, Australian War Memorial, Canberra
The Roll of Honour contains the names of all the men from the Anzac Mounted Division known to have served and lost their lives or were injured during the Battle of Bir el Mazar.
Bir el Mazar, Sinai, 17 September 1916, Gullett Account Topic: BatzS - El Mazar
Bir el Mazar
Sinai, 17 September 1916
Gullett Account
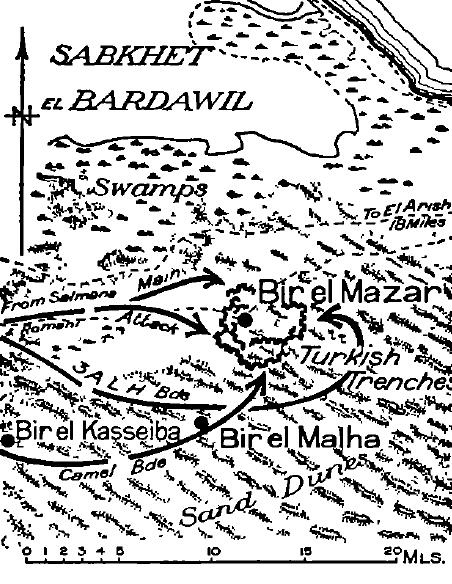
Map detailing the attack on Bir el Mazar
[Extracted from Gullett, HS, The Australian Imperial Force in Sinai and Palestine, 1914–1918, p. 198.]
Gullett, HS, The Australian Imperial Force in Sinai and Palestine, 1914–1918 (10th edition, 1941) Official Histories – First World War Volume VII
Chapter XIII
The Advance to El Arish
Early in September it was decided to make an attempt against the Turkish garrison at Mazar, some forty-four miles east of Romani, on the main northern track towards El Arish The Turkish force was believed to be 2,200 strong, made up of remnants of the troops which had fought at Romani, and supported by four mountain guns, a few anti-aircraft guns, and ten machine-guns. As there was no water-supply for the horses east of Salmana, 700 camels were organised to carry about twenty gallons each to a point ten miles east of Salmana, to meet Chauvel's troops as they returned, and provide a drink for the animals of two brigades. The 2nd and 3rd Light Horse Brigades, with the 1st Brigade as covering troops, were the main attacking body, supported by two batteries of Royal Horse Artillery. A few Australian companies of the Imperial Camel Corps, commanded by Captain G. F. Langley,* and supported by two guns of the Hong Kong and Singapore Mountain Battery, were ordered to proceed across the sands to the south, destroy a Turkish post believed to be at Kasseiba, and then join up with the main body before Mazar at daylight on September 17th.
The engagement at Mazar was always afterwards referred to in terms of strong disapproval by the regimental officers who participated. Soundly entrenched, the Turks occupied a bare sand-ridge with a good command over the approach from all sides, although most of their trenches faced west. On the night of the 15th Chauvel led his three brigades as far as Salmana, and remained there under the palm hods during the day of the 16th. The cover, however, was but slight; in the afternoon the Australians were discovered and machine-gunned by a German airman, and a few casualties were suffered. The pilot doubtless informed the garrison at Mazar of the British advance, and Chauvel was thus robbed of the chance of a surprise assault. Soon after dark the 2nd Brigade, which was now again under Ryrie's leadership, and the 3rd Brigade, under Royston, moved out and marched for Mazar, while the 1st Brigade followed for about ten miles and then remained in support. Ryrie appeared on the west of the enemy's position at dawn, and the 5th and 7th Light Horse Regiments, dismounting from their horses, advanced to within 700 or 800 yards of the trenches. A few small outposts were rushed and carried, but the advancing line then encountered sharp fire from mountain batteries and rifles at an effective range. At the same time the 3rd Light Horse Brigade had come up on the south, where Royston was looking out keenly for Langley's battalion of Camels. Langley, however, was late. He had found his route extremely sandy and slow, and in places the gullies between the dunes were so narrow that his men had to pass in single file. The 3rd Light Horse Brigade closed on the position on a very light front extending over two miles, with the right flank round as far as the telegraph wire on the east, which was cut. The whole line met with stout resistance; but the squadrons to the east were looking into the trenches from the rear, and all ranks of the 3rd Brigade, like those of the 2nd, were confident as to their capacity to carry the position with - out heavy losses.
Chauvel had explicit orders that, if the garrison was not taken by surprise and Overrun in the first rush, he was to consider the operation a reconnaissance in force and withdraw. On no account was he seriously to involve his brigades. Royston, on the south and south east, took an unfavourable view of the prospect; after the regiments had been held up for nearly three hours Chauvel decided at 7 o'clock to break off the engagement. Chauvel was doubtless influenced by the absence of the camel detachment, and also by the fact that, owing to a miscalculation by the native guide (a sergeant in the Sinai police), his two batteries had not up to this time come into action. A further consideration, and one which always weighed with Chauvel, was the wretched prospect ahead of his wounded if the engagement should prove expensive. Langley arrived between 7 and 8 o'clock, after the brigades had withdrawn, and the division then marched back to the water dCp8t. Chauvel was satisfied that, in the circumstances, he had correctly interpreted his unsatisfactory orders, and Murray fully endorsed his decision; but throughout the regiments there was bitter disappointment. The casualties of the division, most of which were suffered by the 7th Light Horse Regiment, were one officer and two other ranks killed, and nineteen other ranks wounded, while one Turkish officer and seventeen other ranks and a few Bedouins were captured.
Lieutenant F. W. Slatter of the 3rd Brigade Machine-Gun Squadron, was killed as he brought a machine-gun into action. The ambitious scheme for watering two brigades in the desert-which in its magnitude was probably without parallel - was frustrated by the absence of proper arrangements at the depot. Sound organisation had deposited 14,000 gallons of water at the appointed place, but adequate steps were not taken to make it available for the horses. As the regiments arrived, there was a wild, disorderly scramble about the troughs. The water was exhausted before a large portion of the two brigades had come up, and many horses went thirty hours without a drink. The protracted desert work was now telling heavily on the horses, particularly on those of the 1st and 2nd Brigades, which had been so long upon the desert. They were much reduced in condition, and had taken to eating the sand and camp refuse. The horsefeed coming forward from Egypt and other sources was of wretched quality, and it was plain that either negligence or corruption was responsible for the approval of it at the base. After Mazar the 1st and 2nd Brigades were ordered back to the Canal for a richly earned rest.
The enemy's estimate of the strength of his position at Mazar, and the degree to which he considered it menaced by Chauvel's troops on September 17th, were shown by his evacuation of the place two days later. Romani, however, continued to be for some time the advanced base of the British army; but substantial mobile forces were now encamped in advanced positions to the east of that stronghold, and were also extended over the oasis area to the south.
The Australian Light Horse Studies Centre is a not for profit and non profit group whose sole aim is to write the early history of the Australian Light Horse from 1900
- 1920. It is privately funded and the information is provided by the individuals within the group and while permission for the use of the material has been given for this
site for these items by various donors, the residual and actual copyright for these items, should there be any, resides exclusively with the donors. The information on
this site is freely available for private research use only and if used as such, should be appropriately acknowledged. To assist in this process, each item has a citation
attached at the bottom for referencing purposes.
Please Note: No express or implied permission is given for commercial use of the information contained within this site.
A note to copyright holders
The Australian Light Horse Studies Centre has made every endeavour to contact copyright holders of material digitised for this blog and website and where
appropriate, permission is still being sought for these items. Where replies were not received, or where the copyright owner has not been able to be traced, or where
the permission is still being sought, the Australian Light Horse Studies Centre has decided, in good faith, to proceed with digitisation and publication. Australian Light
Horse Studies Centre would be happy to hear from copyright owners at any time to discuss usage of this item.