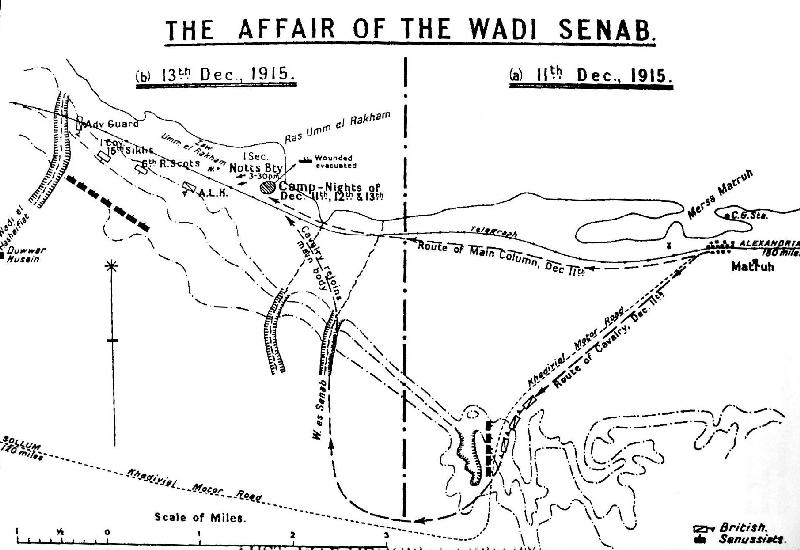
Topic: MilitiaRC - Rifle Clubs
Australian Militia Force Structure
The Rifle Club Movement
A Distinct Factor in the Defence Problem.
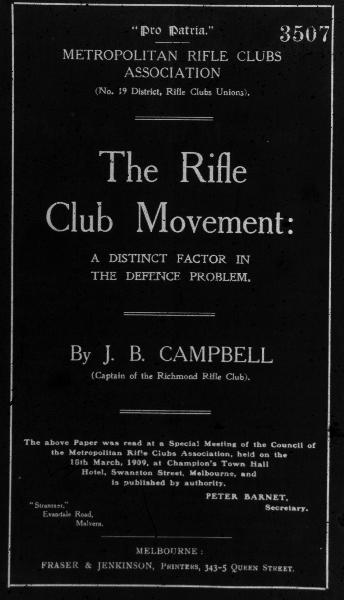
Cover of the report
This interesting essay called "The Rifle Club Movement: A Distinct Factor in the Defence Problem" was read at a Special Meeting of the Council of the Metropolitan Rifle Clubs Association, held on 16 March 1909, at Champion's Town Hall Hotel, Swanston Street, Melbourne. It was subsequently published as a pamphlet by Fraser and Jenkinson, Printers, 343-5 Queen St., Melbourne. It maps the philosophy that lay behind the Rifle Club Movement in Australia prior to the Kitchener Report of 1910.
"PRO PATRIA."
METROPOLITAN RIFLE CLUBS ASSOCIATION
(No. 19 District. Rifle Clubs Unions).
The Rifle Club Movement:
A DISTINCT FACTOR IN THE DEFENCE PROBLEM.
By J. B. CAMPBELL
(Captain of the Richmond Rifle Club).
TWENTY years hence, when a history of the defence system of Australia shall have been compiled, not' the least interesting chapters will be those relating to the Rifle Club Movement and its development.
The period to which the historian will chiefly refer for his facts will be during the two years immediately preceding, and the ten years following upon, the establishment of the Commonwealth.
During this period, an aspiration of the people found expression, and made itself sufficiently intelligible, to be not only capable of definition, but of receiving a suitable organisation, and to be recognised as a factor in the defence problem.
There is something about our Rifle Club Movement which causes it to be viewed with feelings of misgiving by many honest-minded military men of the Conservative type, and by those who claim to be progressive it is regarded as something which must be understood, and in some way identified with the military forces.
It is quite possible the movement has more to fear from its military friends than from thus pronouncedly hostile.
The Rifle Club Movement has been defined as a manifestation of the spirit of the people concerning defence; as an acknowledgment or recognition by the manhood of the Commonwealth of the fact that, should an enemy ever land on these shores, they must meet him.
If we are then, as a nation, living in conformity with Divine law, we need not fear the issue.
My object to-night is to show the Rifle Club Movement as a civilian institution, as a distinct factor in the defence problem. It possesses a personality of its own, which must be preserved, and, -whilst its course lies parallel and in harmony with the military forces, it must ever be absorbed or dominated by them.
I would like it clearly understood from the outset that the term "military domination", is used in no offensive sense whatever. It is a convenient expression; it expresses a fear on the part of rifle Cub members---a fear that is instinctive rather than logical, and, consequently, somewhat difficult to express, but certainly not less real on that account. It is an instinctive knowledge, that whilst an intimate relationship must exist, a mesalliance will be demoralising and disastrous to both.
I think, too, that by giving this instinctive dread of absorption the fullest publicity, and following up any train of thought it may suggest to its logical conclusion, the light may come which will lead to a complete understanding.
If we can establish our movement as a manifestation of the spirit of the people, we will have established something which must command the most profound respect and attention; something which must not only not be ignored, but to oppose which will be futile.
We will at once concede that the military forces constitute, not only the arm which strikes, but, in the fullest meaning of the words, the intelligence which makes them efficient and effective, and clam that the spirit of the people is the will power, the power which sustains and vitalises, which enables and requires each member of the body corporate to perform its legitimate functions.
The highest degree of military efficiency to which any nation may attain is to establish complete harmony between its military forces and the spirit of its people.
The spirit of the people is the exact measure of the capacity of the community for effective resistance.
As captain and enrolling officer of one of the strongest clubs in the Commonwealth, it is my privilege to receive the first confidences of new members. These are uniformly of such a character as to cause me to be proud of my countrymen, proud to be an Australian. One of the members expressed it as: “Captain, my object in joining the rifle club is that, should the country ever want its men to turn out, I don't want to be a damned fool." Any man who can give expression to this sentiment, however roughly, is to me a man and a b. other.
This is the sentiment which binds us, and, taken in the aggregate as expressive of a willingness on the part of the community to make sacrifice for the protection of our homes, is what we mean when me speak of “The Spirit of the People concerning Defence."
The history to which I have alluded will contain the life story of two of our most eminent citizen soldiers - Lt.-Colonel Sir Frederick Sargood and Colonel J. M. Templeton.
I do not mean that these men either established the Rifle Club Movement, or marked it with their personality. The nature of our movement precludes such a possibility. But a study of their lives, in their simplicity, their constancy to their youthful ideal, their transparent honesty, and sincerity of purpose, forms a faithful illustration of the spirit which animates our movement.
The Rifle Club Movement was surely sanctified by the fact that the special services rendered by these talented men were just prior to their decease, and form a fitting climate a devoted and eminently successful career.
With faculties rendered more acute by the approach of death, the prompting of their spirit, and the wisdom begotten by a well-spent lifetime, showed them it was only in an atmosphere of the most absolute freedom that the inner life of the movement would find expression.
The special service which Sir Frederick Sargood rendered was to free the movement from military domination.
That which Colonel Templeton did was to secure it a suitable organisation.
It was something more than a coincidence, or mere fortuitous combination of circumstances, which, at such a critical period in the history of our movement. Tare to it two glen so well able to interpret its spirit. It is an evidence that mighty influences are at work. When the time serves, the man also will be at hand.
Colonel Templeton was a man essentially a soldier. Military in all his habits, military by instinct and by training, he knew no recreation apart from military exercises. He brought an untiring zeal and boundless enthusiasm to every task he undertook.
Sir Frederick Sargood was a man of more diversified attainments and, whether his career is viewed from the military, the social, the commercial, or the Parliamentary standpoint, the same record of successful achievement will be revealed.
Neither of these men knew, nor sought, a royal road to success. They looked for no reward, except as a result of honest effort. They were too practical-minded to allow either fate or luck a place in their calculations. They were both born leaders of men, and possessed a full measure of those rare qualities which inspire zeal, enthusiasm, and devotion, in all those who submit to their leadership.
Constituted as the Victorian Parliament is--the most Conservative of Australian Parliaments-it is not easy to understand how such a radical departure from established military precedent as making provision for independent control of rifle clubs was effected. Some wonderful influence was exercised to cause a body so steeped in ultra-Conservatism as the Legislative Council of Victoria to belie its reputation, and its traditions, and allow the force of law to he given to such forward legislation as freedom from direct military control of rifle clubs, and the Wages Board system ire our factory laws.
Such an influence was the personality of Sir Frederick Sargood. The liveliest apprehensions and fighting spirit of Conservatism were fully aroused by both these measures. Argument had been exhausted without bringing conviction. Conservatism is superior to logic, and peculiarly susceptible to personal influence. It was to the tact and beautiful personality of Sir Frederick that a way out was found, and the Minister of Defence, rather than the Military Commandant, became the actual head off the Rifle Club Movement.
Before proceeding further, and because I want our discussion to have practical issue, I would like to know that we are in agreement upon our premises, else our talk may become like an harangue between a Freetrader and a Protectionist, or a Conservative and a Liberal, or a capitalist and a labourite.
Each of these may argue honestly, conscientiously, and logically from his own standpoint, but, because they are not in agreement upon their premises, they cannot agree in their conclusions. Each regards the best efforts of the other as just so much vapid utterance.
It is found the only basis of stable government is to recognise these each as an existent force, operating for the commonweal, provide that peace shall be maintained, freedom of conscience exist, and that these forces shall act and react each upon the other, producing a spirit of tolerance and compromise. Whilst each, as a force, remains true to its fundamental principles, and as individuals to the truth as they see it.
To understand the spirit of the people concerning defence, it is necessary to recognise that the military and the civilian are two distinct, but not necessarily antagonistic, forces. That they are distinct phases of the same question.
The premises to which I ask your acquiescence are:-A movement is something which moves. If it becomes stagnant or hidebound it cannot rightly be termed a movement.
Movement is an effect following a cause.
Movement means progression, and implies an objective.
The Means by which expression is sought.
The Intelligence which directs; every throb or pulsation which vitalises; every effort or impulse which bears upon the objective, we designate as The Movement.
Where we have an effect of such a tangible nature as the actual existence of 400 rifle clubs, with a membership of upwards of 20,000 men, in Victoria, the causes which led to their establishment ought to be capable of demonstration. And if we can trace the movement back to its cause, the objective should become apparent.
If our movement is what we claim it to be, we should be able to show it was conceived in the ordinary way; that there is nothing miraculous about it: that it is a visible effect, following an ascertainable cause; that it was conceived as an idea: that it was subjected to the ordinary processes of evolution and became a conviction universally held by the people.
One of my earliest recollections is the withdrawal of the British troops from Australia. I saw the 14th Regiment leave Victoria Barracks, accompanied them to Port Melbourne, and witnessed the embarkation.
As a spectacle, the event was an impressive one, but what it signified made it trebly so.
A great principle was at issue, which when viewed from the differing standpoints of British and colonial, speedily revealed that interests were not identical, or rather that they formed two distinct phase; of the same principle.
The question arose: Will the British troops who are paid by the colonies be available for Australian defence? The reply was: “Not necessarily. In the event of war, British troops must go where they can most effectively be used." No other answer was possible from the Imperial standpoint.
The views of colonial statesmen are, however, limited by their responsibilities and their jurisdiction. To assure a force, however insignificant, being available for local defence, the right of independent control must be conceded.
Many persons find it difficult or cannot discriminate between independent control and independence.
To understand the intensity of feeling which the withdrawal occasioned, it is necessary to know something of contemporary history. A few years previously, the Eureka Stockade incident had transpired. Victoria was occupied wholly by adventurous spirits, freemen from the whole civilised world. And the official classes were largely drawn from, or wholly tainted by administration of the convict system obtaining in other parts of Australia, the attitude adopted by whom speedily gave the fullest play to the spirit of insurrection, which necessitated the services of the soldiers to quell, the memory of which had not been effaced when the question of withdrawal arose.
In America, though the Civil War had ended, a great people were staggering under its awful after-effects. In Europe, first Denmark, and then Austria, had been vanquished by Germany. And the troops from Australia had barely reached European waters when the Franco-Prussian war broke out.
In such stirring times as these, it is small wonder if the exact significance of the withdrawal was rot fully appreciated.
The community was divided into two antagonistic camps. The official and governing classes, who arrogated to themselves the title of loyalists, regarded the bayonet of the soldier as the emblem of authority, the final word, the basis of law and order. These regarded the withdrawal as a most fatuous policy, as a shirking of authority, as a betrayal of their worthy selves, a depth of baseness worthy only of a vacillating and a pusillanimous Parliament.
It was believed in some quarters that the home authorities had acted in a spirit of pique, and, when the colonies refused to pay for the services of the troops, they had only to be withdrawn for these to realise their defencelessness.
It is certain, however, that a large majority regarded the withdrawal as severing the last link with a bad old past.
Democracy had stood defiant, and though, in the actual shock of war, it had been worsted, in all the forms of law and order it proved triumphant, and, standing between the infuriated officials and their exasperated victims, proved conclusively that, for the remedy of all social abuses, the ballot box, in the hands of an intelligent people, is a more potent weapon than the bayonets of the most skilled soldiery.
Then was forced home upon the Australian mind the truth that an idle soldiery is as much a menace to the social welfare as it is protection against a foreign foe; that a free people are the custodians, and must be the guardians of their liberties.
Then was horn the conviction that the citizens themselves must do their own soldiering; that the duty of defence against lawlessness from within, and invasion from without, is an ordinary obligation of citizenship.
This forms the basic principle of our Rifle Club Movement.
In his work on the progress of modern thought, Samuel Laing says: “What the foremost minds think to-clay, the mass of thinkers will think to-morrow, and the day after the great army of non-thinkers will accept as a self-evident fact."
At this latter stage do we stand to-day, and an expectant people awaits action by a hesitating and a halting Parliament.
The first stage may be said to have been from the Eureka Stockade to the withdrawal of the British troops, for then only the foremost minds were sufficiently free from the thraldom of tradition and of caste to discriminate between, righte us resistance and rebellion. The home authorities seem to have accurately diagnosed the trouble, and England's response to her rebellious colonists was not to overawe them with an armed force, but to confer upon them a full measure of self-government, and at a stroke made her troublesome officials amenable to the popular will. So far from having acted in a spirit, of pique, judging the event after a lapse of upwards of fifty years, and in the light of the Treaty of Vereeniging, it is nearer the truth to designate it inspired statesmanship. It is
undoubtedly the secret of England's colonising greatness. The outcome of this trustful confidence by Britain in her colonies is Australian loyalty as we know it.
Freed from military domination, the great mind of the people found itself free to act, and the need for an effective defence system was abundantly apparent. Freedom to act, without the necessary knowledge of how to act, constituted a stage that gave a certain amount of satisfaction to our ultraIoyalists, who themselves were incapable of thinking upon any new lines.
The reluctance to depart from established precedent, the mistakes and errors which have been committed and honestly acknowledged, the follies and conceits which have been slavishly copied and courageously discarded, form the happiest augury for successful achievement, and prove nothing except that our system is being subjected to the ordinary processes of evolution. It is certain that it will eventually adapt itself to its environment.
Some essential factor is not fully recognised. It is the province of the Rifle Club Movement to discover this factor.
The great natural law which underlies the processes of evolution is that of polarity. Every living thing, or principle, is the product of two distinct forces working in harmony, each performing its natural functions. "Male and female created He them" was written early in the world's history.
Animate and inanimate nature is subject to the same laws. Though we have no faculty which enables us to comprehend the mysterious natural forces by which we are surrounded, our senses are given us to recognise those laws in operation, and with which we have no option but to conform. We recognise the province of the pistil and stamen in the vegetable world, environment and heredity in animated nature, the positive and negative currents in electricity and magnetism. The most stable of all known laws, that of gravity, we knew is itself an effect of attraction and repulsion. There can be no like without an unlike, no action without reaction. What is true of the physical is equally so of the psychological. We are on sound ground, and in a fair way to understand, all we can know of any phenomena, if we can discern the forces which are working for their development, and allot to each its proper sphere.
Taking the effective defence of the Commonwealth as our objective, before we can talk understandingly on the subject we must recognise the factors whose operations bring it within the pale of this natural law.
A generation, a full thirty years, passed from the withdrawal of the British troops until the establishment of the Rifle Club 'Movement upon its present basis, which was to recognise it as a civilian institution, and, though its kinship to the military forces is admitted, to assure it an existence free from the possibility of military domination.
This freedom was not attained without determined effort and keen controversy, and this State of Victoria thereby rendered great service to Australia and to the Empire.
The immediate effect was that 20,000 men enrolled, under the freer conditions in this State, whilst during the same period throughout the rest of Australia less that one-third that number were enrolled.
It was at this stage that Sir Frederick Sargood and Colonel Templeton rendered such signal service.
No two men ever occupied a higher position in the estimation of their fellows than did these, upon all matters relating to defence.
Both were of the Conservative school. None had better right to be regarded as a father, for each had grown grey in the service.
The fullness of years alone was responsible for their retirement from active work. Each had entered the service at an early age, had advanced step by step, until they had honourably and ably occupied every position, from the lowest to the highest, open to non-professionals.
The Defence Bill of 1883 was wholly the work of a school of earnest thinkers and workers, amongst whom Sir Frederick then Major Sargood, Colonel Templeton, and Major Christopherson were leading lights, and their onerous services wire rewarded by handsome recognition in the Parliamentary records of the State.
When the wave of patriotic fervour, occasioned by the Boer War, swept over Victoria, none were so admirably qualified to give it direction. The enthusiasm in the other colonies was not less intense, but it was less accurately diagnosed. Rifle clubs were there organised as a military reserve. They were given a military status, armed at the public expense, and required to conform to military conditions.
Colonel Templeton organised them here exactly on the lines of a regimental rifle club, rather than as a military unit, and desired no military status whatever. There is really nothing original about this conception. But there is in its application. It is recognised in military circles as necessary for practice, under other than service conditions, to relax discipline, to suspend military procedure, to obliterate rank, so that soldiers of all arms may, in their own way, perfect themselves, develop proficiency, and learn the wonderful possibilities and accuracy of the modern rifle.
Consider a regimental rifle club at voluntary practice, or a regimental contest. Officers and privates take the mound together, each is interested, not only in his own work, but also in that of his comrade for the time being. Each change of light or wind brings a quiet word of warning or advice from the one disengaged, each result is discussed, and adjustment made. There is a confidence which almost amounts to affection in their wonderful weapons. It is to the human element that all errors are attributed. .-end, in the effort to overcome these errors, gradations in rank are lost. Perfect equality here - the equality which is begotten of accurate knowledge. It is the mastery of mind over matter, intelligence and skill versus the elements.
It is the Cult of the Rifle.
A feature, however, that will at once strike the intelligent observer is that. at no voluntary practice, will more than one-tenth of the enrolled strength of the regiment be present, or sufficiently interested, to take more than a passing interest in the club's proceedings.
It is certain of an equal number of civilians, bound together by the loosest of ties, an equal interest will be displayed and equal results attained. Officers are conspicuous by their absence, or their presence is the exception which proves the rule. They plainly intimate that they are interested mere in the general average than in individual proficiency. The civilian club is wholly the field of the individualistic theory, whilst the military theory is that of socialism. A good general average is the height of military ambition; individual excellence that of the rifle club's. Both are right. They are distinct phases of the same question, and are natural polarities in effective rifle shooting.
The regimental club has no military status whatever. At the word of authority it will cease to exist. All the recognition it desires is to be regarded as the custodian of the honour of the regiment. For purposes other than that of rifle practice it has no reason for existence.
If it is necessary to free a regimental rifle club from all sense of military domination, what deplorable results must follow any attempt to bring civilian clubs under its controlling influence.
These facts were well within the knowledge and clearly in the minds of Sir Frederick and Colonel Templeton. So, too, was the danger of having organised bands of armed men, not fully amenable to discipline, recognised and amply provided against. Rifle clubs in Victoria are not organised as a military reserve. Should an emergency arise, it is intended they shall, as clubs, cease to exist, and the members, as citizens with some skill, be absorbed in the military forces. The act of enrolment is simply an acknowledgment that the individual recognises his liability, as a citizen, to the levee en masse conditions of the Defence Act, that he is interested in defence matters, and will do a citizen's part, not only in obeying the law but also in shaping it.
Rifle shooting is only a phase of rifle club work. It is in their anxiety to see the clubs become more “effective" in a military sense that our military friends are apt to retard rather than to forward such a desirable result.
Colonel Templeton recognised the futility of imparting instruction the members were unable or unwilling to assimilate. i.e. recognised their limitations.
The Rifle Club Movement - regimental and civilian - comprise the thinkers of the community concerning defence, and it absolutely certain the non-thinkers will accept their conclusions as self-evident facts.
The military forces and the spirit of the people are the two polarities, which, working in harmony, will evolve the highest military efficiency of which we, as a community, are capable of attaining.
This principle we want to make sure is embodied in the Defence Bill, anti some attempt made to define the sphere of each.
The morning, nine years ago, when the question was decided whether rifle clubs should be treated as military or civilian, one of our leading daily papers (the " Age ") made comparisons between the opinions expressed in its columns by the advocates of military control and "Our Correspondent. 'Burnley,' " (Capt. Campbell), showing that therein a distinct line of cleavage was revealed. It is that point of cleavage I want to get at tonight and from that point draw a line, broad, palpable, and well defined, separating the essentials for military efficiency from the ordinary obligations of citizenship. Military work should be regarded as services rendered and honestly paid for, whilst the benefits conferred by the preparatory work necessary to be classified as effective for defence are mutual.
Thorough-going efficiency and completeness in detail are the essential features of a military force; inefficiency is a military crime. The master mind, despotism and domination, are necessary for that concentration of thought and effort essential for success in war. The military must not be hampered by the tolerance and compromise which must ever mark the ways of the Rifle Club Movement. A lower standard of military efficiency than obtains in European armies we will not tolerate. The folly of applying European methods where European conditions do not exist must be at once recognised. We will not have a standing army, as the word is ordinarily understood. Our soldiers will not be taken even for a term from their ordinary associations. The only permanently employed men will be a sufficient general and instructional staff, a sufficient force of the specialised branches of the service and a sufficient nucleus for each regiment. Twenty or thirty days in the year are all that will be permitted for daylight training. Now if we expect them to attain to a satisfactory standard of efficiency it is evident they must be relieved of all initial and preparatory work, and devote their whole attention to organisation and active service conditions.
It is the province of the Rifle Club Movement to see that this relief is given. We must educate our members up to their responsibilities, and there is but one way by which this may be effected - that is, by making military training universal, and, as part of our educational system, compulsory.
Physical training, evolutions, company drill, rifle shooting, signalling, and first aid should all he part of our ordinary education system. The school period should be extended to 18 years for this purpose, and every lad required to attend a local gymnasium at night and to attain a prescribed standard of proficiency. We would then, at the military age, hand over for more complete training a youth well set up, well informed, well grounded in all the rudimentary essentials.
The education of our youth must be a reflex of the spirit of the people concerning defence.
The chief characteristic of the Rifle Club Movement is its individuality. It is an individual recognition of responsibility, and an individual effort to attain a standard of proficiency. That standard is admittedly low. The effort to elevate it must come from within. From the inception of each individual club until it is identified with the military system, in the person of the State Commandant, care is taken to recognise and preserve characteristic. At every stage the exact contrary to military methods and military procedure obtains.
Every member of the club has an equal voice in the transaction of all club business. Every club has equal representation in the council of the District Union. Every union or equivalent group of unions has equal representation on the Advisory Board. The Chairman of the Advisory Board is the State Commandant.
To the Australian mind the duality thus given to the position of our chief military officer adds to, rather than detracts from, the dignity of the office, he is able to not only keep a watchful eye upon everything pertaining to the military efficiency of the troops, but, through the Advisory Board, he feels himself in direct touch and harmony with the spirit of the people concerning defence.
The Advisory Board thus constituted is competent to deal with any question which can arise concerning rifle club matters, and clubs should be keenly on the alert against any interference whatever with its functions.
An interesting development, and one to which I am able to only make passing reference to-night, but hope to deal with more fully at some future date, is the interest displayed in rifle club work by the friendly Societies of the metropolis. This is a direct result of the expenditure by the Defence Department on miniature rifle ranges. Started at Richmond four years ago, there are now twenty lodges practically affiliated with the local club. Collingwood has been even more successful, having not only thirty lodges identified with it, but the Manchester Unity Order of Oddfellows have branched off, and established a fully appointed rifle club of their own, controlling seventeen lodges of that Order. Port Melbourne Club has 9 lodges; Fitzroy, 14; Essendon and Flemington, 17; Prahran, 19: each of which maintains a rifle team, the doings of which are the subject of nightly report and discussion. The opening of a miniature rifle range is the signal for the Friendly Societies anal the athletic clubs of the district to rally round, and no rifle club is properly equipped for its work until it has provided facilities for night practice. The significance of this development lies in the fact that we are thereby in direct touch with the best elements of the community-its provident man- hood. We have immediate access to, and can voice our aspirations on, the floor of almost every lodge in the metropolis. The 106 lodges enumerated above have a total of upwards of 20,000 members. The possibilities of this development appears to be limited only by the capacity of the officers to deal with it. We know the lodges stand ready to respond to wise direction.
It is gratifying to find the Rifle Clubs' Office fully abreast of this development and its possibilities recognised. The attention of the State Commandant was drawn to it, and he called for a report from its recognised leaders, and on their recommendation formed a Council to organise, to direct, and advise concerning miniature rifle range matters, so that they shall form an integral part of our defence system.
As the names of Sir Frederick Sargood and Colonel Templeton are indissolubly connected with emancipation of rifle clubs from military domination, so will the name of Major Boam be identified with the wise resolve that this Council, ,which has only just been called into existence, shall not be subject to the control or domination of any other existing body ; that it shall have an absolutely independent existence, and shall merge into our defence system in the person of the State Commandant, who is its presiding officer.
I submit the Rifle Club 'Movement has a work to do ; that it is not only a factor, but a controlling factor in the defence problem; that it has a personality of its own which must be preserved; that it can only perform its legitimate functions whilst it is free from the possibility of military domination.
I will therefore conclude with the observation with which we commenced. When a history of the defence system of Australia shall have been compiled, not the least interesting chapters will be those referring to The Rifle Club Movement and its Development.
Further Reading:
The Australian Militia, 1899 - 1920