« July 2008 »
S M T W T F S
1 2 3 4 5
6 7 8 9 10 11 12
13 14 15 16 17 18 19
20 21 22 23 24 25 26
27 28 29 30 31
You are not logged in. Log in


Search the site:


powered by FreeFind
Volunteer with us.

Entries by Topic All topics  
A Latest Site News
A - Using the Site
AAA Volunteers
AAB-Education Centre
AAC-Film Clips
AAC-Photo Albums
AIF & MEF & EEF
AIF - Lighthorse
AIF - ALH - A to Z
AIF - DMC
AIF - DMC - Or Bat
AIF - DMC - Anzac MD
AIF - DMC - Aus MD
AIF - DMC - British
AIF - DMC - BWI
AIF - DMC - French
AIF - DMC - Indian
AIF - DMC - Italian
AIF - DMC - Medical
AIF - DMC - Remounts
AIF - DMC - Scouts
AIF - DMC - Sigs
AIF - DMC - Sigs AirlnS
AIF - DMC - 1 Sig Sqn
AIF - DMC - 2 Sig Sqn
AIF - DMC - Eng
AIF - DMC - Eng 1FSE
AIF - DMC - Eng 2FSE
AIF - DMC - GSR
AIF - 1B - 1 LHB
AIF - 1B - 6 MVS
AIF - 1B - 1 LHMGS
AIF - 1B - 1 Sig Trp
AIF - 1B - 1 LHFA
AIF - 1B - 1 LHR
AIF - 1B - 2 LHR
AIF - 1B - 3 LHR
AIF - 2B - 2 LHB
AIF - 2B - 7 MVS
AIF - 2B - 2 LHFA
AIF - 2B - 2 LHMGS
AIF - 2B - 2 Sig Trp
AIF - 2B - 5 LHR
AIF - 2B - 6 LHR
AIF - 2B - 7 LHR
AIF - 3B - 3 LHB
AIF - 3B - 8 MVS
AIF - 3B - 3 LHB Sigs
AIF - 3B - 3 LHFA
AIF - 3B - 3 LHMGS
AIF - 3B - 3 Sig Trp
AIF - 3B - 8 LHR
AIF - 3B - 9 LHR
AIF - 3B - 10 LHR
AIF - 4B - 4 LHB
AIF - 4B - 4 Sig Trp
AIF - 4B - 9 MVS
AIF - 4B - 4 LHFA
AIF - 4B - 4 LHMGS
AIF - 4B - 4 LHR
AIF - 4B - 11 LHR
AIF - 4B - 12 LHR
AIF - 5B - 5 LHB
AIF - 5B - 10 MVS
AIF - 5B - 5 LHFA
AIF - 5B - 5 Sig Trp
AIF - 5B - ICC
AIF - 5B - 14 LHR
AIF - 5B - 15 LHR
AIF - 5B - 1er Regt
AIF - 5B - 2 NZMGS
AIF - AASC
AIF - Aboriginal LH
AIF - Badges
AIF - Cars
AIF - Chinese LH
AIF - Double Sqns
AIF - Engineers
AIF - Fr - 22 Corps
AIF - Fr - 13 LHR
AIF - Honour Roll
AIF - HQ - 3rd Echelon
AIF - Marching Songs
AIF - Misc Topics
AIF - NZMRB
AIF - NZMRB - AMR
AIF - NZMRB - CMR
AIF - NZMRB - EFT
AIF - NZMRB - NZMFA
AIF - NZMRB - NZMGS
AIF - NZMRB - OMR
AIF - NZMRB - Sig-Trp
AIF - NZMRB - WMR
AIF - Ships
AIF - Ships - Encountr
AIF - Ships - Una
AIF - WFF
AIF - Wireless Sqn
Battles
BatzA - Australia
BatzA - Broken Hill
BatzA - Liverpool
BatzA - Merivale
BatzB - Boer War
BatzB - Bakenlaagte
BatzB - Belmont
BatzB - Bothaville
BatzB - Buffels Hoek
BatzB - Coetzees Drift
BatzB - Diamond Hill
BatzB - Driefontein
BatzB - Elands
BatzB - Graspan
BatzB - Grobelaar
BatzB - Grootvallier
BatzB - Hartebestfontn
BatzB - Houtnek
BatzB - Karee Siding
BatzB - Kimberley
BatzB - Koster River
BatzB - Leeuw Kop
BatzB - Mafeking
BatzB - Magersfontein
BatzB - Modder River
BatzB - Onverwacht
BatzB - Paardeberg
BatzB - Palmietfontein
BatzB - Pink Hill
BatzB - Poplar Grove
BatzB - Rhenoster
BatzB - Sannahs Post
BatzB - Slingersfontn
BatzB - Stinkhoutbm
BatzB - Sunnyside
BatzB - Wilmansrust
BatzB - Wolvekuil
BatzB - Zand River
BatzG - Gallipoli
BatzG - Anzac
BatzG - Aug 1915
BatzG - Baby 700
BatzG - Evacuation
BatzG - Hill 60
BatzG - Hill 971
BatzG - Krithia
BatzG - Lone Pine
BatzG - Nek
BatzJ - Jordan Valley
BatzJ - 1st Amman
BatzJ - 2nd Amman
BatzJ - Abu Tellul
BatzJ - Es Salt
BatzJ - JV Maps
BatzJ - Ziza
BatzM - Mespot
BatzM - Baghdad
BatzM - Ctesiphon
BatzM - Daur
BatzM - Kurna
BatzM - Kut el Amara
BatzM - Ramadi
BatzN - Naval
BatzN - AE1
BatzN - Cocos Is
BatzN - Heligoland
BatzN - Marmara
BatzN - Zeebrugge
BatzN - Zeppelin L43
BatzNG - Bitapaka
BatzO - Other
BatzO - Baku
BatzO - Egypt 1919
BatzO - Emptsa
BatzO - Karawaran
BatzO - Peitang
BatzO - Wassa
BatzP - Palestine
BatzP - 1st Gaza
BatzP - 2nd Gaza
BatzP - 3rd Gaza
BatzP - Aleppo
BatzP - Amwas
BatzP - Ayun Kara
BatzP - Bald Hill
BatzP - Balin
BatzP - Beersheba
BatzP - Berkusieh
BatzP - Damascus
BatzP - El Auja
BatzP - El Buggar
BatzP - El Burj
BatzP - Haifa
BatzP - Huj
BatzP - JB Yakub
BatzP - Kaukab
BatzP - Khan Kusseir
BatzP - Khuweilfe
BatzP - Kuneitra
BatzP - Megiddo
BatzP - Nablus
BatzP - Rafa
BatzP - Sasa
BatzP - Semakh
BatzP - Sheria
BatzP - Surafend
BatzP - Wadi Fara
BatzS - Sinai
BatzS - Bir el Abd
BatzS - El Arish
BatzS - El Mazar
BatzS - El Qatiya
BatzS - Jifjafa
BatzS - Magdhaba
BatzS - Maghara
BatzS - Romani
BatzS - Suez 1915
BatzSe - Senussi
BatzWF - Westn Front
BW - Boer War
BW - NSW
BW - NSW - 1ACH
BW - NSW - 1NSWMR
BW - NSW - 2NSWMR
BW - NSW - 3ACH
BW - NSW - 3NSWIB
BW - NSW - 3NSWMR
BW - NSW - 5ACH
BW - NSW - A Bty RAA
BW - NSW - AAMC
BW - NSW - Aust H
BW - NSW - Lancers
BW - NSW - NSW Inf
BW - NSW - NSWCBC
BW - NSW - NSWIB
BW - NSW - NSWMR_A
BW - NZ
BW - Qld
BW - Qld - 1ACH
BW - Qld - 1QMI
BW - Qld - 2QMI
BW - Qld - 3ACH
BW - Qld - 3QMI
BW - Qld - 4QIB
BW - Qld - 5QIB
BW - Qld - 6QIB
BW - Qld - 7ACH
BW - QLD - AAMC
BW - SA
BW - SA - 1SAMR
BW - SA - 2ACH
BW - SA - 2SAMR
BW - SA - 3SACB
BW - SA - 4ACH
BW - SA - 4SAIB
BW - SA - 5SAIB
BW - SA - 6SAIB
BW - SA - 8ACH
BW - SA - AAMC
BW - Tas
BW - Tas - 1ACH
BW - Tas - 1TIB
BW - Tas - 1TMI
BW - Tas - 2TB
BW - Tas - 2TIB
BW - Tas - 3ACH
BW - Tas - 8ACH
BW - Vic
BW - Vic - 1VMI
BW - Vic - 2ACH
BW - Vic - 2VMR
BW - Vic - 3VB
BW - Vic - 4ACH
BW - Vic - 4VIB
BW - Vic - 5VMR
BW - Vic - 6ACH
BW - Vic - AAMC
BW - Vic - Scot H
BW - WA
BW - WA - 1WAMI
BW - WA - 2ACH
BW - WA - 2WAMI
BW - WA - 3WAB
BW - WA - 4ACH
BW - WA - 4WAMI
BW - WA - 5WAMI
BW - WA - 6WAMI
BW - WA - 8ACH
BW Gen - Campaign
BW Gen - Soldiers
BW General
Cavalry - General
Diary - Schramm
Egypt - Heliopolis
Egypt - Mena
Gen - Ataturk Pk, CNB
Gen - Australia
Gen - Legends
Gen - Query Club
Gen - St - NSW
Gen - St - Qld
Gen - St - SA
Gen - St - Tas
Gen - St - Vic
Gen - St - WA
Gm - German Items
Gm - Bk - 605 MGC
GW - 11 Nov 1918
GW - Atrocities
GW - August 1914
GW - Biographies
GW - Propaganda
GW - Spies
GW - We forgot
Militia 1899-1920
Militia - Area Officers
Militia - Inf - Infantry
Militia - Inf - 1IB
Militia - Inf - 2IB
Militia - Inf - 3IB
Militia - Inf - NSW
Militia - Inf - Qld
Militia - Inf - SA
Militia - Inf - Tas
Militia - Inf - Vic
Militia - Inf - WA
Militia - K.E.Horse
Militia - LH
Militia - LH - Regts
Militia - LH - 1LHB
Militia - LH - 2LHB
Militia - LH - 3LHB
Militia - LH - 4LHB
Militia - LH - 5LHB
Militia - LH - 6LHB
Militia - LHN - NSW
Militia - LHN - 1/7/1
Militia - LHN - 2/9/6
Militia - LHN - 3/11/7
Militia - LHN - 4/6/16
Militia - LHN - 5/4/15
Militia - LHN - 6/5/12
Militia - LHN - 28
Militia - LHQ - Qld
Militia - LHQ - 13/2
Militia - LHQ - 14/3/11
Militia - LHQ - 15/1/5
Militia - LHQ - 27/14
Militia - LHS - SA
Militia - LHS - 16/22/3
Militia - LHS - 17/23/18
Militia - LHS - 24/9
Militia - LHT - Tas
Militia - LHT - 12/26
Militia - LHV - Vic
Militia - LHV - 7/15/20
Militia - LHV - 8/16/8
Militia - LHV - 9/19
Militia - LHV - 10/13
Militia - LHV - 11/20/4
Militia - LHV - 19/17
Militia - LHV - 29
Militia - LHW - WA
Militia - LHW-18/25/10
Militia - Military Orders
Militia - Misc
MilitiaRC - Rifle Clubs
MilitiaRC - NSW
MilitiaRC - NT
MilitiaRC - Qld
MilitiaRC - SA
MilitiaRC - Tas
MilitiaRC - Vic
MilitiaRC - WA
Militiaz - New Zealand
Tk - Turkish Items
Tk - Army
Tk - Bks - Books
Tk - Bks - 1/33IR
Tk - Bks - 27th IR
Tk - Bks - Air Force
Tk - Bks - Yildirim
Tk - POWs
Wp - Weapons
Wp - Hotchkiss Cav
Wp - Hotchkiss PMG
Blog Tools
Edit your Blog
Build a Blog
RSS Feed
View Profile
Open Community
Post to this Blog
Site Index
Education Centre
LH Militia
Boer War
Transport Ships
LH Battles
ALH - Units
ALH - General
Aboriginal Light H
Weapons
Ottoman Sources

"At a mile distant their thousand hooves were stuttering thunder, coming at a rate that frightened a man - they were an awe inspiring sight, galloping through the red haze - knee to knee and horse to horse - the dying sun glinting on bayonet points..." Trooper Ion Idriess

The Australian Light Horse Studies Centre aims to present an accurate history as chroniclers of early Australian military developments from 1899 to 1920.

The Australian Light Horse Studies Centre site holds over 12,000 entries and is growing daily.

Contact: Australian Light Horse Studies Centre

Let us hear your story: You can tell your story, make a comment or ask for help on our Australian Light Horse Studies Centre Forum called:

Desert Column Forum

WARNING: This site contains: names, information and images of deceased people; and, language which may be considered inappropriate today.

Friday, 18 July 2008
Famous Charge by 4th Australian Light Horse Brigade by Vivian Sharpe
Topic: BatzP - Beersheba

The Battle of Beersheba,  Palestine, 31 October 1917 

Vivian Sharpe Article


Part of an article extracted from the HOOFS and HORNS edition of December 1971

Beersheba, Palestine, 31st October 1917

FAMOUS CHARGE BY 4TH AUSTRALIAN LIGHT HORSE BRIGADE
By Vivian Sharpe


TURKS TAKEN BY SURPRISE

Ismet Bey, commanding Beersheba, was watching the British infantry attack from the west, not unduly concerned. He had several infantry battalions and the 3rd Turkish Cavalry Brigade in reserve, and was quite confident that he would not even use these to beat off the British infantry attack. This was about 11 a.m., but 10 minutes later he was amazed to see the plain behind Beersheba covered with horsemen. He sent his aide-de-camp at the gallop to find out the reason for this unexpected turn of events, but that gentleman rode into an Australian patrol and was taken prisoner. Ismet Bey, however, had not long to wait for the answer to his problem, for by 11 30 a.m., the Anzac Mounted Division had dismounted and was advancing against the Turkish defences north-east of the town.
By 1 p.m. the infantry of XXth Corps had captured and secured their first objectives to the west and were consolidating their positions. Everything was going according to plan - at that point. However, progress had slowed down to the east and north east and this was not so good, for although the areas there were under machine-gun and artillery fire from the town it was apparent that the Anzac Mounted Division had possibly dismounted too soon and the Turkish defenders on the hill Tel Saba were now enfilading their advance from the east.

The Australians and New Zealanders of the Anzac Mounted Division were really trained as Mounted Infantry rather than as cavalry for shock action, and they lacked the heavy weapons to support them once they dismounted and took to "Shank's Pony". (The Royal Horse Artillery batteries allotted to the cavalry on a basis of one battery per Brigade had found great difficulty in keeping up with the cavalry during the night march over the rugged terrain and few of the guns were up with the cavalry.) For two sweltering and very thirsty hours the men of the two dismounted divisions (less one Brigade of the Australian Mounted Division) inched their way forward from one rocky ridge to another, from wadi to wadi, slowly getting closer to the Turkish strong points. (Here it is again pointed out that once a horsed regiment dismounted it lost a quarter of its fire-power as each No.3 became the horse-holder for his section.) Shortly after 3 p.m. the Turkish positions on Tel Saba were captured by troops of the Anzac Mounted Division at the point of the bayonet, and the last of the outer defences taken. Three miles away across the wide open plain was Beersheba and its seven wells; but the Turkish inner defences were intact and still practically untouched and in less than two hours it would be dark. To General Harry Chauvel, watching the progress of his troops from the Kassim Zanna ridge, it appeared possible that the coming darkness could easily cheat him of Beersheba — and above all its precious water — as a prize.

At 4p.m. (31st October) the 4th Light Horse Brigade of the Australian Mounted Division was resting and feeding its horses behind Kassim Zanna ridge, which ran roughly north to south about 6 miles east of Beersheba. The Brigade comprised the 4th Light Horse Regiment (Victoria), 11th Light Horse Regiment (Queensland) and the 12th Light Horse Regiment (N.S.W.) but only two regiments were present as the 11th A.L.H. had been detached to watch the left flank of the Division to the south-west. These two regiments, 4th and l2th A.L.H., were comparatively fresh as they had not been involved in the battle since the commencing stages early in the morning. They had, of course, suffered from heat, thirst and flies, but were reasonably rested as far as conditions permitted.

Brigadier-General "Itchy" Grant, commander 4th L.H. Brigade, had spent the afternoon on top of a nearby hill watching the dismounted troopers of the other formations working their way slowly forward across the broken ground to the north. His Divisional Commander. Major-General H.W. Hodgson, came to him shortly after 4 o'clock and told him it was his turn to go in. Together they rode to see General Chauvel at his headquarters some little distance away.

"TAKE TOWN BEFORE DARK!"

General Chauvel had decided that the time had come for an all-out assault if he were to get that precious water for his horses — but he had a difficult decision to make. Would he use his reserve British Yeomanry Brigade or the 4th Australian Light Horse Brigade for this final attack? He was fully aware that the 7th Yeomanry Brigade was trained as cavalry and fully armed with sabres, and that sabres would be a much more useful weapon in a mounted attack, whereas the Australians carried only rifles and bayonets. Finally his mind was made up for him by one major factor - the Australian brigade was nearer at hand and closer to the objective, and time was running out. "Go right in and take the town before dark!" he told Brigadier Grant, and although Chauvel did not directly say "a mounted attack". Grant knew that a mounted shock action was the only way to take Beersheba before nightfall.

Just over an hour's daylight remained and speed was necessary, so Grant sent gallopers with orders for the 4th and l2th Regiments to saddle-up at once and be brought forward by their seconds-in-command to an assembly area south of the track running eastwards from Beersheba. He then galloped forward with two regimental commanders, his Brigade-Major and four orderlies to look for an advanced assembly area closer to the enemy, but if possible one which would not be overlooked and shelled.
It was vital, if the charge were to be successful, that the horses, tired from long hours of waiting in the heat, dust and flies, should not be panicked by shell-fire before the charge commenced. There was little time for any detailed reconnaissance, or to bring up any number of field-guns or machine-guns to support the attack, but General Hodgson sent messages requesting the two nearest batteries of the Royal Horse Artillery to do what they could to assist the Australians. As always, the gallant Horse-Gunners limbered up their guns and galloped forward into action in the open about 2,500 yds from the Turkish trenches.

At the same time the 4th and 12th L.H. Regiments moved from the assembly area about 3,000 yards from their objective, and at 4.30 p.m. trotted forward in Column of Squadrons with Brigade H.Q. right behind them. "Itchy" Grant had decided that each trooper would carry his bayonet in his hand and use it as a short-sword (the 1914-1918 bayonet was much longer, and nastier, than the modern bayonet) and sling his rifle across his back (rifle-buckets were not a general issue with the Light Horse). He had decided that the bayonets would not be fixed to the rifles and used somewhat like a lance as he considered there was too much danger of a trooper losing both if his horse came down and he would thereupon find himself unarmed amongst the enemy.

As the two regiments trotted out of their assembly area into the open they were bombed and machine-gunned by two German planes, but they increased pace and little damage was done. The enemy artillery from Beersheba opened fire at this time but they misjudged the range and most of the shells exploded harmlessly behind the advancing horsemen. As the Lighthorsemen increased their pace to the gallop the machine-gun fire from the Turkish trenches was practically silenced by the magnificently accurate fire of the two R.H.A batteries, who covered the galloping, thundering, yelling mass of Australian horsemen as they swept in clouds of dust towards the Turkish positions and the town beyond.

By this time the daylight was turning in to the short twilight of the East and the decreasing light was lit by flashes of Turkish rifle and artillery fire and the British shells exploding amongst them. Clouds of dust billowed above the charging Australians, reducing visibility and hiding the ground ahead - and also hiding the answer to the dreaded question; Were the Turkish trenches all protected by barbed wire? Also, between the racing horsemen and the town itself ran the Wadi Saba, which had not, obviously, been reconnoitred. Were its bank as steep and the wadi itself as deep as some of those crossed during their approach march on the previous night? If this were the case, then the leading Troops would tumble into ruin and those following crash down on top of them in a turmoil. Aerial photographs had not supplied the answers, and it was probably a good thing that the dust and failing light hid a great deal.

Fortunately the trenches in that particular sector had not been wired, either because the Turks did not expect to be attacked from that desert flank or because there had been insufficient time, or wire, to complete the defences. As the leading squadrons came on the trenches they "put In the hooks" to their horses and leapt over the trenches like steeplechasers, after which some of the troopers threw themselves from their horses and plunged into the trenches to finish off the job there. Others charged right into the second line of defences, leaning down from their saddles to use their bayonets as swords or improvised lances, or firing from the saddle. Over half the Australian total casualties of 64 were sustained during this hand-to-hand fighting in the semi-darkness; the majority of the remainder were wounded before reaching the trenches.

VICTORIOUS HORSEMEN TAKE BEERSHEBA

Within 10 minutes the Turkish trenches were in the hands of the Australians and Grant quickly reorganized his two regiments to gallop straight into the town, capture as many prisoners as possible, and prevent damage to the wells. In the gathering darkness the victorious horsemen swept into Beersheba and through the streets, riding down scattered groups of the enemy and keeping them on the run. Huge flames gushed skywards as the Turks blew up some of their dumps and some of the wells, and the burning railway station added to the glow.

By 6 p.m., two hours after Brigadier Grant had ridden up to General Chauvel to receive his orders for the attack, Beersheba was in British hands, and with its capture the watering of the Desert Mounted Corps and other units was assured, The first part of General Allenby's plan had been accomplished.

The 4th A.L.H. Brigade had captured 1,200 prisoners, 10 field-guns and huge quantities of stores and animals. Ismet Bey, the Turkish commander, had managed to escape by car only minutes before the cheering Australians came thundering through the streets to surround his headquarters.

A great deal of the success of the charge was due to the speed with which it was carried out. It took the Turks by surprise, as It was the first time that a major shock cavalry action had been used against them — and their own cavalry rarely showed much inclination to fight The other cavalry attacks that day had been dismounted actions, the cavalry using their horses purely to carry them forward to forming-up positions, then dismounting and fighting forward on foot. Just before the charge the Turks on that sector had been engaged with the dismounted New Zealand Mounted Rifles on Tel Saba, and not only were they looking in the wrong direction when the Australians galloped at them, but also their rifles were all sighted to Fire at long range. When examined later all the Turkish rifles and what machine-guns that were left were found to be sighted at 800-900 metres or more, and as a result most of the fire had passed over the heads of the charging horsemen.

Quite apart from the vital part they had played in capturing Beersheba, the charge of the 4th A.L.H. Brigade set the standard for the remainder of the campaign.

It had shown that under certain circumstances cavalry could still be used for shock action successfully, and it inspired a spirit of dash and daring which the rest of the cavalry were quick to emulate.

Following Beersheba the Australian Mounted Division (3rd, 4th and 5th Light Horse Brigades) demanded sabres and early in 1918 were finally issued with them (and made good use of them on several occasions), also with rifle buckets, to become armed as true cavalry. However, the Anzac Mounted Division (1st and 2nd Light Horse Brigades and the N.Z. Mounted Rifles Brigade) were never issued with sabres and finished the war as Mounted Infantry.

POST SCRIPT

The writer had the honour of knowing the late General Sir Harry Chauvel quite well, and on the last occasion he talked with the fine old soldier, during lunch at Moonee Valley Races, the subject of Beersheba naturally arose again. Sir Harry said that later he was often condemned because he decided to use his fellow Australians instead of Yeomanry for the charge, and that in doing this he had exhibited prejudice. He was most emphatic that he fully realized a charge by Yeomanry armed with sabres would have been preferable - but this would have necessitated a delay of at least another half an hour to get the Yeomanry brigade forward from their position in reserve, and time was most important. "I suppose I was at fault there, "the fine old soldier admitted, "but I didn’t think the Anzac Division would have been so slow. I suppose the fault was mine in that I didn't decide on a mounted shock attack an hour earlier. If I had done so I most certainly would have sent the Yeomanry in. We simply had to have those wells!”


The post script is the most interesting part of this story in that it is a confession by Chauvel that he actually dithered indecisively subsequent to the fall of Tel el Saba which created further problems for him.


Further Reading:

The Battle of Beersheba

Battles where Australians fought, 1899-1920


Citation: Famous Charge by 4th Australian Light Horse Brigade by Vivian Sharpe


Posted by Project Leader at 10:13 PM EADT
Updated: Wednesday, 29 July 2009 12:53 PM EADT
Colonel Husnu, Yilderim, Page 11
Topic: Tk - Bks - Yildirim

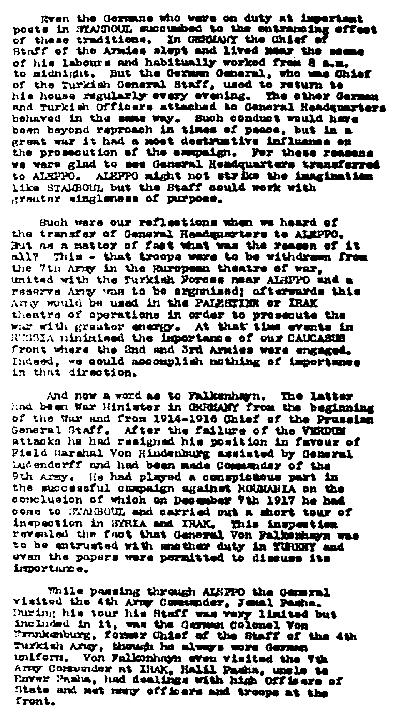
Another entry from the book written by Lieutenant Colonel Hüseyin Hüsnü Emir, called Yilderim. Every day, one page of the book will be posted. This is Page 11.


Colonel Hüsnü, Yilderim, Page 11.

[Click on page for a larger print version.]


Citation: Colonel Hüsnü, Yilderim, Page 11


Posted by Project Leader at 6:49 PM EADT
Updated: Friday, 18 July 2008 6:53 PM EADT
Entertainment for the troops - the movies
Topic: AIF - Misc Topics

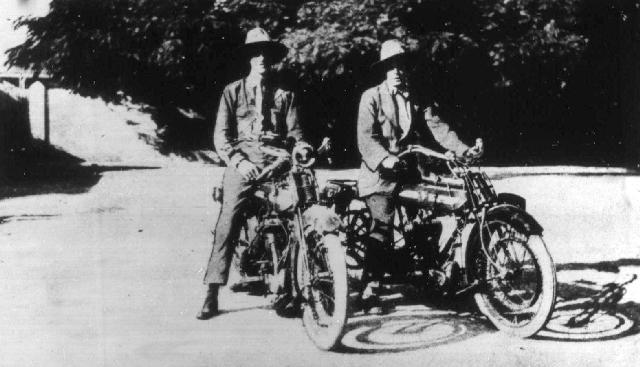
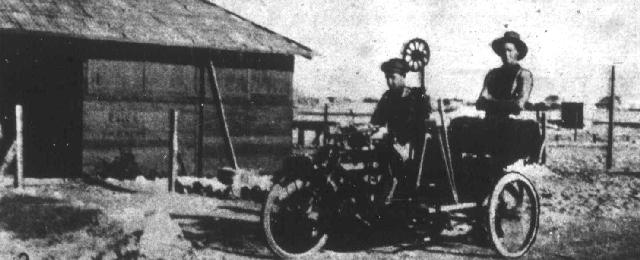
One group of unsung heroes from the Sinai and Palestine campaigns were not soldiers but workers with the YMCA. They worked under difficult conditions to provide facilities to the soldies which were not part of army supply. One item was the supply of movies to the front line troops. The following two pictures give a clear idea as to the difficulty of the work and the conditions under which they worked.

Two motor cyclists moving films from one theatre to another.

The Australasian, 20 January 1917, Picture Supplement, p. ii.

Arriving at Kantara movie house with equipment and the latest films.

The Australasian, 20 January 1917, Picture Supplement, p. ii.

The Kantara movie hall looks rather bleak indeed and also most uncomfortable considering that the ambient temperature in the movie house was in excess of 35C.


Citation: Entertainment for the troops - the movies


Posted by Project Leader at 5:29 PM EADT
9th LHR AIF War Diary, July 18
Topic: AIF - 3B - 9 LHR

9th LHR, AIF

9th Light Horse Regiment

War Diary, 18 July

Pro Gloria et Honore - For Glory and Honour

Regimental March -  Marching Through Georgia


The following entries are extracted and transcribed from the 9th Light Horse Regiment War Diary, the originals of which are held by the Australian War Memorial. There are 366 entries on this site. Each day has entries as they occurred from 1914 to 1919. In addition to the 9th Light Horse Regiment War Diary, when appropriate, entries from the 3rd Light Horse Brigade War Diary and other regiments with the Brigade will also appear. Entries from the unit history, Darley, TH, With the Ninth Light Horse in the Great War, Adelaide, Hassell Press, 1924 will also appear from time to time. The aim is to give the broadest context to the story and allow the reader to follow the day to day activities of the regiment. If a relative happened to have served in the regiment during the Great War, then this provides a general framework in which the individual story may be told.


The Diary


1914

Saturday, July 18, 1914

See 4th Military District, South Australia for militia activities.


1915

Sunday, July 18, 1915

9th Light Horse Regiment Location - Walkers Ridge

9th Light Horse Regiment War Diary - No Entry.

Carew Reynell Diary   - No Entry.


1916

Tuesday, July 18, 1916

9th Light Horse Regiment Location - Roadhead Serapeum.

9th Light Horse Regiment War Diary - Training and lectures carried out throughout the week.

Patrols and outpost work continued as in previous details.


1917

Wednesday, July 18, 1917
9th Light Horse Regiment Location - Abasan el Kebir
9th Light Horse Regiment War Diary - The Regiment paraded dismounted for inspection by General Officer in Command Brigade. Marched into Brigade parade at 0530 and was inspected and marched past returning at 0730.
On Royston, Brigadier General JR, going on sick leave, Maygar, Lieutenant Colonel LC, VC DSO, takes command of the Brigade.


1918

Thursday, July 18, 1918

9th Light Horse Regiment Location - Madhbeh

9th Light Horse Regiment War Diary - Large working parties on cleaning area occupied by 1st Light Horse Brigade led horses.


1919

Friday, July 18, 1919

9th Light Horse Regiment Location - SS Oxfordshire

9th Light Horse Regiment War Diary - Routine.


Previous: 9th LHR AIF War Diary, 17 July

Next: 9th LHR AIF War Diary, 19 July


Sources:

See: 9th Australian Light Horse Regiment, Contents
Australian Light Horse Studies Centre, AIF War Diaries of the Great War, Site Transcription Policy


Further Reading:

9th Light Horse Regiment AIF

Bert Schramm Diary

9th Australian Light Horse Regiment, Roll of Honour 

Battles where Australians fought, 1899-1920


Citation: 9th LHR AIF War Diary, 18 July

Posted by Project Leader at 12:01 AM EADT
Updated: Wednesday, 15 September 2010 2:26 PM EADT
Diaries of AIF Servicemen, Bert Schramm, 18 July 1918
Topic: Diary - Schramm

Diaries of AIF Servicemen

Bert Schramm

18 July 1918


Bert Schramm


2823 Private Herbert Leslie SCHRAMM, a 22 year old Farmer from Whites River, South Australia. He enlisted on 17 February 1916; and at the conclusion of the war Returned to Australia, 10 July 1919.

During part of the course of his military service with the AIF, Bert Schramm kept a diary of his life. Bert was not a man of letters so this diary was produced with great effort on his behalf. Bert made a promise to his sweetheart, Lucy Solley, that he would do so after he received the blank pocket notebook wherein these entries are found. As a Brigade Scout since September 1918, he took a lead part in the September Offensive by the Allied forces in Palestine. Bert's diary entries are placed alongside those of the 9th Light Horse Regiment to which he belonged and to the 3rd Light Horse Brigade to which the 9th LHR was attached. On this basis we can follow Bert in the context of his formation.


The Diaries

The complete diary is now available on the Australian Light Horse Studies Centre Site at:

Bert Schramm Diary


Finding more about a service person. See:

Navigating the National Archives Service File 


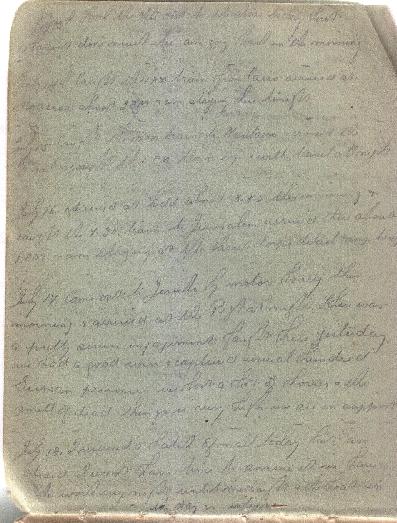
Bert Schramm's Handwritten Diary, 13 - 18 July 1918

[Click on page for a larger print version.]


Bert Schramm

Thursday, July 18, 1918

Bert Schramm's Location - Madhbeh, Jordan Valley, Palestine.

Bert Schramm's Diary - I received a batch of mail today but am afraid I won't have time to answer it now. Have to work my night until midnight and the last in the day is inline.


9th Light Horse Regiment War Diary

9th Light Horse Regiment Location - Madhbeh, Jordan Valley, Palestine.

9th Light Horse Regiment War Diary - Large working parties on cleaning area occupied by 1st Light Horse Brigade led horses.

9th LHR AIF War Diary, 18 July


Darley

Darley, TH, With the Ninth Light Horse in the Great War, Adelaide, Hassell Press, 1924.

No Entry


Previous: Bert Schramm's Diary, 17 July 1918

Next: Bert Schramm's Diary, 19 July 1918


Sources Used:

Bert Schramm's Diary

National Archives Service File.

Embarkation Roll, AWM8.

Australian War Memorial Roll of Honour

Nominal Roll, AWM133, Nominal Roll of Australian Imperial Force who left Australia for service abroad, 1914-1918 War.


War Diaries and Letters

All War Diaries and letters cited on this site should be read in conjunction with the Australian Light Horse Studies Centre, War Diaries and Letters, Site Transcription Policy which may be accessed at:

Australian Light Horse Studies Centre, War Diaries and Letters, Site Transcription Policy 


Further Reading:

Bert Schramm Diary

Bert Schramm Diary, Album

Bert Schramm's Photo Album

9th Australian Light Horse Regiment, AIF

9th Australian Light Horse Regiment, War Diary, Day by Day Account

Battles where Australians fought, 1899-1920


Citation: Diaries of AIF Servicemen, Bert Schramm, 18 July 1918


Posted by Project Leader at 12:01 AM EADT
Updated: Thursday, 2 June 2011 10:36 AM EADT

Newer | Latest | Older

Full Site Index


powered by FreeFind
Let us hear your story: You can tell your story, make a comment or ask for help on our forum.

Desert Column Forum

A note on copyright

The Australian Light Horse Studies Centre is a not for profit and non profit group whose sole aim is to write the early history of the Australian Light Horse from 1900 - 1920. It is privately funded and the information is provided by the individuals within the group and while permission for the use of the material has been given for this site for these items by various donors, the residual and actual copyright for these items, should there be any, resides exclusively with the donors. The information on this site is freely available for private research use only and if used as such, should be appropriately acknowledged. To assist in this process, each item has a citation attached at the bottom for referencing purposes.

Please Note: No express or implied permission is given for commercial use of the information contained within this site.

A note to copyright holders

The Australian Light Horse Studies Centre has made every endeavour to contact copyright holders of material digitised for this blog and website and where appropriate, permission is still being sought for these items. Where replies were not received, or where the copyright owner has not been able to be traced, or where the permission is still being sought, the Australian Light Horse Studies Centre has decided, in good faith, to proceed with digitisation and publication. Australian Light Horse Studies Centre would be happy to hear from copyright owners at any time to discuss usage of this item.

Contact

Australian Light Horse Studies Centre

eXTReMe Tracker