« November 2009 »
S M T W T F S
1 2 3 4 5 6 7
8 9 10 11 12 13 14
15 16 17 18 19 20 21
22 23 24 25 26 27 28
29 30
You are not logged in. Log in


Search the site:


powered by FreeFind
Volunteer with us.

Entries by Topic All topics  
A Latest Site News
A - Using the Site
AAA Volunteers
AAB-Education Centre
AAC-Film Clips
AAC-Photo Albums
AIF & MEF & EEF
AIF - Lighthorse
AIF - ALH - A to Z
AIF - DMC
AIF - DMC - Or Bat
AIF - DMC - Anzac MD
AIF - DMC - Aus MD
AIF - DMC - British
AIF - DMC - BWI
AIF - DMC - French
AIF - DMC - Indian
AIF - DMC - Italian
AIF - DMC - Medical
AIF - DMC - Remounts
AIF - DMC - Scouts
AIF - DMC - Sigs
AIF - DMC - Sigs AirlnS
AIF - DMC - 1 Sig Sqn
AIF - DMC - 2 Sig Sqn
AIF - DMC - Eng
AIF - DMC - Eng 1FSE
AIF - DMC - Eng 2FSE
AIF - DMC - GSR
AIF - 1B - 1 LHB
AIF - 1B - 6 MVS
AIF - 1B - 1 LHMGS
AIF - 1B - 1 Sig Trp
AIF - 1B - 1 LHFA
AIF - 1B - 1 LHR
AIF - 1B - 2 LHR
AIF - 1B - 3 LHR
AIF - 2B - 2 LHB
AIF - 2B - 7 MVS
AIF - 2B - 2 LHFA
AIF - 2B - 2 LHMGS
AIF - 2B - 2 Sig Trp
AIF - 2B - 5 LHR
AIF - 2B - 6 LHR
AIF - 2B - 7 LHR
AIF - 3B - 3 LHB
AIF - 3B - 8 MVS
AIF - 3B - 3 LHB Sigs
AIF - 3B - 3 LHFA
AIF - 3B - 3 LHMGS
AIF - 3B - 3 Sig Trp
AIF - 3B - 8 LHR
AIF - 3B - 9 LHR
AIF - 3B - 10 LHR
AIF - 4B - 4 LHB
AIF - 4B - 4 Sig Trp
AIF - 4B - 9 MVS
AIF - 4B - 4 LHFA
AIF - 4B - 4 LHMGS
AIF - 4B - 4 LHR
AIF - 4B - 11 LHR
AIF - 4B - 12 LHR
AIF - 5B - 5 LHB
AIF - 5B - 10 MVS
AIF - 5B - 5 LHFA
AIF - 5B - 5 Sig Trp
AIF - 5B - ICC
AIF - 5B - 14 LHR
AIF - 5B - 15 LHR
AIF - 5B - 1er Regt
AIF - 5B - 2 NZMGS
AIF - AASC
AIF - Aboriginal LH
AIF - Badges
AIF - Cars
AIF - Chinese LH
AIF - Double Sqns
AIF - Engineers
AIF - Fr - 22 Corps
AIF - Fr - 13 LHR
AIF - Honour Roll
AIF - HQ - 3rd Echelon
AIF - Marching Songs
AIF - Misc Topics
AIF - NZMRB
AIF - NZMRB - AMR
AIF - NZMRB - CMR
AIF - NZMRB - EFT
AIF - NZMRB - NZMFA
AIF - NZMRB - NZMGS
AIF - NZMRB - OMR
AIF - NZMRB - Sig-Trp
AIF - NZMRB - WMR
AIF - Ships
AIF - Ships - Encountr
AIF - Ships - Una
AIF - WFF
AIF - Wireless Sqn
Battles
BatzA - Australia
BatzA - Broken Hill
BatzA - Liverpool
BatzA - Merivale
BatzB - Boer War
BatzB - Bakenlaagte
BatzB - Belmont
BatzB - Bothaville
BatzB - Buffels Hoek
BatzB - Coetzees Drift
BatzB - Diamond Hill
BatzB - Driefontein
BatzB - Elands
BatzB - Graspan
BatzB - Grobelaar
BatzB - Grootvallier
BatzB - Hartebestfontn
BatzB - Houtnek
BatzB - Karee Siding
BatzB - Kimberley
BatzB - Koster River
BatzB - Leeuw Kop
BatzB - Mafeking
BatzB - Magersfontein
BatzB - Modder River
BatzB - Onverwacht
BatzB - Paardeberg
BatzB - Palmietfontein
BatzB - Pink Hill
BatzB - Poplar Grove
BatzB - Rhenoster
BatzB - Sannahs Post
BatzB - Slingersfontn
BatzB - Stinkhoutbm
BatzB - Sunnyside
BatzB - Wilmansrust
BatzB - Wolvekuil
BatzB - Zand River
BatzG - Gallipoli
BatzG - Anzac
BatzG - Aug 1915
BatzG - Baby 700
BatzG - Evacuation
BatzG - Hill 60
BatzG - Hill 971
BatzG - Krithia
BatzG - Lone Pine
BatzG - Nek
BatzJ - Jordan Valley
BatzJ - 1st Amman
BatzJ - 2nd Amman
BatzJ - Abu Tellul
BatzJ - Es Salt
BatzJ - JV Maps
BatzJ - Ziza
BatzM - Mespot
BatzM - Baghdad
BatzM - Ctesiphon
BatzM - Daur
BatzM - Kurna
BatzM - Kut el Amara
BatzM - Ramadi
BatzN - Naval
BatzN - AE1
BatzN - Cocos Is
BatzN - Heligoland
BatzN - Marmara
BatzN - Zeebrugge
BatzN - Zeppelin L43
BatzNG - Bitapaka
BatzO - Other
BatzO - Baku
BatzO - Egypt 1919
BatzO - Emptsa
BatzO - Karawaran
BatzO - Peitang
BatzO - Wassa
BatzP - Palestine
BatzP - 1st Gaza
BatzP - 2nd Gaza
BatzP - 3rd Gaza
BatzP - Aleppo
BatzP - Amwas
BatzP - Ayun Kara
BatzP - Bald Hill
BatzP - Balin
BatzP - Beersheba
BatzP - Berkusieh
BatzP - Damascus
BatzP - El Auja
BatzP - El Buggar
BatzP - El Burj
BatzP - Haifa
BatzP - Huj
BatzP - JB Yakub
BatzP - Kaukab
BatzP - Khan Kusseir
BatzP - Khuweilfe
BatzP - Kuneitra
BatzP - Megiddo
BatzP - Nablus
BatzP - Rafa
BatzP - Sasa
BatzP - Semakh
BatzP - Sheria
BatzP - Surafend
BatzP - Wadi Fara
BatzS - Sinai
BatzS - Bir el Abd
BatzS - El Arish
BatzS - El Mazar
BatzS - El Qatiya
BatzS - Jifjafa
BatzS - Magdhaba
BatzS - Maghara
BatzS - Romani
BatzS - Suez 1915
BatzSe - Senussi
BatzWF - Westn Front
BW - Boer War
BW - NSW
BW - NSW - 1ACH
BW - NSW - 1NSWMR
BW - NSW - 2NSWMR
BW - NSW - 3ACH
BW - NSW - 3NSWIB
BW - NSW - 3NSWMR
BW - NSW - 5ACH
BW - NSW - A Bty RAA
BW - NSW - AAMC
BW - NSW - Aust H
BW - NSW - Lancers
BW - NSW - NSW Inf
BW - NSW - NSWCBC
BW - NSW - NSWIB
BW - NSW - NSWMR_A
BW - NZ
BW - Qld
BW - Qld - 1ACH
BW - Qld - 1QMI
BW - Qld - 2QMI
BW - Qld - 3ACH
BW - Qld - 3QMI
BW - Qld - 4QIB
BW - Qld - 5QIB
BW - Qld - 6QIB
BW - Qld - 7ACH
BW - QLD - AAMC
BW - SA
BW - SA - 1SAMR
BW - SA - 2ACH
BW - SA - 2SAMR
BW - SA - 3SACB
BW - SA - 4ACH
BW - SA - 4SAIB
BW - SA - 5SAIB
BW - SA - 6SAIB
BW - SA - 8ACH
BW - SA - AAMC
BW - Tas
BW - Tas - 1ACH
BW - Tas - 1TIB
BW - Tas - 1TMI
BW - Tas - 2TB
BW - Tas - 2TIB
BW - Tas - 3ACH
BW - Tas - 8ACH
BW - Vic
BW - Vic - 1VMI
BW - Vic - 2ACH
BW - Vic - 2VMR
BW - Vic - 3VB
BW - Vic - 4ACH
BW - Vic - 4VIB
BW - Vic - 5VMR
BW - Vic - 6ACH
BW - Vic - AAMC
BW - Vic - Scot H
BW - WA
BW - WA - 1WAMI
BW - WA - 2ACH
BW - WA - 2WAMI
BW - WA - 3WAB
BW - WA - 4ACH
BW - WA - 4WAMI
BW - WA - 5WAMI
BW - WA - 6WAMI
BW - WA - 8ACH
BW Gen - Campaign
BW Gen - Soldiers
BW General
Cavalry - General
Diary - Schramm
Egypt - Heliopolis
Egypt - Mena
Gen - Ataturk Pk, CNB
Gen - Australia
Gen - Legends
Gen - Query Club
Gen - St - NSW
Gen - St - Qld
Gen - St - SA
Gen - St - Tas
Gen - St - Vic
Gen - St - WA
Gm - German Items
Gm - Bk - 605 MGC
GW - 11 Nov 1918
GW - Atrocities
GW - August 1914
GW - Biographies
GW - Propaganda
GW - Spies
GW - We forgot
Militia 1899-1920
Militia - Area Officers
Militia - Inf - Infantry
Militia - Inf - 1IB
Militia - Inf - 2IB
Militia - Inf - 3IB
Militia - Inf - NSW
Militia - Inf - Qld
Militia - Inf - SA
Militia - Inf - Tas
Militia - Inf - Vic
Militia - Inf - WA
Militia - K.E.Horse
Militia - LH
Militia - LH - Regts
Militia - LH - 1LHB
Militia - LH - 2LHB
Militia - LH - 3LHB
Militia - LH - 4LHB
Militia - LH - 5LHB
Militia - LH - 6LHB
Militia - LHN - NSW
Militia - LHN - 1/7/1
Militia - LHN - 2/9/6
Militia - LHN - 3/11/7
Militia - LHN - 4/6/16
Militia - LHN - 5/4/15
Militia - LHN - 6/5/12
Militia - LHN - 28
Militia - LHQ - Qld
Militia - LHQ - 13/2
Militia - LHQ - 14/3/11
Militia - LHQ - 15/1/5
Militia - LHQ - 27/14
Militia - LHS - SA
Militia - LHS - 16/22/3
Militia - LHS - 17/23/18
Militia - LHS - 24/9
Militia - LHT - Tas
Militia - LHT - 12/26
Militia - LHV - Vic
Militia - LHV - 7/15/20
Militia - LHV - 8/16/8
Militia - LHV - 9/19
Militia - LHV - 10/13
Militia - LHV - 11/20/4
Militia - LHV - 19/17
Militia - LHV - 29
Militia - LHW - WA
Militia - LHW-18/25/10
Militia - Military Orders
Militia - Misc
MilitiaRC - Rifle Clubs
MilitiaRC - NSW
MilitiaRC - NT
MilitiaRC - Qld
MilitiaRC - SA
MilitiaRC - Tas
MilitiaRC - Vic
MilitiaRC - WA
Militiaz - New Zealand
Tk - Turkish Items
Tk - Army
Tk - Bks - Books
Tk - Bks - 1/33IR
Tk - Bks - 27th IR
Tk - Bks - Air Force
Tk - Bks - Yildirim
Tk - POWs
Wp - Weapons
Wp - Hotchkiss Cav
Wp - Hotchkiss PMG
Blog Tools
Edit your Blog
Build a Blog
RSS Feed
View Profile
Open Community
Post to this Blog
Site Index
Education Centre
LH Militia
Boer War
Transport Ships
LH Battles
ALH - Units
ALH - General
Aboriginal Light H
Weapons
Ottoman Sources

"At a mile distant their thousand hooves were stuttering thunder, coming at a rate that frightened a man - they were an awe inspiring sight, galloping through the red haze - knee to knee and horse to horse - the dying sun glinting on bayonet points..." Trooper Ion Idriess

The Australian Light Horse Studies Centre aims to present an accurate history as chroniclers of early Australian military developments from 1899 to 1920.

The Australian Light Horse Studies Centre site holds over 12,000 entries and is growing daily.

Contact: Australian Light Horse Studies Centre

Let us hear your story: You can tell your story, make a comment or ask for help on our Australian Light Horse Studies Centre Forum called:

Desert Column Forum

WARNING: This site contains: names, information and images of deceased people; and, language which may be considered inappropriate today.

Monday, 9 November 2009
The Battle of Khuweilfe, Palestine, 1 - 8 November 1917, 3rd Battalion ICC Account
Topic: AIF - 5B - ICC

The Battle of Khuweilfe

Palestine, 1 - 8 November 1917

3rd Battalion ICC Account


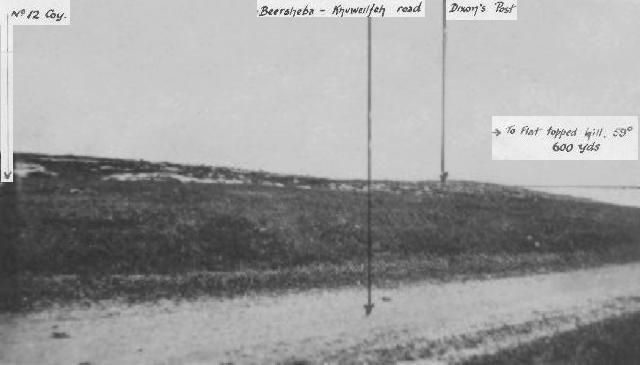
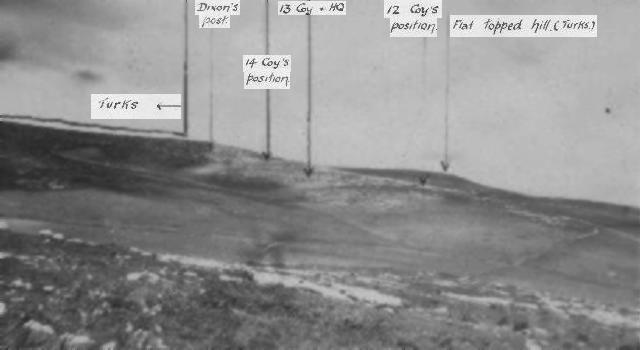
Photograph 1, 3rd Battalion ICC Account, detailing dispositions.

[Click on picture for larger version.]


The following was the plan of attack of General Officer Commanding, 158th Brigade, and detailed first by him in Operation Order No. 45, 5 November 1917 at 1815, to Officer Commanding 3rd Battalion, and afterwards modified and altered by him verbally as far as the 3rd Battalion was concerned before the attack took place.


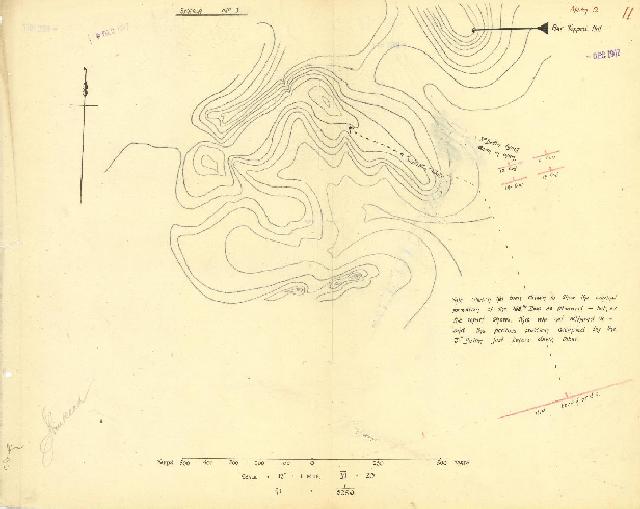
Hand drawn map detailing the plan of attack for 6 November 1917.

[Click on map for larger version.]


The 158th Brigade - 3 Battalions in the firing line and one in reserve.

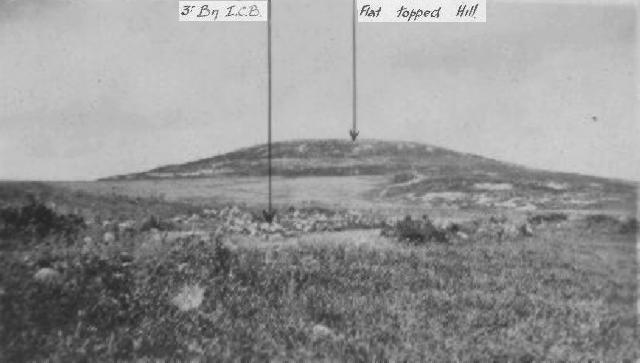
The three battalions in the firing line - 1/1st Herefords on the right, 1/6th Royal Welch Fusiliers in the centre and 1/7th Royal Welch Fusiliers on the left, were to form up at 0310 on 6 November 1917, covering a frontage of 500 yards each; making a total frontage of 1,500 yards, and at the time arrange (0421) the Brigade was to advance under the cover of an artillery barrage and take by storm the Turkish position, moving forward as the barrage lifted. The 3rd Battalion Imperial Camel Battalion was to follow up in rear of the right of the 1/1st Herefords, and as that Brigade made good its first objective (viz Flat Topped Hill) this hill was to be occupied by the 3rd Battalion with the view of protecting the right flank against a probable counter attack, whilst the 1/1st Herefords were to continue the advance.


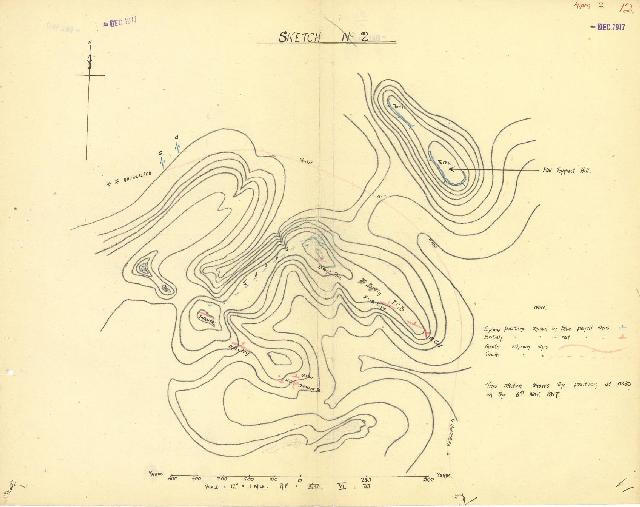
Hand drawn map detailing the situation at 8.30 am, 6 November 1917.

[Click on map for larger version.]


The advance commenced at the appointed time (0421) but for unforseen reasons one of the three Battalions of the 158th Brigade was late in assembling at the point arranged, and the right hand battalion got orders, when on the move, to extend to its left and take up a total frontage of 1,000 yards. In the dark they lost direction and while doing this did a complete left wheel, leaving the 3rd Battalion in the air, and in front of the original line.

The Commanding Officer of the 1/1st Herefords had pointed out his first objective (viz "Flat Topped Hill") to the Officer Commanding 3rd Battalion, and asked the latter to occupy it after it had been taken by the Herefords under the artillery barrage.


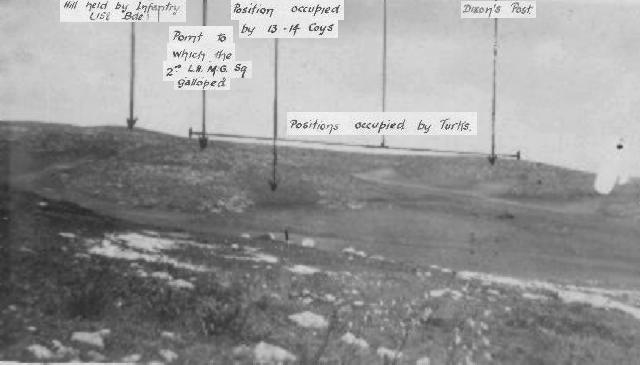
Photograph 2, 3rd Battalion ICC Account, detailing dispositions.

[Click on picture for larger version.]


The night was very dark, and when the 1/1st Herefords lost direction it was not at first reported by the Intelligence Section of the 3rd Battalion.

Just before dawn broke, Lieutenant Moore, the Battalion Intelligence Officer however succeeded by a personal reconnaissance in discovering that the 1/1st Herefords had deviated very far from the original plan of attack and line of advance, although their actual direction and the reasons for it was still most obscure. The Battalion was then lying down in the open, in front of what proved a very strongly held hill, impregnable from a frontal attack.

As the artillery barrage had lifted and no fighting had taken place on this hill, realizing the opportunity to attack - while the defenders were still demoralized from the barrage- had gone, and something was amiss, the 3rd Battalion was moved round behind a low spur, which faced the "Flat Topped Hill", and ran parallel to it (See Sketch 1) to wait until it became light enough to see how the situation stood.


Hand drawn map detailing the situation during 6 November 1917.

[Click on map for larger version.]


The Battalion had only just cleared the point of the spur, when a terrible outburst of machine gun fire took place from "Flat Topped Hill" and the ground the Battalion had just cleared was swept with a devastating fire so severe that nothing could have lived in it. The Battalion was only saved from being exterminated by the orderly way in which Officers Commanding Companies changed direction in the growing light and moved their companies to the flank ordered without loss of time.

Two companies (11 and 12) were placed behind the spur named, and at once came under a very heavy machine gun fire from the Turks on "Flat Top Hill", who were about 300 yards distant.

Just as the right flank was secured, about 200 infantry, of the 1/1st Herefords, who had lost all their officers and had got out of touch with the attacking force and had been slightly demoralised, came rushing back on our left, giving up to the Turks the point of the ridge which dominated all that held by the 3rd Battalion, and which was the key of the position. The position was almost lost, but Lieutenant (Now Captain) Dixon, taking in the crisis at a glance, rushed to the front with about 20 of his men, and taking off his hat cheered the demoralised infantry back in a most gallant manner, retaking the point and holding on to it throughout the fight. About 0830 the Turks again made a most determined attack round our left flank and left rear driving back the infantry in places and endeavoured to seize a hill to the rear of the Battalion, which dominated that held by us and which would - if occupied by the enemy - have completely encircled our position not only by fire - as they now did at this time - but by men also.


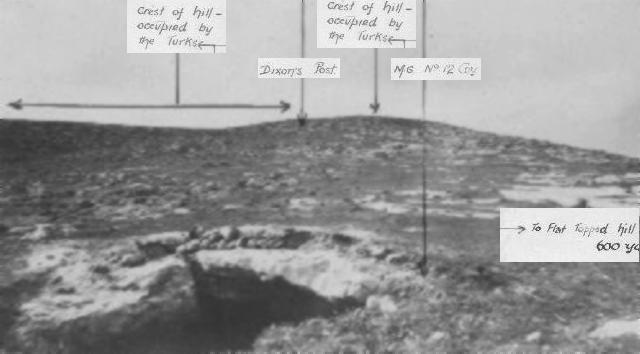
Photograph 3, 3rd Battalion ICC Account, detailing dispositions.

[Click on picture for larger version.]


The position looked again very critical, but the infantry rallied in our rear and the Turkish encircling movement was checked (vide sketch for the position at 0830).

Although the Turks were prevented from surrounding the 3rd Battalion altogether by men, they now swept every approach to its position by machine gun, rifle and shrapnel fire.

At about 1000, representations were made by the 3rd Battalion to the General Officer Commanding of the 150th Brigade for the infantry to come up and drive the Turks off the ridge which they held to the left rear (vide Sketch 2)  and over which the infantry held the commanding ground. This for reasons unknown they were not ordered to do, but the 2nd Brigade Light Horse Machine Gun Squadron were ordered to gallop up a little valley commanded by the Turks and secure the left of the ridge they held. They charged in a very gallant manner, and at once came under a murderous machine gun and shrapnel fire, but very gallantly led by Captain Caine the reached their objective, at which pint the hill rose so abruptly as to give cover from the Turkish firing line above and slightly to their right. They rushed their guns up the hill within forty yards of the Turks, and although the teams were shot down almost to a man, their very gallant action caused the Turks to pause and gave the 3rd Battalion breathing time to size up their position.

The Battalion held on in a critical position all day, the enemy giving no quarter to wounded or stretcher bearers alike.

Throughout the night the position was grave but morning broke to see the Battalion still holding to its ground.

Lieutenant Bickford succeeded in obtaining water and rations under cover of darkness, although a previous attempt by another party had failed under a heavy fire.


Photograph 4, 3rd Battalion ICC Account, detailing dispositions.

[Click on picture for larger version.]


Before dawn on the 7th the 2nd Battalion Light Horse Machine Gun Squadron were withdrawn under cover of darkness, and two infantry platoons which had joined the battalion during the night were put into the position they evacuated by an officer of the 3rd Battalion. These platoons lost very heavily as it became light.

The Battalion held on during the 7th and an enemy counter attack upon Dixon's Post was successfully driven off. Sniping fire became more deadly as the day went on.

About 1500 the Artillery were directed on the ridge to our left rear (vide sketch 3) with marked affect. About 1630 Lieutenant Dixon assisted by rifle grenades, and also by artillery fire, moved against the Turkish positions to his left and left rear and with fixed bayonets cleared the ridge.

The Battalion held to the ground during the night of the 7/8th and next morning it was discovered that the Turks had withdrawn leaving us masters of the position.


Photograph 5, 3rd Battalion ICC Account, detailing dispositions.

[Click on picture for larger version.]


Sources:

See: 3rd ANZAC Battalion, Imperial Camel Corps War Diary, November 1917, AWM4, Sub-class 11/8
Australian Light Horse Studies Centre, AIF War Diaries of the Great War, Site Transcription Policy


Further Reading:

The Imperial Camel Corps Brigade

The Battle of Khuweilfe, Palestine, 1 - 8 November 1917

The Battle of Khuweilfe, Palestine, 1 - 8 November 1917, Roll of Honour

The Third Battle of Gaza, Palestine, 26 October 1917 - 2 January 1918

Battles where Australians fought, 1899-1920


Citation: The Battle of Khuweilfe, Palestine, 1 - 8 November 1917, 3rd Battalion ICC Account

Posted by Project Leader at 12:01 AM EAST
Updated: Tuesday, 9 November 2010 9:08 AM EAST

View Latest Entries

Full Site Index


powered by FreeFind
Let us hear your story: You can tell your story, make a comment or ask for help on our forum.

Desert Column Forum

A note on copyright

The Australian Light Horse Studies Centre is a not for profit and non profit group whose sole aim is to write the early history of the Australian Light Horse from 1900 - 1920. It is privately funded and the information is provided by the individuals within the group and while permission for the use of the material has been given for this site for these items by various donors, the residual and actual copyright for these items, should there be any, resides exclusively with the donors. The information on this site is freely available for private research use only and if used as such, should be appropriately acknowledged. To assist in this process, each item has a citation attached at the bottom for referencing purposes.

Please Note: No express or implied permission is given for commercial use of the information contained within this site.

A note to copyright holders

The Australian Light Horse Studies Centre has made every endeavour to contact copyright holders of material digitised for this blog and website and where appropriate, permission is still being sought for these items. Where replies were not received, or where the copyright owner has not been able to be traced, or where the permission is still being sought, the Australian Light Horse Studies Centre has decided, in good faith, to proceed with digitisation and publication. Australian Light Horse Studies Centre would be happy to hear from copyright owners at any time to discuss usage of this item.

Contact

Australian Light Horse Studies Centre

eXTReMe Tracker