« November 2009 »
S M T W T F S
1 2 3 4 5 6 7
8 9 10 11 12 13 14
15 16 17 18 19 20 21
22 23 24 25 26 27 28
29 30
You are not logged in. Log in


Search the site:


powered by FreeFind
Volunteer with us.

Entries by Topic All topics  
A Latest Site News
A - Using the Site
AAA Volunteers
AAB-Education Centre
AAC-Film Clips
AAC-Photo Albums
AIF & MEF & EEF
AIF - Lighthorse
AIF - ALH - A to Z
AIF - DMC
AIF - DMC - Or Bat
AIF - DMC - Anzac MD
AIF - DMC - Aus MD
AIF - DMC - British
AIF - DMC - BWI
AIF - DMC - French
AIF - DMC - Indian
AIF - DMC - Italian
AIF - DMC - Medical
AIF - DMC - Remounts
AIF - DMC - Scouts
AIF - DMC - Sigs
AIF - DMC - Sigs AirlnS
AIF - DMC - 1 Sig Sqn
AIF - DMC - 2 Sig Sqn
AIF - DMC - Eng
AIF - DMC - Eng 1FSE
AIF - DMC - Eng 2FSE
AIF - DMC - GSR
AIF - 1B - 1 LHB
AIF - 1B - 6 MVS
AIF - 1B - 1 LHMGS
AIF - 1B - 1 Sig Trp
AIF - 1B - 1 LHFA
AIF - 1B - 1 LHR
AIF - 1B - 2 LHR
AIF - 1B - 3 LHR
AIF - 2B - 2 LHB
AIF - 2B - 7 MVS
AIF - 2B - 2 LHFA
AIF - 2B - 2 LHMGS
AIF - 2B - 2 Sig Trp
AIF - 2B - 5 LHR
AIF - 2B - 6 LHR
AIF - 2B - 7 LHR
AIF - 3B - 3 LHB
AIF - 3B - 8 MVS
AIF - 3B - 3 LHB Sigs
AIF - 3B - 3 LHFA
AIF - 3B - 3 LHMGS
AIF - 3B - 3 Sig Trp
AIF - 3B - 8 LHR
AIF - 3B - 9 LHR
AIF - 3B - 10 LHR
AIF - 4B - 4 LHB
AIF - 4B - 4 Sig Trp
AIF - 4B - 9 MVS
AIF - 4B - 4 LHFA
AIF - 4B - 4 LHMGS
AIF - 4B - 4 LHR
AIF - 4B - 11 LHR
AIF - 4B - 12 LHR
AIF - 5B - 5 LHB
AIF - 5B - 10 MVS
AIF - 5B - 5 LHFA
AIF - 5B - 5 Sig Trp
AIF - 5B - ICC
AIF - 5B - 14 LHR
AIF - 5B - 15 LHR
AIF - 5B - 1er Regt
AIF - 5B - 2 NZMGS
AIF - AASC
AIF - Aboriginal LH
AIF - Badges
AIF - Cars
AIF - Chinese LH
AIF - Double Sqns
AIF - Engineers
AIF - Fr - 22 Corps
AIF - Fr - 13 LHR
AIF - Honour Roll
AIF - HQ - 3rd Echelon
AIF - Marching Songs
AIF - Misc Topics
AIF - NZMRB
AIF - NZMRB - AMR
AIF - NZMRB - CMR
AIF - NZMRB - EFT
AIF - NZMRB - NZMFA
AIF - NZMRB - NZMGS
AIF - NZMRB - OMR
AIF - NZMRB - Sig-Trp
AIF - NZMRB - WMR
AIF - Ships
AIF - Ships - Encountr
AIF - Ships - Una
AIF - WFF
AIF - Wireless Sqn
Battles
BatzA - Australia
BatzA - Broken Hill
BatzA - Liverpool
BatzA - Merivale
BatzB - Boer War
BatzB - Bakenlaagte
BatzB - Belmont
BatzB - Bothaville
BatzB - Buffels Hoek
BatzB - Coetzees Drift
BatzB - Diamond Hill
BatzB - Driefontein
BatzB - Elands
BatzB - Graspan
BatzB - Grobelaar
BatzB - Grootvallier
BatzB - Hartebestfontn
BatzB - Houtnek
BatzB - Karee Siding
BatzB - Kimberley
BatzB - Koster River
BatzB - Leeuw Kop
BatzB - Mafeking
BatzB - Magersfontein
BatzB - Modder River
BatzB - Onverwacht
BatzB - Paardeberg
BatzB - Palmietfontein
BatzB - Pink Hill
BatzB - Poplar Grove
BatzB - Rhenoster
BatzB - Sannahs Post
BatzB - Slingersfontn
BatzB - Stinkhoutbm
BatzB - Sunnyside
BatzB - Wilmansrust
BatzB - Wolvekuil
BatzB - Zand River
BatzG - Gallipoli
BatzG - Anzac
BatzG - Aug 1915
BatzG - Baby 700
BatzG - Evacuation
BatzG - Hill 60
BatzG - Hill 971
BatzG - Krithia
BatzG - Lone Pine
BatzG - Nek
BatzJ - Jordan Valley
BatzJ - 1st Amman
BatzJ - 2nd Amman
BatzJ - Abu Tellul
BatzJ - Es Salt
BatzJ - JV Maps
BatzJ - Ziza
BatzM - Mespot
BatzM - Baghdad
BatzM - Ctesiphon
BatzM - Daur
BatzM - Kurna
BatzM - Kut el Amara
BatzM - Ramadi
BatzN - Naval
BatzN - AE1
BatzN - Cocos Is
BatzN - Heligoland
BatzN - Marmara
BatzN - Zeebrugge
BatzN - Zeppelin L43
BatzNG - Bitapaka
BatzO - Other
BatzO - Baku
BatzO - Egypt 1919
BatzO - Emptsa
BatzO - Karawaran
BatzO - Peitang
BatzO - Wassa
BatzP - Palestine
BatzP - 1st Gaza
BatzP - 2nd Gaza
BatzP - 3rd Gaza
BatzP - Aleppo
BatzP - Amwas
BatzP - Ayun Kara
BatzP - Bald Hill
BatzP - Balin
BatzP - Beersheba
BatzP - Berkusieh
BatzP - Damascus
BatzP - El Auja
BatzP - El Buggar
BatzP - El Burj
BatzP - Haifa
BatzP - Huj
BatzP - JB Yakub
BatzP - Kaukab
BatzP - Khan Kusseir
BatzP - Khuweilfe
BatzP - Kuneitra
BatzP - Megiddo
BatzP - Nablus
BatzP - Rafa
BatzP - Sasa
BatzP - Semakh
BatzP - Sheria
BatzP - Surafend
BatzP - Wadi Fara
BatzS - Sinai
BatzS - Bir el Abd
BatzS - El Arish
BatzS - El Mazar
BatzS - El Qatiya
BatzS - Jifjafa
BatzS - Magdhaba
BatzS - Maghara
BatzS - Romani
BatzS - Suez 1915
BatzSe - Senussi
BatzWF - Westn Front
BW - Boer War
BW - NSW
BW - NSW - 1ACH
BW - NSW - 1NSWMR
BW - NSW - 2NSWMR
BW - NSW - 3ACH
BW - NSW - 3NSWIB
BW - NSW - 3NSWMR
BW - NSW - 5ACH
BW - NSW - A Bty RAA
BW - NSW - AAMC
BW - NSW - Aust H
BW - NSW - Lancers
BW - NSW - NSW Inf
BW - NSW - NSWCBC
BW - NSW - NSWIB
BW - NSW - NSWMR_A
BW - NZ
BW - Qld
BW - Qld - 1ACH
BW - Qld - 1QMI
BW - Qld - 2QMI
BW - Qld - 3ACH
BW - Qld - 3QMI
BW - Qld - 4QIB
BW - Qld - 5QIB
BW - Qld - 6QIB
BW - Qld - 7ACH
BW - QLD - AAMC
BW - SA
BW - SA - 1SAMR
BW - SA - 2ACH
BW - SA - 2SAMR
BW - SA - 3SACB
BW - SA - 4ACH
BW - SA - 4SAIB
BW - SA - 5SAIB
BW - SA - 6SAIB
BW - SA - 8ACH
BW - SA - AAMC
BW - Tas
BW - Tas - 1ACH
BW - Tas - 1TIB
BW - Tas - 1TMI
BW - Tas - 2TB
BW - Tas - 2TIB
BW - Tas - 3ACH
BW - Tas - 8ACH
BW - Vic
BW - Vic - 1VMI
BW - Vic - 2ACH
BW - Vic - 2VMR
BW - Vic - 3VB
BW - Vic - 4ACH
BW - Vic - 4VIB
BW - Vic - 5VMR
BW - Vic - 6ACH
BW - Vic - AAMC
BW - Vic - Scot H
BW - WA
BW - WA - 1WAMI
BW - WA - 2ACH
BW - WA - 2WAMI
BW - WA - 3WAB
BW - WA - 4ACH
BW - WA - 4WAMI
BW - WA - 5WAMI
BW - WA - 6WAMI
BW - WA - 8ACH
BW Gen - Campaign
BW Gen - Soldiers
BW General
Cavalry - General
Diary - Schramm
Egypt - Heliopolis
Egypt - Mena
Gen - Ataturk Pk, CNB
Gen - Australia
Gen - Legends
Gen - Query Club
Gen - St - NSW
Gen - St - Qld
Gen - St - SA
Gen - St - Tas
Gen - St - Vic
Gen - St - WA
Gm - German Items
Gm - Bk - 605 MGC
GW - 11 Nov 1918
GW - Atrocities
GW - August 1914
GW - Biographies
GW - Propaganda
GW - Spies
GW - We forgot
Militia 1899-1920
Militia - Area Officers
Militia - Inf - Infantry
Militia - Inf - 1IB
Militia - Inf - 2IB
Militia - Inf - 3IB
Militia - Inf - NSW
Militia - Inf - Qld
Militia - Inf - SA
Militia - Inf - Tas
Militia - Inf - Vic
Militia - Inf - WA
Militia - K.E.Horse
Militia - LH
Militia - LH - Regts
Militia - LH - 1LHB
Militia - LH - 2LHB
Militia - LH - 3LHB
Militia - LH - 4LHB
Militia - LH - 5LHB
Militia - LH - 6LHB
Militia - LHN - NSW
Militia - LHN - 1/7/1
Militia - LHN - 2/9/6
Militia - LHN - 3/11/7
Militia - LHN - 4/6/16
Militia - LHN - 5/4/15
Militia - LHN - 6/5/12
Militia - LHN - 28
Militia - LHQ - Qld
Militia - LHQ - 13/2
Militia - LHQ - 14/3/11
Militia - LHQ - 15/1/5
Militia - LHQ - 27/14
Militia - LHS - SA
Militia - LHS - 16/22/3
Militia - LHS - 17/23/18
Militia - LHS - 24/9
Militia - LHT - Tas
Militia - LHT - 12/26
Militia - LHV - Vic
Militia - LHV - 7/15/20
Militia - LHV - 8/16/8
Militia - LHV - 9/19
Militia - LHV - 10/13
Militia - LHV - 11/20/4
Militia - LHV - 19/17
Militia - LHV - 29
Militia - LHW - WA
Militia - LHW-18/25/10
Militia - Military Orders
Militia - Misc
MilitiaRC - Rifle Clubs
MilitiaRC - NSW
MilitiaRC - NT
MilitiaRC - Qld
MilitiaRC - SA
MilitiaRC - Tas
MilitiaRC - Vic
MilitiaRC - WA
Militiaz - New Zealand
Tk - Turkish Items
Tk - Army
Tk - Bks - Books
Tk - Bks - 1/33IR
Tk - Bks - 27th IR
Tk - Bks - Air Force
Tk - Bks - Yildirim
Tk - POWs
Wp - Weapons
Wp - Hotchkiss Cav
Wp - Hotchkiss PMG
Blog Tools
Edit your Blog
Build a Blog
RSS Feed
View Profile
Open Community
Post to this Blog
Site Index
Education Centre
LH Militia
Boer War
Transport Ships
LH Battles
ALH - Units
ALH - General
Aboriginal Light H
Weapons
Ottoman Sources

"At a mile distant their thousand hooves were stuttering thunder, coming at a rate that frightened a man - they were an awe inspiring sight, galloping through the red haze - knee to knee and horse to horse - the dying sun glinting on bayonet points..." Trooper Ion Idriess

The Australian Light Horse Studies Centre aims to present an accurate history as chroniclers of early Australian military developments from 1899 to 1920.

The Australian Light Horse Studies Centre site holds over 12,000 entries and is growing daily.

Contact: Australian Light Horse Studies Centre

Let us hear your story: You can tell your story, make a comment or ask for help on our Australian Light Horse Studies Centre Forum called:

Desert Column Forum

WARNING: This site contains: names, information and images of deceased people; and, language which may be considered inappropriate today.

Tuesday, 17 November 2009
The Jifjafa Raid, Sinai, April 10 to 14, 1916, Mapping the Jifjafa Region
Topic: BatzS - Jifjafa

The Jifjafa Raid

Sinai, 10 - 14 April 1916

 Mapping the Jifjafa Region


British Map 1:125,000 Little Bitter Lake illustrating western section of journey to Jifjafa.
 
Note: "M" = Wadi um Mukhsheib, "MH" = Moiya Harab.

[Click on map for larger version.]


1913 British Map Giddi 1:125,000 illustrating the eastern route to Jifjafa.
 
Note: "X" = Point 1340, "J" = Jifjafa.

[Click on map for larger version.]


1:250,000, 1915 German map with Ottoman overlay detailing the topography around Jifjafa
 
[Click on map for larger version.]


Further Reading:

Reconnaissance to Muksheib by Captain Wearne

Jifjafa Raid Progressive Maps

The Jifjafa Raid, Sinai, April 10 to 14

Battles where Australians fought, 1899-1920


Citation: The Jifjafa Raid, Sinai, April 10 to 14, 1916, Mapping the Jifjafa Region

Posted by Project Leader at 12:01 AM EAST
Updated: Sunday, 29 November 2009 7:54 AM EAST
The Battle of Maghara, Sinai, 15 October 1916, Gullett Account
Topic: BatzS - Maghara

The Battle of Maghara

Sinai, 15 October 1916

Gullett Account 


Left to right: Lt Murray, Surveyor; Mr Gullett, Official War Correspondent; Lt O'Connor, Photographer.
 
[AWM No B01393]


Gullett, HS,  The Australian Imperial Force in Sinai and Palestine, 1914–1918 (10th edition, 1941) Official Histories – First World War
Volume VII:


From Romani could be seen, some forty miles across the broken and rolling sand-hills to the south, the gloomy, barren mass of the ranges of central Sinai. Waterless, except at occasional wells, and served only by lonely, narrow tracks which were always hazardous, and often impossible, for wheeled transport, these mountains were still in the possession of the Turks, and were a constant, if not a serious, menace to the British force advancing east along the seaboard. Murray's plan was to deal finally with the Turkish posts in the hills after he had reached El Arish; but it was decided in October to make an exception to the general scheme, and to endeavour to storm the Turkish stronghold at Maghara, from which troops had debouched by the passes during the Romani fighting.

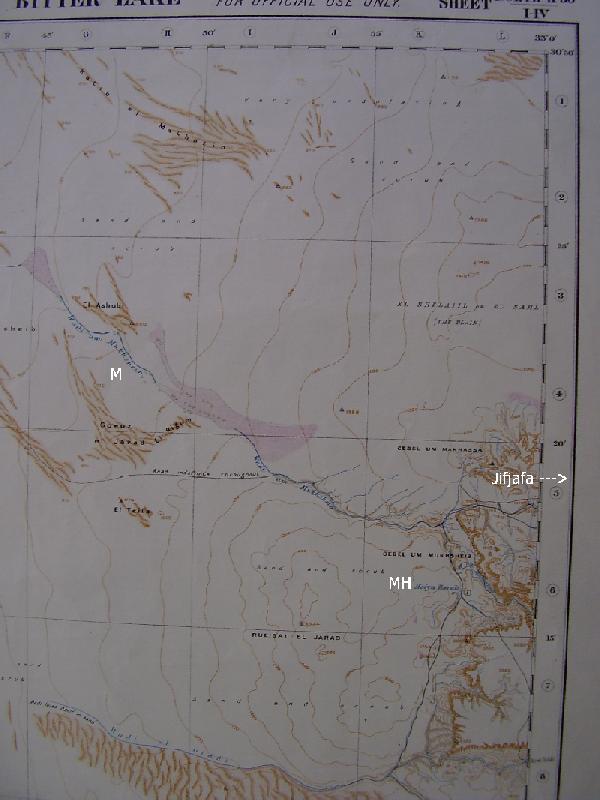
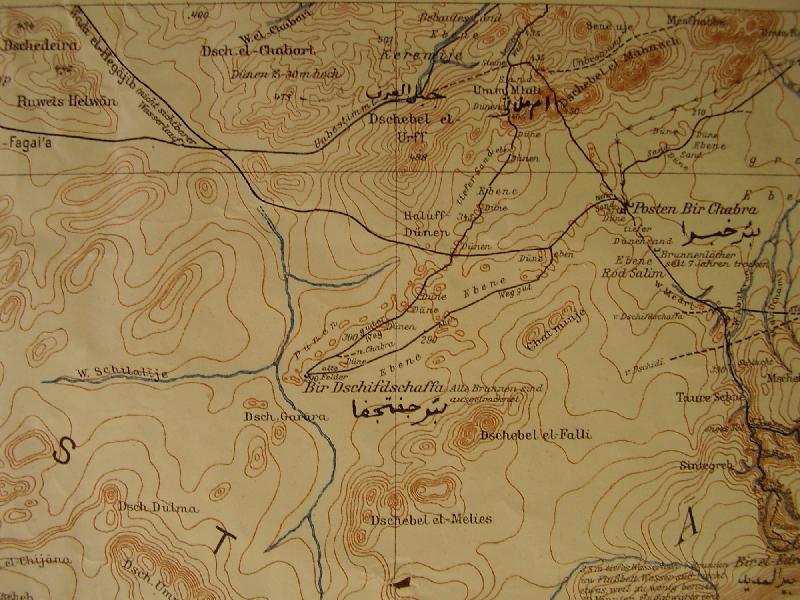
Maghara, an old settlement made up of a few stone houses, is perched on the northern shoulder of the range, about fifty miles south-east of Romani. A narrow defile, in places not more than twenty feet wide, falling steeply through the harsh, yellow, sandstone rocks, gives the settlement access by the Wadi Baba to the plain below. Running along the foot-hills upon either side of the mouth of the Baba is a narrow flat of hard ground, clear except for a few mimosa bushes, and showing signs of cultivation. From this flat towards Bayud, to the north, stretches one of the most desolate and difficult expanses of sand-dune country in all northern Sinai.

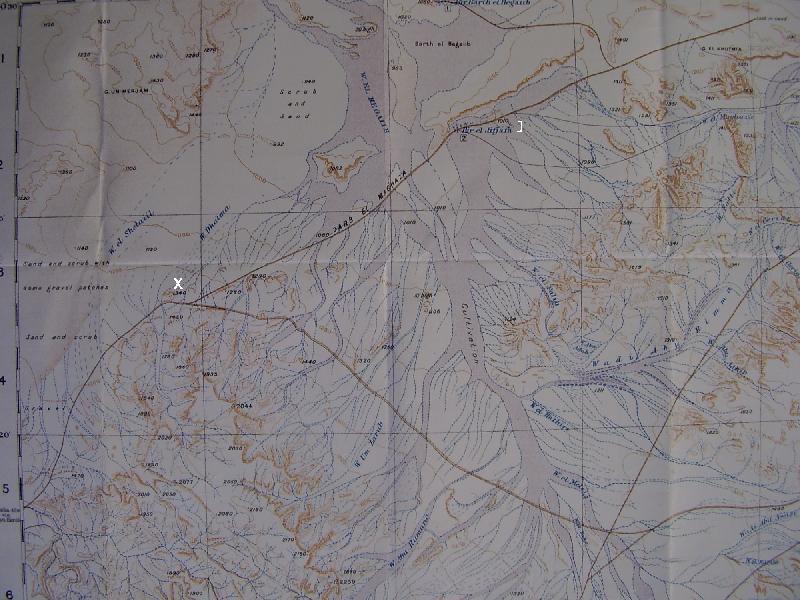
A column made up of the 11th and 12th Light Horse Regiments, one regiment of City of London Yeomanry, and 300 troops drawn from the camel companies, supported by two guns of the Hong Kong and Singapore Battery, was placed for the raid under the command of Major-General A. G. Dallas'-who afterwards led the unlucky 53rd Division at Gaza-with Brigadier-General S. F. Mott as second-in-command. From Bayud, where the column assembled, to Maghara is only twenty-five miles, and, allowing for the circuitous route through the sand-hills, the march would not exceed thirty-five. Over normal, well-watered country preparations for such a raid by a small mounted force would entail very little work or consideration. But, in view of the country to be covered, the arrangements were exceptionally elaborate. The force contemplated did not exceed 1,100 dismounted rifles; but water and rations had to be provided for men and horses for four or five days, and when the column moved out from Bayud its total strength, including native camel-drivers, was 5,000 men, 2,300 horses, 7,000 camels. The water-supply was drawn from Bayud, where a month earlier the wells had only been capable of supplying half a squadron in twenty-four hours. A squadron of the 12th Light Horse Regiment, under Lieutenant B. Lowing: worked constantly for a month at the improvement of the water, and sank and timbered to a depth of about twelve feet sixteen wells, which were capable of giving an abundant supply to the whole column.

Marching by the stars, the column, with Grant of the 11th Light Horse Regiment and Lieutenant P. Goldenstedt as guides, reached Zagadan and halted there for the day. That night, the 11th Light Horse still leading, the column moved on Maghara. The route wound through the intricate troughs among countless sand-hills devoid of distinguishing features. During the night a dense fog shut off the stars, but Grant, who had a phenomenal sense of locality and direction, kept on constantly at a sound pace through the sandy desolation. Shortly before dawn the horses came suddenly on to hard ground, and a little later, as daylight was breaking, the advanced screen was fired on by a Turkish outpost. The column had emerged from the maze of sand-hills directly in front of the Turkish position. Immediately the Turks fired, the leading troops, under Captain C. A. R. Munro* and Lieutenant Farlow, charged their outposts on the foot-hills at the gallop, although in the fog they had only the rifle-fire to guide them. A few prisoners were taken.

General Dallas's plan was to push the 11th Light Horse Regiment up the heights in the centre straight for the main defences; the 12th Light Horse Regiment and the yeomanry were to work round on the north, while a half-squadron was to advance up the Wadi Baba, which led into the pass. But the fog which enshrouded the range concealed all the objectives. Dallas's orders were identical with those given to Chauvel at Mazar. If the Turks were in strength, he was not to risk his force, but was to consider the operations as a reconnaissance only; accordingly, after consultation with the regimental leaders, he decided merely to make a demonstration and withdraw. The 11th Light Horse Regiment was then ordered to advance on the main front, with the 12th to the right. After the long preparation for the raid, the Australians were exceptionally keen for a fight. Galloping across the narrow flat, they dismounted and advanced up the range with great eagerness. The fog was still heavy, but conditions improved as the men climbed. Covered by overhead fire from the two mountain guns and a number of machine-guns, they ascended a few hundred feet before encountering the enemy, and were then fired upon from a redoubt on a commanding hill. Taking every advantage of the good cover provided by the rough hill-side, a squadron of the 11th crept forward with the bayonet, while the 12th Regiment, on the right, kept the Turks in the redoubt quiet with enfilade fire from machine-guns and rifles. The enemy, who throughout was completely surprised, refused a hand to hand fight, and fled up the heights.

The light horsemen had now accomplished half their ascent, and the worst of the ground was behind them. The main Turkish position was in sight, and the squadron leaders were confident they could carry it without heavy losses. But communications were indifferent; Dallas, having decided only to make a demonstration, now broke off the sporting little engagement, and the light horsemen, intensely disappointed, retired. One Australian was killed and a few men were wounded. Captain Munro won distinction in the bold leadership of his squadron and in a gallant attempt to carry some Turkish wounded out under fire.


Further Reading:

The Battle of Maghara, Sinai, 15 October 1916

The Battle of Maghara, Sinai, 15 October 1916, Roll of Honour  

Battles where Australians fought, 1899-1920


Citation: The Battle of Maghara, Sinai, 15 October 1916, Gullett Account  

Posted by Project Leader at 12:01 AM EAST
Updated: Tuesday, 1 December 2009 10:32 PM EAST
Monday, 16 November 2009
The Jifjafa Raid, Sinai, April 10 to 14, 1916, New York Times Account, 16 April 1916
Topic: BatzS - Jifjafa

The Jifjafa Raid

Sinai, 10 - 14 April 1916

New York Times Account, 16 April 1916


New York Times Account, 16 April 1916


The Transcription:

 
LONDON, April 13.-The following official statement on the campaign in Egypt was issued by the British War Office tonight:

The Commander in Chief in Egypt, reports that on April 13 a successful reconnaissance was made by a column of Australian troops at Jifjaffa. The column moved out on the night of April 12-13 and reached Hill 1,082, three miles southwest of Jifjaffa, by 5:30 o'clock in the morning. The enemy's camp was attacked at 7 o'clock in the morning, and occupied after a brisk fight. The enemy's known casualties were six killed and five wounded. One Austrian Lieutenant of Engineers and forty-three Turks, of whom four were wounded, were made prisoner. Our only casualty was one non-commissioned officer killed. Only two unwounded mounted men of the enemy escaped. Our troops destroyed all water plants.

The Katia Oasis has been occupied by our troops.


Further Reading:

The Jifjafa Raid, Sinai, April 10 to 14

Battles where Australians fought, 1899-1920


Citation: The Jifjafa Raid, Sinai, April 10 to 14, 1916, New York Times Account, 16 April 1916

Posted by Project Leader at 12:01 AM EAST
Updated: Sunday, 29 November 2009 6:32 PM EAST
Sunday, 15 November 2009
The Jifjafa Raid, Sinai, April 10 to 14, 1916, Times Account, 17 April 1916
Topic: BatzS - Jifjafa

The Jifjafa Raid

Sinai, 10 - 14 April 1916

Times Account


Times, 17 April 1916, p. 8.


The Transcription:


ENEMY CAMP IN EGYPT CAPTURED

AN AUSTRALIAN EXPLOIT.

ONLY TWO TURKS ESCAPE.


The Secretary of the War Office yesterday issued the, following for publication:

The General Officer Commanding-in-Chief in Egypt reports that on April 13 a successful reconnaissance was made by a 'column of Australian troops at Jifjaffa.

The column moved out on the night of April 12 - 13 and reached Hill 1,082, three miles west by south of Jifjaffa, by 5.30 a.m.

The enemy's camp was attacked at 7 a.m. and was occupied after a brisk fight,

The enemy's known casualties were six killed and five wounded, and one Austrian engineer Lieutenant and 33 Turks, of whom four were wounded, taken prisoners. Our only casualty was one non-commissioned officer killed. Only two unwounded mounted men of the enemy escaped. Our troops destroyed all well plant.

The Katia oasis has been occupied by our troops.

Though the Turks have never got beyond the Suez Canal, the fact remains that for more than a year they have been occupying Egyptian territory. The Sinai Peninsula, which lies between the canal and the Turco-Egyptian boundary, from Rafa and the Gulf of Akaba, has never been cleared of the enemy. Occasionally we have made short reconnaissances into the desert from the canal defences, and air raids over it.

The operations now narrated are the most considerable since the Turkish raid on the Canal in February last year.

There are three routes from Turkey to Egypt across the desert, all of which were used on that occasion. The most northern runs behind the Mediterranean sand-dunes from Rafa through El Arish, Katia, to Kantara. Our troops have occupied the Katia district, 30 miles east of the Canal, a very valuable acquisition owing to the fact that it has a good supply of water, in which the land is so deficient. The middle route runs from El Audja, believed to be the terminus of a railway from Beersheba, across the heart of the Peninsula, and reaches the Canal just south of Ismailia. This was the main line of the Turkish advance. Jifjaffa, which has been occupied by our troops, lies on it, and is about 60 miles east of the Canal. The third line of approach is from Akaba to Suez, and between the second and third line lies the post of El Hassana, recently bombed by our airmen.


Further Reading:

The Jifjafa Raid, Sinai, April 10 to 14

Battles where Australians fought, 1899-1920


Citation: The Jifjafa Raid, Sinai, April 10 to 14, 1916, Times Account, 17 April 1916

Posted by Project Leader at 12:01 AM EAST
Updated: Sunday, 29 November 2009 10:08 PM EAST
Saturday, 14 November 2009
Citation: Remount Section, AIF, Contents
Topic: AIF - DMC - Remounts

Remount Section, AIF

Contents


Items

Remount Section, AIF, The Training of a Remount By Lieutenant SJ Hardy, Royal Scots Greys 

Remount Section, AIF, Happy Dispatches, Chapter XV. “Hell-Fire Jack” by Andrew Barton ‘Banjo’ Paterson


The Waler

The Waler, Moving the Light Horse

The Riding Test, Argus 27 January 1915 


History


Roll of Honour


Lest we forget


Further Reading:

Remount Section, AIF

The Light Horse

Australian Light Horse Militia

Militia 1899 - 1920

Battles where Australians fought, 1899-1920


Citation: Remount Section, AIF, Contents

Posted by Project Leader at 12:01 AM EAST
Updated: Friday, 11 December 2009 3:38 PM EAST

Newer | Latest | Older

Full Site Index


powered by FreeFind
Let us hear your story: You can tell your story, make a comment or ask for help on our forum.

Desert Column Forum

A note on copyright

The Australian Light Horse Studies Centre is a not for profit and non profit group whose sole aim is to write the early history of the Australian Light Horse from 1900 - 1920. It is privately funded and the information is provided by the individuals within the group and while permission for the use of the material has been given for this site for these items by various donors, the residual and actual copyright for these items, should there be any, resides exclusively with the donors. The information on this site is freely available for private research use only and if used as such, should be appropriately acknowledged. To assist in this process, each item has a citation attached at the bottom for referencing purposes.

Please Note: No express or implied permission is given for commercial use of the information contained within this site.

A note to copyright holders

The Australian Light Horse Studies Centre has made every endeavour to contact copyright holders of material digitised for this blog and website and where appropriate, permission is still being sought for these items. Where replies were not received, or where the copyright owner has not been able to be traced, or where the permission is still being sought, the Australian Light Horse Studies Centre has decided, in good faith, to proceed with digitisation and publication. Australian Light Horse Studies Centre would be happy to hear from copyright owners at any time to discuss usage of this item.

Contact

Australian Light Horse Studies Centre

eXTReMe Tracker