"At a mile distant their thousand hooves were stuttering thunder, coming at a rate that frightened a man - they were an awe inspiring sight, galloping through the red haze - knee to knee and horse to horse - the dying sun glinting on bayonet points..." Trooper Ion Idriess
The Australian Light Horse Studies Centre aims to present an accurate history as chroniclers of early Australian military developments from 1899 to 1920.
The Australian Light Horse Studies Centre site holds over 12,000 entries and is growing daily.
Contact:Australian Light Horse Studies CentreLet us hear your story:
You can tell your story, make a comment or ask for help on our Australian Light Horse Studies Centre Forum called:
WARNING: This site contains: names, information and images of deceased people; and, language which may be considered inappropriate today.
Monday, 23 March 2009
Bothaville, South Africa, November 6, 1900, Times Account, 10 Nov 1900 Topic: BatzB - Bothaville
Bothaville
South Africa, 6November 1900
Times Account, 10 November 1900
The Times, 10 November 1900, p. 7.
DEFEAT OF DE WET.
EIGHT GUNS CAPTURED.
The following telegram from Lord Roberts has been received at the War Office :
Johannesburg, Nov. 8, 3 30 p.m.
Colonel Le Gallais surprised the Boer forces on night of 5th inst. three miles south of Bothaville. He was heavily engaged for five hours, the enemy's strength about 1,000. Charles Knox followed Le Gallais with Do Lisle's Mounted Infantry and completely defeated the enemy.
We captured one 12-pounder of "Q" Battery, one 15-pounder 14th Battery, four Krupps guns, one "Pom-Pom," and one Maxim, with all their ammunition and wagons, and 100 prisoners. Twenty-five Boers were left dead on the field and 30 wounded.
Steyn and De Wet were with this force, and left in great haste. The enemy were pursued for some miles in a south-easterly direction, when they broke up in small parties.
Our casualties were:
Killed: Le Gallais, 8th Hussars; Captain F. Engelbach, of the Buffs; Lieut. W. A. Williams, South Wales Borderers and eight men. Wounded: Seven officers and 26 men.
I deeply regret the death of these three officers, all most promising. Le Gallais, is, indeed, a very serious loss, the most gallant and capable cavalry leader.
The fighting must at one time have been at close quarters. "U" Battery, R.H.A., under Major P. B. Taylor, was in action• at a range of 400 yards.
Amongst the wounded prisoners is De Villiers, Steyn's secretary, and amongst the dead the Boer doctor with Red Cross on his arm, rifle in baud, and bandolier half emptied.
On the 6th a party of Boers attacked a post of mounted troops near Honeynest Kloof and wounded one man.
The Modder River Camp was fired into yesterday and two of our men wounded. The Boers had one killed and 14 wounded.
Lieutenant-Colonels White's and Barker's columns axe doing good service in the south-eastern province of the Orange River Colony breaking up the small parties of Boers who have been trying to excite the burghers in that part of the country to rebellion.
Douglas, on the morning of the 6th, surprised a laager south of the road running from Zeerust to Rustenburg. He captured several prisoners and several wagons.
Boyes, while conveying a convoy from Harrismith to Vrede, was opposed by a small party of Boers on the 6th inst. Two Boers were killed We had one of the Manchester Mounted Infantry wounded.
Smith-Dorrien reports having been engaged with the enemy some miles south of Dalmanuth: on the 6th inst. He drove them to the east of the omati River. Casualties not yet reported.
Grobelaar Recht - Article - London Times 21 May 1901, p. 5. Topic: BatzB - Grobelaar
Grobelaar Recht
Article - London Times 21 May 1901, p. 5.
The text
SUMMARY OF THE SITUATION.
CAPE TOWN, MAY 20.*
Having returned from the north, I am enabled to give a summary of the present state of affairs in the Transvaal and Orange colonies. In the northern Transvaal, General Bindon Blood's advance has driven the majority of the Boors west, though a few are still left in the north of the Zoutpansberg. Delarey is drawing round him most of these fugitives. A number of men who have lately been operating in the neighbourhood of Ermelo have also crossed into Delarey's command, leaving Botha. The British columns are moving in every direction, the great object being not to allow the enemy any rest. Delarey has organized a system of remounting from the Orange Colony, but the horses are in the poorest condition.
Lord Methuen and General Babington still move accompanied by small bodies of infantry. The new and excellent system of blockhouses which has been inaugurated for the protection of the line is very economical, releasing for active operations over 6,000 men. The railway from Elandsfontein to Volksrust is studded with blockhouses, effectively preventing attacks on the line.
The troops in Orange Colony are busily employed in denuding the country east of the railway. Many columns are operating, moving slowly and taking all horses and stock. A few wandering small commandos are west of the line, but in the south Hertzog and Brand temporarily hold the country round Petrusburg. Hertzog sets as treasurer, and each Orange commandant receives regularly £45 monthly. The Orange commandos refuse to accompany De Wet, stating that it is too dangerous.
De Wet's latest journey, in company with an escort of 40 men, was a wonderful performance. heaving Credo, he passed north to Ermelo, and thence across the line near Nylstroom. Winding south-west between Zeerust and Lichtenburg, he halted for a few days near Maribogo, and thence proceeded southwards to Boshof and Philippolis, where he is said to have had an interview with Hertzog. In confirmation of this, I believe it is a tact that all rebels attached to the Orange commandos have received orders to concentrate near Orange River.
The following official statement is published regarding the military operations Scheepers's commando is being kept moving in the hilly contiguous to the Graaf Reinet and Somerset Fast boundaries. Its strength is stated to have dwindled to 100 men, and the horses are much exhausted. In the eastern province the enemy have been reinforced by Lotter, Myburgh, Lategan, and, it is reported, by Kruitzinger, who have crossed from the Orange River Colony to the north and north Rest of Venterstad. The reinforcements, to the number of 800, appear to be making the country south of Venterstad their base. It is assumed that they were unable to obtain subsistence in the southern part of the Orange River Colony, and that they have crossed partly with the object of living on Cape Colony and partly to come to the aid of Fouche, who is sorely pressed.
Lategan ambushed a patrol of 14 of Nesbitt's Horse at Damplaats. Lategan's brother was wounded and taken prisoner. Another patrol of seven men was ambushed south of Venterstad.
The total of the Boer casualties in April was killed, 105 wounded, 118 prisoners and surrenders, 2,183.
Magersfontein, South Africa, December 11, 1899 Topic: BatzB - Magersfontein
Magersfontein
South Africa, 11 December 1899
Magersfontein, scene of a heavy British defeat the volume of Boer bullets sweeping the by Boer forces on 11 December 1899, during the Second South African War. For nearly three weeks the British under Lieut.-General Lord Methuen had been pressing north towards Kimberley (then languishing under a Boer siege) though forced to fight three sharp and costly engagements against enemy detachments seeking to impose delay (see Belmont, Graspan and Modder River). Following the last of these actions, Methuen had rested his troops for more than a week, while building up supplies and taking reinforcements-including several Canadian detachments, and a contingent of Victorian Mounted Rifles which joined a small party of 29 men of the. New South Wales Lancers already serving with the force.
By 10 December, his division now comprising some 15,00 men, Methuen prepared to brush aside vet another Boer blocking force about 24 kilometres short of his objective. The enemy occupied the Magersfontein Range which ran from north-west to south-east across the British axis of advance along the railway line to Kimberley. The strong point to this position was a dominating hill at the southernmost end of the range, to the right (east) of the railway, which rose to a height of 60 metres above the surrounding veldt. Separated by a gap of a kilometre was a lower extension of the range in the form of a series of scrub-covered ridges which never rose more than 18 metres as they made a more southerly sweep towards the banks of the Modder River.
To defend his position, the Boer commander (General Piet Cronje) had about 8,000 men. These were deployed in sangars across the forward slopes of the high ground, though the bulk occupied rifle pits constructed at the level of the veldt, carefully concealed so as to be barely visible at a distance of 100 metres while commanding sweeping arcs of fire across the open plain in front of them. These trenches formed a broken but formidable defensive line covering the base of Magersfontein Hill and the ridge line, as well as the flat ground (or pan) in between. Pom-pom quick-fire weapons and Maxim machine-guns were placed below the crest line, while the Boer field-guns were positioned out of sight on reverse slopes from Where their fire could be directed by observers.
Although once more denied detailed knowledge of the enemy's dispositions, Methuen prepared to launch a dawn assault against the bluff Which he correctly identified as the key to the Boer Position. He effectively announced his intention on the wet afternoon of 10 December by ordering an advance by the Black ('batch to within about a kilometre of the hill; these retired, without drawing a shot from the Boers, after removing several wire fences which blocked their path. This demonstration was then followed at 4, 30 p.m. by a two-hour bombardment from the 31 guns and howitzers available in the British train. Although the barrage looked spectacular, the enemy defenders were actually sheltering out of harm's Way in rear positions and reportedly suffered no more than three men wounded. Any element of doubt in Cronje's mind regarding the actual direction of attack had, however, now been eliminated.
Methuen's approach on the night of 10 December took place in pitch-dark and amid driving rain which, while it helped conceal movement, added immeasurably to the discomfort of the troops and the problem of control. The principal attack formation, a brigade of 4,000 men from four highland regiments under Major-General A.J. Wauchope, was forced to move into position in mass of quarter-column, a formation which effectively had the troops advance on a very narrow front, packed together shoulder-to-shoulder. The intention was to take the units to their start-point by this means, before shaking out into extended deployment about an hour before daybreak when they would fix bayonets and charge. This plan miscarried horribly when the formation for the movement Was retained too long, and the dense mass of men blundered on until only 400 metres from the Boer trenches in the gloom of approaching dawn at about 4 a.m.
The storm of bullets which the Boers suddenly poured into the packed ranks of the Highlanders rivalled a First World War battle in its intensity. Though much of the fire was high, many British fell-including Wauchope - and the rest either sought refuge on the ground or broke and ran to the rear. By the time daylight finally arrived, the makings of a disaster were already evident. As at Modder River, retreat was impossible, so that Survivors of the failed British assault remained largely pinned down where they were for the next fourteen hours. Whereas they were formerly sodden from the night's storm, now they were forced to endure the burning sun without shade, food or water, and were subjected to searching enemy fire in response to any visible movement. Only the supporting fire of the British artillery could do anything to mitigate the troops' plight, by forcing the Boers to periodically seek shelter from shells. The Royal Horse Artillery's G. Battery had come forward to within 1,300 metres of the low ridge line on the right and 1,800 metres of the bluff, and maintained a heavy and effective fire for the rest of the day and throughout the night until the next morning. The mounted escort for this battery (which included the New South Wales Lancers) stayed with the guns for the whole of that time, deploying forward to help suppress Boer sniper fire and themselves being hotly engaged. When withdrawn the next day they were almost the last British troops to retire from the battlefield.
All hopes which Methuen might have entertained of retrieving the situation evaporated shortly after 1 p.m., when an order to retire, given to a small group of men being troubled by enfilading fire, was taken by adjoining troops as a general instruction to fall back. The mass retirement which resulted was accompanied by a withering fire from the Boers which caused the most severe losses of the entire day. Only with the arrival of dusk were survivors of the most advanced attacking units able to withdraw safely, and ambulance parties to begin clearing the field of casualties. The failed attack had produced British losses totalling over 900, with 220 of these killed; Boer losses were only one-third this number, and included 87 killed.
Unlike at the Modder River battle, the Boers did not vacate their positions under the cover of darkness on this occasion, and the morning of 12 December found them still holding their ground in strength; the trenches before Magersfontein were not, in fact, abandoned by the burghers until twelve weeks later. In the meantime Methuen pulled his mauled division back to its previous camp at Modder River on the night of the 11th. Here he was ordered to stay by the British commander-in-chief in South Africa, General Sir Redvers Buller, while rebuilding the strength for his force in preparation for a renewed drive towards Kimberley.
Extracted from the book produced by Chris Coulthard-Clark, Where Australians Fought - The Encyclopaedia of Australia's Battles, Allen and Unwin, Sydney, 1998, pp. 60-62.
Additional References cited by Chris Coulthard-Clark:
W. Baring Pemberton (1964) Battles of the Boer War, London.
R.L. Wallace (1976) The Australians at the Boer War, Canberra: Australian War Memorial & Australian Government Publishing Service.
1st Australian Armoured Car Section - Sinai Topic: AIF - Cars
1st AUSTRALIAN ARMOURED CAR SECTION, AIF
Sinai
Below is a transcription from a manuscript submitted by Captain E.H. James called "The Motor Patrol". It is lodged in the AWM as AWM 224MSS 209.
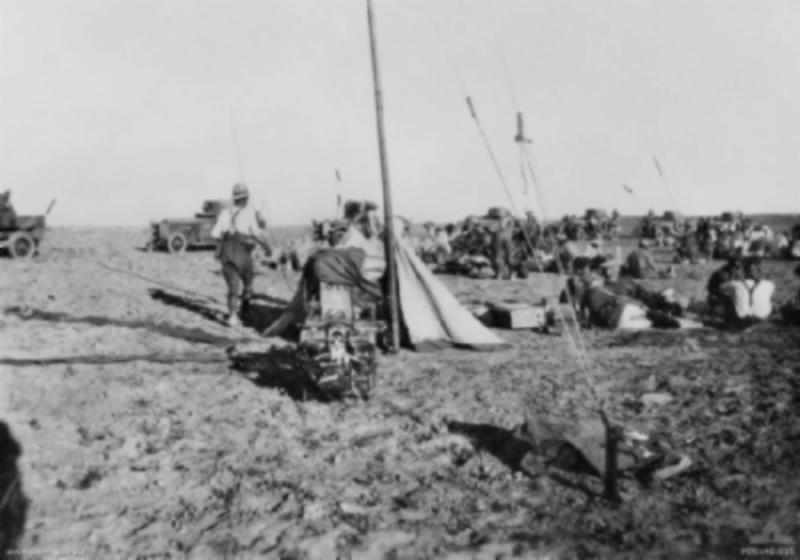
Men, possibly of the Australian Flying Corps, relaxing around a radio set, powered by a generator. There are a number of armoured cars, made by Rolls Royce and Ford in the background, each with a number of spare tyres attached to their sides.
On the 18th May, 1917, the patrol loaded their cars and baggage on the trucks of the little narrow gauge Military Railway at Railhead W.D.A. Everything was securely roped up for the long journey to Egypt and at 6 p.m., the little engine whistled and puffed away m its long dusty trip across the Libyan Desert. The personnel spread themselves in their cars as these were the only seats available on the train. We slept on board as comfortably as could be expected under the circumstances and in the morning had our usual breakfast of bully beef and biscuit. The next day was a never-to-be-forgotten one.
The temperature was between 119 and 120 degrees in the shade (which was difficult to find) and a genuine Khamseen (sand storm) was in full force. It seemed to us to be working itself up into an extra fury to give us a send off. The coarse grains of sand (from which it was impossible to get protection) would sting the face and hands like driving hail stones. The engine of our train was making heavy weather as it had to rise nearly 1000 feet from the Kharga oasis to the top of the scarp which was the level of the ordinary desert. The difficulty was intensified by the drift sand which covered the rails. The troops, every few miles, would walk ahead with shovels and clear the truck to give the engine a chance to get going.
Once on level ground the going was easier and the train ands better progress.
On the subject of the oases it is just as well to mention that these are not exactly what they are popularly supposed to be. The oases in the deserts in the North of Africa are merely deep depressions in the ground. Some of them are very large and are generally from 20 to 100 miles in diameter.
They owe their fertility to water which comes from the mountains in the South, from underground sources. Most oases are populated by natives who sink wells and pump the water over the depression. They cultivate date palms principally. The dates are collected, dried and sent by camel to Egypt in exchange for other merchandise.
After spending the day in the train we ultimately arrived at the Nile Valley and transferred from the narrow gauge train to the Broad gauge Egyptian State Railway's train at oasis Junction and after another night and day, in this train, we arrived at Cairo at 10 P.M. only to be immediately shunted off to the train to Kantara which we reached at 11.30 A.M. on 21st May.
We unloaded here and packed our baggage once more on to our fleet of "Lizzies" and drove across the Canal at Kantara by the pontoon bridge to the terminus of the new Military Railways to Palestine.
Once more we loaded up and entrained for the new front, getting away after a hasty snack of lunch at 1 P.M. After a day and a night on board this train, we ultimately arrived at our new destination at the new front outside Gaza. We off loaded at a place known as Khan Yunis and were immediately welcomed at the new front by an enemy plane who promptly tried to bomb the train and was greeted by the "archies" whose spent Shrapnel dropped all over us much to the annoyance of one of our drivers whose haversack and breakfast was ruined by a piece of shell case.
We moved off to our new camps which were in an old Arab orchard surrounded by prickly pears and we were told to dig dugouts for ourselves as the place was supposed to be popular with enemy aeroplanes especially on moonlight nights.
Next morning we were introduced to General Sir Harry Chauvel, the Commander of Desert Mounted Column which was reputed to be the largest body of cavalry and mounted troops ever assembled. We were inspected and welcomed by the General and his staff and were informed that the motor units would co-operate with the mounted troops in forthcoming military operations. We were to get the hang of the country as quickly as possible and learn the various routes from one end of the front to the other.
On the 30th May, with two of our machine gun cars accompanied by one car from No. 7 Patrol, 2 Rolls. Armoured Cars and 1 waggon from the 11th Light Armoured Motor battery, we took part in a reconnaissance from the Wadi Ghuzzie in an Easterly direction. About 20 miles out the country became very sandy and we decided to leave the heavy armoured oars in a commanding position and proceed further with two light Patrol care across the doubtful looking country. We ran across several of our light horse patrols who reported numerous small bodies of mounted Turks to the Fast in which direction we proceeded without encountering any of them, although they could be seen in the hills through the glasses. We reconnoitred the district for about an hour and returned to the armoured cars and then back to our camp in the evening.
During all movements such as these, we made it a fixed rule that all patrol cars must invariably work in pairs. This was necessary for several reasons. First of all in case of mechanical trouble one vehicle could always help the other out of difficulties or if necessary even tow it home.
Secondly it was also a great advantage to have the extra man power with two car crews in bad country when any manhandling of the vehicles had to be done.
Thirdly it was a great preventative of disaster. It rendered ambush almost impossible, provided the cars always kept their proper distances from each other on patrol; also in difficult crossings of creeks or depressions etc., one vehicle could generally cover the other until it was across, when the first vehicle would in turn cover the crossing of the second and so on.
This patrol throughout its existence was remarkably free from bad accidents or disasters of any description and there is no doubt that our rule of working in pairs in this fashion was largely responsible for our good fortune in this respect.
For the balance of the week we busied ourselves overhauling our engines and chassis and trying out our Lewis Guns so that everything would be ready for any emergency and on the 5th June, we moved out to the outpost camp at Tel-61 Fare and were attached to the Imperial Mounted Division. Next day we took part in an armed Reconnaissance with the mounted troops for about 8 miles towards Beersheba. No serious opposition was offered by the enemy and our force after obtaining the information required, returned to camp before 6 P.M.
On 8th June, Instructions were received that the whole patrol would be required next day for an important Reconnaissance at El Esani. we accordingly sent a couple of motor cyclists in company with one car to pick out the easiest crossings at Gorz Mabrook (a place where it was necessary to get the cars across deep wadis) as we did not wish to waste any time next day. Early next morning we nicked up the Divisional Commander, Major General Hodgson and his General staff officers and proceeded with four machine gun cars reconnoitring the whole of the Esani district for four hours while the Light Horse Regiments were making a demonstration and engaging the Turks (towards the south East) in order to distract their attention from our activities. We returned shortly after midday to camp without any untoward events except a misfiring engine which was quickly rectified.
On the 14th June we picked up the Corps Commander and staff again for another reconnaissance which was carried out this time during the afternoon in the direction of Beersheba near a place called El Buggar.
Everything proceeded satisfactorily except that an inquisitive enemy aeroplane became too interested in our movements and we were compelled to keep him bum by concentrating three of our Lewis Guns on to him until he rose to a reasonable height again. We returned to camp before dark.
[Note: Wadis. - The Egyptian name for old river beds or creeks.]
All motor movements had to be made by daylight (except well behind the lines) as of course lights were not allowed to be used in any advanced positions. Although on moonlight nights very good work could often be done after sunset.
Next day one of our cars was out of action through being driven over a deep shell hole hidden in the long grass, with the result that a front axle was badly bent. However, we built a log fire in the evening and managed to get enough heat to straighten up the axle again, so the vehicle was ready for business as usual in the morning.
On the 20th June, we took the whole patrol on another inspection of the Turkish positions this time to the North East to El Dammath and El Nagile. Much useful information vas apparently obtained by the staff. We returned to camp before nightfall without our presence even being noticed by the enemy
About this time daily reconnaissances were made of all enemy positions until the 25th June when we took part in a new type of engagement. On this date it was decided to make a big drive on "no man's land" between the entrenched positions of both forces as bodies of the enemy were secreted in various concealed places therein. Accordingly two bodies of Mounted troops operating from each end of the position to be enveloped started out at daybreak and began to gradually converge.
The gun cars of No. 1. Light Car Patrol accompanied the Mounted Troops and we left a stores car with reserve ammunition also a few important spares in a good concealed position known to our dispatch riders who could quickly find the spot if necessary. It was not to be expected that the enemy would ignore such a demonstration of force as this, and we were heavily shelled when passing the exposed positions between the Wadi Imleih to the Wadi Hanafish. However, we suffered no casualties although a few mounted men were hit.
The chief duty of the Light Car Patrol was to cover the retirement of the mounted men when the movement was completed.
We accordingly took up a position along a ridge and engaged the Turks with machine gun fire until the mounted force was well back towards our own lines when we ceased fire and packed up our machine guns and with our superior speed soon regained our own lines, picking up our stores car on the way, arriving back at our camp almost as soon as the rest of the force.
The operation was quite a success as a number of prisoners were roped in although not as many as was expected. The day's work proved how usefully motor units could be utilised in covering a retirement.
Two days after this, Brigade Headquarters discovered a new use for a Light Car patrol by sending us out to a position to draw fire.
Our instructions were to travel quickly over an exposed position making as much dust as possible as it was desired to know what sort of artillery the enemy had here. We were quite pleased to find out that our mission in this respect was not successful as we did not draw the fire.
About this time rumours had reached headquarters that gas attacks were being prepared for us by the Turks. Supplies of gas masks were issued to the various units. Gas instructors were detailed also to instruct all ranks how to use these. The men of the Armoured Car sections and Light Car patrols did gas drill along with others. No Information was available as to how the motor vehicles would behave in a gas attack or what effect the gas would have on the running of the engines so it was decided to try this out and one morning we had a full dress rehearsal. Gas masks were carefully fitted by the whole unit. The cars were lined up with full equipment and fully manned. A smoke and gas barrage was prepared in a suitable valley, and at the word go the whole unit drove quickly through the screen. On reaching the other side the cars were turned round and slowly driven back again along the same route to the starting point. All masks had been carefully adjusted and neither the smoke nor gas bad any effect. It was thought that perhaps the running of the engines would be affected by the impure air mixture passing through the Carburettors, but it made no apparent difference whatever as the motors seemed to run as steadily as usual without any misfiring being noticed. Possibly they may not have developed their full power but as the cars were not fully extended we could not tell this. One thing was demonstrated however, and that was that motor vehicles could operate in gas even if the animals could not.
During the month of July the patrol was engaged on many small stunts and reconnaissances along the whole front, but mainly towards the east. The chief object seemed to be to obtain more information about the country and roads for transport and the possibility of obtaining water for the horses and troops in the country ahead, in the event of an advance in this direction by our forces. Towards the end of the month there was a rumour that the Turks were evacuating Beersheba so we did a trip out in this direction but as we got well shelled for our inquisitiveness we did not persist, neither did we believe the rumours.
During August we were attached for duty to the A. & N.Z. Mtd. Division, Desert Mounted Corps, and later on to the Yeomanry Mounted division. It was the custom for the various divisions to relieve each other periodically for front line duly. The relieved division would move back a few miles and would have a bit of a spell from their more arduous duties. The Light am Patrols however, generally stayed with the new duty division in order to put them "au-fait" with the country and roads.
Nothing really exciting happened in August until the 23rd and 24th, when the Patrol was operating with the Yeomanry Mtd. division which was bivouacked at Rashed Bek and reconnoitring the country around Ibin Said. During these operations the Divisional Commander Major General Barrow wished to view as closely as possible some enemy works being constructed near Gnaam. The patrol oars conveyed him and other staff officers to the spot required. By keeping well separated and under cover of tile folds in the ground we managed to escape observation. However, when we left the observation point to return, our movements were evidently noticed as two shells immediately dropped beside us. The car drivers then took a track under cover of a slight rise in the ground and although this was out of eight of the enemy gunners they evidently had the range of it registered exactly for shells continued to drop r along the track about every 25 yards. The road was too unhealthy a place to motor along consequently the care had to take to the open ground. This meant travelling over very bad and bumpy country, it also meant that we were compelled to take a route which had to cross a deep wadi or creek. We traversed the side of this wadi looking for a suitable crossing for nearly half a mile till at last we discovered a possible track across and by dint of hard work with plenty of pushing end swearing all care except one were safely across. When the last car was nearly over and half way up the bank, some treacherous ground gave way with the result that the vehicle dropped to the bottom again (about a 15 foot fall). Fortunately, it dropped on its four wheels right side up. A quick examination showed a burst tyre, damaged wheel, some broken water joints and a cracked engine hanger. We hastily changed the wheel and tyre, patched up the water joints and braced up the broken hangar with some fencing wire. A rope was then fixed to the front axle and the other end to one of the ours that was across. Another ten minutes towing and pushing brought the damaged car to the top.
All the time the car was in the wadi, an attack was being very vigorously pushed by the Turks and a number of mounted men in our vicinity were being extremely hard pressed. At one time it looked as if the car would have to be burnt and abandoned but fortunately some reinforcements came up in time to push back the attack, giving us time to get everything clear away. During the whole operations of the War, No. 1 Light Car Patrol never lost a vehicle, but this occasion was the closest shave we had in this respect.
On the 4th September, we carried out an interesting experiment in conjunction with the Signal Squadron Royal Engineers, during one of the armed reconnaissances which were being conducted fairly frequently by us about this time. In these stunts, time was the essence of the contract and as much information as possible would be collected in the enemy's territory before he was able to bring up powerful reinforcements by which time we ware generally back behind our own entrenchments again. In these affairs it was very important for the various Brigades and Divisional Headquarters to be kept in constant touch with what was going on at the various points in their sectors. The moat satisfactory way of doing this was by field telephones. These however, sometimes when done by hand took a considerable time to lay and pick up again after the stunt was over.
It was decided to do it by motor car, accordingly we took the Machine gun out of one of our Lizzies and in its place mounted a large cable drum which had been prepared by the R.E. men. This drum revolved on a spindle supported by a couple of bearings, a handle was fitted for paying out and winding up the cable as the motor was driven across country.
The trial proved very satisfactory and after the stunt was over the cable was being collected while the car travelled at about 12 or 15 miles an hour and was about half in when an enemy aeroplane became interested and began to take a hand in the proceedings.
Hal Harkin, the driver of the car who was also a very expert machine gunner, was very upset at having left his machine gun behind, when the Pilot of the Aeroplane began machine gunning him from above. Two of the R.E. men endeavoured to keep the plane up with their rifles but they veto having a rough spin until another car came back to give them a hand when the plane rose and let them got back with their cable.
For the next few weeks, the Patrol spent most of its tine studying the ground and possible roads, tracks and water supply, on the Eastern flank of the force and on the 18th September, The Australian Mounted Division took over the outpost lines from the Yeomanry Mtd. Division who went back for a rest. We were now attached to the new division and things seemed to be getting busier. The raids began to go further into the enemy's lines and there was a feeling of subdued excitement in the air as if something was going to happen at any moment. Orders are received to send all unnecessary equipment and baggage back to the dumps at Rafa.
Evidently moves were contemplated so all weight was to be out down to the minimum. On the 24th September a big reconnaissance took place to Asluj (a point on the Turkish Railway line) and the whole district was reconnoitred very thoroughly and in the evening the force returned back to their old camp.
The Battle of Hébuterne, France, 2 April 1918, Roll of Honour Topic: BatzWF - Westn Front
The Battle of Hébuterne
France, 27 March to 5 April 1918
AIF
Roll of Honour, 2 April 1918
Poppies on the Roll of Honour, Australian War Memorial, Canberra
The Roll of Honour contains the names of all the men from the Allied Forces known to have given their lives on 2 April 1918 during the Battle of Hébuterne, France, 27 March to 5 April 1918.
Roll of Honour
John Ross AIRD, 12th Field Company Engineers, 2 April 1918
Alfred ASTRIDGE, 45th Infantry Battalion, 2 April 1918
Arthur Edward Henry BAILEY, 45th Infantry Battalion, 2 April 1918
Kenneth CHADBURNE, 8th Infantry Battalion, 2 April 1918
William Robert Berry DAVIS, 8th Infantry Battalion, 2 April 1918
Quintin William DIX, 12th Field Ambulance, 2 April 1918
Phillip Thomas DONNELLY, 3rd Machine Gun Battalion, 2 April 1918
Robert Joseph Roy FORD, 45th Infantry Battalion, 2 April 1918
Norman Alexander FORSYTH, 41st Infantry Battalion, 2 April 1918
William John GIRVAN, 26th Infantry Battalion, 2 April 1918
Jesse JUDGE, 3rd Machine Gun Battalion, 2 April 1918
Robert Gibson LATTA, 45th Infantry Battalion, 2 April 1918
Thomas MACKENZIE, 12th Field Ambulance, 2 April 1918
Laurence Leslie MAGUIRE, 45th Infantry Battalion, 2 April 1918
Joseph Henry MILES, 26th Infantry Battalion, 2 April 1918
Athol Herbert MORRIS, 33rd Infantry Battalion, 2 April 1918
Oliver NORMAN, 4th Light Trench Mortar Battery, 2 April 1918
Reginald Wallis PALMER, 5th Pioneer Battalion, 2 April 1918
James PRITCHARD, 28th Infantry Battalion, 2 April 1918
Stanley James QUINN, 35th Infantry Battalion, 2 April 1918
Harry Osborne SLATER, 16th Infantry Battalion, 2 April 1918
Robert Maurice STUBBS, 46th Infantry Battalion, 2 April 1918
Philip SWAIN, 8th Field Artillery Brigade, 2 April 1918
Maurice Albert THISTLETHWAITE, 8th Infantry Battalion, 2 April 1918
Sydney Henry TURPIN, 26th Infantry Battalion, 2 April 1918
Arthur Hanesworth WALTON, 51st Infantry Battalion, 2 April 1918
James Henry WYLES, 15th Infantry Battalion, 2 April 1918
The Australian Light Horse Studies Centre is a not for profit and non profit group whose sole aim is to write the early history of the Australian Light Horse from 1900
- 1920. It is privately funded and the information is provided by the individuals within the group and while permission for the use of the material has been given for this
site for these items by various donors, the residual and actual copyright for these items, should there be any, resides exclusively with the donors. The information on
this site is freely available for private research use only and if used as such, should be appropriately acknowledged. To assist in this process, each item has a citation
attached at the bottom for referencing purposes.
Please Note: No express or implied permission is given for commercial use of the information contained within this site.
A note to copyright holders
The Australian Light Horse Studies Centre has made every endeavour to contact copyright holders of material digitised for this blog and website and where
appropriate, permission is still being sought for these items. Where replies were not received, or where the copyright owner has not been able to be traced, or where
the permission is still being sought, the Australian Light Horse Studies Centre has decided, in good faith, to proceed with digitisation and publication. Australian Light
Horse Studies Centre would be happy to hear from copyright owners at any time to discuss usage of this item.