« March 2009 »
S M T W T F S
1 2 3 4 5 6 7
8 9 10 11 12 13 14
15 16 17 18 19 20 21
22 23 24 25 26 27 28
29 30 31
You are not logged in. Log in


Search the site:


powered by FreeFind
Volunteer with us.

Entries by Topic All topics  
A Latest Site News
A - Using the Site
AAA Volunteers
AAB-Education Centre
AAC-Film Clips
AAC-Photo Albums
AIF & MEF & EEF
AIF - Lighthorse
AIF - ALH - A to Z
AIF - DMC
AIF - DMC - Or Bat
AIF - DMC - Anzac MD
AIF - DMC - Aus MD
AIF - DMC - British
AIF - DMC - BWI
AIF - DMC - French
AIF - DMC - Indian
AIF - DMC - Italian
AIF - DMC - Medical
AIF - DMC - Remounts
AIF - DMC - Scouts
AIF - DMC - Sigs
AIF - DMC - Sigs AirlnS
AIF - DMC - 1 Sig Sqn
AIF - DMC - 2 Sig Sqn
AIF - DMC - Eng
AIF - DMC - Eng 1FSE
AIF - DMC - Eng 2FSE
AIF - DMC - GSR
AIF - 1B - 1 LHB
AIF - 1B - 6 MVS
AIF - 1B - 1 LHMGS
AIF - 1B - 1 Sig Trp
AIF - 1B - 1 LHFA
AIF - 1B - 1 LHR
AIF - 1B - 2 LHR
AIF - 1B - 3 LHR
AIF - 2B - 2 LHB
AIF - 2B - 7 MVS
AIF - 2B - 2 LHFA
AIF - 2B - 2 LHMGS
AIF - 2B - 2 Sig Trp
AIF - 2B - 5 LHR
AIF - 2B - 6 LHR
AIF - 2B - 7 LHR
AIF - 3B - 3 LHB
AIF - 3B - 8 MVS
AIF - 3B - 3 LHB Sigs
AIF - 3B - 3 LHFA
AIF - 3B - 3 LHMGS
AIF - 3B - 3 Sig Trp
AIF - 3B - 8 LHR
AIF - 3B - 9 LHR
AIF - 3B - 10 LHR
AIF - 4B - 4 LHB
AIF - 4B - 4 Sig Trp
AIF - 4B - 9 MVS
AIF - 4B - 4 LHFA
AIF - 4B - 4 LHMGS
AIF - 4B - 4 LHR
AIF - 4B - 11 LHR
AIF - 4B - 12 LHR
AIF - 5B - 5 LHB
AIF - 5B - 10 MVS
AIF - 5B - 5 LHFA
AIF - 5B - 5 Sig Trp
AIF - 5B - ICC
AIF - 5B - 14 LHR
AIF - 5B - 15 LHR
AIF - 5B - 1er Regt
AIF - 5B - 2 NZMGS
AIF - AASC
AIF - Aboriginal LH
AIF - Badges
AIF - Cars
AIF - Chinese LH
AIF - Double Sqns
AIF - Engineers
AIF - Fr - 22 Corps
AIF - Fr - 13 LHR
AIF - Honour Roll
AIF - HQ - 3rd Echelon
AIF - Marching Songs
AIF - Misc Topics
AIF - NZMRB
AIF - NZMRB - AMR
AIF - NZMRB - CMR
AIF - NZMRB - EFT
AIF - NZMRB - NZMFA
AIF - NZMRB - NZMGS
AIF - NZMRB - OMR
AIF - NZMRB - Sig-Trp
AIF - NZMRB - WMR
AIF - Ships
AIF - Ships - Encountr
AIF - Ships - Una
AIF - WFF
AIF - Wireless Sqn
Battles
BatzA - Australia
BatzA - Broken Hill
BatzA - Liverpool
BatzA - Merivale
BatzB - Boer War
BatzB - Bakenlaagte
BatzB - Belmont
BatzB - Bothaville
BatzB - Buffels Hoek
BatzB - Coetzees Drift
BatzB - Diamond Hill
BatzB - Driefontein
BatzB - Elands
BatzB - Graspan
BatzB - Grobelaar
BatzB - Grootvallier
BatzB - Hartebestfontn
BatzB - Houtnek
BatzB - Karee Siding
BatzB - Kimberley
BatzB - Koster River
BatzB - Leeuw Kop
BatzB - Mafeking
BatzB - Magersfontein
BatzB - Modder River
BatzB - Onverwacht
BatzB - Paardeberg
BatzB - Palmietfontein
BatzB - Pink Hill
BatzB - Poplar Grove
BatzB - Rhenoster
BatzB - Sannahs Post
BatzB - Slingersfontn
BatzB - Stinkhoutbm
BatzB - Sunnyside
BatzB - Wilmansrust
BatzB - Wolvekuil
BatzB - Zand River
BatzG - Gallipoli
BatzG - Anzac
BatzG - Aug 1915
BatzG - Baby 700
BatzG - Evacuation
BatzG - Hill 60
BatzG - Hill 971
BatzG - Krithia
BatzG - Lone Pine
BatzG - Nek
BatzJ - Jordan Valley
BatzJ - 1st Amman
BatzJ - 2nd Amman
BatzJ - Abu Tellul
BatzJ - Es Salt
BatzJ - JV Maps
BatzJ - Ziza
BatzM - Mespot
BatzM - Baghdad
BatzM - Ctesiphon
BatzM - Daur
BatzM - Kurna
BatzM - Kut el Amara
BatzM - Ramadi
BatzN - Naval
BatzN - AE1
BatzN - Cocos Is
BatzN - Heligoland
BatzN - Marmara
BatzN - Zeebrugge
BatzN - Zeppelin L43
BatzNG - Bitapaka
BatzO - Other
BatzO - Baku
BatzO - Egypt 1919
BatzO - Emptsa
BatzO - Karawaran
BatzO - Peitang
BatzO - Wassa
BatzP - Palestine
BatzP - 1st Gaza
BatzP - 2nd Gaza
BatzP - 3rd Gaza
BatzP - Aleppo
BatzP - Amwas
BatzP - Ayun Kara
BatzP - Bald Hill
BatzP - Balin
BatzP - Beersheba
BatzP - Berkusieh
BatzP - Damascus
BatzP - El Auja
BatzP - El Buggar
BatzP - El Burj
BatzP - Haifa
BatzP - Huj
BatzP - JB Yakub
BatzP - Kaukab
BatzP - Khan Kusseir
BatzP - Khuweilfe
BatzP - Kuneitra
BatzP - Megiddo
BatzP - Nablus
BatzP - Rafa
BatzP - Sasa
BatzP - Semakh
BatzP - Sheria
BatzP - Surafend
BatzP - Wadi Fara
BatzS - Sinai
BatzS - Bir el Abd
BatzS - El Arish
BatzS - El Mazar
BatzS - El Qatiya
BatzS - Jifjafa
BatzS - Magdhaba
BatzS - Maghara
BatzS - Romani
BatzS - Suez 1915
BatzSe - Senussi
BatzWF - Westn Front
BW - Boer War
BW - NSW
BW - NSW - 1ACH
BW - NSW - 1NSWMR
BW - NSW - 2NSWMR
BW - NSW - 3ACH
BW - NSW - 3NSWIB
BW - NSW - 3NSWMR
BW - NSW - 5ACH
BW - NSW - A Bty RAA
BW - NSW - AAMC
BW - NSW - Aust H
BW - NSW - Lancers
BW - NSW - NSW Inf
BW - NSW - NSWCBC
BW - NSW - NSWIB
BW - NSW - NSWMR_A
BW - NZ
BW - Qld
BW - Qld - 1ACH
BW - Qld - 1QMI
BW - Qld - 2QMI
BW - Qld - 3ACH
BW - Qld - 3QMI
BW - Qld - 4QIB
BW - Qld - 5QIB
BW - Qld - 6QIB
BW - Qld - 7ACH
BW - QLD - AAMC
BW - SA
BW - SA - 1SAMR
BW - SA - 2ACH
BW - SA - 2SAMR
BW - SA - 3SACB
BW - SA - 4ACH
BW - SA - 4SAIB
BW - SA - 5SAIB
BW - SA - 6SAIB
BW - SA - 8ACH
BW - SA - AAMC
BW - Tas
BW - Tas - 1ACH
BW - Tas - 1TIB
BW - Tas - 1TMI
BW - Tas - 2TB
BW - Tas - 2TIB
BW - Tas - 3ACH
BW - Tas - 8ACH
BW - Vic
BW - Vic - 1VMI
BW - Vic - 2ACH
BW - Vic - 2VMR
BW - Vic - 3VB
BW - Vic - 4ACH
BW - Vic - 4VIB
BW - Vic - 5VMR
BW - Vic - 6ACH
BW - Vic - AAMC
BW - Vic - Scot H
BW - WA
BW - WA - 1WAMI
BW - WA - 2ACH
BW - WA - 2WAMI
BW - WA - 3WAB
BW - WA - 4ACH
BW - WA - 4WAMI
BW - WA - 5WAMI
BW - WA - 6WAMI
BW - WA - 8ACH
BW Gen - Campaign
BW Gen - Soldiers
BW General
Cavalry - General
Diary - Schramm
Egypt - Heliopolis
Egypt - Mena
Gen - Ataturk Pk, CNB
Gen - Australia
Gen - Legends
Gen - Query Club
Gen - St - NSW
Gen - St - Qld
Gen - St - SA
Gen - St - Tas
Gen - St - Vic
Gen - St - WA
Gm - German Items
Gm - Bk - 605 MGC
GW - 11 Nov 1918
GW - Atrocities
GW - August 1914
GW - Biographies
GW - Propaganda
GW - Spies
GW - We forgot
Militia 1899-1920
Militia - Area Officers
Militia - Inf - Infantry
Militia - Inf - 1IB
Militia - Inf - 2IB
Militia - Inf - 3IB
Militia - Inf - NSW
Militia - Inf - Qld
Militia - Inf - SA
Militia - Inf - Tas
Militia - Inf - Vic
Militia - Inf - WA
Militia - K.E.Horse
Militia - LH
Militia - LH - Regts
Militia - LH - 1LHB
Militia - LH - 2LHB
Militia - LH - 3LHB
Militia - LH - 4LHB
Militia - LH - 5LHB
Militia - LH - 6LHB
Militia - LHN - NSW
Militia - LHN - 1/7/1
Militia - LHN - 2/9/6
Militia - LHN - 3/11/7
Militia - LHN - 4/6/16
Militia - LHN - 5/4/15
Militia - LHN - 6/5/12
Militia - LHN - 28
Militia - LHQ - Qld
Militia - LHQ - 13/2
Militia - LHQ - 14/3/11
Militia - LHQ - 15/1/5
Militia - LHQ - 27/14
Militia - LHS - SA
Militia - LHS - 16/22/3
Militia - LHS - 17/23/18
Militia - LHS - 24/9
Militia - LHT - Tas
Militia - LHT - 12/26
Militia - LHV - Vic
Militia - LHV - 7/15/20
Militia - LHV - 8/16/8
Militia - LHV - 9/19
Militia - LHV - 10/13
Militia - LHV - 11/20/4
Militia - LHV - 19/17
Militia - LHV - 29
Militia - LHW - WA
Militia - LHW-18/25/10
Militia - Military Orders
Militia - Misc
MilitiaRC - Rifle Clubs
MilitiaRC - NSW
MilitiaRC - NT
MilitiaRC - Qld
MilitiaRC - SA
MilitiaRC - Tas
MilitiaRC - Vic
MilitiaRC - WA
Militiaz - New Zealand
Tk - Turkish Items
Tk - Army
Tk - Bks - Books
Tk - Bks - 1/33IR
Tk - Bks - 27th IR
Tk - Bks - Air Force
Tk - Bks - Yildirim
Tk - POWs
Wp - Weapons
Wp - Hotchkiss Cav
Wp - Hotchkiss PMG
Blog Tools
Edit your Blog
Build a Blog
RSS Feed
View Profile
Open Community
Post to this Blog
Site Index
Education Centre
LH Militia
Boer War
Transport Ships
LH Battles
ALH - Units
ALH - General
Aboriginal Light H
Weapons
Ottoman Sources

"At a mile distant their thousand hooves were stuttering thunder, coming at a rate that frightened a man - they were an awe inspiring sight, galloping through the red haze - knee to knee and horse to horse - the dying sun glinting on bayonet points..." Trooper Ion Idriess

The Australian Light Horse Studies Centre aims to present an accurate history as chroniclers of early Australian military developments from 1899 to 1920.

The Australian Light Horse Studies Centre site holds over 12,000 entries and is growing daily.

Contact: Australian Light Horse Studies Centre

Let us hear your story: You can tell your story, make a comment or ask for help on our Australian Light Horse Studies Centre Forum called:

Desert Column Forum

WARNING: This site contains: names, information and images of deceased people; and, language which may be considered inappropriate today.

Sunday, 29 March 2009
Captain Albert Ernest Wearne
Topic: AIF - DMC - Scouts

Brigade Scouts

Captain Albert Ernest Wearne


As to Captain Wearne, the man who trained and led the Brigade Scouts in the earlier part of 1916, he had a good war.


Captain Albert Ernest Wearne


ReligionMethodist
OccupationJournalist
AddressLiverpool, New South Wales
Marital statusMarried
Age at embarkation44
Next of kinWife, Mrs. Margery Maud Wearne, Athol, Cecil Park, Liverpool, New South Wales
Enlistment date2 October 1915
Rank on enlistmentLieutenant
Unit name6th Light Horse Regiment, 11th Reinforcement
AWM Embarkation Roll number10/11/3
Embarkation detailsUnit embarked from Sydney, New South Wales, on board HMAT SS Hawkes Bay on 23 October 1915
Rank from Nominal RollMajor
Unit from Nominal Roll8th Light Horse Regiment
Recommendations (Medals and Awards)

Mention in Despatches


Awarded, and promulgated, 'London Gazette', fourth Supplement, No. 29763 (22 September 1916); 'Commonwealth Gazette' No. 184 (14 December 1916). Awarded, and promulgated, 'London Gazette', Supplement, No. 29845 (1 December 1916); 'Commonwealth Gazette' No. 62 (19 April 1917)
FateReturned to Australia 12 November 1917
Medals

Military Cross


Source: 'Commonwealth Gazette' No. 103
Date:
29 June 1917
Other detailsMedals: Military Cross, 1914-15 Star, British War Medal, Victory Medal

Extracted from The AIF Project, UNSW@ADFA, 2008


In late March the 8th LHR was selected to provide and lead a long range expedition into the Sinai with the objective of discovering problems and techniques required for such an action. The reason for the 8th LHR’s selection lay with one man, the leader of the Brigade Scouts, Captain Albert Ernest Wearne. He was considered to be the best Scout Officer in the Light Horse and so was a natural choice.

The aim of the expedition was to mount a reconnaissance overland to Wadi um Muksheib where earlier on in the year, the Turks were reported employing work parties to improve the water cisterns in the wadi’s catchment area. In addition they were ordered to inspect the water supply at Moiya Harab and El Hassif. Finally they were to report on their impressions of the land regarding distances and time required for travel, water supplies and other preparations necessary to move a large body of men across arid plains.

Two novelties were to be employed. The first was air support. An aircraft was allocated to fly in advance of the column. The pilot was given specific instructions to report on the countryside ahead of the column with a careful eye out for Turkish troops. This reduced the need for the column to send out advanced guards which then allowed the column greater speed and flexibility. The other novelty was the use of wireless. A radio transmitter was to be carried for the specific purposes of maintaining constant communication with the Anzac Mounted Division at the Canal.

By use of both technologies, it was hoped that mounted men could move rapidly because their need for supplies would be kept to a minimum. Such long-range reconnaissances then would have the ability to strike the Turks hard and disappear before the Turks were able to respond in any effective manner. Since they would have speed on their side, they could make their getaway in relative safety, always knowing the location of any pursuing enemy. If this could be achieved, a long-range raid could sever communication link over the Darb el Maghaza, the new route the Turks were developing, which ran through Bir el Jifjafa. Cutting off this route would restrict any further Turkish advances to the more established Darb el Sultani that followed the coast by way of Katia. The impact on British strategy would be huge, allowing the British to concentrate their defence of Egypt on a confined front.

The raid on Jifjafa was undertaken to fulfil this strategic imperative. Here is Gullett's account.

"Major W. H. Scott was ordered to proceed with a squadron of the 9th Light Horse Regiment (South Australia and Victoria), under Captain Wearne, to capture the position, destroy the well sinking machinery on which the enemy was reported to be working, and observe the country generally. Scott had, after allowing for the horseholders, about ninety rifles available for action, in addition to thirty-two officers and men from the Australian and Royal Engineers and the Army Medical Corps; but, when his column was complete with transport camels and their native Bikanet escort, it included no less than 320 officers and men, 175 horses, and 261 camels."


The raid was most successful and the Turks were confined to attacking from the coast. Wearne's ability on both expeditions was in no small part the reasons for their success. He begins to carry with him a mystique that projects him larger than life, as he would have been by the time Henry Bostock joined the camp at Bally Bunion for a couple day's induction into the scouts. I believe they only stayed there for 5 days, not much time to transfer all the skills. It was just enough time to work out who the new chums were by the time they hit the road and headed towards Hill 70 and Romani.


Further Reading:

Brigade Scouts, Contents 

Australian Light Horse Order of Battle - Outline 

The Australian Light Horse - Structure


Citation: Captain Albert Ernest Wearne

Posted by Project Leader at 11:01 PM EADT
Updated: Friday, 3 April 2009 10:05 PM EADT
Bert Schramm's Diary, 29 March 1919
Topic: Diary - Schramm

Diaries of AIF Servicemen

Bert Schramm


During part of the course of his military service with the AIF, 2823 Private Herbert Leslie Schramm, a farmer from White's River, near Tumby Bay on the Eyre Peninsular, kept a diary of his life. Bert was not a man of letters so this diary was produced with great effort on his behalf. Bert made a promise to his sweetheart, Lucy Solley, that he would do so after he received the blank pocket notebook wherein these entries are found. As a Brigade Scout since September 1918, he took a lead part in the September 1918 breakout by the Allied forces in Palestine. Bert's diary entries are placed alongside those of the 9th Light Horse Regiment to which he belonged and to the 3rd Light Horse Brigade to which the 9th LHR was attached. On this basis we can follow Bert in the context of his formation.

 Bert Schramm's Diary, 29 March 1919


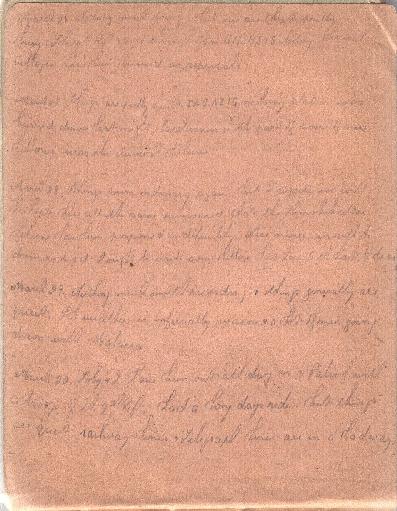
Bert Schramm's Handwritten Diary, 26 - 30 March 1919

[Click on page for a larger print version.]

Diaries

Bert Schramm

Saturday, March 29, 1919

Bert Schramm's Location - Zagazig, Egypt.

Bert Schramm's Diary - Nothing much worth recording and things are generally quiet. The weather is infernally warm and a lot of men going down with malaria.


9th Light Horse Regiment War Diary

9th Light Horse Regiment Location - Zagazig, Egypt.

9th Light Horse Regiment War Diary - Aikman, Lieutenant GE; and, 24 Other Ranks from C Squadron relieved the Ghurkhas guard at Abu el Akdar station. Ten Other Ranks, B Squadron, relieved the 3rd Machine Gun Squadron personnel at No 4 Post, Belbeis line.


Darley

Darley, TH, With the Ninth Light Horse in the Great War, Adelaide, Hassell Press, 1924.

No Entry


Previous: Bert Schramm's Diary, 28 March 1919

Next: Bert Schramm's Diary, 30 March 1919


Further Reading:

9th Light Horse Regiment AIF War Diary - Complete day by day list

Bert Schramm Diary 

Bert Schramm Diary - Complete day by day list


Additional Reading:

Darley, TH, With the Ninth Light Horse in the Great War, Adelaide, Hassell Press, 1924.


Citation: Bert Schramm's Diary, 29 March 1919


Posted by Project Leader at 12:01 AM EADT
Updated: Saturday, 9 May 2009 9:48 PM EADT
The Battle of Karee Siding, South Africa, 29 March 1900, Roll of Honour
Topic: BatzB - Karee Siding

The Battle of Karee Siding

South Africa, 29 March 1900

Allied Forces

Roll of Honour


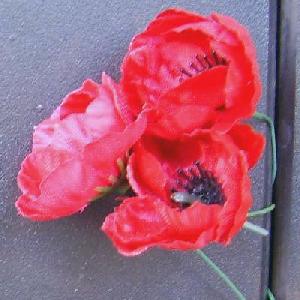
Poppies on the Roll of Honour, Australian War Memorial, Canberra


The Roll of Honour contains the names of all the men from the Allied Forces known to have given their lives during the Battle of Karee Siding, South Africa, 29 March 1900.


Roll of Honour


The Battle of Karee Siding, South Africa, 29 March 1900, Roll of Honour


Lest We Forget


Further Reading:

The Battle of Karee Siding, South Africa, 29 March 1900

The Battle of Karee Siding, South Africa, 29 March 1900, Roll of Honour

Battles where Australians fought, 1899-1920


Citation: The Battle of Karee Siding, South Africa, 29 March 1900, Roll of Honour

Posted by Project Leader at 12:01 AM EADT
Updated: Friday, 1 April 2011 5:33 PM EADT
Saturday, 28 March 2009
Rhenoster Kop, South Africa, November 29, 1900
Topic: BatzB - Rhenoster

Rhenoster Kop

South Africa, 29 November 1900


Rhenoster Kop, an action during the Second South African War, fought on 29 November 1900 about 32 kilometres east of Pretoria. A British column commanded by Major-General A. Paget, comprising two infantry battalions, nine guns and a mounted brigade which included Australian Bushmen (from Queensland, Tasmania and Victoria) and New Zealand Mounted Rifles, attacked a 1,200 - strong commando with two guns led by General Ben Viljoen which had been harassing the railway line to Delagoa Bay. Although numerically weaker, the Boer main body of 650 men occupied a strong defensive position atop a crescent-shaped line of kopjes (hills) covered with rocks and small bushes. The feature-known generally as Rhenoster Kop after the highest point on the south-western end-gave a commanding view of the northern approach over a wide open slope, while deep ravines on both flanks restricted the scope for attacks from these quarters.

Paget marched out at 4 a.m. to begin the action with a frontal infantry assault across hundreds of metres of' flat grassy ground against the Boers' left and centre. This movement was soon stalled by the enemy's fire. On the infantry's left, the Queenslanders and New Zealanders also went into action in a dismounted role-the latter reaching within 400 metres of Boer positions. At the far end of this flank were the Victorians and West Australians, who advanced on foot under the covering fire of a British field battery. This enabled them to secure a rocky ridge opposite the far right end of the enemy's line, but they were prevented from making further progress by deep ravines across their front; the bulk of the Bushmen were-like the rest of the British force engaged along a front of more than six kilometres-pinned down on the open veldt.

The stalemate which had been reached by 7.30 a.m. lasted for the next twelve hours, with the attacking troops forced to remain in their exposed positions under a glaring hot sun while suffering great thirst. At 7 p.m. part of the Boer force under Vecht-General C.H. Müller launched an unsuccessful hour-long counter-attack against the New Zealanders, whose gains were closest to the enemy. Thereafter the troops worked under the cover of darkness to begin digging trenches, aiming to make their positions more secure when the fight resumed next morning. This effort proved to be pointless, as when dawn arrived it was found that the Boers had abandoned the fight and safely withdrawn. In this action - the last pitched battle of its kind during the war - the Boers had suffered 31 casualties and a few men captured, compared to British losses totalling 85, (30 of whom were among the mounted troops).


Extracted from the book produced by Chris Coulthard-Clark, Where Australians Fought - The Encyclopaedia of Australia's Battles, Allen and Unwin, Sydney, 1998, p. 88.


Additional References cited by Chris Coulthard-Clark:

L.S. Amery, (ed.) The Times History of the War in South Africa 1899-1902, Vol. 4 (1906), London: Sampson Low, Marston & Co.

History of the War in South Africa 1899-1902, Vol. 3 (1908), London. 

R.L. Wallace (1976) The Australians at the Boer War, Canberra: Australian War Memorial & Australian Government Publishing Service.


Further Reading:

Battles where Australians fought, 1899-1920


Citation: Rhenoster Kop, South Africa, November 29, 1900

Posted by Project Leader at 11:01 PM EADT
Updated: Sunday, 5 April 2009 11:48 AM EADT
Es Salt, Palestine, April 30 to May 3, 1918
Topic: BatzJ - Es Salt

Es Salt

Palestine, 30 April - 3 May 1918


Es Salt, an Arab village 23 kilometres west of Amman, Palestine, which became the scene for heavy fighting between British and Turkish forces on 30 April-3 May 1918. The village had been seized before by British troops, during the raid on Amman (q.v.) a month earlier, but possession had been relinquished following the failure of that operation. This second large-scale sortie was launched because the commander of the Egyptian Expeditionary Force, General Sir Edmund Allenby, wished to use the plateau on which Es Salt stood as the launching point for a movement against the vital railway junction town of Deraa. Command of the operation was given to Lieut.-General Sir Harry Chauvel, who had available both the Australian Mounted Division Major-General Henry Hodgson) and Anzac Mounted Division (Major-General Edward Chaytor), along with the 60th (London) Division.

Using the British infantry to attack eastwards into the foothills of Tel Nimrin, above the bridgehead held around the Ghoraniye crossing on the Jordan, Chauvel sent two light horse brigades of Hodgson's division north up the east bank of the river to seize the crucial crossing at Jisr ed Damieh, nineteen kilometres north-west of Es Salt, and prevent the movement of Turkish reinforcements from Nablus. While the 4th Brigade remained to hold this position, the other (the 3rd) was ordered to turn its attention down the track from Damieh to Es Salt itself. Another of Hodgson's brigades following along behind, the British 5th Mounted, was to turn east at an earlier track - at Umm esh Shert and by this parallel route also make for Es Salt. With the town captured, the plan called for one of Hodgson's brigades and one of Chaytor's (the 2nd Light Horse, which had been sent around the southern flank) to advance down from Es Salt into the rear of the Turkish positions opposing the 60th Division.

Initially the operation went perfectly, and by the evening of 30 April Es Salt had been seized after a brilliant fight. Thereafter serious difficulties arose which brought the plan undone. The 4th Brigade, left to guard the Damieh crossing, came under heavy pressure from the Turks early on the morning of I May and was forced back-thereby allowing some of the enemy to advance towards Es Salt and into the rear of the light horsemen holding the town. Although the Australians were reinforced by some regiments of New Zealanders and British yeomanry, the defenders were forced to give still further ground, during which nine British guns were lost to the enemy. Although the threat to the left flank of the 60th Division's advance was thus checked, the infantry were themselves making little progress during repeated attacks against the Turkish defenders in the foothills, nor could the mounted brigades moving against the rear of the enemy positions make any headway.

With the tide of battle against him, Chauvel decided on 3 May to withdraw. Not only was the enemy being strongly reinforced, but co-operation promised by elements of the Arab army raised in rebellion against the Turks had failed to materialise. Again, the retreat was complicated by a mass of refugees which came away from Es Salt with the troops and caused congestion along the roads. The operation had cost Chauvel's mounted brigades 50 killed, 278 wounded and 37 men missing; the infantry had suffered another 1,116 casualties. Apart from more than 1,000 taken prisoner, the Turks were estimated to have lost over 1,500 in killed and wounded. Despite this balanced outcome, the sortie had clearly been a failure, although it did have a valuable outcome in encouraging the enemy to believe (wrongly) that Allenby's next stroke was also planned for this area.


Extracted from the book produced by Chris Coulthard-Clark, Where Australians Fought - The Encyclopaedia of Australia's Battles, Allen and Unwin, Sydney, 1998, pp. 145-146.


Additional References cited by Chris Coulthard-Clark:

H.S. Gullett (1944) The Australian Imperial Force in Sinai and Palestine, Sydney Angus & Robertson


Further Reading:

Battles where Australians fought, 1899-1920


Citation: Es Salt, Palestine, April 30 to May 3, 1918

Posted by Project Leader at 11:01 PM EADT
Updated: Sunday, 5 April 2009 12:14 PM EADT

Newer | Latest | Older

Full Site Index


powered by FreeFind
Let us hear your story: You can tell your story, make a comment or ask for help on our forum.

Desert Column Forum

A note on copyright

The Australian Light Horse Studies Centre is a not for profit and non profit group whose sole aim is to write the early history of the Australian Light Horse from 1900 - 1920. It is privately funded and the information is provided by the individuals within the group and while permission for the use of the material has been given for this site for these items by various donors, the residual and actual copyright for these items, should there be any, resides exclusively with the donors. The information on this site is freely available for private research use only and if used as such, should be appropriately acknowledged. To assist in this process, each item has a citation attached at the bottom for referencing purposes.

Please Note: No express or implied permission is given for commercial use of the information contained within this site.

A note to copyright holders

The Australian Light Horse Studies Centre has made every endeavour to contact copyright holders of material digitised for this blog and website and where appropriate, permission is still being sought for these items. Where replies were not received, or where the copyright owner has not been able to be traced, or where the permission is still being sought, the Australian Light Horse Studies Centre has decided, in good faith, to proceed with digitisation and publication. Australian Light Horse Studies Centre would be happy to hear from copyright owners at any time to discuss usage of this item.

Contact

Australian Light Horse Studies Centre

eXTReMe Tracker