"At a mile distant their thousand hooves were stuttering thunder, coming at a rate that frightened a man - they were an awe inspiring sight, galloping through the red haze - knee to knee and horse to horse - the dying sun glinting on bayonet points..." Trooper Ion Idriess
The Australian Light Horse Studies Centre aims to present an accurate history as chroniclers of early Australian military developments from 1899 to 1920.
The Australian Light Horse Studies Centre site holds over 12,000 entries and is growing daily.
Contact:Australian Light Horse Studies CentreLet us hear your story:
You can tell your story, make a comment or ask for help on our Australian Light Horse Studies Centre Forum called:
WARNING: This site contains: names, information and images of deceased people; and, language which may be considered inappropriate today.
Monday, 16 March 2009
Houtnek, South Africa, April 30 to May 1, 1900 Topic: BatzB - Houtnek
Houtnek
South Africa, 30 April-1 May 1900
Houtnek, an action fought on 30 April - 1 May 1900 during the Second South African War, which effectively marked the start of the march by the British army under Field Marshal Lord Roberts from the Orange Free State capital to Pretoria, the capital of the Transvaal republic. The engagement followed Roberts' decision to straighten the alignment of his forces around Bloemfontein (captured on 13 March) by moving north the column commanded by Lieut.-General Ian Hamilton from Thaba 'Nchu, east of Bloemfontein, to Winburg via Jacobsrust. He was, however, unaware that a large enemy force under General Philip Botha was holding positions in ridges astride this route-principally near Houtnek where the road passed through a defile.
Hamilton commenced his march early on 30 April, but his progress was checked soon after 9 a.m. as the mounted infantry leading his advance were approaching Houtnek. Seeing the high ground in front and on both flanks to he held by enemy parties, Hamilton decided to make an attack on Thoba Mountain - a large feature at the western end of' the ranges which dominated a pass through which a second road ran to Jacobsrust. Using his mounted infantry to keep the Boers on his right flank and front engaged, he sent infantry towards the mountain on his left. The troops cleared the lower slopes without difficulty but were unable to carry the position before nightfall, forcing them to bivouac where they were, while Hamilton telegraphed for cavalry reinforcements from Thaba 'Nchu.
According to their custom, during the night most of the burghers returned to laagers (camps) behind the hills. By the next morning Botha had already determined to abandon his position and sent away his supply train. Only a portion of his force resumed the defence, but despite this the British assault on Thoba Mountain was strongly opposed so that it was 1 p.m. before the feature was in Hamilton's hands. Just as this issue was decided, squadrons of British cavalry were sighted approaching around Thoba Mountain from the west. With the Boer positions in the east now outflanked as well, the remaining defenders promptly mounted and rode off. By 3.30 p.m. Hamilton's transport was able to use the road over the mountains to Jacobsrust.
The two-day delaying action had cost the British 103 casualties, including four members of E Squadron of the New South Wales Mounted Rifles under Captain William Holmes. The latter squadron - minus 25 men detached for scouting duty - had been sent to occupy an advanced post on a hill located less than 1,500 metres from several enemy guns. Holmes' men were subjected to intense shrapnel and rifle-fire throughout the first day's fighting and until ordered to withdraw about noon the next day it was while galloping away from the position in groups of four that one of the Australians was fatally wounded.
Extracted from the book produced by Chris Coulthard-Clark, Where Australians Fought - The Encyclopaedia of Australia's Battles, Allen and Unwin, Sydney, 1998, pp. 74-75.
Additional References cited by Chris Coulthard-Clark:
P.L. Murray (1911) Official Records of the Australian Military Contingents to the War in South Africa, Melbourne: Government Printer.
R.L. Wallace (1976) The Australians at the Boer War, Canberra: Australian War Memorial & Australian Government Publishing Service.
Zeebrugge, Belgium, April 22 to 23, 1918 Topic: BatzN - Zeebrugge
Zeebrugge
Belgium, 22-23 April 1918
Zeebrugge, a naval operation conducted against the Flanders coast on 22-23 April 1918, aimed at closing off the Belgian port of Bruges from use as a base for German submarines. The port itself lay thirteen kilometres inland, its access to the sea being via a ship canal exiting at Zeebrugge or a series of minor waterways leading into Ostend harbour. Both exits were vulnerable to blockage if ships could be sunk in their narrow mouths, although such an enterprise was an especially difficult undertaking. Not only was the entrance at Zeebrugge shielded by a 2.5 kilometre long mole, swinging in an arc from west of the canal mouth to provide a barrier against fierce North Sea storms and creating an artificial harbour, but the whole stretch of coastline from Nieuport to Knokke was heavily fortified by more than 200 German guns ranging in calibre from 3.5 inches to 15 inches.
In February 1918 a call was made among naval units in Britain, seeking volunteers for 'special service'. Men from the RAN battlecruiser Australia (then in port at Rosyth, Scotland) offered themselves, and one officer and ten ratings (five seamen, five stokers) were chosen. These were detached for training at Chatham depot, before being assigned to ships in the attacking force. The core of this force was five old light cruisers specially prepared as blockships – three (Thetis, Intrepid and Iphigenia) planned for use at Zeebrugge, the other two (Brilliant and Sirius) against Ostend. The stokers from Australia joined the crew of Thetis, the leader of the ships to block the channel, while the seamen joined HMS Vindictive as bomber - throwers in a storming party to he landed on the Zeebrugge mole. The officer, Artificer Engineer William Edgar, was placed in charge of the engine room of the Mersey ferry-boat Iris, whose role was to attend Vindictive during the landing of the storming party.
The attacking force sailed late on the afternoon of 22 April, 146 vessels making for Ostend while 76 headed for Zeebrugge. The latter group was nearing its objectives when the Germans opened fire at 11.50 p.m. Although lashed by hire from the defenders' guns, Vindictive succeeded in reaching the mole although sadly out of position, and with the assistance of Daffodil, one of the two supporting ferry boats managed to land her storming parties. A company of naval assault personnel in Iris could not also be put ashore, however, because of' the water turbulence and the fact that the scaling ladders carried on board were too short. The success of the submarine C3 in reaching its assigned position under a section of viaduct near the mole's land-end, before tonnes of high explosive packed on board were detonated, ensured that the garrison did not receive reinforcements which made the storming parties' task impossible.
Meanwhile the three blockships charged forward, making for the canal mouth. Subjected to massive enemy fire and caught in a strong current, Thetis missed the gap in the enemy's net defences and became ensnared, trailing this wreckage which eventually pulled her up 300 metres short of the canal mouth where she went aground. The two vessels following managed to get inside the two piers which jutted out into the sea from either side of the entrance, before charges were blown which put them on the silty bottom. The crews of all three ships were taken off by a motor launch, but only after the storm of fire directed at this vessel had caused heavy casualties among the men packing its decks.
An hour after the action began the signal was given for the attackers to withdraw. Retrieving as many of the assault personnel as could get hack, Vindictive and her two ferry-boat consorts pulled away from the mole while making thick smoke to mask their escape. At this moment Iris had the misfortune to be hit by heavy shells fired blind by the enemy through the smokescreen. The explosions caused heavy casualties and set the vessel on fire, but Iris still managed to reach Dover at 2.45 p.m. that same day under her own power.
While the Zeebrugge raid had broadly achieved its goal, that on Ostend failed completely. The action of the Germans late on the afternoon of 22 April in shifting or removing two marker buoys critical to accurate navigation meant that the attacking squadron lost its way. The two blockships went ashore on the sand north of their intended mark, their crews also being picked up by motor launches. The failure of this part of the operation prompted a second attempt against Ostend on 9-10 May, this time using the battered Vindictive as blockship. It, too, failed to quite achieve the desired result, in that the old cruiser sank just clear of the central channel into the harbour. This mattered less, however, since only small shallow-draught vessels could use the canal system here, and ocean-going submarines and destroyers already at Bruges were thus bottled up. And although the Germans managed to bring Zeebrugge back into service by removing the piers and dredging the sides of the canal, this still only made possible the passage of small submarines at high tide.
In addition to restricting the use of the port facilities at Bruges, the Allies had won a significant moral victory with this epic raid. Eleven Victoria Crosses were won during the combined operation of 22-23 April. Although heavy, losses had not been crushing; in the 1,784-strong Zeebrugge assault force, for example, there were 170 killed and 400 wounded. None of the Australians present were among the casualties - Australia was, in fact, the only ship providing volunteers who did not post losses. This was purely by good luck, since one of the stokers in Thetis recorded that on making their way from the wrecked blockship they were obliged to row a lifeboat some 800 metres under fire before being picked up by a motor launch. At the height of Iris's withdrawal, Edgar had also braved fire on the upper deck to turn on the vessel's smoke apparatus; his service in the action earned him the Distinguished Service Cross and promotion to Engineer Lieutenant rank. Three of the RAN seamen in Vindictive were also awarded Distinguished Service Medals.
Extracted from the book produced by Chris Coulthard-Clark, Where Australians Fought - The Encyclopaedia of Australia's Battles, Allen and Unwin, Sydney, 1998, pp. 143-145.
Additional References cited by Chris Coulthard-Clark:
Arthur W . Jose, ( 1928), The Royal Australian Navy 1914-1918, Sydney: Angus & Robertson.
South Africa and the Transvaal War - Account of Belmont Topic: BatzB - Belmont
Belmont
South Africa, 23 November 1899
Louis Creswicke, South Africa and the Transvaal War, Vol. 2, Belmont Account
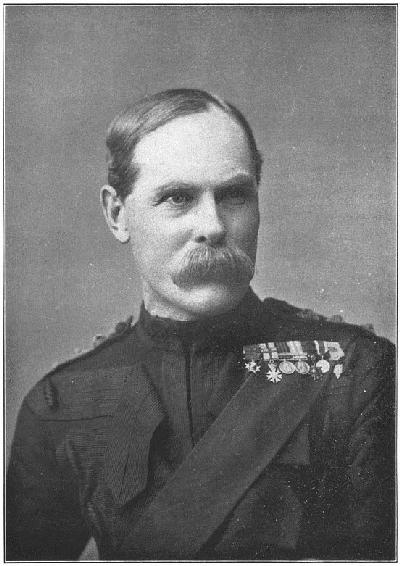
LIEUTENANT GENERAL LORD METHUEN, C.B.
[Photo by Elliott & Fry, London.]
THE BATTLE OF BELMONT
On the morning of Tuesday, the 21st of November, at three o'clock, Lord Methuen's march to the relief of Kimberley definitely began. The force consisted of the Naval Brigade, the 9th Brigade under Colonel Featherstonhaugh, the Guards Brigade under General Sir H. Colvile, two batteries of Field Artillery, Rimington's Guides, and the 9th Lancers. The first halt was made at Fincham's Farm, some twelve miles off, where the troops breakfasted, and whence the 9th Lancers and Rimington's Guides started on a reconnoitring expedition, which was not without its excitement. The Boers were reported to be somewhere in the vicinity, and soon they were espied, some three hundred of them, climbing a kopje with the evident intention of firing down on the party. This they did, and with such rapidity that only by sheer luck the men escaped. They went on to the farm of one Thomas, a supposed loyalist, for the purpose of watering their horses. This person had declared that there were no Boers in the neighbourhood; but no sooner had the tired beasts begun to dip their dusty noses in the cool and longed-for draught than a brisk fire was opened on them from all sides, and the troops had hurriedly to return to the main body at Fincham's. But they lost three horses.
On the following day the division moved on to the said Thomas's Farm. The advance party again came under fire—"Just by way of salute," as Tommy said—but the enemy was promptly silenced. Here the troops bivouacked.
On the night of the 22nd coffee was served out about twelve o'clock, and after this the whole force prepared to move.
The general orders were as follows: "At three a.m. Guards Brigade to advance from small white house near railway on Gun Kopje, supported by battery on right plus Naval Brigade; 9th Brigade on west side of Table Mountain; at same hour, bearing already taken, supported by battery on left, 9th Lancers, two [Pg 87] squadrons, one company Mounted Infantry, marching north of Belmont Station, keeping one to two miles on left flank and advanced; Rimington's Guides, one squadron Lancers, one company Mounted Infantry from Witte Putt to east of Sugar Loaf; one company Mounted Infantry on right of Naval Brigade, protecting right; the force having got over open ground should arrive at daybreak on enemy; 9th Brigade having secured Table Mountain to swing round left and keep on high ground, and then advance east to west on A (on plan; not printed); Guards Brigade conform, being pivot; then Guards advance on east edge of Mount Blanc, guns clearing entire advance with shrapnel; cavalry to get round rear of enemy, securing horses and laager."
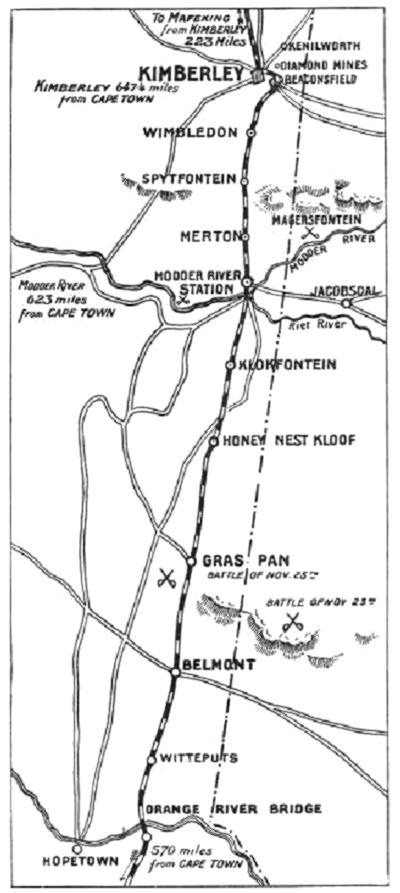
Lord Methuen's Line of Advance
This carefully-arranged programme, however, was not followed in its entirety. In the grim blackness of the small hours the Grenadiers lost direction, and Lord Methuen was committed to a frontal attack. But still the attack was a brilliant success. The Boers were caught napping, for they were in the happy belief that the troops were still at Witte Putt at the very hour when they were marching steadily upon them.
The infantry tramped four miles in pitch darkness and took up their position on a long low hill facing the enemy. The Boers occupied a magnificent horseshoe-shaped position on a series of kopjes and ridges eastward of Belmont railway station. As usual, they had utilised the boulders as screens, behind which they could [Pg 88] safely blaze away at the advancing ranks. Near daybreak—the hot summer morning dawned about four o'clock—firing began. The Guards had opened out for the attack, and the Boers, suddenly espying them from the heights, thereupon commenced to pelt and batter them. The Scots and Grenadiers nevertheless proceeded. Their position was far from comfortable, as it was necessary to cross some hundred yards of arid open veldt with no cover at all, while the enemy, ensconced behind tremendous rocks some 500 feet above their level, had nothing to do but to point their rifles and send their bullets whizzing at the advancing mass. But the Guards stoutly held their own, lying down and returning volley after volley for a full half-hour. Meanwhile the 9th Brigade advanced across the plain in extended order, and at half-past four two batteries posted near the railway commenced shelling the enemy's position.
Now the Guards began to proceed. Steadily forward they went—the thin, extended line moved as on parade, no supports being behind them.
Scarcely had they reached the base of the hill than a fierce storm of lead poured like a cascade from guns and rifles. It was useless now to attempt to return the fire—the Boers were invisible. There was no help for it; the men had only to move on and trust to their best "cold Sheffield" and their warm, gallant hearts. They fixed bayonets. Major Kinloch gave the word to his men to advance. "Now, boys, as hard as you can go!" he sang out. The other officers shouted their orders; all were dashing along like lions loosened from a cage. Cheers rent the air, bullets buzzed, cannons roared, blood streamed and spouted, plucky men and brave boys dropped dead on every side. Yet on went the infantry brigades! The first kopje was stormed! The Boers had vanished!
It was a sight to thrill the blood, to make the heart leap to the throat—so grand, so awful, so reminiscent of all the great traditions of British history. The enemy went helter-skelter to their second kopje on the right, where another force was strongly intrenched. Here they were sheltered by a number of "schantz," or trenches built of boulders and arranged in gallery form, and here our men mounted after them—Coldstreams, Grenadiers, Scots Guards, Northumberlands, Northamptons, and 2nd King's Own Yorkshires, now steadily advancing without excitement and with stern determination, and through a horrible cross-fire from the death-dealing rifles of the enemy.
Their advance was grand—a feat of heroism—with the Boer missiles flying about their heads and the track of blood seeming to tinge the very atmosphere with red. On and on they pushed, cheering loudly up the steep incline and over the boulders, nimble as goats, determined as giants, on and on, and, with a mighty roar, [Pg 89] took the position. Dead men lay at their feet, but honour, with its laurel crown, wreathed their heads!
Again the Boers made a hasty, a desperate retreat; again they sought a strongly-fortified position; again, our cavalry being too far off to reach them, the infantry combat was renewed.
A hurricane of bullets poured down. Death for the third time stared and gibbered; for the third time our gallant fellows, all in mass, again advanced to the attack. The Naval Brigade brought up four guns, and Captain Prothero got his cannon in position of 1800 yards and blazed out a chorus of distraction.
The enemy fled. The rout was now complete. Away went the 9th Lancers, away went the Mounted Infantry, both pursuing the fugitives for a good five miles. Thus the battle of Belmont was won. The whole of the camp waggons, filled with boxes of clothing, hundreds of horses and bullocks, were captured, and tons of ammunition were destroyed.
But this fight, that has taken so short a time to describe, and which was over in less than four hours, was hardly won. Forms all bloodily dashed lay here and there and everywhere, and the Scots Guards, who had stormed the kopje to inspiriting strains of drums and pipes, were doomed later on to hear the wail of the pibroch for many comrades mourned and buried. In all, our losses—about 200—were comparatively small considering that the engagement was a series of three battles, during which the Boers were constantly carrying off dead and wounded. Very many of our officers were wounded and three were killed. One—Lieutenant Fryer of the Grenadier Guards—was slain while gallantly leading his men and creeping along the bed of a stream in the enemy's rear. After the battle Lord Methuen made the following address to the troops: "Comrades, I congratulate you on the complete success achieved by you this morning. The ground over which we had to fight presented exceptional difficulties, and we had as an enemy a past-master in the tactics of mounted infantry. With troops such as you are, a commander can have no fear of the result. There is a sad side, and you and I are thinking as much of those who have died for the honour of their country and of those who are suffering as we are thinking of our victory."
Three instances were reported of the despicable treachery of the Boers. Lieutenant Willoughby was shot at from an ambush under cover of the white flag; a Boer holding a white flag in his left hand murdered Lieutenant Brine with his right, and Lieutenant Blundell-Hollinshead-Blundell (3rd Batt. Grenadier Guards) was shot in the merciful act of tending a wounded Boer. Lord Methuen after the fight sent a remonstrance to the Boer commander, saying, "Acting quite fairly with you, I decline to take Kimberley men [Pg 90] who know the country, because their parole cannot be accepted. I must ask you to warn your wounded not to shoot our officers. I must warn you not to use Dum-Dum bullets, or use the flag of truce treacherously. Such action is cowardly in the extreme, and I cannot countenance it."
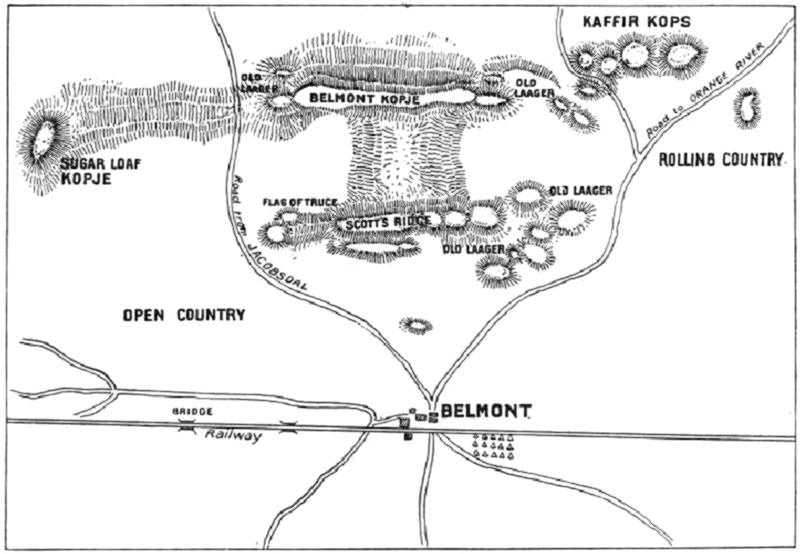
Plan of the Battle of Belmont.
The Boer losses were reported as very small, but no credence can be placed on their statements, for the very good reason that it has been President Kruger's policy to conceal from outsiders, and even from his own country, the extent of his losses. Whenever the Boer dies in battle, his body is weighted and cast into a river, or into a trench as quickly as possible. His family are left in ignorance as to his fate, and their only conclusion is to assume that he is dead. But Mr. Kruger's methods and his ruthless military oligarchy were disapproved even by his own countrymen, and more especially by his own countrywomen, who now began to mistrust the continual story of Boer victory, and asked pitifully for permission themselves to seek for fathers, sons, and brothers from whom they never heard. In some cases many of these were lying not an inch below their feet, for a British search party came upon a portion of the veldt that was literally mosaicked with dead Dutchmen whose bodies were scarcely more than peppered with earth!
Mr. Knight, the correspondent of the Morning Post, who was a [Pg 91] general favourite, was wounded in a singularly treacherous manner. He was in the firing line of the Northamptons, who were then attacking the Boers. Some of the enemy suddenly emerged from behind rocks and displayed a handkerchief attached to a rifle. On this sign Mr. Knight with two others rose, and all three were instantly shot with Dum-Dum bullets. Mr. Knight's sufferings were great, and the arm was amputated. The use of Dum-Dum bullets had been proscribed, as, after hitting the mark, they expand and cause wounds as large as a five-shilling piece. The Boers, besides using them on occasion, so manœuvred the Mauser bullets that they could act in identical fashion. Another treacherous Boer device was the wearing of the red cross upon their sleeves—an action on a par with the display of the white flag—for convenience' sake. However, it must always be remembered that the Boer armies were commandeered and cosmopolitan armies, and not disciplined troops.
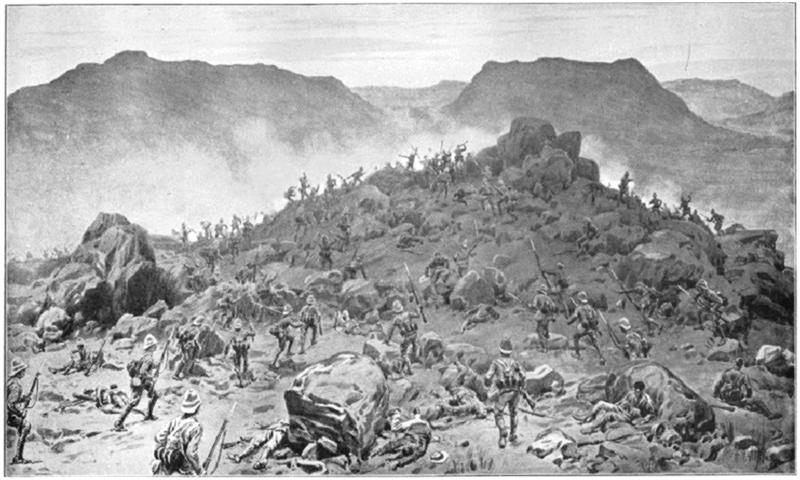
THE BATTLE OF BELMONT, 23rd November 1899—BAYONET ATTACK BY THE SCOTS AND GRENADIER GUARDS.
[Drawing by Frank Dodd, R.I.]
During the heat of the fray Colonel Crabbe, commanding the Grenadier Guards, became detached from his regiment. He was instantly surrounded by Boers, and being wounded, might probably have been killed had not a private suddenly rushed to the rescue. The plucky fellow shot two of the enemy, silenced a third with his bayonet, and finally, amid a shower of bullets, carried off the Colonel to the shelter of an ambulance waggon. Colonel Crabbe sustained injuries to wrist and thigh, but was not dangerously wounded.
A curious experience befell the Hon. George Peel, who was trying to reach Kimberley, where his sister, the Hon. Mrs. Rochfort Maguire, was imprisoned. Roaming about after the battle of Belmont, he came by accident on a Boer camp. A Dutchman promptly emerged, and when he was preparing to meet a grim fate, deciding that all hope was lost, he found himself accosted and handed a Bible. He was in the very act of congratulating himself on his lucky escape when on the scene came two grenadiers, who seeing his battered condition and his Bible, mistook him for a Boer spy and carried him off as a prize. Fortunately he was recognised by a member of Lord Methuen's camp and liberated.
Very interesting are the following official particulars given by the General Officer Commanding the 9th Brigade to the Chief Staff Officer of the 1st Division:—
"Belmont, Nov. 23, 1899.
'Sir,—I have the honour to submit the following report of the part taken by the brigade under my command in the action which took place to-day. The rendezvous was left at 3.7 a.m. in the following formation: Northumberland Fusiliers, in column of companies, on the left, directing, and fifty paces from them moved the Northamptonshire Regiment in similar formation, and parallel [Pg 92] to them. In rear of both these battalions was the 2nd Battalion King's Own Yorkshire Light Infantry and two companies Munster Fusiliers." (Having described the operations which ended in the occupation of a ridge south of Table Mountain, Major-General Featherstonhaugh continues:) "This party of the enemy was finally dislodged at the point of the bayonet, and 'independent fire' poured into them at a distance of fifty yards, when a white flag was hoisted by the party. On our men ceasing fire, the white flag still being displayed, a shot was fired by this party at our men; but the actual bearer of the flag of truce, followed by some eleven or twelve unarmed Boers, surrendered themselves to Colonel Money and were made prisoners.—
Signed for Major-General Featherstonhaugh,
Edward S. Bulfin,
Captain, Brigade Major, 9th Brigade."
The following is the list of officers killed and wounded at the battle of Belmont:—
3rd Grenadier Guards.—Lieutenant Fryer, killed; Lieutenant Blundell-Hollinshead-Blundell, dangerously wounded; Second Lieutenants Leslie and Vaughan, wounded; Lieutenants Gurdon Rebow and Russell, slightly wounded; and in addition the following officers reported as wounded: Lieutenants Lygon and Cameron, and Lieutenant-Colonel Crabbe. 1st Battalion Coldstream Guards.—Lieutenant Grant, wounded. 2nd Battalion Coldstream Guards.—Lieutenant the Hon. Claude Willoughby, slightly wounded; Second Lieutenant Burton, severely wounded. 1st Battalion Scots Guards.—Major the Hon. North Dalrymple Hamilton, severely wounded; Second Lieutenants Bulkley and Alexander, wounded. 1st Battalion Northumberland Fusiliers.—Captain Eagar and Lieutenant Brine, killed; Major Dashwood and Lieutenant Festing, dangerously wounded; Captain Sapte and Lieutenant Fishbourne, Brigadier-General Featherstonhaugh, Captain Freeland, 2nd Northampton, Lieutenant Barton, 2nd Northampton, severely wounded.
Bert Schramm's Diary, 16 March 1919 Topic: Diary - Schramm
Diaries of AIF Servicemen
Bert Schramm
During part of the course of his military service with the AIF, 2823 Private Herbert Leslie Schramm, a farmer from White's River, near Tumby Bay on the Eyre Peninsular, kept a diary of his life. Bert was not a man of letters so this diary was produced with great effort on his behalf. Bert made a promise to his sweetheart, Lucy Solley, that he would do so after he received the blank pocket notebook wherein these entries are found. As a Brigade Scout since September 1918, he took a lead part in the September 1918 breakout by the Allied forces in Palestine. Bert's diary entries are placed alongside those of the 9th Light Horse Regiment to which he belonged and to the 3rd Light Horse Brigade to which the 9th LHR was attached. On this basis we can follow Bert in the context of his formation.
Bert Schramm's Diary, 16 March 1919
Bert Schramm's Handwritten Diary, 12 - 16 March 1919
[Click on page for a larger print version.]
Diaries
Bert Schramm
Sunday, March 16, 1919
Bert Schramm's Location - Moascar, Egypt.
Bert Schramm's Diary - More troops have been called out today and there has been small scraps in a few different places. We are all in readiness to move anywhere at a moments notice. All trains have been delayed today. Things are generally messed up. Seems as if we are in for another war.
9th Light Horse Regiment War Diary - Voluntary church services.
At 2145 information received that civil disturbances had commenced in Ismailia. Inlying piquet turned out mounted and proceeded to Ismailia. Two Officers and 50 Other Ranks, B Squadron standing to, ready to move dismounted at short notice.
Disturbance ended at 2250 at which time the mounted piquet returned to camp.
Information received that serious disturbances were taking place in Zagazig area. Detachment of 10th Light Horse Regiment forced to fire on a large crowd before they would disperse. Railway lines torn up in many places between Cairo and Moascar.
1500, three Non Commissioned Officers twelve Other Ranks proceeded by Motor Lorry to Quassassin to guard the lock there. One Squadron, 8th Light Horse Regiment ordered to fit out mounted and proceed to Zagazig 17th March 1919. One mounted squadron 9th Light Horse Regiment to proceed following day.
Darley
Darley, TH, With the Ninth Light Horse in the Great War, Adelaide, Hassell Press, 1924.
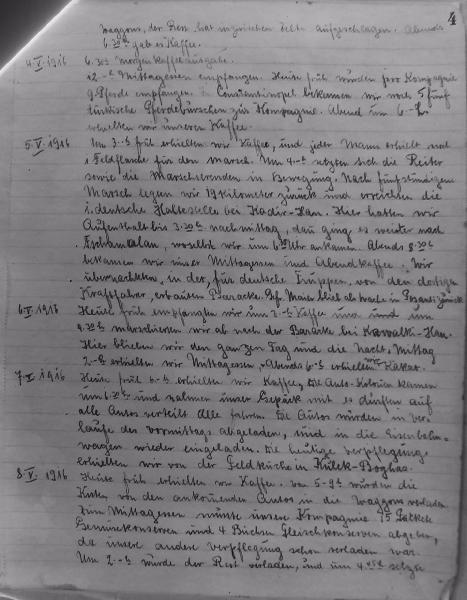
605th Machine Gun Company War Diary - 3 to 8 May 1916 Topic: Gm - Bk - 605 MGC
German 605th Machine Gun Company (MGC)
War Diary, 3 May to 8 May 1916
605th Machine Gun Company War Diary - 3 to 8 May 1916
The entries
3.V.16:
The company furnished details to unload the trucks whilst the remainder pitched tents. There was coffee at 6.30.
4.V.16:
6.30 a.m. morning coffee issued. 12 noon dinner. Early to-day 9 horses per company were received. In Constantinople we received 5 Turkish grooms for the company. We got coffee at 6 p.m.
5.V. 16:
At 3 a.m. we got coffee and every man got a water bottle for the march. At 4 a.m. the mounted men and those marching moved off. After marching five hours we covered 19 kilometers and reached the first German camping ground at Kadirhan. Here we halted till 3.30 p.m. and then on to Tschamalam which we reached at 6.30 p.m. At 8.30 p.m. we got dinner and evening coffee. We spent the night in the barracks built by the local mechanical transport for the German troops. Private Maier was left at Posanti on guard duty.
6.V.16:
To-day we got coffee at 3 a.m. and at 4.30 marched to the huts at Kawalki Han. Here we remained the whole day and the night. Dinners were at 2 p.m. and we got cocoa at 6 p.m.
7.V.16:
To-day we got coffee at 6 a.m. The mechanical transport arrived at 6.30 and took our baggage, and all of us were allowed to ride distributed among all the lorries. The lorries were unloaded during the course of the morning and our kit loaded on to the railway trucks. The day's rations were received from the field kitchen in Kulek-Boghaz.
8.V.16:
To-day we got coffee early. From 5 to 9 a.m. our gear was shifted from the lorries as they arrived to the railway trucks. For dinner our company had to furnish 15 packets of preserved vegetables and 4 tins of preserves meat, as the rest of our supplies had already been loaded. By 2 p.m. the balance was loaded and at 4.45 the train moved off from Kulek Boghaz to Adana. At 6.30 p.m. we were given tea at the main railway station by the German Colony at Adana. After that we went on to Mamoure. We arrived at 10.30 p.m. and had to spend the night at the railway.
The Australian Light Horse Studies Centre is a not for profit and non profit group whose sole aim is to write the early history of the Australian Light Horse from 1900
- 1920. It is privately funded and the information is provided by the individuals within the group and while permission for the use of the material has been given for this
site for these items by various donors, the residual and actual copyright for these items, should there be any, resides exclusively with the donors. The information on
this site is freely available for private research use only and if used as such, should be appropriately acknowledged. To assist in this process, each item has a citation
attached at the bottom for referencing purposes.
Please Note: No express or implied permission is given for commercial use of the information contained within this site.
A note to copyright holders
The Australian Light Horse Studies Centre has made every endeavour to contact copyright holders of material digitised for this blog and website and where
appropriate, permission is still being sought for these items. Where replies were not received, or where the copyright owner has not been able to be traced, or where
the permission is still being sought, the Australian Light Horse Studies Centre has decided, in good faith, to proceed with digitisation and publication. Australian Light
Horse Studies Centre would be happy to hear from copyright owners at any time to discuss usage of this item.