« March 2009 »
S M T W T F S
1 2 3 4 5 6 7
8 9 10 11 12 13 14
15 16 17 18 19 20 21
22 23 24 25 26 27 28
29 30 31
You are not logged in. Log in


Search the site:


powered by FreeFind
Volunteer with us.

Entries by Topic All topics  
A Latest Site News
A - Using the Site
AAA Volunteers
AAB-Education Centre
AAC-Film Clips
AAC-Photo Albums
AIF & MEF & EEF
AIF - Lighthorse
AIF - ALH - A to Z
AIF - DMC
AIF - DMC - Or Bat
AIF - DMC - Anzac MD
AIF - DMC - Aus MD
AIF - DMC - British
AIF - DMC - BWI
AIF - DMC - French
AIF - DMC - Indian
AIF - DMC - Italian
AIF - DMC - Medical
AIF - DMC - Remounts
AIF - DMC - Scouts
AIF - DMC - Sigs
AIF - DMC - Sigs AirlnS
AIF - DMC - 1 Sig Sqn
AIF - DMC - 2 Sig Sqn
AIF - DMC - Eng
AIF - DMC - Eng 1FSE
AIF - DMC - Eng 2FSE
AIF - DMC - GSR
AIF - 1B - 1 LHB
AIF - 1B - 6 MVS
AIF - 1B - 1 LHMGS
AIF - 1B - 1 Sig Trp
AIF - 1B - 1 LHFA
AIF - 1B - 1 LHR
AIF - 1B - 2 LHR
AIF - 1B - 3 LHR
AIF - 2B - 2 LHB
AIF - 2B - 7 MVS
AIF - 2B - 2 LHFA
AIF - 2B - 2 LHMGS
AIF - 2B - 2 Sig Trp
AIF - 2B - 5 LHR
AIF - 2B - 6 LHR
AIF - 2B - 7 LHR
AIF - 3B - 3 LHB
AIF - 3B - 8 MVS
AIF - 3B - 3 LHB Sigs
AIF - 3B - 3 LHFA
AIF - 3B - 3 LHMGS
AIF - 3B - 3 Sig Trp
AIF - 3B - 8 LHR
AIF - 3B - 9 LHR
AIF - 3B - 10 LHR
AIF - 4B - 4 LHB
AIF - 4B - 4 Sig Trp
AIF - 4B - 9 MVS
AIF - 4B - 4 LHFA
AIF - 4B - 4 LHMGS
AIF - 4B - 4 LHR
AIF - 4B - 11 LHR
AIF - 4B - 12 LHR
AIF - 5B - 5 LHB
AIF - 5B - 10 MVS
AIF - 5B - 5 LHFA
AIF - 5B - 5 Sig Trp
AIF - 5B - ICC
AIF - 5B - 14 LHR
AIF - 5B - 15 LHR
AIF - 5B - 1er Regt
AIF - 5B - 2 NZMGS
AIF - AASC
AIF - Aboriginal LH
AIF - Badges
AIF - Cars
AIF - Chinese LH
AIF - Double Sqns
AIF - Engineers
AIF - Fr - 22 Corps
AIF - Fr - 13 LHR
AIF - Honour Roll
AIF - HQ - 3rd Echelon
AIF - Marching Songs
AIF - Misc Topics
AIF - NZMRB
AIF - NZMRB - AMR
AIF - NZMRB - CMR
AIF - NZMRB - EFT
AIF - NZMRB - NZMFA
AIF - NZMRB - NZMGS
AIF - NZMRB - OMR
AIF - NZMRB - Sig-Trp
AIF - NZMRB - WMR
AIF - Ships
AIF - Ships - Encountr
AIF - Ships - Una
AIF - WFF
AIF - Wireless Sqn
Battles
BatzA - Australia
BatzA - Broken Hill
BatzA - Liverpool
BatzA - Merivale
BatzB - Boer War
BatzB - Bakenlaagte
BatzB - Belmont
BatzB - Bothaville
BatzB - Buffels Hoek
BatzB - Coetzees Drift
BatzB - Diamond Hill
BatzB - Driefontein
BatzB - Elands
BatzB - Graspan
BatzB - Grobelaar
BatzB - Grootvallier
BatzB - Hartebestfontn
BatzB - Houtnek
BatzB - Karee Siding
BatzB - Kimberley
BatzB - Koster River
BatzB - Leeuw Kop
BatzB - Mafeking
BatzB - Magersfontein
BatzB - Modder River
BatzB - Onverwacht
BatzB - Paardeberg
BatzB - Palmietfontein
BatzB - Pink Hill
BatzB - Poplar Grove
BatzB - Rhenoster
BatzB - Sannahs Post
BatzB - Slingersfontn
BatzB - Stinkhoutbm
BatzB - Sunnyside
BatzB - Wilmansrust
BatzB - Wolvekuil
BatzB - Zand River
BatzG - Gallipoli
BatzG - Anzac
BatzG - Aug 1915
BatzG - Baby 700
BatzG - Evacuation
BatzG - Hill 60
BatzG - Hill 971
BatzG - Krithia
BatzG - Lone Pine
BatzG - Nek
BatzJ - Jordan Valley
BatzJ - 1st Amman
BatzJ - 2nd Amman
BatzJ - Abu Tellul
BatzJ - Es Salt
BatzJ - JV Maps
BatzJ - Ziza
BatzM - Mespot
BatzM - Baghdad
BatzM - Ctesiphon
BatzM - Daur
BatzM - Kurna
BatzM - Kut el Amara
BatzM - Ramadi
BatzN - Naval
BatzN - AE1
BatzN - Cocos Is
BatzN - Heligoland
BatzN - Marmara
BatzN - Zeebrugge
BatzN - Zeppelin L43
BatzNG - Bitapaka
BatzO - Other
BatzO - Baku
BatzO - Egypt 1919
BatzO - Emptsa
BatzO - Karawaran
BatzO - Peitang
BatzO - Wassa
BatzP - Palestine
BatzP - 1st Gaza
BatzP - 2nd Gaza
BatzP - 3rd Gaza
BatzP - Aleppo
BatzP - Amwas
BatzP - Ayun Kara
BatzP - Bald Hill
BatzP - Balin
BatzP - Beersheba
BatzP - Berkusieh
BatzP - Damascus
BatzP - El Auja
BatzP - El Buggar
BatzP - El Burj
BatzP - Haifa
BatzP - Huj
BatzP - JB Yakub
BatzP - Kaukab
BatzP - Khan Kusseir
BatzP - Khuweilfe
BatzP - Kuneitra
BatzP - Megiddo
BatzP - Nablus
BatzP - Rafa
BatzP - Sasa
BatzP - Semakh
BatzP - Sheria
BatzP - Surafend
BatzP - Wadi Fara
BatzS - Sinai
BatzS - Bir el Abd
BatzS - El Arish
BatzS - El Mazar
BatzS - El Qatiya
BatzS - Jifjafa
BatzS - Magdhaba
BatzS - Maghara
BatzS - Romani
BatzS - Suez 1915
BatzSe - Senussi
BatzWF - Westn Front
BW - Boer War
BW - NSW
BW - NSW - 1ACH
BW - NSW - 1NSWMR
BW - NSW - 2NSWMR
BW - NSW - 3ACH
BW - NSW - 3NSWIB
BW - NSW - 3NSWMR
BW - NSW - 5ACH
BW - NSW - A Bty RAA
BW - NSW - AAMC
BW - NSW - Aust H
BW - NSW - Lancers
BW - NSW - NSW Inf
BW - NSW - NSWCBC
BW - NSW - NSWIB
BW - NSW - NSWMR_A
BW - NZ
BW - Qld
BW - Qld - 1ACH
BW - Qld - 1QMI
BW - Qld - 2QMI
BW - Qld - 3ACH
BW - Qld - 3QMI
BW - Qld - 4QIB
BW - Qld - 5QIB
BW - Qld - 6QIB
BW - Qld - 7ACH
BW - QLD - AAMC
BW - SA
BW - SA - 1SAMR
BW - SA - 2ACH
BW - SA - 2SAMR
BW - SA - 3SACB
BW - SA - 4ACH
BW - SA - 4SAIB
BW - SA - 5SAIB
BW - SA - 6SAIB
BW - SA - 8ACH
BW - SA - AAMC
BW - Tas
BW - Tas - 1ACH
BW - Tas - 1TIB
BW - Tas - 1TMI
BW - Tas - 2TB
BW - Tas - 2TIB
BW - Tas - 3ACH
BW - Tas - 8ACH
BW - Vic
BW - Vic - 1VMI
BW - Vic - 2ACH
BW - Vic - 2VMR
BW - Vic - 3VB
BW - Vic - 4ACH
BW - Vic - 4VIB
BW - Vic - 5VMR
BW - Vic - 6ACH
BW - Vic - AAMC
BW - Vic - Scot H
BW - WA
BW - WA - 1WAMI
BW - WA - 2ACH
BW - WA - 2WAMI
BW - WA - 3WAB
BW - WA - 4ACH
BW - WA - 4WAMI
BW - WA - 5WAMI
BW - WA - 6WAMI
BW - WA - 8ACH
BW Gen - Campaign
BW Gen - Soldiers
BW General
Cavalry - General
Diary - Schramm
Egypt - Heliopolis
Egypt - Mena
Gen - Ataturk Pk, CNB
Gen - Australia
Gen - Legends
Gen - Query Club
Gen - St - NSW
Gen - St - Qld
Gen - St - SA
Gen - St - Tas
Gen - St - Vic
Gen - St - WA
Gm - German Items
Gm - Bk - 605 MGC
GW - 11 Nov 1918
GW - Atrocities
GW - August 1914
GW - Biographies
GW - Propaganda
GW - Spies
GW - We forgot
Militia 1899-1920
Militia - Area Officers
Militia - Inf - Infantry
Militia - Inf - 1IB
Militia - Inf - 2IB
Militia - Inf - 3IB
Militia - Inf - NSW
Militia - Inf - Qld
Militia - Inf - SA
Militia - Inf - Tas
Militia - Inf - Vic
Militia - Inf - WA
Militia - K.E.Horse
Militia - LH
Militia - LH - Regts
Militia - LH - 1LHB
Militia - LH - 2LHB
Militia - LH - 3LHB
Militia - LH - 4LHB
Militia - LH - 5LHB
Militia - LH - 6LHB
Militia - LHN - NSW
Militia - LHN - 1/7/1
Militia - LHN - 2/9/6
Militia - LHN - 3/11/7
Militia - LHN - 4/6/16
Militia - LHN - 5/4/15
Militia - LHN - 6/5/12
Militia - LHN - 28
Militia - LHQ - Qld
Militia - LHQ - 13/2
Militia - LHQ - 14/3/11
Militia - LHQ - 15/1/5
Militia - LHQ - 27/14
Militia - LHS - SA
Militia - LHS - 16/22/3
Militia - LHS - 17/23/18
Militia - LHS - 24/9
Militia - LHT - Tas
Militia - LHT - 12/26
Militia - LHV - Vic
Militia - LHV - 7/15/20
Militia - LHV - 8/16/8
Militia - LHV - 9/19
Militia - LHV - 10/13
Militia - LHV - 11/20/4
Militia - LHV - 19/17
Militia - LHV - 29
Militia - LHW - WA
Militia - LHW-18/25/10
Militia - Military Orders
Militia - Misc
MilitiaRC - Rifle Clubs
MilitiaRC - NSW
MilitiaRC - NT
MilitiaRC - Qld
MilitiaRC - SA
MilitiaRC - Tas
MilitiaRC - Vic
MilitiaRC - WA
Militiaz - New Zealand
Tk - Turkish Items
Tk - Army
Tk - Bks - Books
Tk - Bks - 1/33IR
Tk - Bks - 27th IR
Tk - Bks - Air Force
Tk - Bks - Yildirim
Tk - POWs
Wp - Weapons
Wp - Hotchkiss Cav
Wp - Hotchkiss PMG
Blog Tools
Edit your Blog
Build a Blog
RSS Feed
View Profile
Open Community
Post to this Blog
Site Index
Education Centre
LH Militia
Boer War
Transport Ships
LH Battles
ALH - Units
ALH - General
Aboriginal Light H
Weapons
Ottoman Sources

"At a mile distant their thousand hooves were stuttering thunder, coming at a rate that frightened a man - they were an awe inspiring sight, galloping through the red haze - knee to knee and horse to horse - the dying sun glinting on bayonet points..." Trooper Ion Idriess

The Australian Light Horse Studies Centre aims to present an accurate history as chroniclers of early Australian military developments from 1899 to 1920.

The Australian Light Horse Studies Centre site holds over 12,000 entries and is growing daily.

Contact: Australian Light Horse Studies Centre

Let us hear your story: You can tell your story, make a comment or ask for help on our Australian Light Horse Studies Centre Forum called:

Desert Column Forum

WARNING: This site contains: names, information and images of deceased people; and, language which may be considered inappropriate today.

Thursday, 5 March 2009
Suez Canal Attack, Egypt, Official British History Account, Pt 6b
Topic: BatzS - Suez 1915

Suez Canal Attack

Egypt, January 28 - February 3, 1915

 Official British History Account, Pt 6b


The following is an extract from:

MacMunn, G., and Falls, C., Military Operations Egypt & Palestine - From the Outbreak of War with Germany to June 1917, London, 1928, pp. 34 -  36.


Chapter II


NOTE III.

THE EXPEDITION AGAINST THE CANAL, FROM GERMAN AND TURKISH SOURCES.

The chief authority as to the happenings on the Turkish side is a German officer, Oberst Freiherr Kress von Kressenstein, who also appears to have been the soul of the expedition against the Canal and responsible for the details of its undoubtedly excellent organization. This officer has written an account which is interesting without being of high value in the early stages from the historian's point of view, as he there seldom mentions the numbers of formations and appears to have written rather from memory than from a diary, still less from official archives.

From his story, it appears that from the very date of mobilization on the 2nd August 1914, months before Turkey entered the war, the commander of the Turkish Fourth Army at Damascus, General Zekki Pasha, was instructed to make plans for an attack on the Canal. The conquest of Egypt was not then contemplated. That idea came only with the appointment of the Minister of Marine, Djemal Pasha, as Commander-in-Chief in Syria and Palestine. It may even then have been due merely to the desire of the new general to arouse by propaganda enthusiasm for the liberation of Mohammedans from unbelievers, and to urge on the troops against what was certainly an admirable country to pillage.

It was soon discovered that neither Zekki Pasha nor his Chief of the Staff was qualified for the task. Enver then put it in the hands of the commander of the VIII Corps at Damascus - Colonel Djemal Bey (known as Djemal Kuchuh, the "little Djemal") - and sent him a German staff of six, with Kress as its chief. In November, about the date of the declaration of war, Zekki was succeeded by the energetic and vigorous Djemal Pasha, who brought as his Chief of the Staff Oberst von Frankenberg und Proschlitz. The preparations now went forward much more speedily. Camels were purchased, roads made, supplies of all kinds collected, as was duly reported in Egypt. In mid January the expedition, consisting, according to Kress, of 20,000 men, with 9 batteries of field artillery and one 15-cm. howitzer battery, moved out from Beersheba in two echelons.

Kress had made a very careful reconnaissance of the Desert of Sinai, and his appreciation is interesting. He was evidently a bold and resolute man, who was not daunted by conditions that appeared at first sight most unfavourable, but were in the end overcome with comparative ease by good organization. The main difficulty for an expedition crossing the desert was, as he recognized, the water supply. Whilst a part of the hinterland of the desert was covered with chimes almost impassable to large bodies of troops, the rest had, as has been stated, a better surface, covered with what Kress describes as a "ready-made macadam." This, however, was broken by islands of deep, shifting sand, up to several square miles inn extent, across which the Turks with extraordinary patience constructed brushwood tracks.

The few thousand nomad Bedouin who, as Kress puts it, eke out a scanty livelihood by robbery and cattle raising, he found unreliable as soldiers or traders, but states that they gave invaluable service as guides, and so long as the Turks and Germans were masters of the desert served them, with rare exceptions, faithfully. This, he considered, was due to their hostility to the British, rather than their friendship for the Turks. The former, he declares, had done nothing to improve the material existence of the Bedouin, their policy being to maintain the desert as a barrier between Palestine and the Canal. Except at a few of their evacuated stations, he and his expedition, he somewhat naively complains, came upon no wells sunk by British.

Disregarding all the precedents, as he declares with pride, of the invaders of history, the force marched through the desert instead of following the coast. The old road along which marched so many great armies, through El Arish, was threatened by hostile ships. That from Ma'an, through Nekhl, to Suez, was also under the guns of British warships in the neighbourhood of Aqaba. The water supply was under the control of the German Major Fischer, who had 5,000 camels carrying water. Thanks to his organization, and to the fact that the season had been wetter than usual, there was never any water shortage. The invaders found springs at Kossaima, 45 miles south of El Arish, and, at Hubr um Mukhsheib, 20 miles east of Deversoir, a pool of rainwater that sufficed them during the halt in front of the Canal. On the march not a man or a beast was lost.

The main body marched from Beersheba, through El Auja and Ibni, between the hill-ranges of Maghara and Yelleg, through Jifjafa upon Ismailia. Smaller detachments moved by El Arish upon Qantara and through Nekhl against Suez. The object of these two latter was merely to keep the enemy in doubt as to the point at which the main attack was to be made. The only trouble of the main body was bombing by British and French aeroplanes. These, it is admitted, caused panic at first, but the troops soon got used to them. [The aerial bombs of that day were, it will be recalled, small - not more than 20 lb. in weight - and not effective weapons against troops in the open, particularly when they fell in sand.] The Turkish force was provided neither with aeroplanes nor weapons of defence against them.

Kress makes one very illuminating statement:-

" The Army Commander, Djemal Pasha, had expected that his appearance on the Canal would be followed by arising of the Egyptian Nationalists. [Sir J. Maxwell had information of a plot, hatched by the agents of Baron Oppenheim, the German explorer, for a rising in Cairo and the murder of Europeans to take place at the same time as the attack on the Canal. The presence of the Australians in the capital put a stop to any such attempts.] In this hope he was deceived. There remained, however, an attainable goal, to force "his way suddenly astride the Canal, hold the crossing a few days, and in that time close the Canal permanently."


If we take the latter as Djemal's real aim, the only one which he cherished seriously, though doubtless ready to seize what opportunities fortune offered of greater results, the whole expedition, which otherwise appears as crazy in aim as admirable in organization, becomes comprehensible. If the Turkish commander had any knowledge of the numbers of British and Colonial troops in Egypt, he cannot have thought that a rising was likely to do more than slightly embarrass Sir J. Maxwell. The conquest of Egypt was only possible through an extraordinary stroke of luck.

Djemal himself, according to his own account, had singularly overestimated general Egyptian sympathy for the Turks and the energy and courage of their would-be supporters in the country. He told his troops that the Egyptian patriots would rise behind the British when the Turks appeared. He was by no means sure of the ultimate success of the campaign, but, he states, he "had staked everything upon surprising the English and being able to hold the stretch of the Canal south of Ismailia with five or six thousand men at the first rush, so that I could bring up the 10th Division and have a force of ten thousand rifles securely dug in on the far bank." Thereafter his intention was to take Ismailia, and hold it four or five days. Meanwhile the 8th Division was to be hastened across the desert.

This programme sounds over-sanguine. But to grip the Canal for three days and destroy it was a more feasible enterprise. The enemy, in the event of a temporary success, might have been enabled to sink half a dozen ships in the Canal, for at least that number appears to have been moored in the Timsah. There is no record of whether adequate explosives accompanied the force.

Previous Chapter: Suez Canal Attack, Egypt, ENGINEER WORK ON THE CANAL DEFENCES, Official British History Account, Pt 6

Next Chapter: Suez Canal Attack, Egypt, THE ATTACK, Official British History Account, Pt 7


Further Reading:

Suez Canal Attack, Egypt, Contents

Where Australians Fought, Sinai, 1916-1917

Light Horse Battles

Battles where Australians fought, 1899-1920


Citation: Suez Canal Attack, Egypt, Official British History Account, Pt 6b


Posted by Project Leader at 12:01 AM EAST
Updated: Sunday, 26 April 2009 11:27 PM EADT
1st Australian Armoured Car Section - AFTER THE ARMISTICE - Part 2
Topic: AIF - Cars


 1st AUSTRALIAN ARMOURED CAR SECTION, AIF

AFTER THE ARMISTICE

Part 2


This is a transcription from a manuscript submitted by Captain E.H. James called "The Motor Patrol". It is lodged in the AWM as AWM 224 MSS 209. This is Part 2.


AFTER THE ARMISTICE - Part 2

On the 4th December, we had another interesting trip and under orders from the G.O.C. we proceeded to Katna a railway town to take over from the Turks a train load of Guns and Machine Guns from the Turkish Southern line. These were to be handed over to us under the terms of the Armistice.

We arrived at Katna in the morning expecting the train to be in about midday and waited all day in the teeming rain without any sign of it. Late in the afternoon a message was received that the train was delayed owing to the lack of fuel, and the firewood gathered along the route was wet and unsuitable. We camped on the railway platform for the night and next morning the train slowly steamed in.

We went through the inventory of the guns and stores on board and found these correct. The Turkish officer in charge seemed to be quite pleased to hand over his charge. He said he was finished with military duties and was going back to his farm. He had had quite enough of war and handed to the writer his dagger as a souvenir. We placed a guard on the train which was the first one through from the Turkish direction since the Armistice and after about an hour's wait to get up a sufficient head of steam the train slowly proceeded on to Aleppo.

We drove there by road and arrived a couple of hours ahead of the train. Two days later we received orders at midnight to turn out and kill or capture a party of bandits who were attacking our telegraph linesmen along the road about 60 miles west. The night was bleak, cold, wet and miserable but after about five minutes grumbling the unit was going full speed, splashing through sheets of water and mud and all soaked through to the skin, only to arrive at our destination (with the first streaks of dawn) to find that the bandits had bolted to the mountains hours before, probably long before we started. However, this was only what we expected, so we picked up the linesmen and returned to our camp near Aleppo.

On the 11th we had a different sort of turnout. All care and guns were cleaned up and polished and everyone had his best uniform on for the occasion as this was the day of the Grand procession through the city on the official entry of General Allenby (the Commander in Chief). The inhabitants had to be impressed properly and the mounted forces with the various motor units in full strength made a good display as they paraded through the principal streets.

Two days later, we had another excursion after bandits in the direction of El Hamman; this time we managed to capture one of them. We brought him in and handed him over to the authorities to deal with.

The weather at this time of the year being the wet season, was very cold and miserable and the members of the patrol were feeling it very severely after their long sojourn in the extreme heat of the Jordan Valley. Many of them who managed to survive the malaria while in the hot and unhealthy parts were now succumbing to it although in a district where malaria was not prevalent, and one after another the men were being drafted off to hospital. Fortunately, we were able to get sufficient reinforcements to carry on with.

On the 28th December, the unit drew patrol and supplies for ten days and received orders to move north about 100 miles to the Turkish town of Ain Tab which was to be the centre of our operations until further orders. Ain Tab is at the foot of the mountains and is a very cold place in the winter and as it happened to be nearly mid winter we arrived there at the coldest time of the year. We drove into the town at 4 p.m. and were met by Major Mills, the British Representative there.

We were allotted quarters in an American school which was empty and were glad to get under a roof once more. We soon had some firewood brought up and a cheerful fire burning. Next morning when we woke up a snow storm was in full progress and the ground was under a mantle of white. Motoring was more or less out of the question and we hoped that no orders for any more moves would be received for some time. New Years Day broke out fine end we took the opportunity of sending back to Aleppo to bring up further supplies of petrol. The following night the car returned to Ain Tab with supplies after a very rough trip; the driver reported that the rains had washed innumerable stones on to the roads and he had had no fewer than fourteen punctures on the trip back. We found out afterwards that the stones were not wholly responsible for our tyre troubles so the tyres themselves were somewhat to blame. The M.T. stores had received a consignment of tyres of American manufacture which had been seat up from Egypt and these we discovered were far from being up to the standard of the quality of the usual tyres or British manufacture which we had received previously.

This day the 2nd January, was a day of gloom with the unit. Sergeant J. Langley the gallant N.C.O. who had led his car into numerous fights and who was the admiration of the whole unit, died at Aleppo hospital from malaria. He was a man of splendid physique, young, healthy and full of vigour, yet he died the second day after going to hospital. He received a bar to his D.C.M. the week previously. He was buried with full military honours at Aleppo Cemetery.


Previous section: 1st Australian Armoured Car Section - AFTER THE ARMISTICE - Part 1

Next section: 1st Australian Armoured Car Section - THE BATTLE WITH THE KURDISH BANDITS - Part 1


Further Reading:

1st AUSTRALIAN ARMOURED CAR SECTION, AIF, Contents 

Australian Light Horse Order of Battle - Outline 

The Australian Light Horse - Structure

Australian Light Horse Order of Battle

Battles where Australians fought, 1899-1920


Citation: 1st Australian Armoured Car Section - AFTER THE ARMISTICE - Part 2

Posted by Project Leader at 12:01 AM EAST
Updated: Monday, 13 April 2009 11:29 PM EADT
Bert Schramm's Diary, 5 March 1919
Topic: Diary - Schramm

Diaries of AIF Servicemen

Bert Schramm


During part of the course of his military service with the AIF, 2823 Private Herbert Leslie Schramm, a farmer from White's River, near Tumby Bay on the Eyre Peninsular, kept a diary of his life. Bert was not a man of letters so this diary was produced with great effort on his behalf. Bert made a promise to his sweetheart, Lucy Solley, that he would do so after he received the blank pocket notebook wherein these entries are found. As a Brigade Scout since September 1918, he took a lead part in the September 1918 breakout by the Allied forces in Palestine. Bert's diary entries are placed alongside those of the 9th Light Horse Regiment to which he belonged and to the 3rd Light Horse Brigade to which the 9th LHR was attached. On this basis we can follow Bert in the context of his formation.

 Bert Schramm's Diary, 5 March 1919


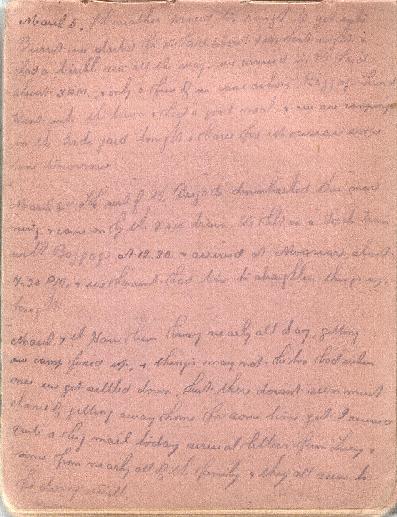
Bert Schramm's Handwritten Diary, 5 - 8 March 1919

[Click on page for a larger print version.]

Diaries

Bert Schramm

Wedesday, March 5, 1919

Bert Schramm's Location - HMT Ellenga, at sea.

Bert Schramm's Diary - The weather proved too rough to get into Beirut. We started for Port Said about 7 pm last night and had a terrible sea all the way. We arrived at Port Said about 3 pm and only a few of us came ashore: Baggage trains. Went into the town and had a good meal. We are camping in the good yard tonight and leave for Moascar some time tomorrow.


9th Light Horse Regiment War Diary

9th Light Horse Regiment Location - Moascar, Egypt.

9th Light Horse Regiment War Diary -  Reorganising camp area.


Darley

Darley, TH, With the Ninth Light Horse in the Great War, Adelaide, Hassell Press, 1924.

No Entry


Previous: Bert Schramm's Diary, 4 March 1919

Next: Bert Schramm's Diary, 6 March 1919


Further Reading:

9th Light Horse Regiment AIF War Diary - Complete day by day list

Bert Schramm Diary 

Bert Schramm Diary - Complete day by day list


Additional Reading:

Darley, TH, With the Ninth Light Horse in the Great War, Adelaide, Hassell Press, 1924.


Citation: Bert Schramm's Diary, 5 March 1919


Posted by Project Leader at 12:01 AM EAST
Updated: Wednesday, 6 May 2009 1:17 PM EADT
605th Machine Gun Company War Diary, 13 to 20 July 1916
Topic: Gm - Bk - 605 MGC

German 605th Machine Gun Company (MGC)

War Diary, 13 to 20 July 1916 


605th Machine Gun Company War Diary, 13 to 20 July 1916


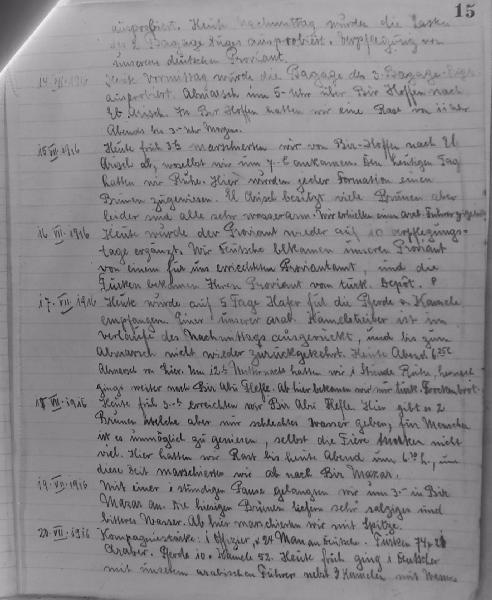
The entries


13.VII.16:    

This morning the loads of the first baggage section were tested and in the afternoon those of the 2nd section. Rations from our German supplies.


14.VII.16: 
   

This morning the baggage of the 3rd baggage section was tested. We moved off at 5 p.m. via Bir Lahfan to El Arish. We had a halt at Bir Lahfan from 11 p.m. to 3 a.m.


15.VII.16:    

At 3 a.m. we left Bir Lahfan for El Arish whose we arrived at 7 a.m. Today was a rest day.Here each formation was assigned one well. There are many wells in El Arish but unfortunately they are all short of water. We received an Arab headman hire.


16.VII.16:    

To-day our supplies ware made up to 10 days. We Germans got our supplies from a supply office provided for us, and the Turks got their supplies from a Turkish depot.


17.VII.16:    

Today we received 5 days oats for the horses and camels. One of our Arab camel drivers moved away during the course of the afternoon and did not return by the time we left. We marched off at 6.25 p.m., halt at midnight for 1 hour, and then on to Bir Abu Tilul. From this date we only got Turkish biscuit.


18.VII.16:    

At 3 a.m. we reached Bir Abu Tilul. There are 2 wells here which only yield bad water. It is impossible for men to drink it, and even animals don't drink much. We halted here till 6.30 p.m.


19.VII.16:
    

3 a.m. The wells here are very salty and bitter. From here on we marched with a point (advance guard).


20.VII.16:     

Strength of company - 1 officer, 24 O.R. Germans, Turks 74, Arabs 21, horses 10, camels 52.


Previous Page: 605th Machine Gun Company War Diary, 3 to 13 July 1916

Next Page: 605th Machine Gun Company War Diary, 20 to 23 July 1916


Further Reading:

German 605th Machine Gun Company (MGC) , Contents 

The Battle of Romani

Light Horse Battles

Battles where Australians fought, 1899-1920


Citation: 605th Machine Gun Company War Diary, 13 to 20 July 1916


Posted by Project Leader at 12:01 AM EAST
Updated: Wednesday, 15 April 2009 1:54 PM EADT
Wednesday, 4 March 2009
First Bullecourt, France, April 11, 1917
Topic: BatzWF - Westn Front

First Bullecourt

France, 11 April 1917


The village of Bullecourt seen from the Allied trenches.


First Bullecourt, the battle on 11 April 1917 to capture a strongpoint in the string of defences across northern France which the Germans called the Siegfried Line but which were known to the Allies as the Hindenburg Line. Following their heavy losses in the Somme campaign during 1916, the next March the Germans made a deliberate withdrawal into a shorter line fifteen to 50 kilometres to their rear. In response to discovery of this move, the two Australian divisions of I Anzac Corps then in the line around Hers (2nd and 5th) were ordered to send out columns to follow up the enemy retirement in conjunction with British formations on both flanks.

Bullecourt


After a period of comparatively rapid advance, during late March and early April these operations became more intense as the Australians found themselves up against strong rearguard forces which the Germans had left behind in outpost villages to impose delay. Several resulting actions were fiercely fought encounters entailing moderately heavy casualties-377 at Lagnicourt on 26 - 27 March; more than 600 at Noreuil on 2 April; and 649 at Hermies, Boursies and Demicourt on 8 - 9 April. The last-mentioned series of actions coincided with the stroke undertaken at Arras by the British Third Army at the start of a new great offensive. It was to assist this operation that the Fifth Army (which included 1 Anzac Corps) was tasked with attacking the Hindenburg Line south of Arras. The point selected for attack was Bullecourt, which-now heavily fortified - had been incorporated into the German defences as an advanced bastion.

Carriage of the attack was entrusted to two brigades (4th and 12th) of the 4th Australian Division which were marched up in extreme haste. These were to strike east of the village and then swing left and advance along the trench system from the flank. Upon their success, the British 62nd Division on the Australian left would also move forward to capture the village itself and link up for a push through into the rear of the German defences. A surprise element would be a dozen British tanks leading the assault - the first time these machines had been used in the Fifth Army-and their task was to break down the enemy's formidable wire entanglements for the following infantry.


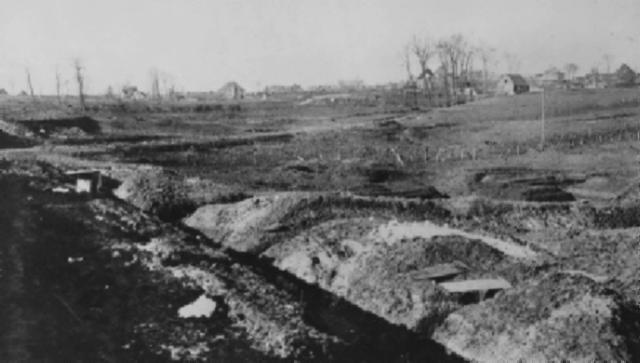
A captured piece of the Hindenburg Line from the east.


During the attack launched at 4.30 a.m. on 11 April both brigades succeeded in penetrating the front line of trenches and seizing part of the second line, but without the benefit of any support from the tanks which by 7 a.m. were all burning wrecks littering the battlefield: only four even reached the enemy wire, and just one got to the first trench-line. The troops had achieved almost the impossible in advancing without a protective artillery barrage or the gunfire support which the tanks had been meant to provide.

While the Australians had got inside the Hindenburg Line, they now found themselves fighting without support and cut off from reinforcements. In the mistaken belief that attack parties had passed deep into enemy rear positions, Allied artillery was prohibited from firing - thereby giving the Germans a free hand in dealing with the penetration. In addition, the enemy resistance encountered grew steadily as members of the 27th Württemberg Division emerged from deep shelters on the flanks and even in rear of the assault waves. Half, an hour after midday the survivors began limping back away from their untenable gain. Barely 660 men out of 3,000 members of the 4th Brigade remained alive or uninjured, and the 12th Brigade had suffered 950 casualties; 1,170 of the attackers had passed into enemy hands as prisoners - the largest number of Australians captured in a single battle. The adverse impression about the utility of tanks would remain with Australians for more than a year.


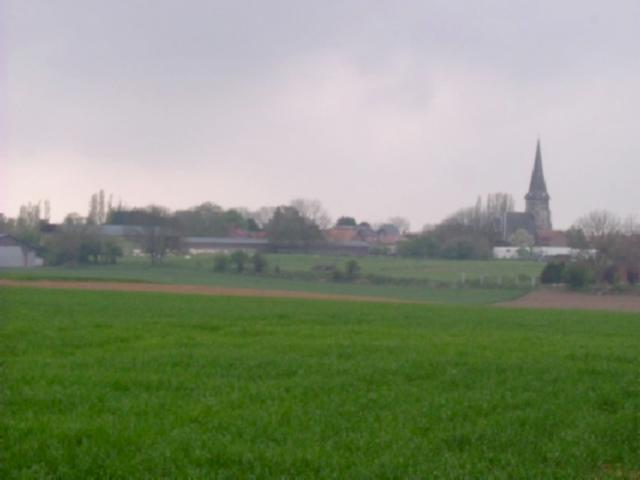
Bullecourt today.


Extracted from the book produced by Chris Coulthard-Clark, Where Australians Fought - The Encyclopaedia of Australia's Battles, Allen and Unwin, Sydney, 1998, pp. 125-126.


Additional References cited by Chris Coulthard-Clark:

C.E.W. Bean, (1933), The Australian Imperial Force in France 1917,  Sydney: Angus & Robertson.


Further Reading:

Battles where Australians fought, 1899-1920


Citation: First Bullecourt, France, April 11, 1917

Posted by Project Leader at 11:01 PM EAST
Updated: Sunday, 5 April 2009 4:20 PM EADT

Newer | Latest | Older

Full Site Index


powered by FreeFind
Let us hear your story: You can tell your story, make a comment or ask for help on our forum.

Desert Column Forum

A note on copyright

The Australian Light Horse Studies Centre is a not for profit and non profit group whose sole aim is to write the early history of the Australian Light Horse from 1900 - 1920. It is privately funded and the information is provided by the individuals within the group and while permission for the use of the material has been given for this site for these items by various donors, the residual and actual copyright for these items, should there be any, resides exclusively with the donors. The information on this site is freely available for private research use only and if used as such, should be appropriately acknowledged. To assist in this process, each item has a citation attached at the bottom for referencing purposes.

Please Note: No express or implied permission is given for commercial use of the information contained within this site.

A note to copyright holders

The Australian Light Horse Studies Centre has made every endeavour to contact copyright holders of material digitised for this blog and website and where appropriate, permission is still being sought for these items. Where replies were not received, or where the copyright owner has not been able to be traced, or where the permission is still being sought, the Australian Light Horse Studies Centre has decided, in good faith, to proceed with digitisation and publication. Australian Light Horse Studies Centre would be happy to hear from copyright owners at any time to discuss usage of this item.

Contact

Australian Light Horse Studies Centre

eXTReMe Tracker