"At a mile distant their thousand hooves were stuttering thunder, coming at a rate that frightened a man - they were an awe inspiring sight, galloping through the red haze - knee to knee and horse to horse - the dying sun glinting on bayonet points..." Trooper Ion Idriess
The Australian Light Horse Studies Centre aims to present an accurate history as chroniclers of early Australian military developments from 1899 to 1920.
The Australian Light Horse Studies Centre site holds over 12,000 entries and is growing daily.
Contact:Australian Light Horse Studies CentreLet us hear your story:
You can tell your story, make a comment or ask for help on our Australian Light Horse Studies Centre Forum called:
WARNING: This site contains: names, information and images of deceased people; and, language which may be considered inappropriate today.
Wednesday, 4 March 2009
First Bullecourt, France, April 11, 1917 Topic: BatzWF - Westn Front
First Bullecourt
France, 11 April 1917
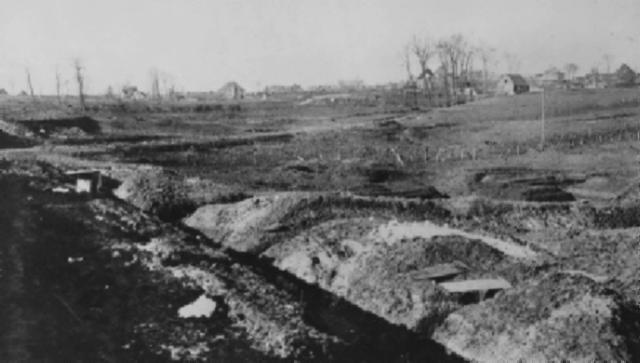
The village of Bullecourt seen from the Allied trenches.
First Bullecourt, the battle on 11 April 1917 to capture a strongpoint in the string of defences across northern France which the Germans called the Siegfried Line but which were known to the Allies as the Hindenburg Line. Following their heavy losses in the Somme campaign during 1916, the next March the Germans made a deliberate withdrawal into a shorter line fifteen to 50 kilometres to their rear. In response to discovery of this move, the two Australian divisions of I Anzac Corps then in the line around Hers (2nd and 5th) were ordered to send out columns to follow up the enemy retirement in conjunction with British formations on both flanks.
Bullecourt
After a period of comparatively rapid advance, during late March and early April these operations became more intense as the Australians found themselves up against strong rearguard forces which the Germans had left behind in outpost villages to impose delay. Several resulting actions were fiercely fought encounters entailing moderately heavy casualties-377 at Lagnicourt on 26 - 27 March; more than 600 at Noreuil on 2 April; and 649 at Hermies, Boursies and Demicourt on 8 - 9 April. The last-mentioned series of actions coincided with the stroke undertaken at Arras by the British Third Army at the start of a new great offensive. It was to assist this operation that the Fifth Army (which included 1 Anzac Corps) was tasked with attacking the Hindenburg Line south of Arras. The point selected for attack was Bullecourt, which-now heavily fortified - had been incorporated into the German defences as an advanced bastion.
Carriage of the attack was entrusted to two brigades (4th and 12th) of the 4th Australian Division which were marched up in extreme haste. These were to strike east of the village and then swing left and advance along the trench system from the flank. Upon their success, the British 62nd Division on the Australian left would also move forward to capture the village itself and link up for a push through into the rear of the German defences. A surprise element would be a dozen British tanks leading the assault - the first time these machines had been used in the Fifth Army-and their task was to break down the enemy's formidable wire entanglements for the following infantry.
A captured piece of the Hindenburg Line from the east.
During the attack launched at 4.30 a.m. on 11 April both brigades succeeded in penetrating the front line of trenches and seizing part of the second line, but without the benefit of any support from the tanks which by 7 a.m. were all burning wrecks littering the battlefield: only four even reached the enemy wire, and just one got to the first trench-line. The troops had achieved almost the impossible in advancing without a protective artillery barrage or the gunfire support which the tanks had been meant to provide.
While the Australians had got inside the Hindenburg Line, they now found themselves fighting without support and cut off from reinforcements. In the mistaken belief that attack parties had passed deep into enemy rear positions, Allied artillery was prohibited from firing - thereby giving the Germans a free hand in dealing with the penetration. In addition, the enemy resistance encountered grew steadily as members of the 27th Württemberg Division emerged from deep shelters on the flanks and even in rear of the assault waves. Half, an hour after midday the survivors began limping back away from their untenable gain. Barely 660 men out of 3,000 members of the 4th Brigade remained alive or uninjured, and the 12th Brigade had suffered 950 casualties; 1,170 of the attackers had passed into enemy hands as prisoners - the largest number of Australians captured in a single battle. The adverse impression about the utility of tanks would remain with Australians for more than a year.
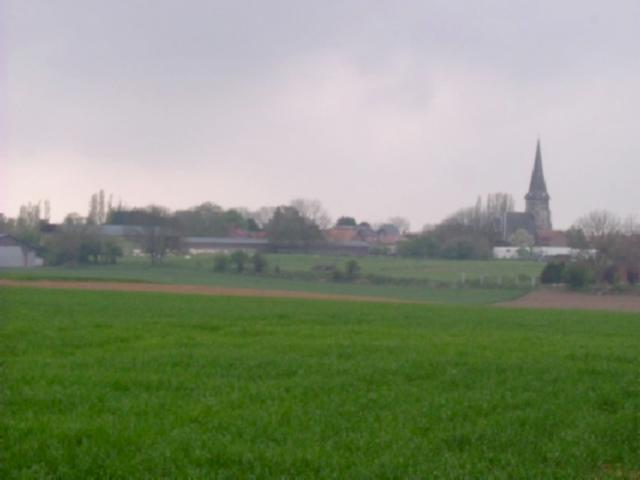
Bullecourt today.
Extracted from the book produced by Chris Coulthard-Clark, Where Australians Fought - The Encyclopaedia of Australia's Battles, Allen and Unwin, Sydney, 1998, pp. 125-126.
Additional References cited by Chris Coulthard-Clark:
C.E.W. Bean, (1933), The Australian Imperial Force in France 1917, Sydney: Angus & Robertson.
Suez Canal Attack, Egypt, Official British History Account, Pt 7 Topic: BatzS - Suez 1915
Suez Canal Attack
Egypt, January 28 - February 3, 1915
Official British History Account, Pt 7
The following is an extract from:
MacMunn, G., and Falls, C., Military Operations Egypt & Palestine - From the Outbreak of War with Germany to June 1917, London, 1928, pp. 37 - 46.
Chapter III
THE ATTACK ON THE SUEZ CANAL, 1ST - 10TH FEBRUARY 1915.
THE ATTACK.
FROM the 31st January onwards the British troops stationed along the Canal expected the attack at any moment and, having had ample warning of its approach, awaited it with confidence.
The dispositions of the enemy, so far as they could be discovered, were on the 1st February as follows:
At Bir Habeita, 6 miles east of Serapeum, at least 2,500 infantry and apparently two guns; at Moiya Harab, 30 miles to the south-east and in a position such that they might be intended either to reinforce the former body or to strike at the 1st Sector in the neighbourhood of Shallufa, about 8,000 men; further north, at Bir el Mahadat, 10 miles E.N.E, of El Ferdan, about 3,000 men. On the other hand, trenches which had been dug by the Turks 5 miles north-east of Qantara now seemed to have been evacuated, and behind, at Bir ed Dueidar, only about 300 men could be seen, though the palm grove of this oasis was certainly large enough to conceal many more. In rear, on the northern Sinai route at Bir el Abd, 40 miles east of the Canal, and at El Arish on the Palestine frontier ; on the southern route at Nekhl ; there appeared to be further considerable forces.
No move by the Turks was detected on this day but for a slight advance opposite Ismailia Ferry Post, as a result of which the bridgehead there and Bench Mark Post, 2 miles to north of it, were reinforced. A little further north small bodies of the enemy in the desert east of El Ferdan were scattered by the fire of H.M.S. Clio from her station near Ballah.
On the morning of the 2nd February it was discovered by patrols from Ismailia Ferry Post that there had been a further advance opposite that point during the night. Small detachments which moved out from the bridgehead made contact with the enemy and were in action till about 3.30 p.m. A high wind, which had grown stronger as the day wore on, whipped up the sand till the troops found themselves almost in darkness, and aerial reconnaissance became impossible. The enemy showed no immediate intention of coming to close quarters. He apparently entrenched himself in the evening 22 miles south-east of the British defences.
A French naval officer, Enseigne de vaisseau Potier de la Morandière, thus describes the reconnaissance from the Ferry Post:
On the hills, ten or fifteen kilometres from the Canal, we could see numerous traces on the sand of the columns which had moved "forward during the night. But in the plain there was nothing. The desert, in its high light, looked like a smooth cloth, but was in "reality cut by numerous depressions in which troops could be hidden. The first patrols which moved out were met by rifle fire. They were reinforced; then artillery was sent out to their support. At my side was a battery of Indian mountain artillery, commanded by a young English officer, the only European in it. He had just been ordered to go forward. A sharp command and, in a few seconds, before we could see how it was done, the guns which had been in position were packed on the mules and the column was on the move.
Meanwhile there had sprung up a sand storm which hid everything from view. I went out on to a dune with the English colonel in command of the post. But there it was even worse. Even to keep one's eyes open was horrible torture. And to think that people were fighting out in that. In the evening the detachments came in, one after another, the officers cursing the sand, the wind and the enemy, who had fallen back before them. Then quiet fell and we began to think there had been a false alarm.
Not only at the Ferry Post but on the whole twenty mile front from Deversoir to El Ferdan the British outposts were in touch with the enemy during the day. The Clio again came into action, driving the groups on which she fired out of range.
It was now more than ever certain that the attack would fall upon the central hector, though still unknown whether its main weight would be directed north or south of Lake Timsah. In view of the enemy's activity in front of El Ferdan further reinforcements were brought up to that point: an armoured train with four platoons of New Zealand infantry, and two platoons to support the 5th Gurkhas in the post on the east bank. In that part of the sector between the Great Bitter Lake and Lake Timsah there were now the following troops:-
19th Lancashire Battery R.F.A. (T) (four 15-pdrs.); 5th Battery Egyptian Artillery (four mountain guns and two maxims); 1st Field Company East Lancashire Royal Engineers (T) (two sections); 22nd Indian Infantry Brigade, less 3rd Brahmans (62nd and 92nd Punjabis, 2/10th Gurkha Rifles); 2nd Q.V.O. Rajputs; Two Platoons 128th Pioneers (escort to the Egyptian battery); 137th (Indian) Field Ambulance.
Of these there were six companies on the east bank; two of the 92nd Punjabis in the Tussum Post, two of the 92nd in that of Serapeum, and two of the Gurkhas at Deversoir. On the west bank were eleven posts each held by two platoons, [The total number of posts between the two lakes was twelve, but No. 1 Post on the left, which was protected by the large lagoons at the southern end of Lake Timsah, consisted of a half platoon only. It manned an observation post on a dune known as Gebel Mariam, just west of the point where the Canal channel enters the lake.], each platoon on a frontage of some 600 yards and finding three sentry posts 200 yards apart. In reserve at Serapeum were three companies. At the first sign of the attack a company of the 62nd Punjabis was ordered up from here to the danger point, mile-post 47.4, a little south of Tussum, and this company was subsequently reinforced by six platoons of the 2nd Rajputs.
The sand storm continued into the night. The Indian sentries, peering into the darkness, their faces screened in their puggarees and the breeches of their rifles wrapped round with rags, saw and heard nothing till 3.25 a.m. on the 3rd February, when an observation post at Tussum heard troops passing south-east of the post and towards the Canal bank. A moment later loud shouting and howling broke out south of the post. [The noise, in defiance of strict orders, was made by irregulars, "the Champions of Islam," calling upon Allah and adjuring the attackers to die for the faith.] Major T. R. Maclachlan, who was in command, moved a machine gun and half a platoon down to the southern flank of the post to rake the east bank. The shouting thereupon ceased and the enemy replied with ineffective machine-gun fire.
Still there was nothing to be seen. Then the moon, only two days past full, emerged from the clouds, and dark masses were discerned moving slowly down the gullies on the east bank towards the water. Presently these masses were discovered to be pontoons and rafts carried by squads of men. At 4.20 a.m. the Egyptian battery, which had moved to this point the previous day and dug in on the top of the high west bank in order to obtain a field of view, opened fire, with good results, for it was soon observed that the two foremost pontoons had been abandoned. With the assistance of rifle fire from the 62nd Punjabis and 128th Pioneers at Post No. 5, the battery checked most of the attempts of the enemy to carry his craft down to the water.
It is not clear whether the Turks had intended to make their first crossing at this point or whether the other detachments moving on the Canal had been slightly delayed in the darkness by the rough ground. At all events, within a few minutes gangs carrying pontoons appeared upon the east bank on a frontage of a mile and a half from a short distance north of the point of the first attempt. The rapid fire of the defenders caused most of the craft to be abandoned on the bank, while the pontoons which reached the water were quickly holed and sunk.
Three pontoons only crossed the Canal, under cover of heavy machine-gun and rifle fire now opened by the enemy from the sand-dunes close to the east bank. To the south, a boat-load of Turks landed opposite mile-post 43.3, on the front of Post No. 6. The party was instantly charged with the bayonet by a small body under Major O. St. J. Skeen, 62nd Punjabis, and all killed or wounded. The other two boat-loads landed at the original point, opposite mile-post 47.6. This party was at once attacked by Captain M. H. L. Morgan and Lieut. R. A. FitzGibbon with small detachments of the 62nd Punjabis and 128th Pioneers from Post No. 5. [Both officers were wounded, the latter mortally, though, after being hit, he ran a considerable distance with a message to the Egyptian battery of which he commanded the escort.] Six Turks were killed and four wounded; about twenty escaped and hid under the west bank, where they were later rounded up and captured by a party of the 2nd Rajputs. The small parties which made these gallant attacks were the only Turks to cross the Suez Canal, save as prisoners, in the course of the war. Six months later a few raiders swam the Canal near Qantara and placed sticks of dynamite on the railway line. These, however, were probably native smugglers, who had taken Turkish pay when their peacetime occupation was gone.
The fire from the east bank was intense and well directed, and casualties among the defenders began to mount up. But as the light improved it was seen how roughly the enemy had been handled. His iron pontoons, rafts 2 and other abandoned material littered the east bank, along which also lay many dead. His surprise crossing had been a complete failure. The pontoons were of the German service pattern, of galvanized iron, each capable of holding about 20 men. There were also a number of rafts, subsequently found to consist of a light wooden framework filled with empty kerosene tins. They were 15 feet long by 12 feet wide and equipped with long-necked crutches to enable them to be rowed across.
Yet the Turkish command had by no means abandoned hope. At dawn an attack was launched against Tussum Post, and the enemy artillery began to shell the British positions, the warships in the Canal, and merchant shipping moored in Lake Timsah. The Hardinge and Requin in turn opened fire upon parties of Turkish infantry in the desert, as they became visible, and by the time it was daylight the action was general. It was now discovered that the Turks were holding a trench 200 yards south of Tussum Post, facing westward. Enfilade fire from the machine guns in the post practically destroyed this party. It was next found that a larger body of the enemy, some 350 strong, had made a lodgement in the British day trenches east and south of the post. At 7 a.m. a counter-attack from the southern flank of the post, led by Captain H. M. Rigg, 92nd Punjabis, recaptured a portion of these trenches and took 70 prisoners. At 11 a.m. a further counter-attack was carried out against the day trenches by Lieut. J. W. Thomson-Glover, 35th Sikhs, attached 92nd Punjabis, from the northern end of the post. This was completely successful, though not until 3.30 p.m. were the whole of the trenches regained. In all 7 Turkish officers and 280 other ranks were captured or killed and a quantity of material taken in these trenches.
Br.-General S. Geoghegan, commanding the 22nd Indian Brigade, observing at 6.30 a.m. that there was no sign of an attack south of Serapeum, decided to collect at that point sufficient troops to clear the Turks still in front of or south of Tussum Post out of the trenches and sandhills. Two companies of the 2/10th Gurkhas with their machine guns moved up from Deversoir to Serapeum, where six platoons of the 2nd Rajput had also been collected. Crossing by the ferry, two platoons of the Rajputs with the two companies of the 92nd Punjabis from the post on their right, began at 8.40 a.m. to advance up the east bank towards Tussum. As this movement continued, the enemy broke in surprisingly large numbers from hummocks and sandhills in the neighbourhood of the point from which his southern boat-load had crossed during the night. But at the same moment a considerable Turkish force came into the open some three miles to the north-east, deployed, and, supported by two batteries,' began to advance in the direction of Serapeum Post. The force which carried out this attack was afterwards found to have been the 74th Regiment, 25th Division; the other two regiments of that division, the 73rd and 75th, having already been committed to the attack against Tussum Post and the Canal immediately south of it. Behind the 7th Regiment the 28th of the 10th Division, Djemal Pasha's reserve, also advanced, though how nearly it approached the Canal is not clear.
Against this superior force the British counter-attack was unable to continue. The Rajputs, pushing on along the bank, came under heavy fire and lost the officer commanding the detachment, Captain R. T. Arundell, before they were brought to a standstill. The Punjabis were concentrated on the right to face the Turkish attack, and six platoons of the 2/10th Gurkhas moved up into support, the whole detachment on the east bank being now under the command of Lieut.-Colonel F. G. H. Sutton, 2/10th Gurkha Rifles. But the little force held its ground and its determined front brought the enemy's attack to a standstill, nowhere nearer than 1,200 yards to the British line. A second cause of the failure on the part of the Turks to press the attack was probably the fire of the French warships Requin and D'Entrecasteaux, of which more will be said later.
The abandoned pontoons lying along the Asiatic bank constituted a certain danger, as there was a possibility of their being again employed after the fall of darkness, should the enemy re-establish himself in force upon the bank. About 7.45 a.m. Br.-General Geoghegan requested Lieut.-Commander G. B. Palmes, R.N., in command of T.B. 043 at Deversoir, to destroy these. The torpedo boat moved up the Canal, firing two rounds from its 3-pdr, into each pontoon. 3 Feb. Lieut.-Commander Palmes then landed to see if any still lay behind the east bank, and succeeded in blowing up two more with gun-cotton. Finally he almost walked into a trench full of Turks, but succeeded in regaining his dinghy.
While the attacks on Tussum and Serapeum were in progress, another Turkish force, advancing from the southeast, threatened Ismailia Ferry Post, on the other side of Lake Timsah. [This force consisted of the 68th regiment, 23rd Division.] This attack was never seriously pressed, the enemy's advanced troops entrenching some eight hundred yards from the defences. On the other hand his artillery, well handled, speedily became menacing. It appeared that the two field batteries were in action in support of the infantry, while from far out in the desert a 15-cm. howitzer battery also opened fire.
At 8.15 a.m. these guns, which had been directed against the Hardinge but had hitherto been shooting short, began to straddle the ship. First a ricochet carried away the wireless aerial. A few minutes later a high explosive shell struck the forward funnel, another the base of the after funnel; next a shell from one of the heavy howitzers burst over the fore part of the ship, causing casualties to the guns' crews. The steering gear was damaged and the fore stokehold rendered untenable. It was only too evident to Commander Linberry that the heavy guns had his range exactly. If he remained where he was there was considerable risk that his ship, unarmoured and highly vulnerable, would be sunk in the channel. At 8.45 a.m., therefore, the Hardinge slipped and proceeded to anchor in Lake Timsah, outside the fairway. The heavy howitzers fired only three or four rounds more at her, then switched to another target.
The artillery defence of Tussum now fell largely upon the Requin, [The Requin, whose specially dredged berth had been long chosen, had made preparation for the defence of the Sector by placing numerous range-marks in the desert. Her role was, in fact, that of a floating battery.], the only warship in the area, except the armed tug Mansourah and T.B. 043, both armed with light guns. She was searching for the enemy's field artillery and shelling small groups of infantry in front of Ismailia Ferry Post with her 10-cm. guns when she came under the fire of the 15-cm howitzers which had previously engaged the Hardinge.
She could not find the enemy battery, the shooting of which became more and more accurate. Presently it straddled the ship and the situation became uncomfortable. The crews of the 10-cm. guns, which had no protection, were moved beneath the shelter of the steel deck, and a bigger head of steam raised in case the ship should have to shift her moorings. One 27.4-cm. turret gun alone remained in action, at first without effect. But at 9 o'clock a puff of smoke was observed in the desert, corresponding with the fall of a big shell near the ship. It was estimated that the Turkish howitzers were firing from a point 9,200 metres distant. Fire was accordingly opened with the turret gun at ranges varying from 9,000 to 9,500 metres. After the third round the heavy howitzer fire ceased suddenly and was not resumed, a serious danger to the Canal being thus removed.
The Requin did further good work opposite Tussum and Serapeum, aided by the cruiser D'Entrecasteaux. The latter had received orders to move up and replace the disabled Hardinge. Subsequently these orders were cancelled, as the flagship Swiftsure was on her way down from Qantara to carry out that task. The D'Entrecasteaux therefore moved about three-quarters of a mile north of Deversoir and then received the wireless message: "Repulse the attack on Serapeum." She could see Requin's shells bursting east of that point and she herself at once opened fire with her 14-cm. guns. The crossfire from the heavy guns of the two French ships was now therefore directed upon the area of the Turkish deployment. It was probably in great measure owing to the moral effect of the melinite that the Turkish troops could not here be induced to advance.
The enemy had now been definitely repulsed between Serapeum and Tussum. His artillery continued to shell the west bank intermittently till 2 p.m., when fire ceased. The silence that followed indicated that the action had been broken off, and bodies of Turks were soon seen moving eastward, to be hastened on their way by the 24-cm. gun of the D'Entrecasteaux, firing at extreme range. The force under Lieut.-Colonel Sutton which had carried out the counter-attack now withdrew to its former position north of Serapeum. About half an hour later a small body of the enemy occupied the ridge which it had evacuated, but was shelled off it by the British artillery.
Opposite Ismailia the enemy's artillery persisted longer, numerous shells falling in the bridgehead and camp, though 3 Feb. without causing any casualties. But at 3.30 p.m. the Requin apparently silenced a battery firing on the shipping in the Timsah, and here, as further south, the action now died down.
Reinforcements of the 31st Indian Brigade, which began to arrive at Serapeum at 4.30 p.m., were not required, but they were retained in positions of close support at various points in view of the possibility that the offensive would be renewed. Major-General A. Wallace, commanding the 11th Indian Division, took over command of the front between the Great Bitter Lake and Lake Timsah. The Swiftsure had now taken up the former berth of the Hardinge, the Ocean had also moved to this part of the front, and the Hardinge had been sent to replace the Swiftsure at Qantara.
Further reinforcements for the front at Ismailia, consisting of Headquarters 2nd Australian Brigade, with the 7th and 8th Battalions Australian Infantry, arrived in the town during the evening. All was ready for the fresh attack which, it seemed probable, would have to be met in the morning. The night passed quietly, save for some musketry fire from the east bank south of Tussum Post.
Elsewhere the attacks on the Canal had been of minor importance, nowhere pressed with energy sufficient to give Major-General Wilson a moment's inquietude or uncertainty as to the enemy's real plan. In the Suez sector the enemy did not come to close quarters. Fire was exchanged between a small detachment and the post on the east bank at El Kubri, after which the Turks withdrew.
Against El Ferdan, the northernmost post of the 2nd Sector, the infantry attack was equally feeble. There had been some firing on this part of the front before dawn, and daylight discovered two lines of trenches dug about two and a half miles from the Canal. On these the Clio opened fire.
Soon after 9 a.m. two Turkish field guns began firing on the railway station, making good practice and securing several direct hits. The Clio located and engaged these guns within less than half an hour, whereupon the Turks turned their attention to her, continuing to do remarkably pretty shooting. She was hit twice and had some small damage done to one of her guns, but she sustained no casualties among her crew. By 10.30 a.m. she had silenced the Turkish guns. During the afternoon she had further practice against bodies of the enemy seen falling back towards the northeast.
At Qantara, in the 3rd Sector, there was a rather stronger attack, between 5 and 6 a.m., upon two piquets furnished by the 89th Punjabis. The machine guns and rifles of the piquets caused heavy loss to the enemy when he came up against the British barbed-wire defences, and he was driven off without difficulty. Thirty-six prisoners were subsequently brought in here and 20 dead found outside the wire. These figures did not represent the whole of the enemy's losses, as he carried off further dead and wounded in his retirement.
These feint attacks had all been conducted with so little resolution as to fail completely in their object. There were known to be further detachments of the enemy in the Suez Sector in the neighbourhood of posts other than at El Kubri, but they did not appear within machine-gun range of Baluchistan, Gurkha or Shallufa.
Bert Schramm's Diary, 4 March 1919 Topic: Diary - Schramm
Diaries of AIF Servicemen
Bert Schramm
During part of the course of his military service with the AIF, 2823 Private Herbert Leslie Schramm, a farmer from White's River, near Tumby Bay on the Eyre Peninsular, kept a diary of his life. Bert was not a man of letters so this diary was produced with great effort on his behalf. Bert made a promise to his sweetheart, Lucy Solley, that he would do so after he received the blank pocket notebook wherein these entries are found. As a Brigade Scout since September 1918, he took a lead part in the September 1918 breakout by the Allied forces in Palestine. Bert's diary entries are placed alongside those of the 9th Light Horse Regiment to which he belonged and to the 3rd Light Horse Brigade to which the 9th LHR was attached. On this basis we can follow Bert in the context of his formation.
Bert Schramm's Diary, 4 March 1919
Bert Schramm's Handwritten Diary, 2 - 4 March 1919
[Click on page for a larger print version.]
Diaries
Bert Schramm
Tuesday, March 4, 1919
Bert Schramm's Location - HMT Ellenga, at sea.
Bert Schramm's Diary - We left Tripoli this morning at 7.30. There has been a real gale blowing all day and a big majority of the men have been sick but thank goodness I have been alright. Of course we are packed in like sheep and officers as per usual travel first class. We are to call in at Beirut but the weather has been rough to get in and at present we are lying outside waiting for calmer weather. It looks as if we will have to wait sometime.
1st Australian Armoured Car Section - THE BATTLE WITH THE KURDISH BANDITS - Part 1 Topic: AIF - Cars
1st AUSTRALIAN ARMOURED CAR SECTION, AIF
THE BATTLE WITH THE KURDISH BANDITS
Part 1
Below is a transcription from a manuscript submitted by Captain E.H. James called "The Motor Patrol". It is lodged in the AWM as AWM 224MSS 209. This is Part 1.
THE BATTLE WITH THE KURDISH BANDITS - Part 1
The 12th January, 1919, was our last scrap. We claimed that we fired the last shot in connection with the Great War. This is how it happened. The town of Ain Tab where we were stationed was an inland town in the mountains. Although well inside the Turkish line at the signing of the Armistice, the town now had both a British and Turkish Commandant residing there. Any person who had a grievance or a complaint to make went to both and if he was up to the usual standard of Eastern artfulness he would try and work one against the other. Well to get on with the story, a party of Armenians looking very sorrowful and woebegone an the day in question, arrived at the house of the Turkish Commandant and explained to him with tears in their eyes that they had been waylaid and stripped of their clothes and robbed of all their possessions by brigands on the main road between Killis and Ain Tab. The Turkish official said that he was very sorry to hear the sad news, but explained that the matter had nothing to do with him and they had better run across and tell the British Commandant. Perhaps he might be able to get their clothes and possessions back again for them.
They took his advice and went across to Major Hills, the British official, who questioned them and managed to get the story out of them and the position of their caravan when robbed. He then sent across for the officer in charge of the Light Car Patrol who immediately got a couple of his cars ready with instructions to chase the brigands. We were told these gentlemen were about four miles down the main road so we took one of the Armenians who could speak some English, as a guide to the position and although expecting the usual wild goose chase, we set off at full speed in the direction of the trouble, everyone being very sarcastic on the subject of Bandits in general, but sure enough, when we had gone about four miles down the road we saw a long camel caravan halted in the middle of the road and a squad of armed horsemen holding them up with rifles in the true highwayman fashion. Joy beat in the hearts of the motor patrol. At last, they were doing to get even with somebody for all the miserable expeditions at midnight in the cold and wet that they had endured for the last few weeks.
No questions were asked by either side. The bandits knew they had been caught red-handed and could expect no quarter. They all started firing wildly with their rifles and revolvers from horseback as they galloped down the road which had stone walls along each side at this particular spot. The horses apparently were not much in the steeple chasing line so their riders rode straight on hoping to get gape in the walls. The two cars tore on (one on either side of the caravan) holding their fire until up to the horses then they let go at the riders who fired from the hips as they ran along side by side. However, owing to the speed and the bumping of the cars and the elusiveness of the target the shooting on both sides was very bad. The writer who at one time rather fancied himself as a bit of a revolver shot, still remembers his disgust at emptying every shot in his Webley at point blank range at a Kurdish horseman without the slightest affect. We then concentrated on the horses which were much more difficult to miss with the result that the animals were soon all on the ground except one which galloped away without the rider who was wounded. The riders however, jumped aver the wall and began shooting from behind cover at us so we divided, (each car's crew going to opposite ends of the wall) and we opened up on them from both flanks with rifles and a Lewis Gun. This soon fetched them up and they tried to bolt away through some ploughed ground. However, our shooting was better now and we picked them off as they ran up the hill. We accounted for the whole band who were all either killed or wounded. We found that some of them had three or four bullets through before they dropped.
605th Machine Gun Company War Diary, 20 to 23 July 1916 Topic: Gm - Bk - 605 MGC
German 605th Machine Gun Company (MGC)
War Diary, 20 to 23 July 1916
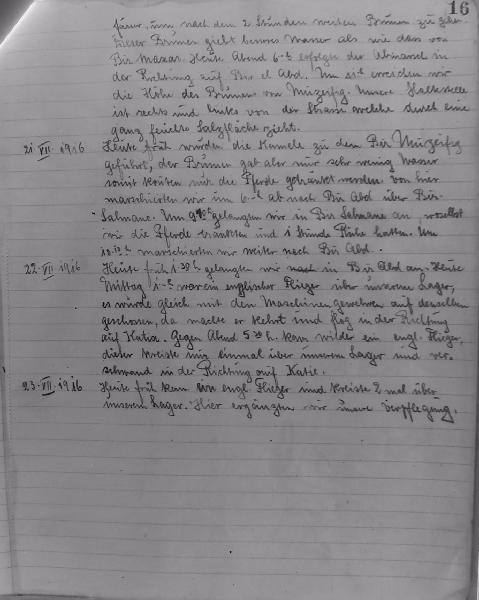
605th Machine Gun Company War Diary, 20 to 23 July 1916
The entries
20.VII.16:
Strength of company - 1 officer, 24 O.R. Germans, Turks 74, Arabs 21, horses 10, camels 52. Early this: morning 1 German went with our Arab headman and 3 camels and water casks to a well 2 hours away. This well has better water than those of Bir Mazar. At 6 p.m. we marched off in the direction of Bir El Abd. At 11 p.m. we came up to the line of the well of Moseifig. Our halting place is right and left of the road which passes through a quite damp salt pan.
21.VII.16:
Early this morning the camels were taken to Bir Moseifig but the well yielded only a very little water and so only the horses could be watered. From here we marched at 6 p.m. to Bir Abd via Bir Salmane. At 9 we reached Bir Salmane where we watered the horses and had an hour's halt. At 10.10 we marched on to Bir Abd.
22.VII.16:
At 1.30 a.m. we reached Bir Abd. At 1 p.m. an English plane was over our camp. The machine guns opened fire at once. It turned back and flew in the direction of Katia. About 5.00 p.m. an English plane came again, circled once over our camp and disappeared in the direction of Katia.
23.VII.16:
An English plane came early this morning had circled twice over our camp. We replenish our supplies here. We moved off at 6 p.m. from Bir el Abd to Hod el Dababis and arrived at 8.30 p.m. Here there is an old English well which yields only salt and bitter water. We pitched our camp on a little hill in the vicinity of the little palm grove.
The Australian Light Horse Studies Centre is a not for profit and non profit group whose sole aim is to write the early history of the Australian Light Horse from 1900
- 1920. It is privately funded and the information is provided by the individuals within the group and while permission for the use of the material has been given for this
site for these items by various donors, the residual and actual copyright for these items, should there be any, resides exclusively with the donors. The information on
this site is freely available for private research use only and if used as such, should be appropriately acknowledged. To assist in this process, each item has a citation
attached at the bottom for referencing purposes.
Please Note: No express or implied permission is given for commercial use of the information contained within this site.
A note to copyright holders
The Australian Light Horse Studies Centre has made every endeavour to contact copyright holders of material digitised for this blog and website and where
appropriate, permission is still being sought for these items. Where replies were not received, or where the copyright owner has not been able to be traced, or where
the permission is still being sought, the Australian Light Horse Studies Centre has decided, in good faith, to proceed with digitisation and publication. Australian Light
Horse Studies Centre would be happy to hear from copyright owners at any time to discuss usage of this item.