« March 2009 »
S M T W T F S
1 2 3 4 5 6 7
8 9 10 11 12 13 14
15 16 17 18 19 20 21
22 23 24 25 26 27 28
29 30 31
You are not logged in. Log in


Search the site:


powered by FreeFind
Volunteer with us.

Entries by Topic All topics  
A Latest Site News
A - Using the Site
AAA Volunteers
AAB-Education Centre
AAC-Film Clips
AAC-Photo Albums
AIF & MEF & EEF
AIF - Lighthorse
AIF - ALH - A to Z
AIF - DMC
AIF - DMC - Or Bat
AIF - DMC - Anzac MD
AIF - DMC - Aus MD
AIF - DMC - British
AIF - DMC - BWI
AIF - DMC - French
AIF - DMC - Indian
AIF - DMC - Italian
AIF - DMC - Medical
AIF - DMC - Remounts
AIF - DMC - Scouts
AIF - DMC - Sigs
AIF - DMC - Sigs AirlnS
AIF - DMC - 1 Sig Sqn
AIF - DMC - 2 Sig Sqn
AIF - DMC - Eng
AIF - DMC - Eng 1FSE
AIF - DMC - Eng 2FSE
AIF - DMC - GSR
AIF - 1B - 1 LHB
AIF - 1B - 6 MVS
AIF - 1B - 1 LHMGS
AIF - 1B - 1 Sig Trp
AIF - 1B - 1 LHFA
AIF - 1B - 1 LHR
AIF - 1B - 2 LHR
AIF - 1B - 3 LHR
AIF - 2B - 2 LHB
AIF - 2B - 7 MVS
AIF - 2B - 2 LHFA
AIF - 2B - 2 LHMGS
AIF - 2B - 2 Sig Trp
AIF - 2B - 5 LHR
AIF - 2B - 6 LHR
AIF - 2B - 7 LHR
AIF - 3B - 3 LHB
AIF - 3B - 8 MVS
AIF - 3B - 3 LHB Sigs
AIF - 3B - 3 LHFA
AIF - 3B - 3 LHMGS
AIF - 3B - 3 Sig Trp
AIF - 3B - 8 LHR
AIF - 3B - 9 LHR
AIF - 3B - 10 LHR
AIF - 4B - 4 LHB
AIF - 4B - 4 Sig Trp
AIF - 4B - 9 MVS
AIF - 4B - 4 LHFA
AIF - 4B - 4 LHMGS
AIF - 4B - 4 LHR
AIF - 4B - 11 LHR
AIF - 4B - 12 LHR
AIF - 5B - 5 LHB
AIF - 5B - 10 MVS
AIF - 5B - 5 LHFA
AIF - 5B - 5 Sig Trp
AIF - 5B - ICC
AIF - 5B - 14 LHR
AIF - 5B - 15 LHR
AIF - 5B - 1er Regt
AIF - 5B - 2 NZMGS
AIF - AASC
AIF - Aboriginal LH
AIF - Badges
AIF - Cars
AIF - Chinese LH
AIF - Double Sqns
AIF - Engineers
AIF - Fr - 22 Corps
AIF - Fr - 13 LHR
AIF - Honour Roll
AIF - HQ - 3rd Echelon
AIF - Marching Songs
AIF - Misc Topics
AIF - NZMRB
AIF - NZMRB - AMR
AIF - NZMRB - CMR
AIF - NZMRB - EFT
AIF - NZMRB - NZMFA
AIF - NZMRB - NZMGS
AIF - NZMRB - OMR
AIF - NZMRB - Sig-Trp
AIF - NZMRB - WMR
AIF - Ships
AIF - Ships - Encountr
AIF - Ships - Una
AIF - WFF
AIF - Wireless Sqn
Battles
BatzA - Australia
BatzA - Broken Hill
BatzA - Liverpool
BatzA - Merivale
BatzB - Boer War
BatzB - Bakenlaagte
BatzB - Belmont
BatzB - Bothaville
BatzB - Buffels Hoek
BatzB - Coetzees Drift
BatzB - Diamond Hill
BatzB - Driefontein
BatzB - Elands
BatzB - Graspan
BatzB - Grobelaar
BatzB - Grootvallier
BatzB - Hartebestfontn
BatzB - Houtnek
BatzB - Karee Siding
BatzB - Kimberley
BatzB - Koster River
BatzB - Leeuw Kop
BatzB - Mafeking
BatzB - Magersfontein
BatzB - Modder River
BatzB - Onverwacht
BatzB - Paardeberg
BatzB - Palmietfontein
BatzB - Pink Hill
BatzB - Poplar Grove
BatzB - Rhenoster
BatzB - Sannahs Post
BatzB - Slingersfontn
BatzB - Stinkhoutbm
BatzB - Sunnyside
BatzB - Wilmansrust
BatzB - Wolvekuil
BatzB - Zand River
BatzG - Gallipoli
BatzG - Anzac
BatzG - Aug 1915
BatzG - Baby 700
BatzG - Evacuation
BatzG - Hill 60
BatzG - Hill 971
BatzG - Krithia
BatzG - Lone Pine
BatzG - Nek
BatzJ - Jordan Valley
BatzJ - 1st Amman
BatzJ - 2nd Amman
BatzJ - Abu Tellul
BatzJ - Es Salt
BatzJ - JV Maps
BatzJ - Ziza
BatzM - Mespot
BatzM - Baghdad
BatzM - Ctesiphon
BatzM - Daur
BatzM - Kurna
BatzM - Kut el Amara
BatzM - Ramadi
BatzN - Naval
BatzN - AE1
BatzN - Cocos Is
BatzN - Heligoland
BatzN - Marmara
BatzN - Zeebrugge
BatzN - Zeppelin L43
BatzNG - Bitapaka
BatzO - Other
BatzO - Baku
BatzO - Egypt 1919
BatzO - Emptsa
BatzO - Karawaran
BatzO - Peitang
BatzO - Wassa
BatzP - Palestine
BatzP - 1st Gaza
BatzP - 2nd Gaza
BatzP - 3rd Gaza
BatzP - Aleppo
BatzP - Amwas
BatzP - Ayun Kara
BatzP - Bald Hill
BatzP - Balin
BatzP - Beersheba
BatzP - Berkusieh
BatzP - Damascus
BatzP - El Auja
BatzP - El Buggar
BatzP - El Burj
BatzP - Haifa
BatzP - Huj
BatzP - JB Yakub
BatzP - Kaukab
BatzP - Khan Kusseir
BatzP - Khuweilfe
BatzP - Kuneitra
BatzP - Megiddo
BatzP - Nablus
BatzP - Rafa
BatzP - Sasa
BatzP - Semakh
BatzP - Sheria
BatzP - Surafend
BatzP - Wadi Fara
BatzS - Sinai
BatzS - Bir el Abd
BatzS - El Arish
BatzS - El Mazar
BatzS - El Qatiya
BatzS - Jifjafa
BatzS - Magdhaba
BatzS - Maghara
BatzS - Romani
BatzS - Suez 1915
BatzSe - Senussi
BatzWF - Westn Front
BW - Boer War
BW - NSW
BW - NSW - 1ACH
BW - NSW - 1NSWMR
BW - NSW - 2NSWMR
BW - NSW - 3ACH
BW - NSW - 3NSWIB
BW - NSW - 3NSWMR
BW - NSW - 5ACH
BW - NSW - A Bty RAA
BW - NSW - AAMC
BW - NSW - Aust H
BW - NSW - Lancers
BW - NSW - NSW Inf
BW - NSW - NSWCBC
BW - NSW - NSWIB
BW - NSW - NSWMR_A
BW - NZ
BW - Qld
BW - Qld - 1ACH
BW - Qld - 1QMI
BW - Qld - 2QMI
BW - Qld - 3ACH
BW - Qld - 3QMI
BW - Qld - 4QIB
BW - Qld - 5QIB
BW - Qld - 6QIB
BW - Qld - 7ACH
BW - QLD - AAMC
BW - SA
BW - SA - 1SAMR
BW - SA - 2ACH
BW - SA - 2SAMR
BW - SA - 3SACB
BW - SA - 4ACH
BW - SA - 4SAIB
BW - SA - 5SAIB
BW - SA - 6SAIB
BW - SA - 8ACH
BW - SA - AAMC
BW - Tas
BW - Tas - 1ACH
BW - Tas - 1TIB
BW - Tas - 1TMI
BW - Tas - 2TB
BW - Tas - 2TIB
BW - Tas - 3ACH
BW - Tas - 8ACH
BW - Vic
BW - Vic - 1VMI
BW - Vic - 2ACH
BW - Vic - 2VMR
BW - Vic - 3VB
BW - Vic - 4ACH
BW - Vic - 4VIB
BW - Vic - 5VMR
BW - Vic - 6ACH
BW - Vic - AAMC
BW - Vic - Scot H
BW - WA
BW - WA - 1WAMI
BW - WA - 2ACH
BW - WA - 2WAMI
BW - WA - 3WAB
BW - WA - 4ACH
BW - WA - 4WAMI
BW - WA - 5WAMI
BW - WA - 6WAMI
BW - WA - 8ACH
BW Gen - Campaign
BW Gen - Soldiers
BW General
Cavalry - General
Diary - Schramm
Egypt - Heliopolis
Egypt - Mena
Gen - Ataturk Pk, CNB
Gen - Australia
Gen - Legends
Gen - Query Club
Gen - St - NSW
Gen - St - Qld
Gen - St - SA
Gen - St - Tas
Gen - St - Vic
Gen - St - WA
Gm - German Items
Gm - Bk - 605 MGC
GW - 11 Nov 1918
GW - Atrocities
GW - August 1914
GW - Biographies
GW - Propaganda
GW - Spies
GW - We forgot
Militia 1899-1920
Militia - Area Officers
Militia - Inf - Infantry
Militia - Inf - 1IB
Militia - Inf - 2IB
Militia - Inf - 3IB
Militia - Inf - NSW
Militia - Inf - Qld
Militia - Inf - SA
Militia - Inf - Tas
Militia - Inf - Vic
Militia - Inf - WA
Militia - K.E.Horse
Militia - LH
Militia - LH - Regts
Militia - LH - 1LHB
Militia - LH - 2LHB
Militia - LH - 3LHB
Militia - LH - 4LHB
Militia - LH - 5LHB
Militia - LH - 6LHB
Militia - LHN - NSW
Militia - LHN - 1/7/1
Militia - LHN - 2/9/6
Militia - LHN - 3/11/7
Militia - LHN - 4/6/16
Militia - LHN - 5/4/15
Militia - LHN - 6/5/12
Militia - LHN - 28
Militia - LHQ - Qld
Militia - LHQ - 13/2
Militia - LHQ - 14/3/11
Militia - LHQ - 15/1/5
Militia - LHQ - 27/14
Militia - LHS - SA
Militia - LHS - 16/22/3
Militia - LHS - 17/23/18
Militia - LHS - 24/9
Militia - LHT - Tas
Militia - LHT - 12/26
Militia - LHV - Vic
Militia - LHV - 7/15/20
Militia - LHV - 8/16/8
Militia - LHV - 9/19
Militia - LHV - 10/13
Militia - LHV - 11/20/4
Militia - LHV - 19/17
Militia - LHV - 29
Militia - LHW - WA
Militia - LHW-18/25/10
Militia - Military Orders
Militia - Misc
MilitiaRC - Rifle Clubs
MilitiaRC - NSW
MilitiaRC - NT
MilitiaRC - Qld
MilitiaRC - SA
MilitiaRC - Tas
MilitiaRC - Vic
MilitiaRC - WA
Militiaz - New Zealand
Tk - Turkish Items
Tk - Army
Tk - Bks - Books
Tk - Bks - 1/33IR
Tk - Bks - 27th IR
Tk - Bks - Air Force
Tk - Bks - Yildirim
Tk - POWs
Wp - Weapons
Wp - Hotchkiss Cav
Wp - Hotchkiss PMG
Blog Tools
Edit your Blog
Build a Blog
RSS Feed
View Profile
Open Community
Post to this Blog
Site Index
Education Centre
LH Militia
Boer War
Transport Ships
LH Battles
ALH - Units
ALH - General
Aboriginal Light H
Weapons
Ottoman Sources

"At a mile distant their thousand hooves were stuttering thunder, coming at a rate that frightened a man - they were an awe inspiring sight, galloping through the red haze - knee to knee and horse to horse - the dying sun glinting on bayonet points..." Trooper Ion Idriess

The Australian Light Horse Studies Centre aims to present an accurate history as chroniclers of early Australian military developments from 1899 to 1920.

The Australian Light Horse Studies Centre site holds over 12,000 entries and is growing daily.

Contact: Australian Light Horse Studies Centre

Let us hear your story: You can tell your story, make a comment or ask for help on our Australian Light Horse Studies Centre Forum called:

Desert Column Forum

WARNING: This site contains: names, information and images of deceased people; and, language which may be considered inappropriate today.

Tuesday, 17 March 2009
Zeppelin L43, North Sea, May 4, 1917
Topic: BatzN - Zeppelin L43

Zeppelin L43

North Sea, 4 May 1917


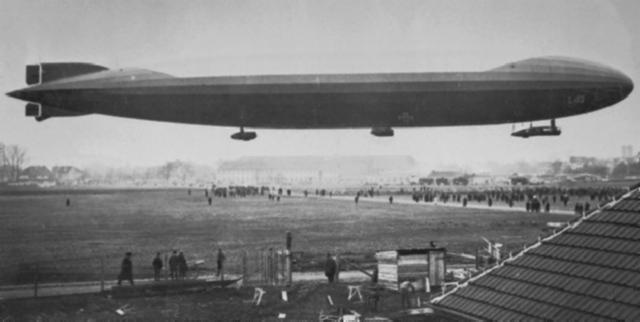
Crowds gather to watch the Zeppelin L43 land on a field.


North Sea, an unusual action fought on 4 May 1917 in waters south-east of Rosyth, Scotland, in which a British naval force of two light cruisers and four destroyers avoided numerous enemy submarines and bombing attacks mounted by the five engined Zeppelin L43, flagship of the German Naval Airship Division. The surface force under Captain John Dumaresq (an Australian serving in the Royal Navy), who commanded HMAS Sydney and was also second-in-command of the 2nd Light Cruiser Squadron, had been sent the previous day to sweep the channels between the mouths of the Forth and Humber estuaries.

Shortly after 10 a.m. a small vessel was sighted to the east of the course being steered by Dumaresq's ships, and a destroyer (Obdurate) detached to investigate this craft. At 10.25 an airship was spotted by the cruiser Dublin rapidly approaching from the east at a distance of about 27 kilometres. Both cruisers raced in the dirigible's direction and opened fire at extreme range. At this point Obdurate, having just reached the suspicious vessel, sighted two submarines-one of' which attacked her. The destroyer's captain responded by dropping several depth charges, but when he sighted the Zeppelin he, too, set off in pursuit of it. Before Obdurate had got within 6.5 kilometres, however, the German airship rose steeply and veered off to the south-east.


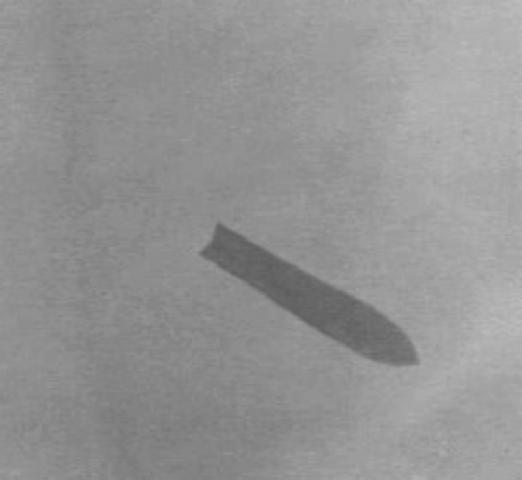
A remarkable photograph of the Zeppelin L43 attacking the HMAS Sydney.

[The photograph was taken by Able Seaman G Leahy, who lay on his back while HMAS Sydney was being bombed, 4 May 1917.]


Between 10.50 and 11.20 a.m. Dublin made three submarine sightings, and twice saw torpedo tracks indicating that she had been the target of unsuccessful attacks. Dumaresq, concluding that he was being lured into a prepared killing ground for enemy submarines, instructed Obdurate to finish checking the identity of the suspect vessel first sighted (which turned out to be an innocent Dutch fishing boat) while ordering his force to resume its original course. The sight of the British warships apparently retreating prompted the German airship to resume stalking them. Soon after midday Dumaresq ordered both cruisers to turn back on their course so as to engage the Zeppelin at a range of about 6,400 metres. This manoeuvre goaded the airship's captain into making a direct but high-level attack on the force.

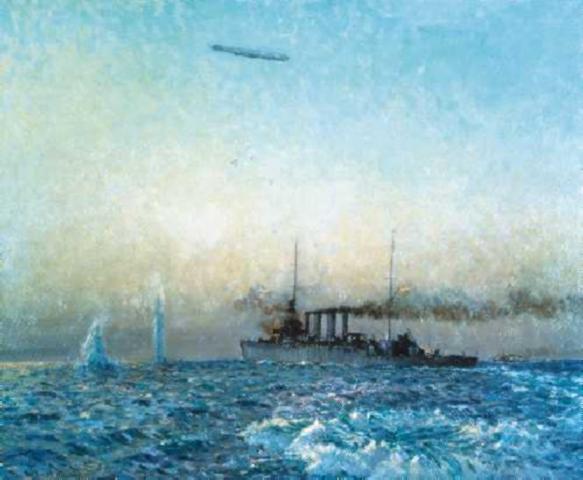
The Zeppelin moved first against Dublin but its efforts to gain a bomb-dropping position were frustrated by the cruiser swerving sharply to starboard. An attempt to close on Obdurate was more successful and three bombs landed within ten metres of the destroyer, flinging shrapnel splinters onto her decks. Twenty minutes later L43 overflew the wildly zigzagging Sidney and dropped ten or twelve bombs, six of these in two salvos, but without scoring any hits. The warships were equally unsuccessful in hitting the airship with their high-angle guns, Dublin firing off 90 rounds and Sydney 69 rounds. Eventually both cruisers had expended their anti-aircraft ammunition, and L43 all its bombs, which brought the engagement to a fruitless end at about 2.30 p.m. During the last stage of the action the German captain apparently sought to summon another airship to his assistance, and in fact a second Zeppelin was sighted in the far distance to the north-east shortly before 1 p.m., but in the event did not approach and join in.


Charles Bryant's 1931 painting depicting the HMAS Sydney a the fight with Zeppelin L43 in the North Sea.


Extracted from the book produced by Chris Coulthard-Clark, Where Australians Fought - The Encyclopaedia of Australia's Battles, Allen and Unwin, Sydney, 1998, pp. 128-129.


Additional References cited by Chris Coulthard-Clark:

Arthur W . Jose, ( 1928), The Royal Australian Navy 1914-1918, Sydney: Angus & Robertson.


Further Reading:

Battles where Australians fought, 1899-1920


Citation: Zeppelin L43, North Sea, May 4, 1917

Posted by Project Leader at 11:01 PM EADT
Updated: Tuesday, 14 April 2009 11:32 PM EADT
Belmont, South Africa, November 23, 1899
Topic: BatzB - Belmont

Belmont

South Africa, 23 November 1899


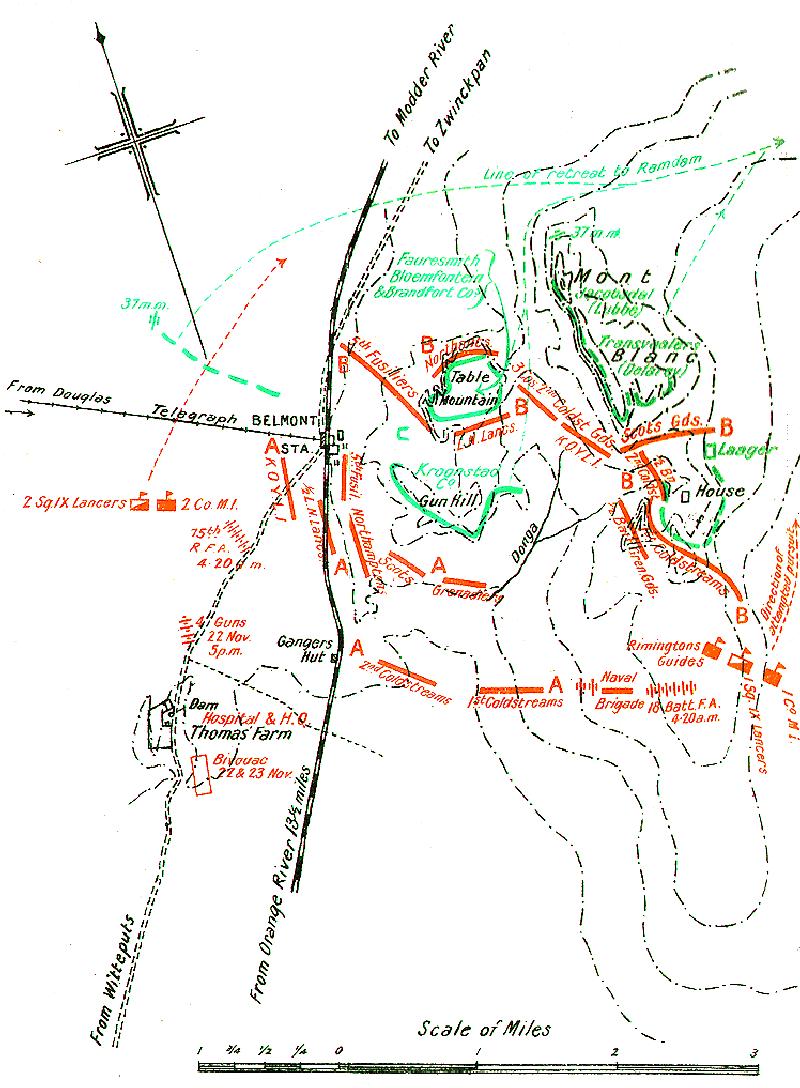
Map showing the battle of Belmont, 23 November 1899
 
[From: The Times History of the War in South Africa, II, London, 1902, facing p. 330.]


Belmont, a railway station in Cape Colony close to the western border of the Orange Free State, was the scene of an action fought on 23 November 1899 (in the opening stages of the Second South African or Boer War) between British troops under Lieut.-General Lord Methuen and a Boer force attempting to frustrate efforts to relieve the besieged diamond-producing town of Kimberley, 90 kilometres to the north. When Methuen marched out from the Orange River on 21 November, he had about 8,500 men and sixteen guns. Mounted patrols informed him that some 2,000 Boers were entrenched 30 kilometres ahead, atop a range of kopjes (small hills) dominating Belmont station from the east.

In response to this information, the next day Methuen marched his infantry to a farm situated about three kilometres to the south of the station and west of' the railway line. From here, he began reconnoitring the enemy position in preparation for an attack to sweep aside this blocking force. Among the mounted troops engaged in this effort was a small group of 29 members of the New South Wales Lancer Regiment under Lieut. S.F. Osborne, part of an advance element of 72 men on this unit which had arrived at Cape Town on 2 November. The remainder of the New South Wales contingent had been sent to sense with forces in the Colesberg area under Major-General john Drench, but Osborne's troop had been attached to tile 9th Lancers - which comprised the main element of, Methuen's limited force of cavalry - and while carrying out patrols became tile first Australian troop to come under fire during the Boer War.

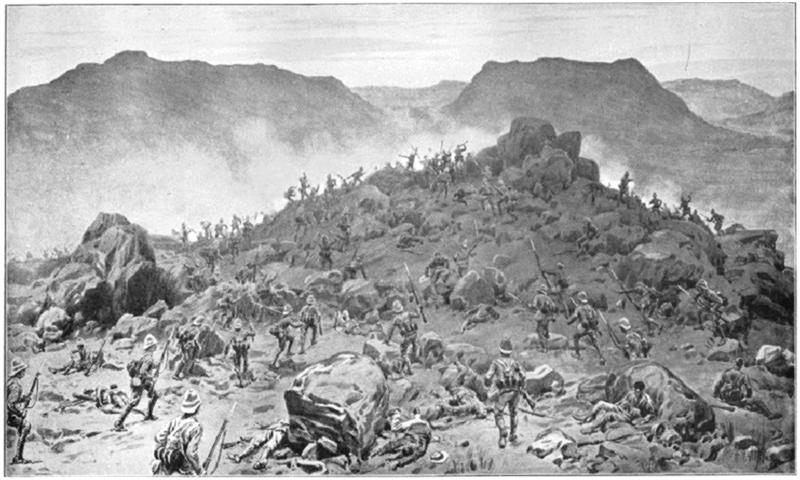
Based on the information available to him Methuen decided to attack on 23 November and began moving his troops across the Great Karoo plain towards the enemy positions at 2 a.m., in preparation for an assault at first light. The ground held by the Boers was inherently strong for defence, comprising a succession of rocky ridges rising from 30 to 75 metres above the level of the surrounding plain. About 2,000 Boers were waiting in well-placed stone breastworks on each crest, supported by five guns. At about 4 a.m. the advancing British troops came under heavy fire and the fighting soon extended across an area of thirteen square kilometres.

The engagement ended with the Boers breaking off at about 7.30 a.m. and making an orderly retreat across the open veldt. About 70 were left behind as prisoners, 24 of whom were wounded; other Boer casualties were unknown, but reckoned at about 100 killed. Methuen was unable to disrupt the enemy withdrawal, both because the 900 cavalry and mounted infantry which he had was insufficient to mount a pursuit and also because the horses of his mounted units were too exhausted from their work prior to the battle. For this victory, his force had suffered 295 casualties (75 of whom were killed) the worst loss occurring among the Grenadier Guards, which lost 22 killed and 114 wounded; among the dead was Private Henry Schultze, a native of St Arnaud, Victoria, who had enlisted in this regular British regiment.


THE BATTLE OF BELMONT, 23rd November 1899—BAYONET ATTACK BY THE SCOTS AND GRENADIER GUARDS.

[Drawing by Frank Dodd, R.I.]


Extracted from the book produced by Chris Coulthard-Clark, Where Australians Fought - The Encyclopaedia of Australia's Battles, Allen and Unwin, Sydney, 1998, pp. 57-58.


Additional References cited by Chris Coulthard-Clark:

W. Baring Pemberton (1964) Battles of the Boer War, London.

B.T. Batsford; and, R. L. Wallace (1976) The Australians at the Boer War. Canberra: Australian War Memorial & Australian Government Publishing Service.


Further Reading:

507 Trooper Frederick Avard

The Fighting 28

Boer War - Battle of Belmont

Battles where Australians fought, 1899-1920


Citation: Belmont, South Africa, November 23, 1899

Posted by Project Leader at 11:01 PM EADT
Updated: Thursday, 2 April 2009 10:33 AM EADT
Mafeking, South Africa, May 17, 1900
Topic: BatzB - Mafeking

Mafeking

South Africa, 17 May 1900


Mafeking, an action during the Second South African war, resulting in the lifting of the Boer siege of this town in north-western Cape Colony, opposite the western border of the Transvaal, on 17 May 1900. The town, defended by about 1,000 men under Lieut.-Colonel Robert Baden-Powell, had been invested by 5,000 Boers since 14 October 1899. The enemy's grip was finally broken when a flying column of cavalry and mounted infantry under Colonel Bryan Mahon covered the 380 kilometres north from the Vaal River in twelve days, riding past Boer forces to link up with another small force which had pushed south from Rhodesia to operate beyond the encircling Boer lines for the previous two months.

On 14 May the latter column, commanded by Colonel Henry Plumer, was reinforced at Sefetili by a battery of Canadian artillery which arrived after a forced march from Beira, escorted by 100 members of the 3rd Queensland Mounted Infantry (Bushmen) under Captain Charles Kellie. The next day Plumer's column was joined by Mahon at Jan Massibi's kraal (fenced enclosure), 32 kilometres west of Mafeking, and on 16 May this combined relief force met and defeated an opposing force of 2,000 Boers in a five-hour action near the Molopo River, north-west of the town. For most of this day's fighting the QMI men remained in the rear, having been assigned the unglamorous job of guarding the supply wagons. Late in the day, however, when the infantry was sent to clear the enemy from trenches near a farmhouse with the bayonet, they refused to be so constrained and-in defiance of their orders-joined in the assault.

As the British troops rose in extended order to make their final dash to the enemy lines 400 metres off', they heard fiendish yells like the sounds of a band of Red Indians from behind and bound the Queenslanders running alongside them as they completed the remaining distance. Although a stirring exhibition of brave spirit, the Australian Bushmen's wild rush had also been an act of folly. Whereas the British troops had been carefully advancing in bounds, making maximum use of cover, the Queenslanders had thrown caution to the winds and would have suffered accordingly if they had been attacking a more disciplined foe.

Losses in this action were minor on both sides (the British suffering seven killed and 24 wounded, the Boers reportedly one-third that total), but the victors were too exhausted to attempt a pursuit and bivouacked where they were. Later that night, after word arrived from the town that negligible enemy opposition remained to bar their progress, a party of volunteers was assembled and made a dash for Mafeking - only eight kilometres away - in advance of the main column. By 3.30 a.m. on 17 May the seven-month siege was broken, the task of relieving the town being completed at daybreak when the Boers were shelled out of their main camp with the loss of some wagons and a 9-pounder gun. News that Mafeking had been liberated prompted scenes of jubilation across the British empire.


Extracted from the book produced by Chris Coulthard-Clark, Where Australians Fought - The Encyclopaedia of Australia's Battles, Allen and Unwin, Sydney, 1998, p. 78.


Additional References cited by Chris Coulthard-Clark:

James Green (1903) The Story of the Australian Bushmen, Sydney: William Brooks & Co.

L.S. Amery, (ed.) The Times History of the War in South Africa 1899-1902, Vol. 4 (1906), London: Sampson Low, Marston & Co.

R.L. Wallace (1976) The Australians at the Boer War, Canberra: Australian War Memorial & Australian Government Publishing Service.


Further Reading:

Battles where Australians fought, 1899-1920


Citation: Mafeking, South Africa, May 17, 1900

Posted by Project Leader at 11:01 PM EADT
Updated: Sunday, 5 April 2009 4:45 PM EADT
Australian Light Horse Order of Battle
Topic: AIF - DMC - Or Bat

Australian Light Horse

Order of Battle


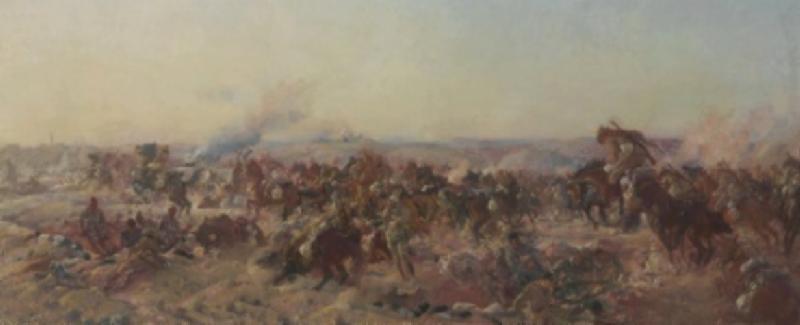
The Charge at Beersheba painting by George Lambert


During the Middle East Campaign from 1916 to 1918, the Australian Light Horse evolved to meet the challenges presented by circumstances and combat. The first division that was formed containing the Australian Light Horse was the Anzac [Australian and New Zealand] Mounted Division created in April 1916. Initially it was anticipated that the mounted formations would embark for service in France until the General Officer Commanding the Egyptian forces, General Murray interceded to keep them in Egypt. Consequently only the 13th Light Horse Regiment and the 4th Light Horse Regiment “B” Squadron embarked for France. The remainder were formed into the Anzac Mounted Division.

The table below maps the transformation of this initial division as it was split into two divisions and the changes that occurred until the end of 1918. Each unit that formed part of the divisions is mapped on a linear basis. Where blank spaces occur, the unit that originally occupied the cell was no longer part of the division.

 
April 1916    
Division Brigade Regiment
Australian and New Zealand  Mounted Division    
Australian and New Zealand  Mounted Division Artillery    
  British 3rd (Territorial Force) Horse Artillery Brigade [8 x 18 pounders]  
    British Leicester Battery
    British Somerset Battery
  British 3rd Horse Artillery Brigade Ammunition Column  
  British 4th (Territorial Force) Horse Artillery Brigade [8 x 18 pounders]  
    British Inverness Battery
    British Ayr Battery
  British 4th Horse Artillery Brigade Ammunition Column  
Anzac Mounted Division Engineers    
  Anzac Field Squadron  
  Anzac Signal Squadron  
Anzac Mounted Division Medical Services    
  1st Light Horse Field Ambulance  
  2nd Light Horse Field Ambulance  
  3rd Light Horse Field Ambulance  
  New Zealand Mounted Field Ambulance  
     
     
  1st Light Horse Brigade  
    1st Light Horse Regiment
    2nd Light Horse Regiment
    3rd Light Horse Regiment
     
  1st Signal Troop  
  2nd Light Horse Brigade  
    5th Light Horse Regiment
    6th Light Horse Regiment
    7th Light Horse Regiment
     
  2nd Signal Troop  
  3rd Light Horse Brigade  
    8th Light Horse Regiment
    9th Light Horse Regiment
    10th Light Horse Regiment
  3rd Signal Troop  
  New Zealand Mounted Rifles Brigade  
    New Zealand Auckland Mounted Rifles  
    New Zealand Canterbury, Wellington Mounted Rifles
    New Zealand Wellington Mounted Rifles  
     
  New Zealand Mounted Rifles Signal Troop  


Anzac Mounted Division Train    
  1st Supply Section  
  2nd Supply Section  
  3rd Supply Section  
  New Zealand Mounted Rifles Supply Section  
     
Anzac Mounted Division Veterinary Services    
  6th Mobile Veterinary Section  
  7th Mobile Veterinary Section  
  8th Mobile Veterinary Section  
  New Zealand 2nd Mobile Veterinary Section  
 
February 1917    
Division Brigade Regiment
Australian and New Zealand  Mounted Division    
Australian and New Zealand Mounted Division Horse Artillery    
  British 3rd (Territorial Force) Horse Artillery Brigade [8 x 18 pounders]  
    British Leicester Battery
    British Somerset Battery
  British 3rd Horse Artillery Brigade Ammunition Column  
  British 4th (Territorial Force) Horse Artillery Brigade [8 x 18 pounders]  
    British Inverness Battery
    British Ayr Battery
  British 4th Horse Artillery Brigade Ammunition Column  
Anzac Mounted Division Engineers    
  Anzac Field Squadron  
  Anzac Signal Squadron  
Anzac Mounted Division Medical Services    
  1st Light Horse Field Ambulance  
  2nd Light Horse Field Ambulance  
     
  New Zealand Mounted Field Ambulance  
  British 22nd Mounted Field Ambulance  
7th Sanitary Section    
  1st Light Horse Brigade  
    1st Light Horse Regiment
    2nd Light Horse Regiment
    3rd Light Horse Regiment
  1st Machinegun Squadron [12 x Vickers machine guns]  
  1st Signal Troop  
  2nd Light Horse Brigade  
    5th Light Horse Regiment
    6th Light Horse Regiment
    7th Light Horse Regiment
  2nd Machinegun Squadron [12 x Vickers machine guns]  
  2nd Signal Troop  


  New Zealand Mounted Rifles Brigade  
    New Zealand Auckland Mounted Rifles  
    New Zealand Canterbury, Wellington Mounted Rifles
    New Zealand Wellington Mounted Rifles  
  New Zealand 1st Machinegun Squadron [12 x Vickers machine guns]  
  New Zealand Mounted Rifles Signal Troop  
  British 22nd Mounted Brigade  
    British 1/1 Staffordshire Yeomanry
    British 1/1 Lincoln Yeomanry
    British 1/1 East Riding Yeomanry
  British 18th Machinegun Squadron [12 x Vickers machine guns]  
  British 22nd Mounted Brigade Signal Troop  
Anzac Mounted Division Train    
  1st Supply Section  
  2nd Supply Section  
     
  New Zealand Mounted Rifles Supply Section  
  26th Depot Unit of Supply  
Anzac Mounted Division Veterinary Services    
  6th Mobile Veterinary Section  
  7th Mobile Veterinary Section  
     
  New Zealand 2nd Mobile Veterinary Section  
     
Imperial Mounted Division    
Imperial Mounted Division Artillery    
  British 19th Horse Artillery Brigade [16 x 18 pounders]  
    1/1 Nottingham Battery
    1/1 Berkshire Battery
    A Battery, Honourable Artillery Company
    B Battery, Honourable Artillery Company
    British 19th Horse Artillery Brigade Ammunition Column
Imperial Mounted Division Engineers    
  Imperial Field Squadron Engineers  
    3rd Field Troop
    4th Field Troop
    British 6th Field Troop
    British 7th Field Troop
  Imperial Signal Squadron  
Imperial Mounted Division Medical Services    
  3rd Light Horse Field Ambulance  
  4th Light Horse Field Ambulance  
     
  British 1/1 South Midlands Mounted Brigade Field Ambulance  
  British 1/2 South Midlands Mounted Brigade Field Ambulance  
8th Sanitary Section    
  3rd Light Horse Brigade  
    8th Light Horse Regiment
    9th Light Horse Regiment
    10th Light Horse Regiment
  3rd Machinegun Squadron [12 x Vickers machine guns]  
  3rd Signal Troop  
  4th Light Horse Brigade  
    4th Light Horse Regiment
    11th Light Horse Regiment
    12th Light Horse Regiment
  4th Machinegun Squadron [12 x Vickers machine guns]  
  4th Signal Troop  


  British 5th Mounted Brigade  
    1/1 Warwickshire Yeomanry
    1/1 Gloucester Hussars
    1/1 Worcestershire Yeomanry
  British 16th Machinegun Squadron [12 x Vickers machine guns]  
  British 6th Mounted Brigade  
    1/1 Royal Buckinghamshire Hussars
    1/1 Queens Own Dorsetshire Yeomanry
    1/1 Berkshire Yeomanry
  British 17th Machinegun Squadron [Vickers machine guns]  
Imperial Mounted Division Train    
  3rd Supply Section  
  4th Supply Section  
     
     
  27th Depot Unit of Supply  
Imperial Mounted Division Veterinary Services    
  8th Mobile Veterinary Section  
  9th Mobile Veterinary Section  
  British 3/1 South Midlands Mobile Veterinary Section  
  British 4/1 South Midlands Mobile Veterinary Section  
 
August 1917    
Division Brigade Regiment
Australian and New Zealand  Mounted Division    
Australian and New Zealand Mounted Division Horse Artillery    
  British 3rd (Territorial Force) Horse Artillery Brigade [8 x 18 pounders]  
    British Leicester Battery
    British Somerset Battery
  British 3rd Horse Artillery Brigade Ammunition Column  
  British 4th (Territorial Force) Horse Artillery Brigade [8 x 18 pounders]  
    British Inverness Battery
    British Ayr Battery
  British 4th Horse Artillery Brigade Ammunition Column  
Anzac Mounted Division Engineers    
  Anzac Field Squadron  
  Anzac Signal Squadron  
Anzac Mounted Division Medical Services    
  1st Light Horse Field Ambulance  
  2nd Light Horse Field Ambulance  
     
  New Zealand Mounted Field Ambulance  
  British 22nd Mounted Field Ambulance  
7th Sanitary Section    
  1st Light Horse Brigade  
    1st Light Horse Regiment
    2nd Light Horse Regiment
    3rd Light Horse Regiment
  1st Machinegun Squadron [12 x Vickers machine guns]  
  1st Signal Troop  
  2nd Light Horse Brigade  
    5th Light Horse Regiment
    6th Light Horse Regiment
    7th Light Horse Regiment
  2nd Machinegun Squadron [12 x Vickers machine guns]  
  2nd Signal Troop  


  New Zealand Mounted Rifles Brigade  
    New Zealand Auckland Mounted Rifles  
    New Zealand Canterbury, Wellington Mounted Rifles
    New Zealand Wellington Mounted Rifles  
  New Zealand 1st Machinegun Squadron [12 x Vickers machine guns]  
  New Zealand Mounted Rifles Signal Troop  
  British 22nd Mounted Brigade  
    British 1/1 Staffordshire Yeomanry
    British 1/1 Lincoln Yeomanry
    British 1/1 East Riding Yeomanry
  British 18th Machinegun Squadron [12 x Vickers machine guns]  
  British 22nd Mounted Brigade Signal Troop  
Anzac Mounted Division Train    
  1st Supply Section  
  2nd Supply Section  
     
  New Zealand Mounted Rifles Supply Section  
  26th Depot Unit of Supply  
Anzac Mounted Division Veterinary Services    
  6th Mobile Veterinary Section  
  7th Mobile Veterinary Section  
     
  New Zealand 2nd Mobile Veterinary Section  
     
Australian Mounted Division    
Australian Mounted Division Artillery    
  British 19th Horse Artillery Brigade [18 x 18 pounders]  
    1/1 Nottingham Battery
     
    A Battery, Honourable Artillery Company
    B Battery, Honourable Artillery Company
    British 19th Horse Artillery Brigade Ammunition Column
Australian Mounted Division Engineers    
  2nd Field Squadron  
    3rd Field Troop
    4th Field Troop
     
     
  2nd Signal Squadron  
Australian Mounted Division Medical Services    
  3rd Light Horse Field Ambulance  
  4th Light Horse Field Ambulance  
     
  British 1/1 South Midlands Mounted Brigade Field Ambulance  
     
8th Sanitary Section    
  3rd Light Horse Brigade  
    8th Light Horse Regiment
    9th Light Horse Regiment
    10th Light Horse Regiment
  3rd Machinegun Squadron [12 x Vickers machine guns]  
  3rd Signal Troop  
  4th Light Horse Brigade  
    4th Light Horse Regiment
    11th Light Horse Regiment
    12th Light Horse Regiment
  4th Machinegun Squadron [12 x Vickers machine guns]  
  4th Signal Troop  


  British 5th Mounted Brigade  
    1/1 Warwickshire Yeomanry
    1/1 Gloucester Hussars
    1/1 Worcestershire Yeomanry
  British 16th Machinegun Squadron [12 x Vickers machine guns]  
  British 6th Signal Troop  


Australian Mounted Division Train    
  35th Australian Army Service Corps Company  
  36th Australian Army Service Corps Company  
  37th Australian Army Service Corps Company  
  38th Australian Army Service Corps Company  
  27th Depot Unit of Supply  
Australian Mounted Division Veterinary Services    
  8th Mobile Veterinary Section  
  9th Mobile Veterinary Section  
  British 3/1 South Midlands Mobile Veterinary Section  
     
 
February 1918    
Division Brigade Regiment
Australian and New Zealand  Mounted Division    
Anzac Mounted Division Artillery    
  British 18th Horse Artillery Brigade [18 x 13 pounders]  
     
    British Somerset Battery
     
     
    British Inverness Battery
    British Ayr Battery
  British 18th Horse Artillery Brigade Ammunition Column  
Anzac Mounted Division Engineers    
  1st Field Squadron  
  1st Signal Squadron  
Anzac Mounted Division Medical Services    
  1st Light Horse Field Ambulance  
  2nd Light Horse Field Ambulance  
     
  New Zealand Mounted Field Ambulance  
     
7th Sanitary Section    
  1st Light Horse Brigade  
    1st Light Horse Regiment
    2nd Light Horse Regiment
    3rd Light Horse Regiment
  1st Machinegun Squadron [12 x Vickers machine guns]  
  1st Signal Troop  
  2nd Light Horse Brigade  
    5th Light Horse Regiment
    6th Light Horse Regiment
    7th Light Horse Regiment
  2nd Machinegun Squadron [12 x Vickers machine guns]  
  2nd Signal Troop  


  New Zealand Mounted Rifles Brigade  
    New Zealand Auckland Mounted Rifles  
    New Zealand Canterbury, Wellington Mounted Rifles
    New Zealand Wellington Mounted Rifles  
  New Zealand 1st Machinegun Squadron [12 x Vickers machine guns]  
  New Zealand Mounted Rifles Signal Troop  


Anzac Mounted Division Train    
  32nd Australian Army Service Corps Company  
  33rd Australian Army Service Corps Company  
  34th Australian Army Service Corps Company  
  5th New Zealand Army Service Corps Company  
  26th Depot Unit of Supply  
Anzac Mounted Division Veterinary Services    
  6th Mobile Veterinary Section  
  7th Mobile Veterinary Section  
     
  New Zealand 2nd Mobile Veterinary Section  
     
Australian Mounted Division    
Australian Mounted Division Artillery    
  British 19th Horse Artillery Brigade [18 x 18 pounders]  
    1/1 Nottingham Battery
     
    A Battery, Honourable Artillery Company
    B Battery, Honourable Artillery Company
    British 19th Horse Artillery Brigade Ammunition Column
Australian Mounted Division Engineers    
  2nd Field Squadron  
    3rd Field Troop
    4th Field Troop
     
     
  2nd Signal Squadron  
Australian Mounted Division Medical Services    
  3rd Light Horse Field Ambulance  
  4th Light Horse Field Ambulance  
     
  British 1/1 South Midlands Mounted Brigade Field Ambulance  
     
8th Sanitary Section    
  3rd Light Horse Brigade  
    8th Light Horse Regiment
    9th Light Horse Regiment
    10th Light Horse Regiment
  3rd Machinegun Squadron [12 x Vickers machine guns]  
  3rd Signal Troop  
  4th Light Horse Brigade  
    4th Light Horse Regiment
    11th Light Horse Regiment
    12th Light Horse Regiment
  4th Machinegun Squadron [12 x Vickers machine guns]  
  4th Signal Troop  


  British 5th Mounted Brigade  
    1/1 Warwickshire Yeomanry
    1/1 Gloucester Hussars
    1/1 Worcestershire Yeomanry
  British 16th Machinegun Squadron [12 x Vickers machine guns]  
  British 6th Signal Troop  


Australian Mounted Division Train    
  35th Australian Army Service Corps Company  
  36th Australian Army Service Corps Company  
  37th Australian Army Service Corps Company  
  38th Australian Army Service Corps Company  
  27th Depot Unit of Supply  
Australian Mounted Division Veterinary Services    
  8th Mobile Veterinary Section  
  9th Mobile Veterinary Section  
  British 3/1 South Midlands Mobile Veterinary Section  
     
 
July 1918    
Division Brigade Regiment
Australian and New Zealand  Mounted Division    
Anzac Mounted Division Artillery    
  British 18th Horse Artillery Brigade [18 x 13 pounders]  
     
    British Somerset Battery
     
     
    British Inverness Battery
    British Ayr Battery
  British 18th Horse Artillery Brigade Ammunition Column  
Anzac Mounted Division Engineers    
  1st Field Squadron  
  1st Signal Squadron  
Anzac Mounted Division Medical Services    
  1st Light Horse Field Ambulance  
  2nd Light Horse Field Ambulance  
     
  New Zealand Mounted Field Ambulance  
     
7th Sanitary Section    
  1st Light Horse Brigade  
    1st Light Horse Regiment
    2nd Light Horse Regiment
    3rd Light Horse Regiment
  1st Machinegun Squadron [12 x Vickers machine guns]  
  1st Signal Troop  
  2nd Light Horse Brigade  
    5th Light Horse Regiment
    6th Light Horse Regiment
    7th Light Horse Regiment
  2nd Machinegun Squadron [12 x Vickers machine guns]  
  2nd Signal Troop  


  New Zealand Mounted Rifles Brigade  
    New Zealand Auckland Mounted Rifles  
    New Zealand Canterbury, Wellington Mounted Rifles
    New Zealand Wellington Mounted Rifles  
  New Zealand 1st Machinegun Squadron [12 x Vickers machine guns]  
  New Zealand Mounted Rifles Signal Troop  


Anzac Mounted Division Train    
  32nd Australian Army Service Corps Company  
  33rd Australian Army Service Corps Company  
  34th Australian Army Service Corps Company  
  5th New Zealand Army Service Corps Company  
  26th Depot Unit of Supply  
Anzac Mounted Division Veterinary Services    
  6th Mobile Veterinary Section  
  7th Mobile Veterinary Section  
     
  New Zealand 2nd Mobile Veterinary Section  
     
Australian Mounted Division    
Australian Mounted Division Artillery    
  British 19th Horse Artillery Brigade [18 x 18 pounders]  
    1/1 Nottingham Battery
     
    A Battery, Honourable Artillery Company
    B Battery, Honourable Artillery Company
    British 19th Horse Artillery Brigade Ammunition Column
Australian Mounted Division Engineers    
  2nd Field Squadron  
    3rd Field Troop
    4th Field Troop
     
     
  2nd Signal Squadron  
Australian Mounted Division Medical Services    
  3rd Light Horse Field Ambulance  
  4th Light Horse Field Ambulance  
  5th Light Horse Field Ambulance  
     
     
8th Sanitary Section    
  3rd Light Horse Brigade  
    8th Light Horse Regiment
    9th Light Horse Regiment
    10th Light Horse Regiment
  3rd Machinegun Squadron [12 x Vickers machine guns]  
  3rd Signal Troop  
  4th Light Horse Brigade  
    4th Light Horse Regiment
    11th Light Horse Regiment
    12th Light Horse Regiment
  4th Machinegun Squadron [12 x Vickers machine guns]  
  4th Signal Troop  
  5th Light Horse Brigade  
    14th Light Horse Regiment
    15th Light Horse Regiment
    French 1er Regiment Mixte de Cavalerie Du Lavant
  New Zealand 2nd Machine Gun Squadron [12 x Vickers machine guns]  
  5th Signal Troop  


Australian Mounted Division Train    
  35th Australian Army Service Corps Company  
  36th Australian Army Service Corps Company  
  37th Australian Army Service Corps Company  
  38th Australian Army Service Corps Company  
  27th Depot Unit of Supply  
Australian Mounted Division Veterinary Services    
  8th Mobile Veterinary Section  
  9th Mobile Veterinary Section  
  10th Mobile Veterinary Section  


Further Reading:

Australian Light Horse Order of Battle - Outline 

The Australian Light Horse - Structure


Citation: Australian Light Horse Order of Battle


Posted by Project Leader at 11:01 PM EADT
Updated: Monday, 30 March 2009 4:46 PM EADT
Baghdad, Mesopatomia, March 11, 1917
Topic: BatzM - Baghdad


Baghdad

Mesopotamia, 11 March 1917

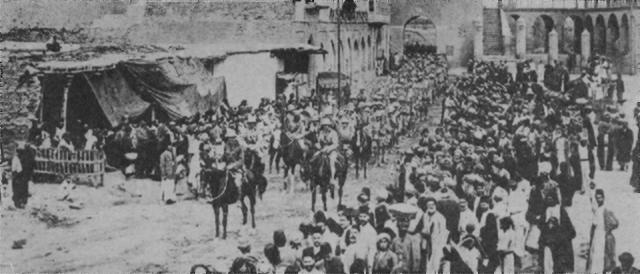
British troops enter Baghdad.


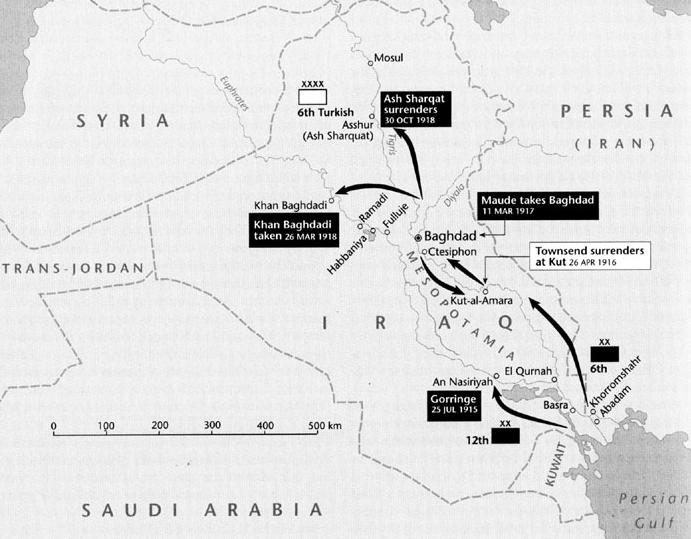
Baghdad, the action in Mesopotamia (present day Iraq) which resulted in the capture of this city from the Turks by British forces under Lieut.-General Sir Stanley Maude on I1 March 1917. On 5 March Maude advanced from Aziziyeh, on the Tigris River 80 kilometres south-east of Baghdad, with his two Army Corps (each of two infantry divisions) and an Indian cavalry division of two brigades. Strong Turkish resistance was encountered at the Diala River, which flowed into the Tigris from the north-east, but by 10 March the British had bridged that obstacle, whereupon the enemy abandoned the city and enabled its occupation the next day.


Mesopotamia campaign.


Australian involvement in this operation was as members of the 1st (Anzac) Wireless Signal Squadron, a unit then two-thirds Australian and one-third from New Zealand. The squadron provided twelve mobile transmitting stations throughout the force, and during the march into Baghdad those operating with the cavalry were among the first troops into the city. Over the next few days two Anzac stations continued to provide Maude's primary communications hack to Basra, the main British base on the Persian Gulf.


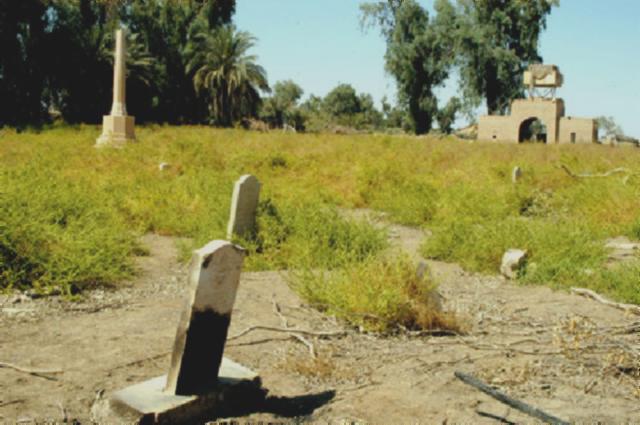
After years of neglect and antipathy, a British War Cemetery in Baghdad.


Extracted from the book produced by Chris Coulthard-Clark, Where Australians Fought - The Encyclopaedia of Australia's Battles, Allen and Unwin, Sydney, 1998, pp. 122-123.


Additional References cited by Chris Coulthard-Clark:

Keast Burke (ed.), (1927), With Horse and Morse in Mesopotamia, Sydney: A&NZ Wireless Signal Squadron History Committee.


Further Reading:

Battles where Australians fought, 1899-1920


Citation: Baghdad, Mesopotamia, March 11, 1917

Posted by Project Leader at 11:01 PM EADT
Updated: Sunday, 5 April 2009 12:58 PM EADT

Newer | Latest | Older

Full Site Index


powered by FreeFind
Let us hear your story: You can tell your story, make a comment or ask for help on our forum.

Desert Column Forum

A note on copyright

The Australian Light Horse Studies Centre is a not for profit and non profit group whose sole aim is to write the early history of the Australian Light Horse from 1900 - 1920. It is privately funded and the information is provided by the individuals within the group and while permission for the use of the material has been given for this site for these items by various donors, the residual and actual copyright for these items, should there be any, resides exclusively with the donors. The information on this site is freely available for private research use only and if used as such, should be appropriately acknowledged. To assist in this process, each item has a citation attached at the bottom for referencing purposes.

Please Note: No express or implied permission is given for commercial use of the information contained within this site.

A note to copyright holders

The Australian Light Horse Studies Centre has made every endeavour to contact copyright holders of material digitised for this blog and website and where appropriate, permission is still being sought for these items. Where replies were not received, or where the copyright owner has not been able to be traced, or where the permission is still being sought, the Australian Light Horse Studies Centre has decided, in good faith, to proceed with digitisation and publication. Australian Light Horse Studies Centre would be happy to hear from copyright owners at any time to discuss usage of this item.

Contact

Australian Light Horse Studies Centre

eXTReMe Tracker