« March 2009 »
S M T W T F S
1 2 3 4 5 6 7
8 9 10 11 12 13 14
15 16 17 18 19 20 21
22 23 24 25 26 27 28
29 30 31
You are not logged in. Log in


Search the site:


powered by FreeFind
Volunteer with us.

Entries by Topic All topics  
A Latest Site News
A - Using the Site
AAA Volunteers
AAB-Education Centre
AAC-Film Clips
AAC-Photo Albums
AIF & MEF & EEF
AIF - Lighthorse
AIF - ALH - A to Z
AIF - DMC
AIF - DMC - Or Bat
AIF - DMC - Anzac MD
AIF - DMC - Aus MD
AIF - DMC - British
AIF - DMC - BWI
AIF - DMC - French
AIF - DMC - Indian
AIF - DMC - Italian
AIF - DMC - Medical
AIF - DMC - Remounts
AIF - DMC - Scouts
AIF - DMC - Sigs
AIF - DMC - Sigs AirlnS
AIF - DMC - 1 Sig Sqn
AIF - DMC - 2 Sig Sqn
AIF - DMC - Eng
AIF - DMC - Eng 1FSE
AIF - DMC - Eng 2FSE
AIF - DMC - GSR
AIF - 1B - 1 LHB
AIF - 1B - 6 MVS
AIF - 1B - 1 LHMGS
AIF - 1B - 1 Sig Trp
AIF - 1B - 1 LHFA
AIF - 1B - 1 LHR
AIF - 1B - 2 LHR
AIF - 1B - 3 LHR
AIF - 2B - 2 LHB
AIF - 2B - 7 MVS
AIF - 2B - 2 LHFA
AIF - 2B - 2 LHMGS
AIF - 2B - 2 Sig Trp
AIF - 2B - 5 LHR
AIF - 2B - 6 LHR
AIF - 2B - 7 LHR
AIF - 3B - 3 LHB
AIF - 3B - 8 MVS
AIF - 3B - 3 LHB Sigs
AIF - 3B - 3 LHFA
AIF - 3B - 3 LHMGS
AIF - 3B - 3 Sig Trp
AIF - 3B - 8 LHR
AIF - 3B - 9 LHR
AIF - 3B - 10 LHR
AIF - 4B - 4 LHB
AIF - 4B - 4 Sig Trp
AIF - 4B - 9 MVS
AIF - 4B - 4 LHFA
AIF - 4B - 4 LHMGS
AIF - 4B - 4 LHR
AIF - 4B - 11 LHR
AIF - 4B - 12 LHR
AIF - 5B - 5 LHB
AIF - 5B - 10 MVS
AIF - 5B - 5 LHFA
AIF - 5B - 5 Sig Trp
AIF - 5B - ICC
AIF - 5B - 14 LHR
AIF - 5B - 15 LHR
AIF - 5B - 1er Regt
AIF - 5B - 2 NZMGS
AIF - AASC
AIF - Aboriginal LH
AIF - Badges
AIF - Cars
AIF - Chinese LH
AIF - Double Sqns
AIF - Engineers
AIF - Fr - 22 Corps
AIF - Fr - 13 LHR
AIF - Honour Roll
AIF - HQ - 3rd Echelon
AIF - Marching Songs
AIF - Misc Topics
AIF - NZMRB
AIF - NZMRB - AMR
AIF - NZMRB - CMR
AIF - NZMRB - EFT
AIF - NZMRB - NZMFA
AIF - NZMRB - NZMGS
AIF - NZMRB - OMR
AIF - NZMRB - Sig-Trp
AIF - NZMRB - WMR
AIF - Ships
AIF - Ships - Encountr
AIF - Ships - Una
AIF - WFF
AIF - Wireless Sqn
Battles
BatzA - Australia
BatzA - Broken Hill
BatzA - Liverpool
BatzA - Merivale
BatzB - Boer War
BatzB - Bakenlaagte
BatzB - Belmont
BatzB - Bothaville
BatzB - Buffels Hoek
BatzB - Coetzees Drift
BatzB - Diamond Hill
BatzB - Driefontein
BatzB - Elands
BatzB - Graspan
BatzB - Grobelaar
BatzB - Grootvallier
BatzB - Hartebestfontn
BatzB - Houtnek
BatzB - Karee Siding
BatzB - Kimberley
BatzB - Koster River
BatzB - Leeuw Kop
BatzB - Mafeking
BatzB - Magersfontein
BatzB - Modder River
BatzB - Onverwacht
BatzB - Paardeberg
BatzB - Palmietfontein
BatzB - Pink Hill
BatzB - Poplar Grove
BatzB - Rhenoster
BatzB - Sannahs Post
BatzB - Slingersfontn
BatzB - Stinkhoutbm
BatzB - Sunnyside
BatzB - Wilmansrust
BatzB - Wolvekuil
BatzB - Zand River
BatzG - Gallipoli
BatzG - Anzac
BatzG - Aug 1915
BatzG - Baby 700
BatzG - Evacuation
BatzG - Hill 60
BatzG - Hill 971
BatzG - Krithia
BatzG - Lone Pine
BatzG - Nek
BatzJ - Jordan Valley
BatzJ - 1st Amman
BatzJ - 2nd Amman
BatzJ - Abu Tellul
BatzJ - Es Salt
BatzJ - JV Maps
BatzJ - Ziza
BatzM - Mespot
BatzM - Baghdad
BatzM - Ctesiphon
BatzM - Daur
BatzM - Kurna
BatzM - Kut el Amara
BatzM - Ramadi
BatzN - Naval
BatzN - AE1
BatzN - Cocos Is
BatzN - Heligoland
BatzN - Marmara
BatzN - Zeebrugge
BatzN - Zeppelin L43
BatzNG - Bitapaka
BatzO - Other
BatzO - Baku
BatzO - Egypt 1919
BatzO - Emptsa
BatzO - Karawaran
BatzO - Peitang
BatzO - Wassa
BatzP - Palestine
BatzP - 1st Gaza
BatzP - 2nd Gaza
BatzP - 3rd Gaza
BatzP - Aleppo
BatzP - Amwas
BatzP - Ayun Kara
BatzP - Bald Hill
BatzP - Balin
BatzP - Beersheba
BatzP - Berkusieh
BatzP - Damascus
BatzP - El Auja
BatzP - El Buggar
BatzP - El Burj
BatzP - Haifa
BatzP - Huj
BatzP - JB Yakub
BatzP - Kaukab
BatzP - Khan Kusseir
BatzP - Khuweilfe
BatzP - Kuneitra
BatzP - Megiddo
BatzP - Nablus
BatzP - Rafa
BatzP - Sasa
BatzP - Semakh
BatzP - Sheria
BatzP - Surafend
BatzP - Wadi Fara
BatzS - Sinai
BatzS - Bir el Abd
BatzS - El Arish
BatzS - El Mazar
BatzS - El Qatiya
BatzS - Jifjafa
BatzS - Magdhaba
BatzS - Maghara
BatzS - Romani
BatzS - Suez 1915
BatzSe - Senussi
BatzWF - Westn Front
BW - Boer War
BW - NSW
BW - NSW - 1ACH
BW - NSW - 1NSWMR
BW - NSW - 2NSWMR
BW - NSW - 3ACH
BW - NSW - 3NSWIB
BW - NSW - 3NSWMR
BW - NSW - 5ACH
BW - NSW - A Bty RAA
BW - NSW - AAMC
BW - NSW - Aust H
BW - NSW - Lancers
BW - NSW - NSW Inf
BW - NSW - NSWCBC
BW - NSW - NSWIB
BW - NSW - NSWMR_A
BW - NZ
BW - Qld
BW - Qld - 1ACH
BW - Qld - 1QMI
BW - Qld - 2QMI
BW - Qld - 3ACH
BW - Qld - 3QMI
BW - Qld - 4QIB
BW - Qld - 5QIB
BW - Qld - 6QIB
BW - Qld - 7ACH
BW - QLD - AAMC
BW - SA
BW - SA - 1SAMR
BW - SA - 2ACH
BW - SA - 2SAMR
BW - SA - 3SACB
BW - SA - 4ACH
BW - SA - 4SAIB
BW - SA - 5SAIB
BW - SA - 6SAIB
BW - SA - 8ACH
BW - SA - AAMC
BW - Tas
BW - Tas - 1ACH
BW - Tas - 1TIB
BW - Tas - 1TMI
BW - Tas - 2TB
BW - Tas - 2TIB
BW - Tas - 3ACH
BW - Tas - 8ACH
BW - Vic
BW - Vic - 1VMI
BW - Vic - 2ACH
BW - Vic - 2VMR
BW - Vic - 3VB
BW - Vic - 4ACH
BW - Vic - 4VIB
BW - Vic - 5VMR
BW - Vic - 6ACH
BW - Vic - AAMC
BW - Vic - Scot H
BW - WA
BW - WA - 1WAMI
BW - WA - 2ACH
BW - WA - 2WAMI
BW - WA - 3WAB
BW - WA - 4ACH
BW - WA - 4WAMI
BW - WA - 5WAMI
BW - WA - 6WAMI
BW - WA - 8ACH
BW Gen - Campaign
BW Gen - Soldiers
BW General
Cavalry - General
Diary - Schramm
Egypt - Heliopolis
Egypt - Mena
Gen - Ataturk Pk, CNB
Gen - Australia
Gen - Legends
Gen - Query Club
Gen - St - NSW
Gen - St - Qld
Gen - St - SA
Gen - St - Tas
Gen - St - Vic
Gen - St - WA
Gm - German Items
Gm - Bk - 605 MGC
GW - 11 Nov 1918
GW - Atrocities
GW - August 1914
GW - Biographies
GW - Propaganda
GW - Spies
GW - We forgot
Militia 1899-1920
Militia - Area Officers
Militia - Inf - Infantry
Militia - Inf - 1IB
Militia - Inf - 2IB
Militia - Inf - 3IB
Militia - Inf - NSW
Militia - Inf - Qld
Militia - Inf - SA
Militia - Inf - Tas
Militia - Inf - Vic
Militia - Inf - WA
Militia - K.E.Horse
Militia - LH
Militia - LH - Regts
Militia - LH - 1LHB
Militia - LH - 2LHB
Militia - LH - 3LHB
Militia - LH - 4LHB
Militia - LH - 5LHB
Militia - LH - 6LHB
Militia - LHN - NSW
Militia - LHN - 1/7/1
Militia - LHN - 2/9/6
Militia - LHN - 3/11/7
Militia - LHN - 4/6/16
Militia - LHN - 5/4/15
Militia - LHN - 6/5/12
Militia - LHN - 28
Militia - LHQ - Qld
Militia - LHQ - 13/2
Militia - LHQ - 14/3/11
Militia - LHQ - 15/1/5
Militia - LHQ - 27/14
Militia - LHS - SA
Militia - LHS - 16/22/3
Militia - LHS - 17/23/18
Militia - LHS - 24/9
Militia - LHT - Tas
Militia - LHT - 12/26
Militia - LHV - Vic
Militia - LHV - 7/15/20
Militia - LHV - 8/16/8
Militia - LHV - 9/19
Militia - LHV - 10/13
Militia - LHV - 11/20/4
Militia - LHV - 19/17
Militia - LHV - 29
Militia - LHW - WA
Militia - LHW-18/25/10
Militia - Military Orders
Militia - Misc
MilitiaRC - Rifle Clubs
MilitiaRC - NSW
MilitiaRC - NT
MilitiaRC - Qld
MilitiaRC - SA
MilitiaRC - Tas
MilitiaRC - Vic
MilitiaRC - WA
Militiaz - New Zealand
Tk - Turkish Items
Tk - Army
Tk - Bks - Books
Tk - Bks - 1/33IR
Tk - Bks - 27th IR
Tk - Bks - Air Force
Tk - Bks - Yildirim
Tk - POWs
Wp - Weapons
Wp - Hotchkiss Cav
Wp - Hotchkiss PMG
Blog Tools
Edit your Blog
Build a Blog
RSS Feed
View Profile
Open Community
Post to this Blog
Site Index
Education Centre
LH Militia
Boer War
Transport Ships
LH Battles
ALH - Units
ALH - General
Aboriginal Light H
Weapons
Ottoman Sources

"At a mile distant their thousand hooves were stuttering thunder, coming at a rate that frightened a man - they were an awe inspiring sight, galloping through the red haze - knee to knee and horse to horse - the dying sun glinting on bayonet points..." Trooper Ion Idriess

The Australian Light Horse Studies Centre aims to present an accurate history as chroniclers of early Australian military developments from 1899 to 1920.

The Australian Light Horse Studies Centre site holds over 12,000 entries and is growing daily.

Contact: Australian Light Horse Studies Centre

Let us hear your story: You can tell your story, make a comment or ask for help on our Australian Light Horse Studies Centre Forum called:

Desert Column Forum

WARNING: This site contains: names, information and images of deceased people; and, language which may be considered inappropriate today.

Saturday, 14 March 2009
Karawaran, Persia, August 6 to 7, 1918
Topic: BatzO - Karawaran

Karawaran

Persia, 6-7 August 1918


Karawaran, a village in northern Persia (now Iran) about 50 kilometres south of Lake Urmia, was the scene of a desperate rearguard action against Turkish troops and marauding Kurds and Persians fought on 67 August 1918 by members of a special British group known as 'Dunsterforce'. The unit-named after its commander, Major General Lionel Dunsterville - included some 47 officers and non-commissioned officers recruited from the AIF in France and Palestine in its eventual strength of 450, and had been raised for the task of guarding against German penetration of Asia by mobilising and organising resistance by the peoples of the Caucasus region.

Attempts to render support to Christian Assyrians and Armenians who were fighting the Turkish 5th and 6th divisions at Urmia, a city on the western side of the lake, were forestalled when the Turks gained entry to that place on 30 July and put 80,000 of its population to flight. A twenty-strong party of Dunsterforce (half of whom were Australians or New Zealanders) and a squadron of British cavalry, which had been detached to escort a convoy carrying money, machine-guns and ammunition from Bijar, met the mass of refugees on the road on 4 August. The commander of the Dunsterforce party, Captain Stanley Savige (an Australian), rode forward the next day to the rear of the column, which he found under attack from local tribesmen but protected by a small rearguard organised by an American missionary, Dr W.A. Shedd. Obtaining permission from his superiors in the British mission, Savige again rode out on 6 August with a party of eight (two of whom were also Australian) to give what assistance was possible against the raiders.

Finding Shedd with 24 armed refugees at the tail of the withdrawing column, Savige relieved him (but took over his men) before riding further on to find better ground on which to fight. At a village apparently named Karawaran, lying south of the town of Miandoab, the rearguard discovered a force of 'Turkish cavalry engaged in looting. These they drove out, and were also forced to fight off about 100 tribesmen who were riding about the valley in search of plunder, before falling back ten kilometres to spend the night in another village.

The fight began again the next morning, this time against a party of 1 50 mounted Kurds who approached directly while others rode around hilly country on both flanks. Savige's men, with no more than twelve of Shetld's original party, mounted a hasty defence from a hill behind the village which checked the enemy horsemen. Then followed a sustained withdrawal which barely succeeded in keeping the pressing enemy away from the rear of the refugee column. The strength of the defence was slowly reduced by the death of one of the Dunsterforce men, and the desertion of all but two of the volunteers, and after seven hours of relentless fighting the remainder were close to exhaustion.

The rearguard was saved from being overrun by the timely arrival of a dozen British cavalrymen who had been policing the road when they intercepted a message from Savige appealing for reinforcement. A short time later a party of 70 Christian tribesmen also arrived to lend support, at which the Turks and others made off. Although the pursuit of the fleeing refugees was continued until the column's tail-end reached Bijar on 17 August, at no stage did the task of defence again result in such fierce combat. The loss of some 30,000 people in the retreat from Urmia made it perhaps one of the most dreadful episodes of the war.


Extracted from the book produced by Chris Coulthard-Clark, Where Australians Fought - The Encyclopaedia of Australia's Battles, Allen and Unwin, Sydney, 1998, pp. 149-150.


Additional References cited by Chris Coulthard-Clark:

H.S. Gullett (1944) The Australian Imperial Force in Sinai and Palestine, Sydney: Angus & Robertson.

S.G. Savige (1919), Stalky's Forlorn Hope, Melbourne: Alexander McCubbin.


Further Reading:

Battles where Australians fought, 1899-1920


Citation: Karawaran, Persia, August 6 to 7, 1918

Posted by Project Leader at 11:01 PM EADT
Updated: Sunday, 5 April 2009 12:09 PM EADT
Leeuw Kop, South Africa, July 3, 1900
Topic: BatzB - Leeuw Kop

Leeuw Kop

South Africa, 3 July 1900


Leeuw Kop (also known as 'Bakenkop'), was an action fought during the Second South African War on 3 July 1900 in the northern Orange Free State, during a British advance from the north-west against the town of Bethlehem. During fighting the previous day a British column under Major-General A.H. Paget had succeeded in pushing back the right wing of an opposing Boer force under General Piet de Wet, and occupied the ridge line known as Plesierfontein thirteen kilometres east of the town of Lindley. Among the 1,000 mounted troops included in Paget's column was a battalion of 400 Imperial Bushmen from South Australia, Western Australia and Tasmania commanded by Major Rose (a West Australian).

Following Paget's success de Wet retired to Leeuw Kop, about ten kilometres to the south-east, and established a new defensive line along a ridge line running north-east which had Bakenkop as its most prominent feature. On 3 July Paget moved his infantry and two guns into the intervening valley towards Leeuw Kop, while sending 800 of his mounted troops with six guns against Bakenkop on the left. The commander of the latter detachment, Colonel A.M. Brookfield, took his men onto a ridge 4,000 metres from his objective and returned the fire of five Boer guns which had begun to engage him. The British guns were distributed in pairs along the ridge line, and although not spaced widely the undulations of the ground meant that no section could actually see any of the others. The mounted troops covering the artillery were also positioned at intervals along the ridge, mostly in rear of the guns.

After an inconclusive duel, it was found that the guns of Brookfield's detachment were beginning to run short of ammunition. The artillery commander accordingly gave the order to cease fire and the crews were ordered to lie down beside their guns. At this point the Boer guns suddenly renewed their fire with increased intensity, causing the British mounted troops not already sheltering behind the ridge to fall back for cover. The heightened barrage was, however, also the prelude to an assault by two Boer parties-each 100-200 strong-who had crept up through fields of Indian maize flanking the British position on both sides. When delivered, this attack caught the guns effectively without any protection. The left flank guns saw the danger of the approaching Boers and opened fire on them, but on the right the enemy approach was not observed until too late and the position was quickly taken. The centre section immediately limbered up and made to join the left section: one crew mistakenly went towards the right section, however, and both men and horses were promptly shot down so that a third gun was added to the Boer booty.

Amidst this confusion, an artillery officer managed to mount a horse and gallop to the rear. I lore he came upon a detachment of South Australians under captain A.E.M. Norton who had been ordered to retire, and these he led hack to the ridge line in time to prevent the Boers from carrying away the captured guns. When confronted with the Australians' fire, the burghers promptly retreated taking some of the captured gunners with them as prisoners. The enemy party attacking the left gun section also now broke contact and withdrew. Meanwhile Paget had seized Leeuw Kop and from here was able to direct flanking fire from his guns against the Boers' artillery, whereupon de Wet abandoned Bakenkop and made off towards Bethlehem.

During the short but sharp battle, Major Rose and about a dozen South Australians were wounded. The Tasmanian squadron, having been kept on other duty near Lindley, did not join in the fighting until the action was in its final stages with the Boers already being driven off.
 

Extracted from the book produced by Chris Coulthard-Clark, Where Australians Fought - The Encyclopaedia of Australia's Battles, Allen and Unwin, Sydney, 1998, p. 81-82.


Additional References cited by Chris Coulthard-Clark:

L.S. Amery, (ed.) The Times History of the War in South Africa 1899-1902, Vol. 4 (1906), London: Sampson Low, Marston & Co.

John Stirling (1907) The Colonials in South Africa, 1899-1902, Edinburgh: W. Blackwood & Sons

R.L. Wallace (1976) The Australians at the Boer War, Canberra: Australian War Memorial & Australian Government Publishing Service.


Further Reading:

Battles where Australians fought, 1899-1920


Citation: Leeuw Kop, South Africa, July 3, 1900

Posted by Project Leader at 11:01 PM EADT
Updated: Sunday, 5 April 2009 4:28 PM EADT
1st Australian Armoured Car Section - The Dead Sea - Part 3
Topic: AIF - Cars

1st AUSTRALIAN ARMOURED CAR SECTION, AIF

THE DEAD SEA

Part 3

This is a transcription from a manuscript submitted by Captain E.H. James called "The Motor Patrol". It is lodged in the AWM as AWM 224 MSS 209. This is Part 3.


THE DEAD SEA - Part 3

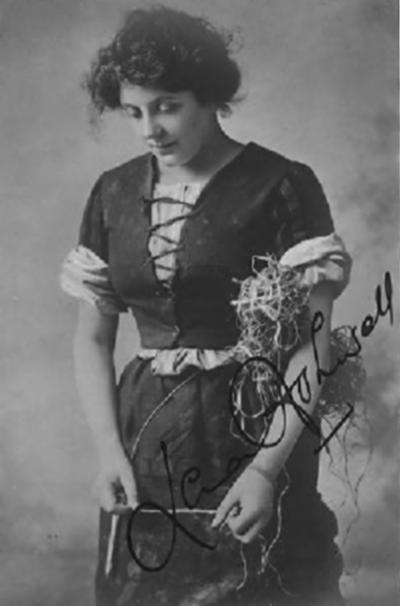
A few evenings later a big concert was held up in Jerusalem by Lena Ashwell's Players and permission was granted for a car load to go to Jerusalem for the night. Needless to say the car was well filled. On the morning of the 25th July during our morning patrol, we discovered a home made boat and some ogre hidden in the reeds skirting a lagoon along to the mouth Of the river. We had not noticed this boat previously so concluded it must have been brought across the river during the night probably by an enemy agent.

We were anxious to see how the boat was brought into the lagoon,- so a couple of us embarked and pushed off when the boat promptly sank with us both, and we just had time to throw our watches and revolvers ashore as we disappeared below the Surface to the amusement of the rest of the patrol. The boat had only sufficient buoyancy for one parson, so evidently only one had come across in it. We discovered that there was a narrow but deep entrance through the reeds into the sea through which the boat had been brought. We replaced the boat whore We had found it after making it leaky enough to prevent it crossing the river again and reported particulars to the nearest intelligence officer who arranged for a watch to be kept beside the boat for the return of the navigator, but he must have received news of the boat's discovery for he never turned up again. When we returned from the morning patrol, the water had dried on our clothes after the immersion and the white salt had dried and left us white like a couple of ghosts to the great enjoyment of the troops in the vicinity who thought it was some new game for their amusement.

Things seemed to be settling down about this time and no events of importance took place mush in the valley. The enemy made a small demonstration on the 6th September and the whole patrol received orders to cross the river at Hajla Bridge which we did first thing in the morning.

We travelled full speed to the north east where we joined the Central India Horse with whom we crossed the Wady Rame. The enemy however changed their minds and retreated at full speed to the hills again. We received orders to return and were back at our post again in plenty of time for lunch. Nothing more of importance happened until the 13th September when orders were received to leave the Valley. We packed up after having been there for six months to a day. They were the six hottest months of the year and we were not sorry to leave. We were not to see the Jordan Valley any more.

Events were shortly going to happen on the other flank near the Mediterranean Coast and we were to be there in time for the kick off. Orders were received for the cars to proceed singly at half hour intervals so as not to excite any particular interest and we were to take two days over the move. We arrived at Ramleh on the evening of the 15th September and proceeded to Sarona a couple of days later. All movements were now done at night time, so as not to arouse the enemy's suspicions of the concentration on this flank. We now joined the 4th Cavalry Division and on the 18th September the officers were called to a conference where the Commander in Chief (General Allenby) explained that the big smash through the enemy's lines was to be attempted at dawn the next morning.

He explained that speed was to be the essence of the whole operation.

The artillery and infantry were to make a break on the enemy's western flank when the mounted troops and motor units ware to pour through at full spend and take the enemy in the rear.


Note:


Lena Ashwell


Lena Ashwell, actress, musician and theatrical manager, organised quality entertainments for the forces on active service, and fundraising events at home. Her major production occurred when her show opened at the Kingsway Theatre, on 29 December 1915. It was a fantasy called 'The Starlight Express' based on Algernon Blackwood’s 'A Prisoner in Fairyland'. Other luminaries involved in this show included Elgar who composed incidental music including songs for soprano and baritone soloists.


Previous section: Steam Tug at the Dead Sea

Next section: 1st Australian Armoured Car Section - Megiddo - Part 1


Further Reading:

1st AUSTRALIAN ARMOURED CAR SECTION, AIF, Contents 

Australian Light Horse Order of Battle - Outline 

The Australian Light Horse - Structure

Australian Light Horse Order of Battle

Battles where Australians fought, 1899-1920


Citation: 1st Australian Armoured Car Section - The Dead Sea - Part 3

Posted by Project Leader at 12:01 AM EADT
Updated: Monday, 13 April 2009 11:21 PM EADT
605th Machine Gun Company War Diary - 17 to 19 May 1916
Topic: Gm - Bk - 605 MGC

German 605th Machine Gun Company (MGC)

War Diary, 17 May to 19 May 1916 


605th Machine Gun Company War Diary - 17 to 19 May 1916


The entries


17.V.16:   

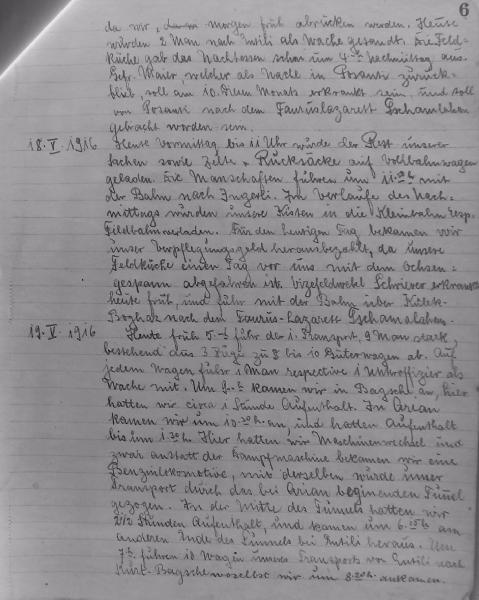
Today we received orders that everything was to be packed up as us are to move off early tomorrow. Today two men were sent on guard duty to Ensili. The field kitchen issued evening dinner early at 4 p.m. Pte. Maier, who remained on guard at Posanti, reported sick on the 10th inst. and was taken from Posanti to the Taurus ambulance-hospital Tschamlahan.


18.V.16:   

By 11 this morning the remainder of our things with tents and peaks were loaded on the main line trucks. The men travelled by train at 11.30 a.m. to Ingerli. During the course of the afternoon our boxes were loaded on to the field railway (narrow gauge). We draw cash in lieu of rations for to-day as our field kitchen, drawn by oxen, left one day ahead of us. Acting Serjt. Major Schriever fell sick early to-day and went by rail Kulek-Boghaz to the Taurus hospital at Tschamlahan.


19.V.16:   

Early this morning 5 a.m. our first troop trains, 9 men, consisting of 3 trains of 8 to 10 trucks, were despatched. On every track there was one N.C.O. or man as guard. At 9 am. we arrived at Bagsche and halted there for about an hour. We arrived at Arian at 10.30 a.m. and stopped till 1.30 p.m.. Here we changed engines, the steam engines being replaced by petrol engines. The latter took our train through the tunnel which begins at Arian. In the middle of the tunnel we stopped for 2½ hours and arrived at Entili at the other end at 6.15 p.m. At 7 p.m. 10 trucks of our train proceeded from Entili to Kulek Bagsche which we reached at 8.20. Here we spent the night in the temporary station buildings. At 6 p.m. the mounted men under the company commander rode from Mamure to Kassan Bey which they reached at midnight. The remainder of the company travelled at noon by the field railway (narrow gauge) to Airan, which they reached at 5.30 p.m. and spent the night at the entrance to the tunnel.


Previous Page: 605th Machine Gun Company War Diary - 8 to 17 May 1916

Next Page: 605th Machine Gun Company War Diary - 19 to 26 May 1916


Further Reading:

German 605th Machine Gun Company (MGC) , Contents 

The Battle of Romani

Light Horse Battles

Battles where Australians fought, 1899-1920


Citation: 605th Machine Gun Company War Diary - 17 to 19 May 1916 


Posted by Project Leader at 12:01 AM EADT
Updated: Wednesday, 15 April 2009 6:48 PM EADT
Bert Schramm's Diary, 14 March 1919
Topic: Diary - Schramm

Diaries of AIF Servicemen

Bert Schramm


During part of the course of his military service with the AIF, 2823 Private Herbert Leslie Schramm, a farmer from White's River, near Tumby Bay on the Eyre Peninsular, kept a diary of his life. Bert was not a man of letters so this diary was produced with great effort on his behalf. Bert made a promise to his sweetheart, Lucy Solley, that he would do so after he received the blank pocket notebook wherein these entries are found. As a Brigade Scout since September 1918, he took a lead part in the September 1918 breakout by the Allied forces in Palestine. Bert's diary entries are placed alongside those of the 9th Light Horse Regiment to which he belonged and to the 3rd Light Horse Brigade to which the 9th LHR was attached. On this basis we can follow Bert in the context of his formation.

 Bert Schramm's Diary, 14 March 1919


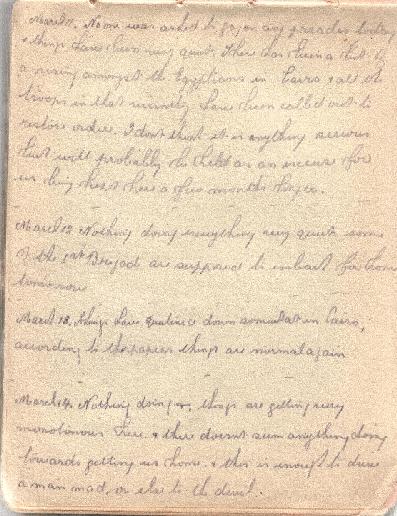
Bert Schramm's Handwritten Diary, 11 - 14 March 1919

[Click on page for a larger print version.]

Diaries

Bert Schramm

Friday, March 14, 1919

Bert Schramm's Location - Moascar, Egypt.

Bert Schramm's Diary - Nothing doing. Things are getting very monotonous here and there doesn't seem to be anything doing towards getting us home and this is enough to drive a man mad or else to the devil.


9th Light Horse Regiment War Diary

9th Light Horse Regiment Location - Moascar, Egypt.

9th Light Horse Regiment War Diary -  Usual routine.

Divisional leave party to Cairo cancelled.

10th Australian Light Horse Regiment War Diary - Usual swimming parade and physical training.

Olden, Major CAN, DSO; Lyall, Captain K; and, Gollan, Lieutenant AB, left for Cairo on duty.

Timperley, Major LC, took over command of the Regiment.


Darley

Darley, TH, With the Ninth Light Horse in the Great War, Adelaide, Hassell Press, 1924.

No Entry


Previous: Bert Schramm's Diary, 13 March 1919

Next: Bert Schramm's Diary, 15 March 1919


Further Reading:

9th Light Horse Regiment AIF War Diary - Complete day by day list

Bert Schramm Diary 

Bert Schramm Diary - Complete day by day list


Additional Reading:

Darley, TH, With the Ninth Light Horse in the Great War, Adelaide, Hassell Press, 1924.


Citation: Bert Schramm's Diary, 14 March 1919


Posted by Project Leader at 12:01 AM EADT
Updated: Wednesday, 6 May 2009 11:57 AM EADT

Newer | Latest | Older

Full Site Index


powered by FreeFind
Let us hear your story: You can tell your story, make a comment or ask for help on our forum.

Desert Column Forum

A note on copyright

The Australian Light Horse Studies Centre is a not for profit and non profit group whose sole aim is to write the early history of the Australian Light Horse from 1900 - 1920. It is privately funded and the information is provided by the individuals within the group and while permission for the use of the material has been given for this site for these items by various donors, the residual and actual copyright for these items, should there be any, resides exclusively with the donors. The information on this site is freely available for private research use only and if used as such, should be appropriately acknowledged. To assist in this process, each item has a citation attached at the bottom for referencing purposes.

Please Note: No express or implied permission is given for commercial use of the information contained within this site.

A note to copyright holders

The Australian Light Horse Studies Centre has made every endeavour to contact copyright holders of material digitised for this blog and website and where appropriate, permission is still being sought for these items. Where replies were not received, or where the copyright owner has not been able to be traced, or where the permission is still being sought, the Australian Light Horse Studies Centre has decided, in good faith, to proceed with digitisation and publication. Australian Light Horse Studies Centre would be happy to hear from copyright owners at any time to discuss usage of this item.

Contact

Australian Light Horse Studies Centre

eXTReMe Tracker