


Topic: AIF - Cars
1st AUSTRALIAN ARMOURED CAR SECTION, AIF
THE LIBYAN DESERT
Below is a transcription from a manuscript submitted by Captain E.H. James called "The Motor Patrol". It is lodged in the AWM as AWM 224 MSS 209.
THE LIBYAN DESERT
On August 15th. 1916, The Australian Armoured Car Battery received orders to entrain at Ismailia for the South of Egypt with their Armoured Care. The battery was detrained at Minis on the 17th. and immediately took part in the operations between this point and the Baharia Oasis along a line of blockhouses through the Libyan Desert over one hundred miles in length. The unit worked in conjunction with the 11th. & 12th. Light Armoured Car Batteries which were imperial unite, and were equipped with Rolls Royce Armoured Care and the new Light Vickers Machine Guns. These vehicles were the envy of the Australians who were equipped with a mixed fleet of care which while satisfactory on hard ground, gave the drivers and gunners plenty of exertion in the soft Band of the desert. The Colt gone with which the Australians were equipped, worked well and the unit did good practice with these. While the unit was stationed at Minia the members suffered severely from Nile fever and welcomed the expeditions into the desert especially when they were detailed to relieve the garrisons occasionally in the desert blockhouses, where the conditions were much more healthy although of course the heat was intense.
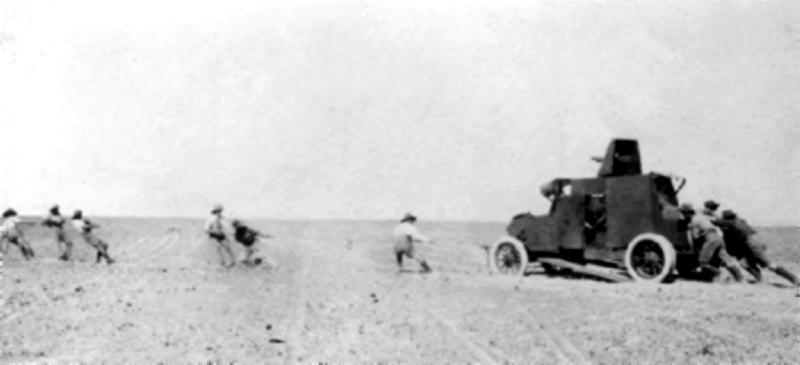
The work of operating the heavy cars in the desert ass extremely strenuous on account of the many very soft patches in the sand which called for skilled driving. All our drivers were accustomed to bush driving in Australia but nevertheless it was wonderful how the driving improved as they became more accustomed to the desert conditions. Efforts were made :,o lighten the care by sacrificing some of the armour plating; and other more or less unnecessary parts; and twin tyres were also devised for the rear wheels which improved the going somewhat. The cars always worked in pairs, chiefly so that there would be plenty of man power available when help was required in bed country.
The chief work of the motor unite was to patrol the desert East of the Nile as it was known that the Senussi were established in some of the oases and were in the habit of making small raids into Egypt across the Libyan Desert. These people could only travel by canals and would perhaps average about 20 miles a day, (while of course the motors could do this distance in an hour). This meant that if the motors patrolled on a line about 100 miles out, information of a raid could always be obtained about four days ahead.
When patrolling, the crews of the care would keep a keen watch on the sand for footmarks which showed up very clearly and any fresh tracks on the desert would always be followed until the people who made them were overhauled and interviewed. On September 6th. a couple of Imperial officers who were out with a car were surprised in the sand dunes near the Baharia Oasis by a party of tribesmen and were overpowered and shot. Next day a patrol car crew discovered the bodies in the sand with their emptied revolvers alongside them. Some days later the party of tribesmen were overhauled and captured by one of the Light Car Patrols.
On the 3rd. December, orders were received by the unit for all cars, guns, and vehicles, to be returned to G.H.Q. Cairo and the unit to proceed South and take over the Ford Light Cars and Lewis guns of a Light Car Patrol and the Australian unit was to take the name of No. 1. Light Car Patrol. The unit proceeded South by rail to Oasis Junction on 6th. December. Next day they travelled by a narrow gauge Military Railway which had been built across the desert to Kharga Oasis and the unit detrained at Rail head at what was known as Water Dump A. A camp was made near railhead in the sand, and work was commenced on the Ford cars which had been taken over in a very dilapidated condition and which had apparently been allowed to run almost to destruction. All ranks worked night and day for the next couple of weeks overhauling and reconditioning the vehicles also in practising on the new Lewis guns. The strength of the unit was increased by the addition of some extra drivers also some dispatch riders with motor cycles who soon became very expert with their machines on the desert.
On 18th. December the Divisional Commander and staff were escorted out to the Dakhla Oasis (about 80 miles) by a fleet of 8 care and an the following day the British flag was officially hoisted at Tenida (the capital of the Oasis) by Mayor General Watson. Two days afterwards the party returned to railhead.
On the 30th. December, we took three cars and two motor cyclists with 6 days rations, patrols &c. on a reconnaissance to discover alternative routes to the south of the Dakhla Oasis. The present route known as the "Gubari road" is a very ancient caravan route across the desert with defined tracks made by the camels' pads which have been crossing the same track for centuries. The surface is very rough anti flinty and the sharp stones caused a lot of damage to the tyros of the motors.
We spent a couple of days exploring the desert south of Mot (the most southern village of the Dakhla Oasis) and proceeded along another ancient route which runs for 220 miles due south to the Wells of El Sheb.
We travelled mostly by the aid of the compass, but discovered that the instrument was very much affected by the Magnetos of the motors and consequently had continually to be checked by stopping the cars and taken some distance away from the engine for bearings to be taken. Cairns of atones were erected in prominent positions and empty petrol tins placed on top Of these to mark routes. These Cairns would be seen for many miles as the sun would be reflected off the shiny tin. In some cases we could see these tins as fur as 20 miles away.
To the cast of the El Sheb route rune a range of rocky hills which appeared to be impassable to cross with vehicles or any description. We Climbed those hills on foot " discovered that the country was comparatively level to the east (the direction which we desired to travel). After two days searching a practicable pass was discovered through the hills about 40 miles from Mut and from this point the sere were able to travel almost due east over splendid hard sand similar to the firm send along the sea shore. High speeds could be obtained and we returned to Kharga Oasis by compass bearing after 4 days and nights in the desert.
Soma weeks later we did this route again thoroughly, spending several days surveying and mapping. We afterwards prepared a comprehensive map of the various routes and landmarks between the two Oases of Karga and Dakhla. This was subsequently forwarded to the General Officer in charge of Southern Egypt and he later wrote and congratulated the unit on the result of the work.
Early in January, 1917, we received instructions to move our camp from Water Dump A and endeavour to effect communication between the Dakhla Oasis and the Oases to the East (Kufra and Farafra).
The first named oasis was about 400 miles east of Dakhla while Ferafra was about 100 miles North East in a direct line, (but very much farther the way motors would traverse, as several ranges of very rocky mountains would have to be avoided).
We decided to try the Kufra Oasis first. It was reported that no Europeans had ever reached this Oasis. There was certainly no caravan route to the west in the direction of the Dakhla Oasis. The native caravans having always proceeded in a northerly direction towards the Mediterranean via Aujila.
The well known Explorer Harding King had made an expedition in 1911 to the South Fast of Dakhla for 200 miles partly in the direction of Kufra but had to return on account of the very heavy country and complete absence of water.
We determined to make our route further North than east. We spent a week making a dump in the desert about 80 miles out from our last camp. We buried stocks of Petrol and water in fanatis, also supplies of bully beef and biscuit here, as this was to be our jumping off point and we naturally wished to start off with a full stock. Water & petrol would be the governing factors of the journey and in order not to waste any of the precious liquid in the radiators of the care, we fitted condensers to the radiator caps and closed up the overflow pipes. The condensed water being caught in a 2 gallon patrol can and returned tat intervals to the radiator again. By this means we saved fully 75,E of the water generally lost through boiling.
Having completed our dump and got everything ready, we made a start with three Ford Cars and a crew of two men on each. Two Motor Cyclist Despatch Riders accompanied the Patrol in order to keen up communications.
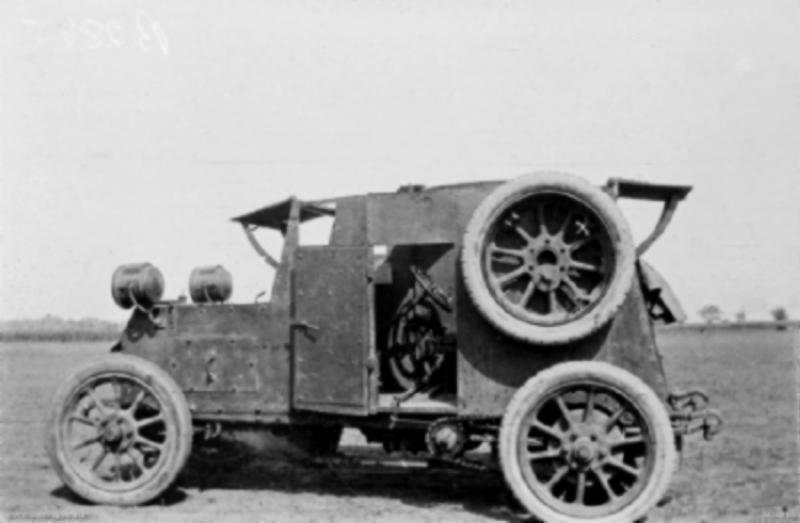
Every ounce that vas not necessary was taken off the vehicles. For instance the cars had no bodies at all. The seats consisted of ration & Ammunition boxes; the cushions were the men's blankets. Two of the cars were stripped of the Lewis Guns mountings. This meant that only one car was really armed, but each car was provided with a rifle, and the crews all had their revolvers.
All the cars at the start were grossly overloaded, as of course this load would be rapidly diminished every mile traversed. It was intended to issue one of the cars as an advanced dump at a point about 200 miles from our objective and make the final dash with two cars and a cyclist.
After leaving the last wall known as "Bir Sheikh Muhammud" the character of the desert begun to change for the worse. Hitherto the sand, although perhaps soft underneath, generally had a hard crust. This meant that once a car got a start it could usually keep going. The crew would run along and push until a speed of 6 or 8 miles per hour was reached and then jump up on to the step. The nature of the ground was now quite different and seemed to be composed of very fine drift sand on the surface to a depth of about six inches. This meant very heavy going on low gear which of course was the very thing we wish to avoid, as it meant increased patrol and water consumption and reduced speed. However, we found that if one car led the way on low gear the others could follow in the tracks made, (running on top gear) as the going was much easier for the following care. Perch car now took its turn half hourly to make the road and the cyclists travelled out on either flank to ascertain if there was any improvement in the ground. Unfortunately there was no sign of improvement and after about 80 miles of this gruelling work one of the cars smashed its differential. We transferred some of the stores to the other two cars and pushed on abandoning the disabled vehicle. We travelled for another day under similar gruelling conditions when a second car caved in under the terrible strain. Things now began to look serious. The two cyclists were sent ahead to a high hill on the horizon to try out the country and they returned that night to state that there was no improvement, so it was reluctantly decided to abandon the present attempt as there was well over 200 miles to go, and try again at a later date. The second car was temporarily repaired and the patrol returned to the well at "Bir Sheikh Muhammed" just as the last water can was emptied.
The cars returned along the old tracks in lose than half the time taken in the outgoing journey, as the road improved each time a vehicle used it, consequently, a second effort should be much easier than the first. We towed in the remaining broken car about a week later and began to make preparations for a second attempt.
The experience gained in the first trip was very useful and given reasonable luck we anticipated success next time. However, the second attempt was never made as before arrangements were completed, orders were received for the patrol to pack up and move into a new and more exciting theatre of the war, and early in May 1917, we started off on the long 1,000 mile journey into Palestine.
Previous section: 1st Australian Armoured Car Section - THE FIRST AUSTRALIAN ARMOURED CAR SECTION
Next section: 1st Australian Armoured Car Section - Sinai
Further Reading:
Bean, C.E.W., The Australian Imperial Force in France, 1916, Official History, Volume III:-
Appendix 2 – The Light Cars in the Libyan Desert.1st AUSTRALIAN ARMOURED CAR SECTION, AIF, Contents
Australian Light Horse Order of Battle - Outline
The Australian Light Horse - StructureAustralian Light Horse Order of Battle
Battles where Australians fought, 1899-1920
Citation: 1st Australian Armoured Car Section - THE LIBYAN DESERT
