« October 2009 »
S M T W T F S
1 2 3
4 5 6 7 8 9 10
11 12 13 14 15 16 17
18 19 20 21 22 23 24
25 26 27 28 29 30 31
You are not logged in. Log in


Search the site:


powered by FreeFind
Volunteer with us.

Entries by Topic All topics
A Latest Site News
A - Using the Site
AAA Volunteers
AAB-Education Centre
AAC-Film Clips
AAC-Photo Albums
AIF & MEF & EEF
AIF - Lighthorse
AIF - ALH - A to Z
AIF - DMC
AIF - DMC - Or Bat
AIF - DMC - Anzac MD
AIF - DMC - Aus MD
AIF - DMC - British
AIF - DMC - BWI
AIF - DMC - French
AIF - DMC - Indian
AIF - DMC - Italian
AIF - DMC - Medical
AIF - DMC - Remounts
AIF - DMC - Scouts
AIF - DMC - Sigs
AIF - DMC - Sigs AirlnS
AIF - DMC - 1 Sig Sqn
AIF - DMC - 2 Sig Sqn
AIF - DMC - Eng
AIF - DMC - Eng 1FSE
AIF - DMC - Eng 2FSE
AIF - DMC - GSR
AIF - 1B - 1 LHB
AIF - 1B - 6 MVS
AIF - 1B - 1 LHMGS
AIF - 1B - 1 Sig Trp
AIF - 1B - 1 LHFA
AIF - 1B - 1 LHR
AIF - 1B - 2 LHR
AIF - 1B - 3 LHR
AIF - 2B - 2 LHB
AIF - 2B - 7 MVS
AIF - 2B - 2 LHFA
AIF - 2B - 2 LHMGS
AIF - 2B - 2 Sig Trp
AIF - 2B - 5 LHR
AIF - 2B - 6 LHR
AIF - 2B - 7 LHR
AIF - 3B - 3 LHB
AIF - 3B - 8 MVS
AIF - 3B - 3 LHB Sigs
AIF - 3B - 3 LHFA
AIF - 3B - 3 LHMGS
AIF - 3B - 3 Sig Trp
AIF - 3B - 8 LHR
AIF - 3B - 9 LHR
AIF - 3B - 10 LHR
AIF - 4B - 4 LHB
AIF - 4B - 4 Sig Trp
AIF - 4B - 9 MVS
AIF - 4B - 4 LHFA
AIF - 4B - 4 LHMGS
AIF - 4B - 4 LHR
AIF - 4B - 11 LHR
AIF - 4B - 12 LHR
AIF - 5B - 5 LHB
AIF - 5B - 10 MVS
AIF - 5B - 5 LHFA
AIF - 5B - 5 Sig Trp
AIF - 5B - ICC
AIF - 5B - 14 LHR
AIF - 5B - 15 LHR
AIF - 5B - 1er Regt
AIF - 5B - 2 NZMGS
AIF - AASC
AIF - Aboriginal LH
AIF - Badges
AIF - Cars
AIF - Chinese LH
AIF - Double Sqns
AIF - Engineers
AIF - Fr - 22 Corps
AIF - Fr - 13 LHR
AIF - Honour Roll
AIF - HQ - 3rd Echelon
AIF - Marching Songs
AIF - Misc Topics
AIF - NZMRB
AIF - NZMRB - AMR
AIF - NZMRB - CMR
AIF - NZMRB - EFT
AIF - NZMRB - NZMFA
AIF - NZMRB - NZMGS
AIF - NZMRB - OMR
AIF - NZMRB - Sig-Trp
AIF - NZMRB - WMR
AIF - Ships
AIF - Ships - Encountr
AIF - Ships - Una
AIF - WFF
AIF - Wireless Sqn
Battles
BatzA - Australia
BatzA - Broken Hill
BatzA - Liverpool
BatzA - Merivale
BatzB - Boer War
BatzB - Bakenlaagte
BatzB - Belmont
BatzB - Bothaville
BatzB - Buffels Hoek
BatzB - Coetzees Drift
BatzB - Diamond Hill
BatzB - Driefontein
BatzB - Elands
BatzB - Graspan
BatzB - Grobelaar
BatzB - Grootvallier
BatzB - Hartebestfontn
BatzB - Houtnek
BatzB - Karee Siding
BatzB - Kimberley
BatzB - Koster River
BatzB - Leeuw Kop
BatzB - Mafeking
BatzB - Magersfontein
BatzB - Modder River
BatzB - Onverwacht
BatzB - Paardeberg
BatzB - Palmietfontein
BatzB - Pink Hill
BatzB - Poplar Grove
BatzB - Rhenoster
BatzB - Sannahs Post
BatzB - Slingersfontn
BatzB - Stinkhoutbm
BatzB - Sunnyside
BatzB - Wilmansrust
BatzB - Wolvekuil
BatzB - Zand River
BatzG - Gallipoli
BatzG - Anzac
BatzG - Aug 1915
BatzG - Baby 700
BatzG - Evacuation
BatzG - Hill 60
BatzG - Hill 971
BatzG - Krithia
BatzG - Lone Pine
BatzG - Nek
BatzJ - Jordan Valley
BatzJ - 1st Amman
BatzJ - 2nd Amman
BatzJ - Abu Tellul
BatzJ - Es Salt
BatzJ - JV Maps
BatzJ - Ziza
BatzM - Mespot
BatzM - Baghdad
BatzM - Ctesiphon
BatzM - Daur
BatzM - Kurna
BatzM - Kut el Amara
BatzM - Ramadi
BatzN - Naval
BatzN - AE1
BatzN - Cocos Is
BatzN - Heligoland
BatzN - Marmara
BatzN - Zeebrugge
BatzN - Zeppelin L43
BatzNG - Bitapaka
BatzO - Other
BatzO - Baku
BatzO - Egypt 1919
BatzO - Emptsa
BatzO - Karawaran
BatzO - Peitang
BatzO - Wassa
BatzP - Palestine
BatzP - 1st Gaza
BatzP - 2nd Gaza
BatzP - 3rd Gaza
BatzP - Aleppo
BatzP - Amwas
BatzP - Ayun Kara
BatzP - Bald Hill
BatzP - Balin
BatzP - Beersheba
BatzP - Berkusieh
BatzP - Damascus
BatzP - El Auja
BatzP - El Buggar
BatzP - El Burj
BatzP - Haifa
BatzP - Huj
BatzP - JB Yakub
BatzP - Kaukab
BatzP - Khan Kusseir
BatzP - Khuweilfe
BatzP - Kuneitra
BatzP - Megiddo
BatzP - Nablus
BatzP - Rafa
BatzP - Sasa
BatzP - Semakh
BatzP - Sheria
BatzP - Surafend
BatzP - Wadi Fara
BatzS - Sinai
BatzS - Bir el Abd
BatzS - El Arish
BatzS - El Mazar
BatzS - El Qatiya
BatzS - Jifjafa
BatzS - Magdhaba
BatzS - Maghara
BatzS - Romani  
BatzS - Suez 1915
BatzSe - Senussi
BatzWF - Westn Front
BW - Boer War
BW - NSW
BW - NSW - 1ACH
BW - NSW - 1NSWMR
BW - NSW - 2NSWMR
BW - NSW - 3ACH
BW - NSW - 3NSWIB
BW - NSW - 3NSWMR
BW - NSW - 5ACH
BW - NSW - A Bty RAA
BW - NSW - AAMC
BW - NSW - Aust H
BW - NSW - Lancers
BW - NSW - NSW Inf
BW - NSW - NSWCBC
BW - NSW - NSWIB
BW - NSW - NSWMR_A
BW - NZ
BW - Qld
BW - Qld - 1ACH
BW - Qld - 1QMI
BW - Qld - 2QMI
BW - Qld - 3ACH
BW - Qld - 3QMI
BW - Qld - 4QIB
BW - Qld - 5QIB
BW - Qld - 6QIB
BW - Qld - 7ACH
BW - QLD - AAMC
BW - SA
BW - SA - 1SAMR
BW - SA - 2ACH
BW - SA - 2SAMR
BW - SA - 3SACB
BW - SA - 4ACH
BW - SA - 4SAIB
BW - SA - 5SAIB
BW - SA - 6SAIB
BW - SA - 8ACH
BW - SA - AAMC
BW - Tas
BW - Tas - 1ACH
BW - Tas - 1TIB
BW - Tas - 1TMI
BW - Tas - 2TB
BW - Tas - 2TIB
BW - Tas - 3ACH
BW - Tas - 8ACH
BW - Vic
BW - Vic - 1VMI
BW - Vic - 2ACH
BW - Vic - 2VMR
BW - Vic - 3VB
BW - Vic - 4ACH
BW - Vic - 4VIB
BW - Vic - 5VMR
BW - Vic - 6ACH
BW - Vic - AAMC
BW - Vic - Scot H
BW - WA
BW - WA - 1WAMI
BW - WA - 2ACH
BW - WA - 2WAMI
BW - WA - 3WAB
BW - WA - 4ACH
BW - WA - 4WAMI
BW - WA - 5WAMI
BW - WA - 6WAMI
BW - WA - 8ACH
BW Gen - Campaign
BW Gen - Soldiers
BW General
Cavalry - General
Diary - Schramm
Egypt - Heliopolis
Egypt - Mena
Gen - Ataturk Pk, CNB
Gen - Australia
Gen - Legends
Gen - Query Club
Gen - St - NSW
Gen - St - Qld
Gen - St - SA
Gen - St - Tas
Gen - St - Vic
Gen - St - WA
Gm - German Items
Gm - Bk - 605 MGC
GW - 11 Nov 1918
GW - Atrocities
GW - August 1914
GW - Biographies
GW - Propaganda
GW - Spies
GW - We forgot
Militia 1899-1920
Militia - Area Officers
Militia - Inf - Infantry
Militia - Inf - 1IB
Militia - Inf - 2IB
Militia - Inf - 3IB
Militia - Inf - NSW
Militia - Inf - Qld
Militia - Inf - SA
Militia - Inf - Tas
Militia - Inf - Vic
Militia - Inf - WA
Militia - K.E.Horse
Militia - LH
Militia - LH - Regts
Militia - LH - 1LHB
Militia - LH - 2LHB
Militia - LH - 3LHB
Militia - LH - 4LHB
Militia - LH - 5LHB
Militia - LH - 6LHB
Militia - LHN - NSW
Militia - LHN - 1/7/1
Militia - LHN - 2/9/6
Militia - LHN - 3/11/7
Militia - LHN - 4/6/16
Militia - LHN - 5/4/15
Militia - LHN - 6/5/12
Militia - LHN - 28
Militia - LHQ - Qld
Militia - LHQ - 13/2
Militia - LHQ - 14/3/11
Militia - LHQ - 15/1/5
Militia - LHQ - 27/14
Militia - LHS - SA
Militia - LHS - 16/22/3
Militia - LHS - 17/23/18
Militia - LHS - 24/9
Militia - LHT - Tas
Militia - LHT - 12/26
Militia - LHV - Vic
Militia - LHV - 7/15/20
Militia - LHV - 8/16/8
Militia - LHV - 9/19
Militia - LHV - 10/13
Militia - LHV - 11/20/4
Militia - LHV - 19/17
Militia - LHV - 29
Militia - LHW - WA
Militia - LHW-18/25/10
Militia - Military Orders
Militia - Misc
MilitiaRC - Rifle Clubs
MilitiaRC - NSW
MilitiaRC - NT
MilitiaRC - Qld
MilitiaRC - SA
MilitiaRC - Tas
MilitiaRC - Vic
MilitiaRC - WA
Militiaz - New Zealand
Tk - Turkish Items
Tk - Army
Tk - Bks - Books
Tk - Bks - 1/33IR
Tk - Bks - 27th IR
Tk - Bks - Air Force
Tk - Bks - Yildirim
Tk - POWs
Wp - Weapons
Wp - Hotchkiss Cav
Wp - Hotchkiss PMG
Blog Tools
Edit your Blog
Build a Blog
RSS Feed
View Profile
Open Community
Post to this Blog
Site Index
Education Centre
LH Militia
Boer War
Transport Ships
LH Battles
ALH - Units
ALH - General
Aboriginal Light H
Weapons
Ottoman Sources

"At a mile distant their thousand hooves were stuttering thunder, coming at a rate that frightened a man - they were an awe inspiring sight, galloping through the red haze - knee to knee and horse to horse - the dying sun glinting on bayonet points..." Trooper Ion Idriess

The Australian Light Horse Studies Centre aims to present an accurate history as chroniclers of early Australian military developments from 1899 to 1920.

The Australian Light Horse Studies Centre site holds over 12,000 entries and is growing daily.

Contact: Australian Light Horse Studies Centre

Let us hear your story: You can tell your story, make a comment or ask for help on our Australian Light Horse Studies Centre Forum called:

Desert Column Forum

WARNING: This site contains: names, information and images of deceased people; and, language which may be considered inappropriate today.

Saturday, 24 October 2009
Battle of Romani, Sinai, August 4 to 5, 1916, Contents
Topic: BatzS - Romani

 Battle of Romani

Sinai, August 4 to 5, 1916

 Contents


The Battle of Romani was the first major engagement after Gallipoli which involved the Light Horse working as a mounted formation.


Items

Outline

Romani, Sinai, August 4 to 5, 1916

Roll of Honour

Battle of Romani, Sinai, August 4 to 5, 1916, Roll of Honour, British Forces 

Battle of Romani, Sinai, August 4 to 5, 1916, Roll of Honour, Smith's Column, British and Australian Casualties

Battle of Romani, Sinai, August 4 to 5, 1916, Roll of Honour, Australia and New Zealand 

Brigade

Battle of Romani, Sinai, August 4 to 5, 1916, Roll of Honour, 1st Australian Light Horse Brigade

Battle of Romani, Sinai, August 4 to 5, 1916, Roll of Honour, 2nd Australian Light Horse Brigade 

Battle of Romani, Sinai, August 4 to 5, 1916, Roll of Honour, 3rd Australian Light Horse Brigade  

Battle of Romani, Sinai, August 4 to 5, 1916, Roll of Honour, New Zealand Mounted Rifles Brigade 


Pictures

Encampment near Romani, August 1916


Maps

General

1:125,000 map of Romani area

1:40,000 Maps

1:40,000 map of Mt Meredith area

1:40,000 map of Mt Royston area

1:40,000 map of Dueidar, Hassaia and Nuss area

1:40,000 map of Bir el Abd area

British War History

Official British War History map of Romani, 4 August 1916


Unit Accounts Map

1st ALHR AIF account map

German Map

1:250,000 German map of Romani area

Romani and Bir el Abd

Official Turkish Account Map


Order of Battle

Turkish

1 nci Kuvvei Seferiye (1st Expeditionary Force)

British

No. 3 Section Canal Defences 

Australian and New Zealand

Australian and New Zealand Mounted Division


Accounts

German

Liman von Sanders Account 


Allied Official War History Accounts

Australia

Gullett Australian Official History account about Katia

Gullett Australian Official History account about Romani

New Zealand

Powles New Zealand Official History account about Romani

British
The British Occupation of Romani 
The Turkish Advance
The Turkish Attack on The 4th August 
The Pursuit on The 5th August 
The end of the pursuit 
The Results of the Battle 
Turkish and German Forces Engaged 
Distribution of E.E.F., 27 July 1916 
The State of The Royal Flying Corps in Egypt at the time of the Battle of Romani 
The Evacuation of the Wounded
 
Analysis
Romani and Bir el Abd summary, Keogh Account 


War Diary Accounts

Australia

General Staff Headquarters, Anzac Mounted Division, AIF, War Diary Account

Anzac Mounted Division Artillery, AIF, War Diary Account

1st Light Horse Brigade Account

1st LH Bde, AIF, War Diary Appendix Account

1st Light Horse Field Ambulance Account

1st Light Horse Machine Gun Squadron Account  

1st ALHR, AIF, War Diary, account

2nd ALHR, AIF, War Diary, account

Account of the 2nd Light Horse Regiment's participation in the Battle of Romani, War Diary, Appendix 4.

3rd ALHR, AIF, War Diary, account

2nd Light Horse Brigade Account

2nd Light Horse Field Ambulance Account

2nd Light Horse Machine Gun Squadron Account 

5th ALHR, AIF, War Diary, account

5th LHR, AIF account about the Battle of Romani, Killed in Action

6th ALHR, AIF, War Diary, account

7th ALHR, AIF, War Diary, account

3rd Light Horse Brigade Account

3rd Light Horse Field Ambulance Account  - No War Diary entries for July and August

3rd Light Horse Machine Gun Squadron Account 

8th ALHR, AIF, War Diary, account

9th ALHR, AIF, War Diary, account

10th ALHR, AIF, War Diary, account

11th ALHR, AIF, War Diary, account - Bir el Aweidia


New Zealand War Diaries

New Zealand Mounted Rifles Brigade Account

Auckland Mounted Rifles Account

Canterbury Mounted Rifles Regiment Account

Wellington Mounted Rifles Account


British War Diaries

42nd (East Lancashire) Infantry Division War Diary Account

125th Infantry Brigade War Diary Account

126th Infantry Brigade War Diary Account

127th Infantry Brigade War Diary Account

52nd (Lowland) Division, War Diary Account

157th Infantry Brigade War Diary Account

157th Infantry Brigade War Diary Account, Appendix- The Mass Heatstroke March


Unit Histories

Australia

1st ALHR AIF account

2nd ALHR AIF account

3rd ALHR AIF account

5th LHR, AIF account

6th LHR, AIF account

7th LHR, AIF account

3rd LHFA, AIF, Unit History Account

8th LHR, AIF account

9th LHR, AIF account

10th LHR, AIF account

11th LHR, AIF account - Bir el Aweidia


New Zealand

AMR, NZMRB account

CMR, NZMRB account

WMR, NZMRB account


British

5th Battalion, Highland Light Infantry, Unit History Account


Newspaper Accounts

New York Times account of Romani, 6 August 1916

London Times account of Romani, 10 August 1916


Individual Accounts

859 Corporal Francis Patrick Curran, 7th LHR


Further Reading:

Battle of Romani, Sinai, August 4 to 5, 1916

Bir el Abd, Sinai, 9 August 1916

Battles where Australians fought, 1899-1920


Citation: Battle of Romani, Sinai, August 4 to 5, 1916, Contents

Posted by Project Leader at 12:01 AM EADT
Updated: Monday, 30 November 2009 7:49 AM EAST
Sunday, 6 September 2009
Battle of Romani, Sinai, August 4 to 5, 1916, Outline
Topic: BatzS - Romani

Battle of Romani

Sinai, August 4 to 5, 1916

Outline


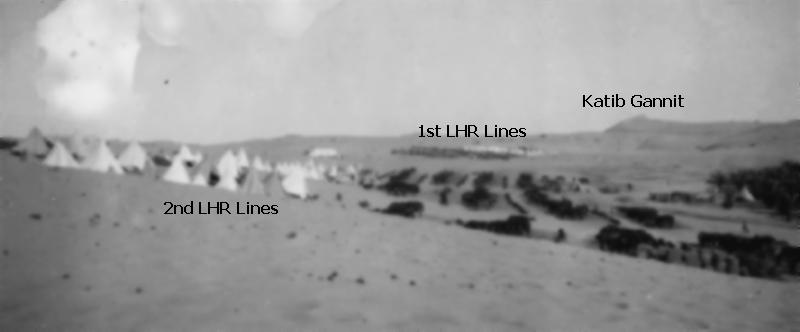
1st Light Horse Brigade camp at Romani


Romani, an action fought on 4-5 August 1916 in the Sinai Desert 35 kilometres east of the Suez Canal, took place amid towering sand-dunes astride the old caravan route to Palestine skirting the Mediterranean Sea. After Turkish raids had inflicted some damage to British outposts in this area during April, Romani was occupied by the 52nd (Lowland) Infantry Division and the Anzac Mounted Division, the latter at that time comprising two brigades of Australian light horse under Major-General Harry Chauvel. From here the mounted troops undertook a vigorous program of desert patrols, aimed at keeping the enemy away from this route to the canal and detecting any approach that was made.

On 18 July, aerial reconnaissance had discovered the presence of four large bodies of Turkish troops a few days' march beyond the line of British outposts. The next fortnight involved continual skirmishing in the midsummer heat, during which it was established from enemy prisoners that the puckish force comprised a reinforced division of 12,000-14,000 men under command of a German general, Kress von Kressenstein. During the night of 2-3 August the Turks advanced to Katia, eight kilometres south-east of Romani, and it was concluded that an attack on the main British position was imminent.

In the expectation that the enemy planned to envelop the southern end of the Romani defences, before sweeping onto the camps and railway behind than, Chauvel positioned his 1st Brigade - all that was available to him since his 2nd Brigade was out on reconnaissance-in small posts covering a frontage of five kilometres south of the 2nd Division's Lines. The Turks were in the process of forming up on their start-lines for an assault when they unexpectedly bumped into the Australians at about midnight on 3 August. After adjusting their plans, the Turks come on an hour later. In the fighting that quickly developed, the 700 rifles in Chauvel's screen of outposts were opposed by up to 8,000 Turks.

Under the weight of the unrelenting enemy pressure, the light horsemen fell back steadily. At 4.30 a.m., when it appeared that the Turks' outflanking movement must succeed, Chauvel brought in his 2nd Brigade into line on the right flank of the 1st. As the Turks continued to feel their way around the southern flank of the defence, Chauvel began moving troops from the left of his line to keep extending his right, with the 52nd Division taking over the parts of his front that had to be thus vacated. Despite these tactics, by 7 a.m. the enemy had gained a long sandhill dubbed Wellington Ridge flanking the camps. The Australians had been pushed back to a towering sand-dune called Mount Royston, their front now facing due south.


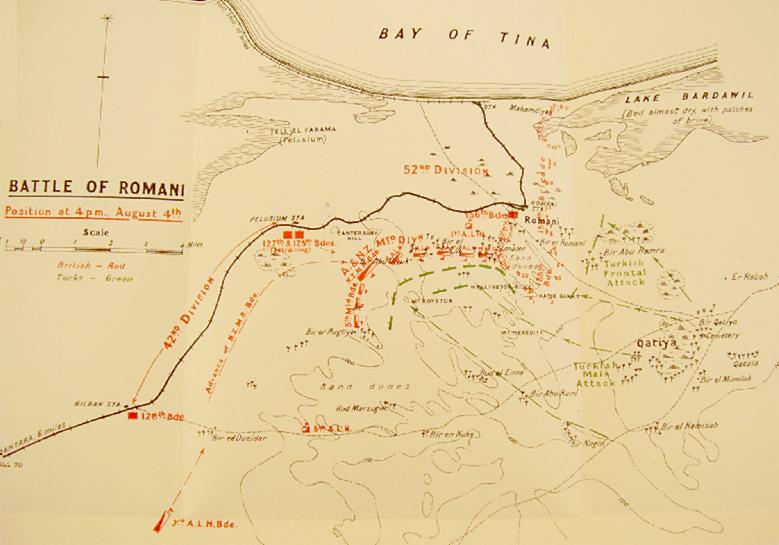
Romani and the disposition of the various armies, 4 August 1916
 
[Click on map for larger image]


At about 7 a.m. the New Zealand Mounted Rifles Brigade and a brigade of British yeomanry, having been sent forward from reserve positions closer to the canal, were ordered into action against the enemy's now exposed flank. These forces were not in position to commence a counter-attack on Mount Royston until nearly 2 p.m. The fight continued throughout the afternoon, but by the time a brigade from a British infantry division in reserve, the 42nd (Lancashire), also neared the scene at about 6 p.m. the Turks had begun surrendering in large numbers. Meanwhile Chauvel's brigades had managed to maintain their positions in the centre, but were too tired for any further counter-stroke to be attempted.

At 4 a.m. on 5 August the 1st and 2nd Light Horse Brigades, together with adjoining infantry, advanced with the bayonet. Except at one point, Turkish resistance on Wellington Ridge was quickly subdued. With the enemy flank now crushed, Chauvel was instructed at 6.30 a.m. to undertake a pursuit using all available mounted troops. This now involved the 3rd Brigade of his own division, which had arrived from the canal zone. The 3rd Light Horse Brigade had a major success south of Katia, when a Turkish strongpoint was rushed at about 1 p.m. and resulted in the capture of 425 enemy and seven machine-guns.

Elsewhere on this front the Turkish positions proved too strong and well protected by fire, so that Katia itself remained untaken. The British forces were compelled to retire, essentially through lack of water for the horses, but during the night the Turks took the opportunity to abandon the place anyway. Thus the threat to Romani had been decisively eliminated, although the failure of the British command to turn the Turkish defeat into a rout has largely obscured the significance of the victory. The brunt of the fighting had fallen upon the Anzac Mounted Division, which suffered over 900 of the 1,130 casualties (including 202 killed) on the British side. Turkish losses are unknown but were estimated at 9,000; 1,250 dead were buried by the victors and nearly 4,000 were taken prisoner.


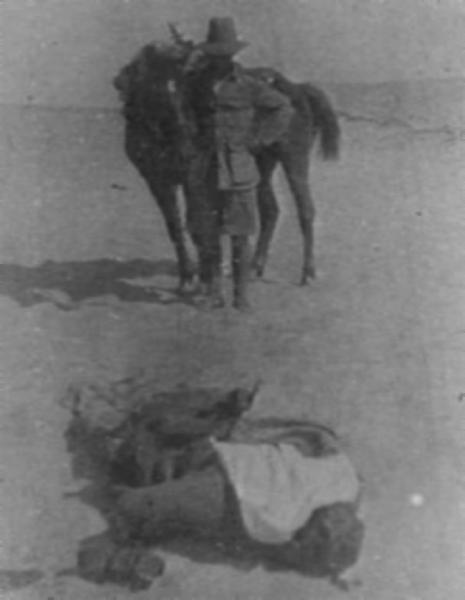
A poignant moment as a 3rd LHR man pays his respects to a fallen Turk.


Extracted from the book produced by Chris Coulthard-Clark, Where Australians Fought - The Encyclopaedia of Australia's Battles, Allen and Unwin, Sydney, 1998, pp. 118-118.


Additional References cited by Chris Coulthard-Clark:

H.S. Gullett, (1944), The Australian Imperial Force in Sinai and Palestine, Sydney: Angus & Robertson.

A.J. Hill, (1978), Chauvel of the Light Horse, Carlton, Vic.: Melbourne University Press.


Further Reading:

Battle of Romani, Sinai, August 4 to 5, 1916

Bir el Abd, Sinai, 9 August 1916

Battles where Australians fought, 1899-1920


Citation: Battle of Romani, Sinai, August 4 to 5, 1916, Outline

Posted by Project Leader at 12:01 AM EADT
Updated: Thursday, 15 October 2009 8:27 AM EADT
Saturday, 5 September 2009
Battle of Romani, Sinai, August 4 to 5, 1916, Roll of Honour, Australia and New Zealand
Topic: BatzS - Romani

Battle of Romani

Sinai, August 4 to 5, 1916

Roll of Honour

Australia and New Zealand


Poppies on the Roll of Honour, Australian War Memorial, Canberra


The Roll of Honour contains the names of all the men from the Anzac Mounted Division known to have served and lost their lives during the Battle of Romani.


Roll of Honour


David J. BARCLAY, 3rd Light Horse Regiment, Killed in Action, 4 August 1916.

Bertie Gerald BARRETT, 11th Light Horse Regiment, Killed in Action, 7 August 1916.

Henry BELL, 7th Light Horse Regiment, Died of Wounds, 6 August 1916.

Owen Ernest Hugh BINGHAM, 3rd Light Horse Regiment, Killed in Action, 4 August 1916.

Charles John BRUCE, 9th Light Horse Regiment, Killed in Action, 5 August 1916.

Harold Alfred BURRILL, 3rd Light Horse Regiment, Killed in Action, 4 August 1916.


Douglas Dunmore CAMPBELL, 2nd Light Horse Regiment, Killed in Action, 4 August 1916.

Conyers CLIFFORD, 7th Light Horse Regiment, Killed in Action, 5 August 1916.

Frank Railton CLINCH, 1st Light Horse Machine Gun Squadron, Killed in Action, 4 August 1916.

Walter Herbert COURTMAN, 1st Light Horse Regiment, Killed in Action, 3 August 1916.

Richard Walter CROZIER, 6th Light Horse Regiment, Killed in Action, 4 August 1916.

Thomas Andrew CUNNINGHAM, 2nd Light Horse Regiment, Killed in Action, 4 August 1916.

Francis Patrick CURRAN, 7th Light Horse Regiment, Killed in Action, 4 August 1916.


Thomas DALE, 2nd Light Horse Regiment, Killed in Action, 4 August 1916.

Dennitt DAVIS, 6th Light Horse Regiment, Killed in Action, 4 August 1916.

Norman DIGBY, 6th Light Horse Regiment, Died of Wounds, 6 August 1916.

Halven Roy DRADY, 6th Light Horse Regiment, Killed in Action, 5 August 1916.

Arthur William DRINKWATER, 7th Light Horse Regiment, Killed in Action, 5 August 1916.

John DUELL, 3rd Light Horse Regiment, Killed in Action, 6 August 1916.

Samuel James DUNKINSON, 7th Light Horse Regiment, Killed in Action, 5 August 1916.


Leonard Ridgeway EASTHER, 3rd Light Horse Regiment, Killed in Action, 4 August 1916.


Percy Walter FINNIS, 2nd Light Horse Regiment, Killed in Action, 4 August 1916.

Horace Ernest FRAZER, 7th Light Horse Regiment, Died of Wounds, 7 August 1916.

James Malcolm FROST, 10th Light Horse Regiment, Killed in Action, 5 August 1916.


Stewart Courtney GADEN, 7th Light Horse Regiment, Killed in Action, 6 August 1916.

Harold GIBBON, 11th Light Horse Regiment, Killed in Action, 7 August 1916.

Thomas Lambert GLASBY, 11th Light Horse Regiment, Killed in Action, 7 August 1916.

Bartholomew James GOGGINS, 1st Light Horse Regiment, Killed in Action, 5 August 1916. 

Alexander Harold GOOD, Canterbury Mounted Rifles Regiment, Died of Wounds, 7 August 1916.

William James GRAHAM, 1st Light Horse Regiment, Killed in Action, 4 August 1916.


Charles HOLLEDGE, 2nd Light Horse Field Ambulance, Killed in Action, 4 August 1916.

Edmund John HOWARD, 3rd Light Horse Regiment, Killed in Action, 4 August 1916.


Fergus Stanley IBBOTT, 3rd Light Horse Regiment, Died of Wounds, 6 August 1916.

Fred INGLIS, 3rd Light Horse Regiment, Killed in Action, 4 August 1916.


Alfred William JAMES, 8th Light Horse Regiment, Killed in Action, 6 August 1916.

Christian JEPSON, 2nd Light Horse Regiment, Killed in Action, 4 August 1916.

John William JONES, Imperial Camel Corps, Killed in Action, 6 August 1916.


Austin KEANE, 1st Light Horse Regiment, Killed in Action, 4 August 1916.

John KELLIHER, 6th Light Horse Regiment, Killed in Action, 4 August 1916.

Basil KERSLAKE, 3rd Light Horse Regiment, Died of Wounds, 5 August 1916.


Thomas LITSTER, 9th Light Horse Regiment, Killed in Action, 5 August 1916.

Walter Bernard LORD, 1st Light Horse Regiment, Killed in Action, 4 August 1916.

Wilford LUDBEY, 3rd Light Horse Regiment, Died of Wounds, 6 August 1916.


Duncan Mark MacLAREN, 10th Light Horse Regiment, Died of Wounds, 6 August 1916.

Lewis MANSON, Canterbury Mounted Rifles Regiment, Killed in Action, 5 August 1916.

Charles Bute MASSY, 5th Light Horse Regiment, Killed in Action, 5 August 1916.

Thomas McCAHON, New Zealand Machine Gun Squadron, Died of Wounds, 4 August 1916.

Samuel Crichton McGOWAN, 5th Light Horse Regiment, Died of Wounds, 7 August 1916.

William McQUIGGIN, 1st Light Horse Regiment, Killed in Action, 4 August 1916.

Vivian Roy MORROW, 1st Light Horse Regiment, Killed in Action, 4 August 1916.

Edward Charles MORTON, Canterbury Mounted Rifles Regiment, Died of Wounds, 7 August 1916.

Ralph Graham MOTTERSHEAD, 1st Light Horse Regiment, Killed in Action, 4 August 1916.


Henrie Clarence NICHOLAS, 3rd Light Horse Regiment, Killed in Action, 4 August 1916.


Nicholas James OATES, 23 Infantry Battalion attached to Imperial Camel Corps, Killed in Action, 6 August 1916.

Thomas O'CALLAGHAN, 2nd Light Horse Regiment, Killed in Action, 4 August 1916.

Harold Reath OLVER, 2nd Light Horse Machine Gun Squadron, Killed in Action, 4 August 1916.


Alan Dexter PALMER, 3rd Light Horse Machine Gun Squadron, Died of Wounds, 6 August 1916.

Joseph George Alfred PICKENS, Canterbury Mounted Rifles Regiment, Killed in Action, 4 August 1916.


Joseph Charles RADNELL, 1st Light Horse Machine Gun Squadron, Killed in Action, 4 August 1916.

Frederick Ormsby REES, Canterbury Mounted Rifles Regiment, Killed in Action, 5 August 1916.

Alan Serafino RIGHETTI, 2nd Light Horse Regiment, Killed in Action, 4 August 1916.

John RITCHIE, 6th Light Horse Regiment, Killed in Action, 4 August 1916.

Mark ROSENBERG, 7th Light Horse Regiment, Killed in Action, 5 August 1916.


Roy Stanley SEWELL, 1st Light Horse Regiment, Killed in Action, 4 August 1916.

Andrew Mitchell SHARP, 9th Light Horse Regiment, Killed in Action, 5 August 1916.

Lionel Francis Watson SMITH, 2nd Light Horse Machine Gun Squadron, Killed in Action, 5 August 1916.

Stuart Rutherford SMITH, 7th Light Horse Regiment, Killed in Action, 5 August 1916.

Wilfred SMITH, 3rd Light Horse Regiment, Killed in Action, 4 August 1916.

Francis Guthrie SMITH, New Zealand Machine Gun Squadron, Killed in Action, 5 August 1916.

William George STEELE, 5th Light Horse Regiment, Killed in Action, 5 August 1916.

Harold Rowton STEVENS, 11th Light Horse Regiment, Killed in Action, 7 August 1916.

William Henry STRIBLEY, 1st Light Horse Regiment, Killed in Action, 4 August 1916.

George SULLIVAN, 2nd Light Horse Regiment, Killed in Action, 4 August 1916.

Ralph SUTTON, Canterbury Mounted Rifles Regiment, Died of Wounds, 5 August 1916.


Alfred Gibbs TOLMAN, 3rd Light Horse Regiment, Killed in Action, 4 August 1916.

William TOOHEY, 2nd Light Horse Regiment, Killed in Action, 4 August 1916.

Michael TUCKEY, 1st Light Horse Regiment, Killed in Action, 4 August 1916.


Roderick William URQUHART, 8th Light Horse Regiment, Killed in Action, 7 August 1916.


John WALKER, Canterbury Mounted Rifles Regiment, Died of Wounds, 6 August 1916.

Leslie WALLACE, Auckland Mounted Rifles Regiment, Died of Wounds, 7 August 1916.

Mervyn Leigh WATERS, Auckland Mounted Rifles Regiment, Killed in Action, 4 August 1916.

Roderick Noel White WEAVER, 3rd Light Horse Regiment, Killed in Action, 4 August 1916.

Frank Lindsay WILLIS, 1st Light Horse Regiment, Died of Wounds, 4 August 1916.

Harry Noel WILSON, 6th Light Horse Regiment, Killed in Action, 4 August 1916.

Alfred Thomas WINTERTON, 1st Light Horse Regiment, Killed in Action, 4 August 1916.

Percy Severn Roy WOODYATT, 2nd Light Horse Regiment, Killed in Action, 4 August 1916.

Edgar Alma Mark WRIGHT, 6th Light Horse Regiment, Killed in Action, 4 August 1916.

Henry Patrick WRIGHT, 8th Light Horse Regiment, Died of Wounds, 7 August 1916.


Lest We Forget


Acknowledgement: Many thanks to Steve Becker who provided much of the raw material that appears in this item.


Further Reading:

Battle of Romani, Sinai, August 4 to 5, 1916 

Bir el Abd, Sinai, 9 August 1916

Battles where Australians fought, 1899-1920


Citation: Battle of Romani, Sinai, August 4 to 5, 1916, Roll of Honour, Australia and New Zealand

Posted by Project Leader at 12:01 AM EADT
Updated: Friday, 23 October 2009 8:56 AM EADT
Friday, 4 September 2009
Battle of Romani, Sinai, August 4 to 5, 1916, Turkish Order of Battle
Topic: BatzS - Romani


Battle of Romani

Sinai, August 4 to 5, 1916

Turkish Order of Battle

The following Order of Battle for the 1st Expeditionary force was constructed by Jeff Leser.


1 nci Kuvvei Seferiye (1st Expeditionary Force)

As at 12 July 1916

Division
3rd Infantry Division
31st Infantry Regiment

32nd Infantry Regiment
 
39th Infantry Regiment


3rd Mountain Artillery Battalion
1st Battery (four 7.5cm mountain guns)
 
2nd Battery (four 7.5cm mountain guns)

3rd Battery (four 7.5cm mountain guns)
 
4th Battery (four 7.5cm mountain guns)


3rd (Divisional) Camel Company
 
3rd (Divisional) Engineer Company

3rd (Divisional) Medical Company


Artillery

150mm Howitzer Battery

Gebirgshaubitzdivision v. Marno (Austrian)
 
1st Battery (six 10cm Mountain Howitzers)
 
2nd Battery (six 10cm Mountain Howitzers)

1st Heavy Mortar Battery (210mm mortars)(German)

2nd Heavy Mortar Battery (210mm mortars)(German)

1st Light Infantry Mortar Detachment (170mm mortars)(German)

2nd Light Infantry Mortar Detachment (170mm mortars)(German) These should be Batterie 350, 351 and 352

Two Anti-aircraft Platoons (2 AA guns each)(German)(possibly Batterie 133 and Batterie 136)

2/60 Fuss Artillerie Battalion (2 100mm Guns)(German)


Machine Guns

32nd MG Company (six MGs)

Maschinegewehr Bataillon 601/01 (German)
 
MG Abteilung 601 (six MGs)
 
MG Abteilung 602 (six MGs)
 
MG Abteilung 603 (six MGs)
 
MG Abteilung 604 (six MGs)
 
MG Abteilung 605 (six MGs)
 
MG Abteilung 606 (six MGs)

MG Abteilung 607 (six MGs)

MG Abteilung 608 (six MGs)
 
Two MGs in reserve.


Air Force

300 Flieger Abteilung (German)


Medical

1st Mobile Hospital
 
2nd Mobile Hospital
 
3rd Mobile Hospital 

4th Mobile Hospital
 
5th Mobile Hospital 

6th Mobile Hospital

Hospital Transportation Column (mule-litter)
 
212 Field Hospital (German)
 
213 Field Hospital (German)


Logistics

1/3 Field Bakery
 
2/3 Field Bakery

3/3 Field Bakery
 
1st Provisions Column
 
2nd Provisions Column
 
3rd Provisions Column
 
4th Provisions Column
 
5th Provisions Column
 
6th Provisions Column


Army Assets
 

2/81st Infantry Battalion
 
1/1st Engineer Company
 
4/2nd Engineer Company
 
1/5th Engineer Company
Sapper (Miner) Detachment
 
Telegraph Detachment
 
Light Radio Detachment
 
Signal Detachment (Telephone)
 
Well-drilling Detachment

Operating as a screen for the force:

Bîrülmezar Bedouin Camel Company

Raider Camel Regiment


Sources:

Herman Cron, Imperial German Army 1914-18,  2002, Translation of Geschichte des Deutsches Heeres im Weltkrieg 1914-1918, 1937, p. 61.

Boden, “Jildirim” Deutsches Streifer auf heiligem, 1925.

Peter Jung, Der k.u.k. Wüstenkrieg. Österreich-Ungarn im Vord, 1992.

Peter Jung, 'Die Militärischen Formation in der Türkei und Mittleren Osten’ in Die KuK Streifkräfte im Ersten Weltkrieg 1914-1918, 1995.

Edward Erickson, Ordered to Die, 2001, p. 155

Der Weltkrieg 1914-1918, Vol. 12, p. 610.

Birinci Cihan Harbinde Türk Harbi 1916 Yili Hareketlieri III nci cilt General Fahri Belen, pp. 211-216.

Birinci Dünya Harbinde Türk Harbi IV ncü Cilt I nci Kisim Sina-Filistin Cephesi, pp. 364-365, and kurulus 6


Acknowledgement: Many thanks to Jeff Leser who provided the material that appears in this item.


Further Reading:

Battle of Romani, Sinai, August 4 to 5, 1916

Bir el Abd, Sinai, 9 August 1916

Battles where Australians fought, 1899-1920


Citation: Battle of Romani, Sinai, August 4 to 5, 1916, Turkish Order of Battle

Posted by Project Leader at 12:01 AM EADT
Updated: Sunday, 1 November 2009 12:16 PM EAST
Sunday, 9 August 2009
Battle of Romani, Sinai, August 4 to 5, 1916, Falls Account, The British Occupation of Romani
Topic: BatzS - Romani

Battle of Romani

Sinai, August 4 to 5, 1916

Falls Account, The British Occupation of Romani


The Battle of Romani, 4-6 August 1916

[Click on map for larger version]

[From: Military operations: Egypt and Palestine, Sketch 10 facing p. 178.]


As part of the Official British War History of the Great War, Captain Cyril Falls and Lieutenant General George MacMunn were commissioned to produce a commentary on the Sinai, Palestine and Syrian operations that took place. In 1928, their finished work, Military Operations, Egypt and Palestine - From the outbreak of war with Germany to June 1917,  was published in London. Their book included a section specifically related to the battle of Romani and is extracted below.

MacMunn, G. & Falls, C., Military operations: Egypt and Palestine, (London 1930), pp. 173 - 182:


Part 1. The British Occupation of Romani.

Between the 11th May and the 4th June the 52nd (Lowland) Division moved to Romani, where a strong position was gradually developed, its left flank on the sea, its right rounded off to cover the new railhead at Romani Station. It was supplied by both the main line from Qantara and the narrow-gauge line from Port Said to Mahamdiyah. A 6-inch pipe-line was laid beside the main railway, but owing to the heavy demands on piping by the Canal Defences, lagged considerably behind railhead. By the 4th June, 17 miles of this pipe had been laid from Qantara, "pipehead" being then west of Pelusium Station. The troops at Romani had therefore still to be supplied with water either by means of trucks from Qantara or by convoys of camels from pipehead. Local water was impregnated with salts to such an extent that it could not be used in the boilers of the engines, and on the 30th June Sir A. Murray informed the War Office that every drop of water drunk at Romani came from the Nile, that the 6-inch pipe was now inadequate, and that he required a 12-inch pipe. This the War Office promised, and three months later the first consignment arrived.

The mounted troops originally established at Romani, Qatiya, and Oghritina had subsisted on the local well water, but the coming of the extreme summer heat, during which a temperature of 123° Fahrenheit was registered inside a tent, altered the situation. British troops could not now march and fight on the saline water; the horses often refused it, and, if they drank it, quickly lost condition.1

1. A condensing plant was installed at Mahamdiyah to supplement the supply, but it proved expensive in coal and the intake sucked in so much sand that the pipes were choked. When it was finally put into working order the further advance across the desert had begun and its need was almost over.


It must be added that both troops and horses gradually accustomed themselves to the local water, and were able to subsist upon it for short periods. Better water than that in existing wells, which were fouled by decaying vegetable matter, was frequently obtained by sinking new ones in their vicinity. The digging of a well in the sand was, however, a long and arduous task. Great saving of time and trouble was effected by the use of the "spear-point" pump, first employed by the Australian Field Squadron. A section of 2j-inch piping was brought to a point and perforated above that point, the perforation being covered with wire gauze. This was driven into the sand, and additional lengths screwed to it till the required depth was attained, when a service lift-and-force pump was attached. Water was thus obtained without difficulty in any water-bearing area and far more quickly than from most of the wills in the Oases.

[175] The defensive position at Romani ran southward from Mahamdiyah along a line of high sand-hills, which marked the eastern edge of an area of very soft and shifting sand. East of this natural line of defence the ground sloped down to much lower dunes and harder sand. Movement here was easier, nor were the dried gypsum pans by which the area was broken, in general serious obstacles. Within sight of the Romani heights were the large groves forming the Qatiya Oasis.

The principal tactical point in the position was a dune known as Katib Gannit, at its southern end, standing 100 feet above its neighbouring hillocks. Between the shore at the western end of the Bardawil Lagoon and Katib Gannit, on the eastern slopes of the Romani heights, were constructed in first line twelve works, on an average 750 yards apart, with another series curving westward, then northward, in the form of a hook, to protect the right or southern flank. The total number of works was eighteen;2 [2 Maps 9 and 10 show only 16 works; apparently the two remaining were in rear of these.] when fully garrisoned they held from 40 to 170 rifles apiece, with an average of 100 rifles. In addition to Lewis guns an average of two Vickers guns was also allotted to each. The works were prominent, since concealment could not be obtained without sacrificing field of fire. They were well wired, though at the opening of the Battle of Romani the spaces between them were not covered by wire, except on the right of the position.

After the middle of May the heat in Sinai is very great, becoming fiercest between mid-June and the end of July. By night it is reasonably cool, and often cold, but day after day, when once the sun is well up, the desert throws back its heat like metal. Plate-laying on the railway could not in these conditions be carried out after 10 a.m. Worse than [177] the sun is the hot southerly wind, or Khamsin,1 [1. Khamsin, fifty. The Bedouin believe this wind blows once every fifty days. It lasts sometimes for only a few hours, sometimes for several days.] which turns the atmosphere to a haze of floating particles of sand. In camp at Romani the troops suffered severely, but the Scotsmen more than the Australians, many of whom, coming front the ranges of the interior, were accustomed to great summer heat and scanty water supply. No major operations took place within this period, for the Turks retained in Sinai only small scattered garrisons, out of reach of the British force. In the air, however, there was considerable activity. Turkish aeroplanes appeared over the Suez Canal twice during the month of May, dropping bombs on Port Said, but causing no material damage and only 23 casualties to troops and civilians. On the 18th a successful bombardment of the town and aerodrome of El Arish was carried out from the sea and air in reprisal for the first of the Turkish raids. On the 22nd the R.F.C. bombed all the enemy camps on a front of 45 miles parallel to the Canal.

The activity of the Turkish aeroplanes was, however, increasing, and Colonel W. G. H. Salmond, commanding the Sketch B. 5th Wing, planned a big raid on the 18th June upon their aerodrome at El Arish. To gain the advantage of surprise, the eleven British machines kept out to sea until past El Arish, then turned inland and approached their objective from the south-east. Two Turkish machines were destroyed on the ground, two of the ten hangars set on fire, and four others hit by bombs. Successful attacks with bombs and machine guns were also made on several parties of Turkish troops. The British aeroplanes were subjected to heavy fire and three brought down. Of these, one fell into the sea, the pilot being rescued by a motor-boat; a second fell north of the aerodrome and was burned by its pilot, Captain R. J. Tipton, R.F.A., before the Turks could reach him. The third aeroplane was observed on the ground by one of the escorting machines, piloted by Captain S. Grant-Dalton, Green Howards, who landed beside it, took off its pilot, Captain H. A. Van Ryneveld, 2 [2. Now Colonel Sir H. A. Van Ryneveld, Director of the South African Air services, who flew from London to Cape Town via Cairo in 1920.] and carried him 90 miles back to Qantara. [178]

On the ground constant patrolling and reconnaissances took place. In one such expedition, to Bir Bayud, 19 miles south-east of Romani, made on the 16th May, a day of particularly intense heat, the 6th A.L.H., narrowly escaped disaster from lack of water, many men lying for hours unconscious in the groves of Qatiya. On the 31st a successful raid on the enemy's post at Bir Salmana, 22 miles E.N.E. of Romani, was carried out by the New Zealand Brigade, supported by the 1st A.L.H. Two Turks were captured and 15 killed, while British aeroplanes caused further loss to the retreating enemy, especially in camels.

During the month of June an operation was carried out from No. 2 Section of the Canal Defences to deny to the enemy the large supplies of water in the Wadi um Mukhsheib and at Moiya Harab, 25 miles east of the Little Bitter Lake, which had been used by the Turks in their attack on the Canal the previous year. A composite force of the 9th and 10th A.L.H. (3rd L. H. Brigade), with detachments of engineers and of the Bikanir Camel Corps, under the command of Lieut.-Colonel T. J. Todd, moved out on the 9th June to the Wadi um Mukhsheib, and a detachment of Middlesex Yeomanry advanced to Moiya Harab. The ancient stone cisterns, sunk beside the wadi's bed to catch its overflow, were pumped dry. Patches of clay which were holding water in large pools were ditched by explosives, to drain off the water into the sand. Three days' work in intense heat disposed of five million gallons of water, the cisterns being then sealed to prevent them from refilling after the next season's rains. As a result, the use by the enemy of the Central Sinai route, by which he had advanced in 1915, was made practically impossible and the area of a serious Turkish offensive narrowed down to the coast route, where preparations had been made to meet it.

At the beginning of June the revolt of the Arabs in the Hejaz against the Turks broke out. This, together with the events which led up to it, will be described in the chapters that follow. One result may be mentioned here : Sir A. Murray was now directed by the C.I.G.S. to consider seriously that advance to El Arish which had previously been merely a vague possibility. Sir W. Robertson did not, however, contemplate that such an advance would be possible before October.


Previous: Battle of Romani, Sinai, August 4 to 5, 1916

Next: The Turkish Advance


Further Reading:

Battle of Romani, Sinai, August 4 to 5, 1916

Bir el Abd, Sinai, 9 August 1916

Battles where Australians fought, 1899-1920


Citation: Battle of Romani, Sinai, August 4 to 5, 1916, Falls Account, The British Occupation of Romani

Posted by Project Leader at 12:01 AM EADT
Updated: Monday, 7 September 2009 6:25 PM EADT

Newer | Latest | Older

Full Site Index


powered by FreeFind
Let us hear your story: You can tell your story, make a comment or ask for help on our forum.

Desert Column Forum

A note on copyright

The Australian Light Horse Studies Centre is a not for profit and non profit group whose sole aim is to write the early history of the Australian Light Horse from 1900 - 1920. It is privately funded and the information is provided by the individuals within the group and while permission for the use of the material has been given for this site for these items by various donors, the residual and actual copyright for these items, should there be any, resides exclusively with the donors. The information on this site is freely available for private research use only and if used as such, should be appropriately acknowledged. To assist in this process, each item has a citation attached at the bottom for referencing purposes.

Please Note: No express or implied permission is given for commercial use of the information contained within this site.

A note to copyright holders

The Australian Light Horse Studies Centre has made every endeavour to contact copyright holders of material digitised for this blog and website and where appropriate, permission is still being sought for these items. Where replies were not received, or where the copyright owner has not been able to be traced, or where the permission is still being sought, the Australian Light Horse Studies Centre has decided, in good faith, to proceed with digitisation and publication. Australian Light Horse Studies Centre would be happy to hear from copyright owners at any time to discuss usage of this item.

Contact

Australian Light Horse Studies Centre

eXTReMe Tracker