« November 2009 »
S M T W T F S
1 2 3 4 5 6 7
8 9 10 11 12 13 14
15 16 17 18 19 20 21
22 23 24 25 26 27 28
29 30
You are not logged in. Log in


Search the site:


powered by FreeFind
Volunteer with us.

Entries by Topic All topics
A Latest Site News
A - Using the Site
AAA Volunteers
AAB-Education Centre
AAC-Film Clips
AAC-Photo Albums
AIF & MEF & EEF
AIF - Lighthorse
AIF - ALH - A to Z
AIF - DMC
AIF - DMC - Or Bat
AIF - DMC - Anzac MD
AIF - DMC - Aus MD
AIF - DMC - British
AIF - DMC - BWI
AIF - DMC - French
AIF - DMC - Indian
AIF - DMC - Italian
AIF - DMC - Medical
AIF - DMC - Remounts
AIF - DMC - Scouts
AIF - DMC - Sigs
AIF - DMC - Sigs AirlnS
AIF - DMC - 1 Sig Sqn
AIF - DMC - 2 Sig Sqn
AIF - DMC - Eng
AIF - DMC - Eng 1FSE
AIF - DMC - Eng 2FSE
AIF - DMC - GSR
AIF - 1B - 1 LHB
AIF - 1B - 6 MVS
AIF - 1B - 1 LHMGS
AIF - 1B - 1 Sig Trp
AIF - 1B - 1 LHFA
AIF - 1B - 1 LHR
AIF - 1B - 2 LHR
AIF - 1B - 3 LHR
AIF - 2B - 2 LHB
AIF - 2B - 7 MVS
AIF - 2B - 2 LHFA
AIF - 2B - 2 LHMGS
AIF - 2B - 2 Sig Trp
AIF - 2B - 5 LHR
AIF - 2B - 6 LHR
AIF - 2B - 7 LHR
AIF - 3B - 3 LHB
AIF - 3B - 8 MVS
AIF - 3B - 3 LHB Sigs
AIF - 3B - 3 LHFA
AIF - 3B - 3 LHMGS
AIF - 3B - 3 Sig Trp
AIF - 3B - 8 LHR
AIF - 3B - 9 LHR
AIF - 3B - 10 LHR
AIF - 4B - 4 LHB
AIF - 4B - 4 Sig Trp
AIF - 4B - 9 MVS
AIF - 4B - 4 LHFA
AIF - 4B - 4 LHMGS
AIF - 4B - 4 LHR
AIF - 4B - 11 LHR
AIF - 4B - 12 LHR
AIF - 5B - 5 LHB
AIF - 5B - 10 MVS
AIF - 5B - 5 LHFA
AIF - 5B - 5 Sig Trp
AIF - 5B - ICC
AIF - 5B - 14 LHR
AIF - 5B - 15 LHR
AIF - 5B - 1er Regt
AIF - 5B - 2 NZMGS
AIF - AASC
AIF - Aboriginal LH
AIF - Badges
AIF - Cars
AIF - Chinese LH
AIF - Double Sqns
AIF - Engineers
AIF - Fr - 22 Corps
AIF - Fr - 13 LHR
AIF - Honour Roll
AIF - HQ - 3rd Echelon
AIF - Marching Songs
AIF - Misc Topics
AIF - NZMRB
AIF - NZMRB - AMR
AIF - NZMRB - CMR
AIF - NZMRB - EFT
AIF - NZMRB - NZMFA
AIF - NZMRB - NZMGS
AIF - NZMRB - OMR
AIF - NZMRB - Sig-Trp
AIF - NZMRB - WMR
AIF - Ships
AIF - Ships - Encountr
AIF - Ships - Una
AIF - WFF
AIF - Wireless Sqn
Battles
BatzA - Australia
BatzA - Broken Hill
BatzA - Liverpool
BatzA - Merivale
BatzB - Boer War
BatzB - Bakenlaagte
BatzB - Belmont
BatzB - Bothaville
BatzB - Buffels Hoek
BatzB - Coetzees Drift
BatzB - Diamond Hill
BatzB - Driefontein
BatzB - Elands
BatzB - Graspan
BatzB - Grobelaar
BatzB - Grootvallier
BatzB - Hartebestfontn
BatzB - Houtnek
BatzB - Karee Siding
BatzB - Kimberley
BatzB - Koster River
BatzB - Leeuw Kop
BatzB - Mafeking
BatzB - Magersfontein
BatzB - Modder River
BatzB - Onverwacht
BatzB - Paardeberg
BatzB - Palmietfontein
BatzB - Pink Hill
BatzB - Poplar Grove
BatzB - Rhenoster
BatzB - Sannahs Post
BatzB - Slingersfontn
BatzB - Stinkhoutbm
BatzB - Sunnyside
BatzB - Wilmansrust
BatzB - Wolvekuil
BatzB - Zand River
BatzG - Gallipoli
BatzG - Anzac
BatzG - Aug 1915
BatzG - Baby 700
BatzG - Evacuation
BatzG - Hill 60
BatzG - Hill 971
BatzG - Krithia
BatzG - Lone Pine
BatzG - Nek
BatzJ - Jordan Valley
BatzJ - 1st Amman
BatzJ - 2nd Amman
BatzJ - Abu Tellul
BatzJ - Es Salt
BatzJ - JV Maps
BatzJ - Ziza
BatzM - Mespot
BatzM - Baghdad
BatzM - Ctesiphon
BatzM - Daur
BatzM - Kurna
BatzM - Kut el Amara
BatzM - Ramadi
BatzN - Naval
BatzN - AE1
BatzN - Cocos Is
BatzN - Heligoland
BatzN - Marmara
BatzN - Zeebrugge
BatzN - Zeppelin L43
BatzNG - Bitapaka
BatzO - Other
BatzO - Baku
BatzO - Egypt 1919
BatzO - Emptsa
BatzO - Karawaran
BatzO - Peitang
BatzO - Wassa
BatzP - Palestine
BatzP - 1st Gaza
BatzP - 2nd Gaza
BatzP - 3rd Gaza
BatzP - Aleppo
BatzP - Amwas
BatzP - Ayun Kara
BatzP - Bald Hill
BatzP - Balin
BatzP - Beersheba
BatzP - Berkusieh
BatzP - Damascus
BatzP - El Auja
BatzP - El Buggar
BatzP - El Burj
BatzP - Haifa
BatzP - Huj
BatzP - JB Yakub
BatzP - Kaukab
BatzP - Khan Kusseir
BatzP - Khuweilfe
BatzP - Kuneitra
BatzP - Megiddo
BatzP - Nablus
BatzP - Rafa
BatzP - Sasa
BatzP - Semakh
BatzP - Sheria
BatzP - Surafend
BatzP - Wadi Fara
BatzS - Sinai
BatzS - Bir el Abd
BatzS - El Arish
BatzS - El Mazar
BatzS - El Qatiya
BatzS - Jifjafa
BatzS - Magdhaba  
BatzS - Maghara
BatzS - Romani
BatzS - Suez 1915
BatzSe - Senussi
BatzWF - Westn Front
BW - Boer War
BW - NSW
BW - NSW - 1ACH
BW - NSW - 1NSWMR
BW - NSW - 2NSWMR
BW - NSW - 3ACH
BW - NSW - 3NSWIB
BW - NSW - 3NSWMR
BW - NSW - 5ACH
BW - NSW - A Bty RAA
BW - NSW - AAMC
BW - NSW - Aust H
BW - NSW - Lancers
BW - NSW - NSW Inf
BW - NSW - NSWCBC
BW - NSW - NSWIB
BW - NSW - NSWMR_A
BW - NZ
BW - Qld
BW - Qld - 1ACH
BW - Qld - 1QMI
BW - Qld - 2QMI
BW - Qld - 3ACH
BW - Qld - 3QMI
BW - Qld - 4QIB
BW - Qld - 5QIB
BW - Qld - 6QIB
BW - Qld - 7ACH
BW - QLD - AAMC
BW - SA
BW - SA - 1SAMR
BW - SA - 2ACH
BW - SA - 2SAMR
BW - SA - 3SACB
BW - SA - 4ACH
BW - SA - 4SAIB
BW - SA - 5SAIB
BW - SA - 6SAIB
BW - SA - 8ACH
BW - SA - AAMC
BW - Tas
BW - Tas - 1ACH
BW - Tas - 1TIB
BW - Tas - 1TMI
BW - Tas - 2TB
BW - Tas - 2TIB
BW - Tas - 3ACH
BW - Tas - 8ACH
BW - Vic
BW - Vic - 1VMI
BW - Vic - 2ACH
BW - Vic - 2VMR
BW - Vic - 3VB
BW - Vic - 4ACH
BW - Vic - 4VIB
BW - Vic - 5VMR
BW - Vic - 6ACH
BW - Vic - AAMC
BW - Vic - Scot H
BW - WA
BW - WA - 1WAMI
BW - WA - 2ACH
BW - WA - 2WAMI
BW - WA - 3WAB
BW - WA - 4ACH
BW - WA - 4WAMI
BW - WA - 5WAMI
BW - WA - 6WAMI
BW - WA - 8ACH
BW Gen - Campaign
BW Gen - Soldiers
BW General
Cavalry - General
Diary - Schramm
Egypt - Heliopolis
Egypt - Mena
Gen - Ataturk Pk, CNB
Gen - Australia
Gen - Legends
Gen - Query Club
Gen - St - NSW
Gen - St - Qld
Gen - St - SA
Gen - St - Tas
Gen - St - Vic
Gen - St - WA
Gm - German Items
Gm - Bk - 605 MGC
GW - 11 Nov 1918
GW - Atrocities
GW - August 1914
GW - Biographies
GW - Propaganda
GW - Spies
GW - We forgot
Militia 1899-1920
Militia - Area Officers
Militia - Inf - Infantry
Militia - Inf - 1IB
Militia - Inf - 2IB
Militia - Inf - 3IB
Militia - Inf - NSW
Militia - Inf - Qld
Militia - Inf - SA
Militia - Inf - Tas
Militia - Inf - Vic
Militia - Inf - WA
Militia - K.E.Horse
Militia - LH
Militia - LH - Regts
Militia - LH - 1LHB
Militia - LH - 2LHB
Militia - LH - 3LHB
Militia - LH - 4LHB
Militia - LH - 5LHB
Militia - LH - 6LHB
Militia - LHN - NSW
Militia - LHN - 1/7/1
Militia - LHN - 2/9/6
Militia - LHN - 3/11/7
Militia - LHN - 4/6/16
Militia - LHN - 5/4/15
Militia - LHN - 6/5/12
Militia - LHN - 28
Militia - LHQ - Qld
Militia - LHQ - 13/2
Militia - LHQ - 14/3/11
Militia - LHQ - 15/1/5
Militia - LHQ - 27/14
Militia - LHS - SA
Militia - LHS - 16/22/3
Militia - LHS - 17/23/18
Militia - LHS - 24/9
Militia - LHT - Tas
Militia - LHT - 12/26
Militia - LHV - Vic
Militia - LHV - 7/15/20
Militia - LHV - 8/16/8
Militia - LHV - 9/19
Militia - LHV - 10/13
Militia - LHV - 11/20/4
Militia - LHV - 19/17
Militia - LHV - 29
Militia - LHW - WA
Militia - LHW-18/25/10
Militia - Military Orders
Militia - Misc
MilitiaRC - Rifle Clubs
MilitiaRC - NSW
MilitiaRC - NT
MilitiaRC - Qld
MilitiaRC - SA
MilitiaRC - Tas
MilitiaRC - Vic
MilitiaRC - WA
Militiaz - New Zealand
Tk - Turkish Items
Tk - Army
Tk - Bks - Books
Tk - Bks - 1/33IR
Tk - Bks - 27th IR
Tk - Bks - Air Force
Tk - Bks - Yildirim
Tk - POWs
Wp - Weapons
Wp - Hotchkiss Cav
Wp - Hotchkiss PMG
Blog Tools
Edit your Blog
Build a Blog
RSS Feed
View Profile
Open Community
Post to this Blog
Site Index
Education Centre
LH Militia
Boer War
Transport Ships
LH Battles
ALH - Units
ALH - General
Aboriginal Light H
Weapons
Ottoman Sources

"At a mile distant their thousand hooves were stuttering thunder, coming at a rate that frightened a man - they were an awe inspiring sight, galloping through the red haze - knee to knee and horse to horse - the dying sun glinting on bayonet points..." Trooper Ion Idriess

The Australian Light Horse Studies Centre aims to present an accurate history as chroniclers of early Australian military developments from 1899 to 1920.

The Australian Light Horse Studies Centre site holds over 12,000 entries and is growing daily.

Contact: Australian Light Horse Studies Centre

Let us hear your story: You can tell your story, make a comment or ask for help on our Australian Light Horse Studies Centre Forum called:

Desert Column Forum

WARNING: This site contains: names, information and images of deceased people; and, language which may be considered inappropriate today.

Saturday, 21 November 2009
The Battle of Magdhaba, Sinai, December 23, 1916, Contents
Topic: BatzS - Magdhaba

The Battle of Magdhaba

Sinai, 23 December 1916

Contents


Items

The Battle of Magdhaba, Sinai, December 23, 1916, Outline 


Roll of Honour

The Battle of Magdhaba, Sinai, December 23, 1916, Roll of Honour, Australia and New Zealand

Brigade

The Battle of Magdhaba, Sinai, December 23, 1916, Roll of Honour, 1st Australian Light Horse Brigade

The Battle of Magdhaba, Sinai, December 23, 1916, Roll of Honour, 3rd Australian Light Horse Brigade  

The Battle of Magdhaba, Sinai, December 23, 1916, Roll of Honour, New Zealand Mounted Rifles Brigade 

The Battle of Magdhaba, Sinai, December 23, 1916, Roll of Honour, Imperial Camel Corps
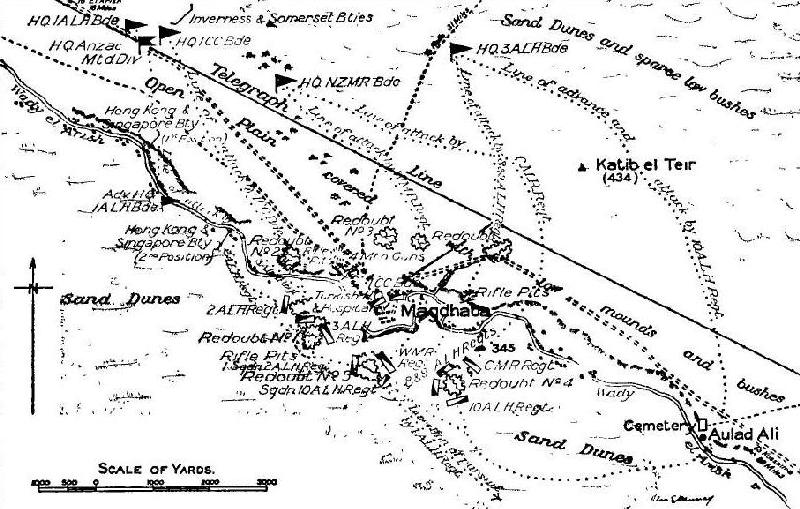
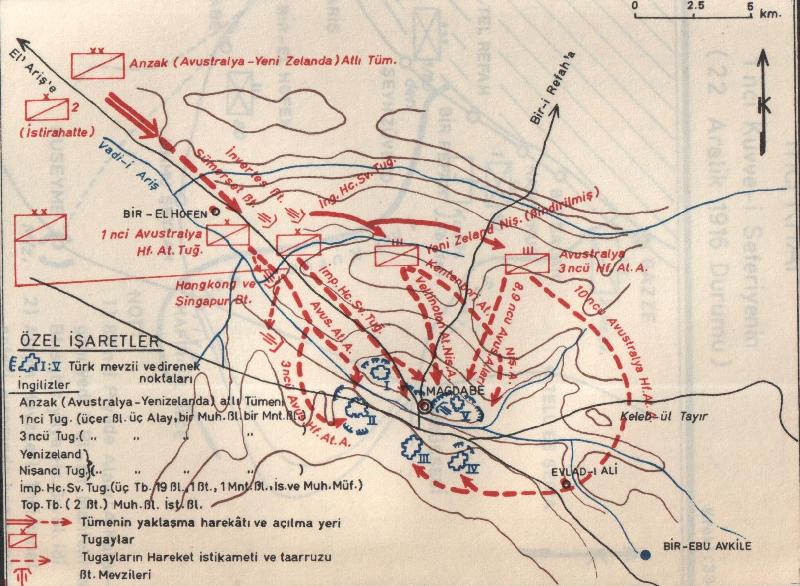
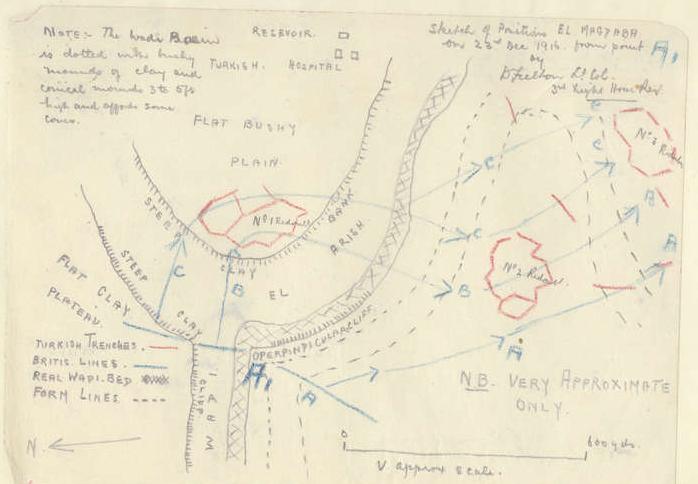
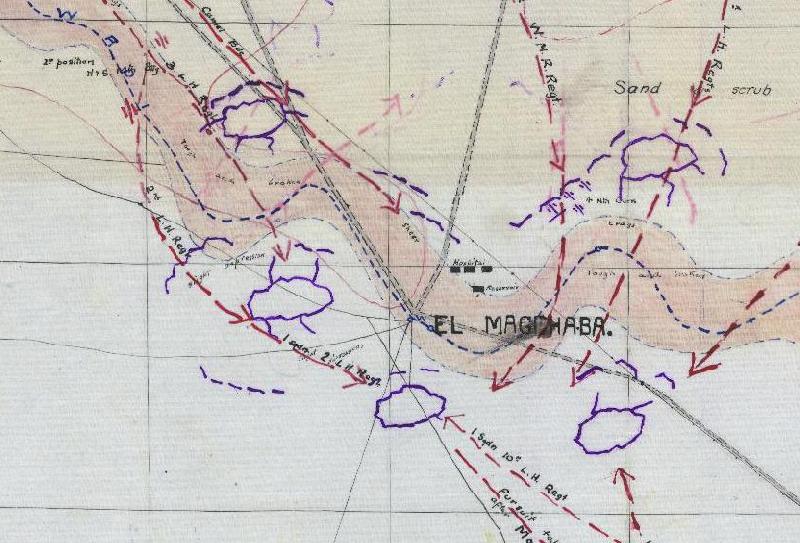
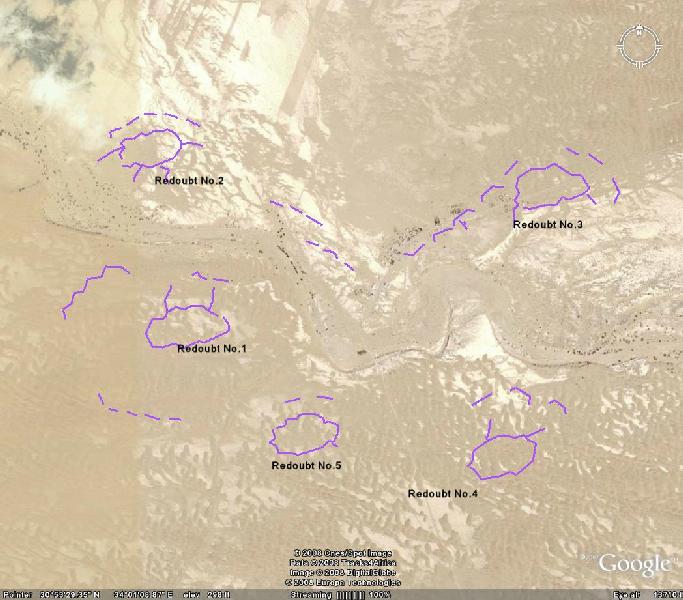
 

Maps

Comparison of Maps, Australia, Britain and Turkey 

Mapping the 3rd LHR attack at Magdhaba 

Mapping the Magdhaba Redoubts 


Official War History Accounts

British

Falls Account

Australian

Gullett Account

Cutlack Account

New Zealand

Powles Account

Turkish

Sinai Campaign Account

German

Kress Account


War Diary Accounts

Australia

General Staff Headquarters, Anzac Mounted Division, AIF, War Diary Account

Anzac Mounted Division Artillery, AIF, War Diary Account

1st Light Horse Brigade Account

1st Light Horse Field Ambulance Account

1st Light Horse Machine Gun Squadron Account  

1st ALHR, AIF, War Diary, account

2nd ALHR, AIF, War Diary, account

3rd ALHR, AIF, War Diary, account

3rd Light Horse Brigade Account

3rd Light Horse Field Ambulance Account

3rd Light Horse Machine Gun Squadron Account 

8th ALHR, AIF, War Diary, account

9th ALHR, AIF, War Diary, account

10th ALHR, AIF, War Diary, account

ICC, AIF, War Diary, account 


New Zealand War Diaries

New Zealand Mounted Rifles Brigade Account

Auckland Mounted Rifles Account

Canterbury Mounted Rifles Regiment Account

Wellington Mounted Rifles Account
British
52nd (Lowland) Division
156th Brigade


Unit Histories

Australia

1st ALHR AIF account

2nd ALHR AIF account

3rd ALHR AIF account

3rd LHFA, AIF, Unit History Account

8th LHR, AIF account

9th LHR, AIF account

10th LHR, AIF account

ICC, AIF, account 


New Zealand

AMR, NZMRB account

CMR, NZMRB account

WMR, NZMRB account


Commentary

The Battle of Magdhaba, Sinai, 23 December 1916, El Arish and El Magdhaba, 9th LHR, AIF, Commentary by Bill Woerlee

Magdhaba and Kress by Bill Woerlee

The Battle of Magdhaba, Sinai, December 23, 1916, ICC, AIF, Commentary by Steve Becker    


Personal Diaries

The Battle of Magdhaba, Sinai, December 23, 1916, 8th LHR, AIF, Auchterlonie Diary Account 


Newspaper Accounts

New York Times Account

Times Account


Further Reading:

The Battle of Magdhaba

The Battle of Magdhaba, Sinai, December 23, 1916, Roll of Honour, Australia and New Zealand

Battles where Australians fought, 1899-1920


Citation: The Battle of Magdhaba, Sinai, December 23, 1916, Contents

Posted by Project Leader at 12:01 AM EAST
Updated: Monday, 30 November 2009 8:56 AM EAST
Monday, 9 November 2009
The Battle of Magdhaba, Sinai, December 23, 1916, Outline
Topic: BatzS - Magdhaba

The Battle of Magdhaba

Sinai, 23 December 1916

Outline


Magdhaba, 1916.


Magdhaba, was fought on 23 December 1916 in the northern Sinai Desert, 35 kilometres south-east of the Mediterranean coastal town of El Arish and about 30 kilometres west of the border with Palestine. Following their defeat at Romani (q.v.) Turkish forces were thrown onto the defensive and retreated to Bir el Abd and subsequently Mazar, in each case abandoning their positions once attacked by British mounted troops - principally Australians and New Zealanders of the Anzac Mounted Division led by Major-General Harry Chauvel. After El Arish was vacated by the enemy and duly occupied by British forces on 21 December, the way into Palestine was barred by two principal Turkish blocking forces: at Magdhaba and Rafa.

The position of Magdhaba at dusk.

[Extracted from Gullett, Chapter XIV – Magdhaba]

 
On the night of 22 December Chauvel was ordered to move against the inland base at Magdhaba. Available to him was his mounted division, less one brigade but with the newly formed Imperial Camel Corps (and attached battery of mountain guns) taking its place. Marching in the early hours of 23 December, by daybreak Chauvel's troops had closed on the enemy-held village. As soon as the Turks' dispositions were clearly established by low-flying aircraft from No. I Squadron, Australian Flying Corps, Chauvel gave his orders. The Imperial Camel Corps was sent from the north-west directly at the nearest redoubt lying east of the Wadi el Arish, while the other brigades detoured around the northern flank, where the firm ground best suited horses, to attack from the north and north-east; one regiment was sent on a wide circling movement to the east then south to cross the wadi and take up position in rear of the enemy position.

A hard fight followed in which the attackers made slow progress crossing open ground under heavy fire. Soon after 1 p.m., upon learning that sources of water apart from the wells at Magdhaba were denied to him, Chauvel decided to call off the attack. The recall reached the commander of the 1st Australian Light Horse Brigade, Brigadier-General Charles Cox, just as his troops were preparing to assault the main enemy redoubt with the bayonet. He temporarily misplaced the message until the attack was underway, and his men's success a few minutes later showed Chauvel that victory was actually at hand.

By 4.30 p.m. the Turkish garrison surrendered; few escaped. The number of enemy killed has been put at about 300 - certainly nearly 100 were collected on the field for burial and just short of 1,300 were captured. The 10th Australian Light Horse Regiment, providing the blocking force south of the wadi, alone accounted for 722 of the prisoners. Chauvel's losses were trifling: only 146 casualties, of whom 22 were killed. After setting fire to the village and leaving two regiments to clear the battlefield of dead and wounded, the remainder of the column returned to El Arish.
 

Preparing the dead for burial, Australians and Ottoman soldiers lay together in peace.


Extracted from the book produced by Chris Coulthard-Clark, Where Australians Fought - The Encyclopaedia of Australia's Battles, Allen and Unwin, Sydney, 1998, p. 122.


Additional References cited by Chris Coulthard-Clark:

H.S. Gullett, (1944), The Australian Imperial Force in Sinai and Palestine, Sydney: Angus & Robertson.

A.J. Hill, (1978), Chauvel of the Light Horse, Carlton, Vic.: Melbourne University Press.


Further Reading:

The Battle of Magdhaba

Battles where Australians fought, 1899-1920


Citation: The Battle of Magdhaba, Sinai, December 23, 1916, Outline

Posted by Project Leader at 12:01 AM EAST
Updated: Wednesday, 11 November 2009 5:51 PM EAST
Saturday, 7 November 2009
The Battle of Magdhaba, Sinai, December 23, 1916, Comparison of Maps, Australia, Britain and Turkey
Topic: BatzS - Magdhaba

The Battle of Magdhaba

Sinai, 23 December 1916

Magdhaba Maps Comparisons, Australia, Britain and Turkey


When reading the official history accounts of Magdhaba, one thing that come quite clear - the redoubts have different numbes on the British map as opposed to the Australian map.

The first map is extracted from Gullett's work, The Australian Imperial Force in Sinai and Palestine, 1914–1918


The position of Magdhaba at dusk.

[Gullett, Chapter XIV – Magdhaba]


The issue to observe is the numbering allocated to the redoubts which is in a clockwise direction. In contrast,  the work by Cyril Falls called Military operations: Egypt and Palestine contains this map called Sketch 12 which faces p. 253.


Sketch 12, Magdhaba 


This particular map uses the anticlockwise notation for the redoubts, a methodology similar to that of the 3rd ALHR in the hand drawn map at Post Citation: Mapping the 3rd LHR attack at Magdhaba - 23 December 1916. Because of these two different methodoologies in constructing maps, much confusion has crept into the commentaries when the fall of Magdhaba is described. While all accounts agree on No. 1 Redoubt, No. 2 Redoubt in the Falls account is to the south east on the same side of the wadi while in the Gullett account is directly to the east over the other side of the wadi. Hence the fall of No. 2 Redoubt, the second to fall in the 3rd LHR and Falls account is in actuality Redoubt No. 5 in the Gullett account of the same incident.

This layout of Falls is also employed in the Turkish account of Magdhaba. The following map was published in Turkish General Staff, Birinci Dünya Harbi'nde Turk harbi. Sina - Filistin cephesi, Harbin Bai??Ÿlangicindan A?kinci Gazze Muharebeleri Sonuna Kadar, IVncu Cilt 1nci Kisim, Ankara 1979. (Sinai-Palestine Front from the beginning of the war to the end of the 2nd Gaza Battle, Volume 4, 1st Part.) Here is their map accompanying the account.


Turkish account from the Turkish General Staff


In giving an account of the Magdhaba story, the circumstances raised in this note indicates the absolute necessity to provide a map which clearly details the methodology employed in the text. It is the only way a reader can reasonably follow the account without the confusion that could possibly occur without these indications of redoubt numbering. As a note, most Australian accounts utilise the numerical methology employed by Gullett.


Further Reading:

The Battle of Magdhaba

The Battle of Magdhaba, Sinai, December 23, 1916, Roll of Honour, Australia and New Zealand

Battles where Australians fought, 1899-1920


Citation: The Battle of Magdhaba, Sinai, December 23, 1916, Comparison of Maps, Australia, Britain and Turkey

Posted by Project Leader at 12:01 AM EAST
Updated: Tuesday, 10 November 2009 9:37 PM EAST
Friday, 6 November 2009
The Battle of Magdhaba, Sinai, December 23, 1916, Mapping the 3rd LHR attack at Magdhaba
Topic: BatzS - Magdhaba

The Battle of Magdhaba

Sinai, 23 December 1916

Mapping the 3rd LHR attack at Magdhaba


3rd LHR line of attack at Magdhaba, 23 December 1916

[AWM4, 10/8/25]


In order to present the real difficulties of attacking the Magdhaba Garrison, below is a hand drawn map from the 3rd LHR War Diary. It gets right down into describing individual features and problems faced by the attacking force.

This demonstrates the skill and tenacity of the men from that regiment in overcoming what would appear insummmountable obstacles in attacking the first redoubt. It is a strong testimony to the new found confidence of these men in their ability as soldiers.


Further Reading:

The Battle of Magdhaba

The Battle of Magdhaba, Sinai, December 23, 1916, Roll of Honour, Australia and New Zealand

Battles where Australians fought, 1899-1920


Citation: The Battle of Magdhaba, Sinai, December 23, 1916, Mapping the 3rd LHR attack at Magdhaba

Posted by Project Leader at 12:01 AM EAST
Updated: Tuesday, 10 November 2009 10:22 PM EAST
Thursday, 5 November 2009
The Battle of Magdhaba, Sinai, December 23, 1916, Mapping the Magdhaba Redoubts
Topic: BatzS - Magdhaba

The Battle of Magdhaba

Sinai, 23 December 1916

Mapping the Magdhaba Redoubts


Map describing the action at Magdhaba from the Anzac Mounted Division War Diary, January 1917.

[AWM4, 1/60/11]


Until the ready availability of the Australian Light Horse War Diaries and the advent of Google Earth, the ability to gain a bird's eye view of the Magdhaba redoubt system built by the Ottoman Forces has been difficult indeed. Through the use of the technological tools available, it is possible to take the data from the hand drawn maps of the Magdhaba redoubts and place them upon a terrain profile provided by Google Earth. The results speak for themselves.

By courtesy of a fellow contributor, Dominic, the data regarding the  redoubts was extracted and placed upon an actual satellite picture of the landscape provided by Gooogle Earth. The result allows the observer to visualise the physical terrain facing the Anzac Mounted Division as the Commanders planned their attack.


Magdhaba Garrison Redoubts as at 22 December 1916.

[Graphics by courtesy of Dominic]


One view of this terrain leads the observer to the conclusion that the Ottoman forces chose their site well. Over a flat surface which provided no cover whatsoever for an attacking force, they dug their trenches in such a way as to produce mutually supporting fire bases. These interlocking defenses meant that any attacking force was always at a vast disadvantage.

While interlocking fire support was its strength, paradoxically, this system of defence was also its weakness. By breaching one redoubt, the others would be exposed to enfilading fire and rendering their continued resistance untenable. This proved to be the downfall of the garrison. 

One should never conclude that the taking of the Magdhaba garrison by Chauvel was a lay down mazere. It was not. Chauvel had already issued orders to call off the attack by 3 p.m.. Had his generals obeyed this order at that time, there would have been no victory to record. But one general refused to read the order and the rest was, as they say, history.


Further Reading:

The Battle of Magdhaba

The Battle of Magdhaba, Sinai, December 23, 1916, Roll of Honour, Australia and New Zealand

Battles where Australians fought, 1899-1920


Citation: The Battle of Magdhaba, Sinai, December 23, 1916, Mapping the Magdhaba Redoubts

Posted by Project Leader at 12:01 AM EAST
Updated: Tuesday, 10 November 2009 10:23 PM EAST

Newer | Latest | Older

Full Site Index


powered by FreeFind
Let us hear your story: You can tell your story, make a comment or ask for help on our forum.

Desert Column Forum

A note on copyright

The Australian Light Horse Studies Centre is a not for profit and non profit group whose sole aim is to write the early history of the Australian Light Horse from 1900 - 1920. It is privately funded and the information is provided by the individuals within the group and while permission for the use of the material has been given for this site for these items by various donors, the residual and actual copyright for these items, should there be any, resides exclusively with the donors. The information on this site is freely available for private research use only and if used as such, should be appropriately acknowledged. To assist in this process, each item has a citation attached at the bottom for referencing purposes.

Please Note: No express or implied permission is given for commercial use of the information contained within this site.

A note to copyright holders

The Australian Light Horse Studies Centre has made every endeavour to contact copyright holders of material digitised for this blog and website and where appropriate, permission is still being sought for these items. Where replies were not received, or where the copyright owner has not been able to be traced, or where the permission is still being sought, the Australian Light Horse Studies Centre has decided, in good faith, to proceed with digitisation and publication. Australian Light Horse Studies Centre would be happy to hear from copyright owners at any time to discuss usage of this item.

Contact

Australian Light Horse Studies Centre

eXTReMe Tracker